
Assessing the Damage
Before embarking on the repair process, it’s crucial to thoroughly assess the damage to the micro USB connector. Begin by visually inspecting the connector for any visible signs of damage, such as bent or broken pins, loose connection, or physical wear and tear. Additionally, test the existing connector by plugging in a compatible cable and checking for any intermittent connection issues or failure to charge or transfer data.
It’s also essential to use a multimeter to measure the continuity and resistance of the connector. This step helps identify any underlying electrical issues that may not be immediately visible. By carefully examining the voltage and resistance readings, you can pinpoint any irregularities that indicate a faulty connector.
Furthermore, take note of any history of intermittent connectivity or previous issues with the micro USB port. Understanding the context of the damage can provide valuable insights into the potential causes and help prevent similar issues in the future.
Assessing the damage also involves considering the surrounding components and circuitry. Inspect the circuit board for any signs of heat damage, corrosion, or loose connections that may have resulted from the damaged micro USB connector. It’s crucial to address any secondary damage to ensure a comprehensive and lasting repair.
By meticulously evaluating the extent of the damage, you can gain a clear understanding of the repair requirements and formulate an effective strategy for restoring the micro USB connector to full functionality.
Gathering the Necessary Tools and Materials
Before initiating the repair process, it’s essential to gather the requisite tools and materials to ensure a smooth and efficient repair of the micro USB connector. Here’s a comprehensive list of items you’ll need:
- Replacement Micro USB Connector: Acquire a high-quality replacement micro USB connector that is compatible with the device model. Ensure that it matches the specifications and form factor of the original connector to guarantee a proper fit.
- Soldering Iron: A reliable soldering iron with adjustable temperature settings is indispensable for precision soldering during the repair. Opt for a soldering iron with a fine tip to facilitate intricate work on the small connector pins.
- Solder Wire: High-quality solder wire with a flux core is essential for creating secure and durable connections between the new micro USB connector and the circuit board. Select solder with a suitable gauge to accommodate the fine soldering requirements of the connector.
- Desoldering Pump or Wick: To remove the existing connector, a desoldering pump or desoldering wick is necessary to extract the old solder and facilitate the safe removal of the damaged connector from the circuit board.
- Flux Pen: Applying flux to the solder joints helps improve the flow of solder and enhances the overall soldering quality. A flux pen simplifies the application of flux to the connector pins and circuit board, promoting reliable electrical connections.
- Small Screwdriver Set: A precision screwdriver set with various head types is vital for disassembling the device and accessing the micro USB connector. Different screwdriver sizes and shapes cater to the diverse screws securing the device’s casing and internal components.
- Magnifying Glass or Loupe: A magnifying tool aids in examining intricate details and verifying the precision of solder joints and connections. It is particularly useful for individuals dealing with small components and intricate circuitry.
- Isopropyl Alcohol and Cotton Swabs: Cleaning the circuit board and surrounding areas with isopropyl alcohol and cotton swabs ensures a pristine work surface, free from contaminants that may hinder the repair process.
- Anti-Static Wrist Strap: To prevent electrostatic discharge (ESD) from damaging sensitive electronic components, an anti-static wrist strap is vital for maintaining a safe working environment.
By assembling these essential tools and materials, you’ll be well-equipped to proceed with the micro USB connector repair, ensuring precision, safety, and optimal functionality of the repaired connector.
Disassembling the Device
Disassembling the device is a critical initial step in accessing the micro USB connector for repair. Follow these steps to safely and methodically disassemble the device:
- Power Off the Device: Before beginning the disassembly process, ensure that the device is powered off and disconnected from any external power sources. This precautionary measure prevents the risk of electrical shock and safeguards the internal components during disassembly.
- Identify and Remove External Screws: Carefully examine the exterior of the device to identify and remove any visible screws securing the casing. Utilize the appropriate screwdriver from your set to systematically unscrew and safely store the removed screws for reassembly.
- Use Opening Tools or Pry Tools: In some cases, devices may have clips, adhesive, or snap-fit components securing the casing. Employ specialized opening tools or pry tools designed for electronic device disassembly to gently separate the casing without causing damage.
- Document the Disassembly Process: As you progress through the disassembly, consider documenting the removal of components and the placement of screws to facilitate the reassembly process. This documentation can include labeled compartments for storing screws and components, ensuring an organized and efficient reassembly.
- Exercise Caution with Ribbon Cables and Flex Cables: Inside the device, you may encounter delicate ribbon cables or flex cables connecting internal components. Exercise caution when detaching these cables, utilizing precision and care to avoid tearing or damaging the connectors.
- Access the Micro USB Connector: Once the device is successfully disassembled, locate the micro USB connector on the circuit board. Assess the accessibility of the connector and surrounding components, ensuring a clear and unobstructed workspace for the subsequent repair steps.
By meticulously following these steps and exercising patience and precision, you can safely disassemble the device, gaining access to the micro USB connector for the subsequent repair process. Remember to maintain an organized approach and prioritize the safety of internal components throughout the disassembly.
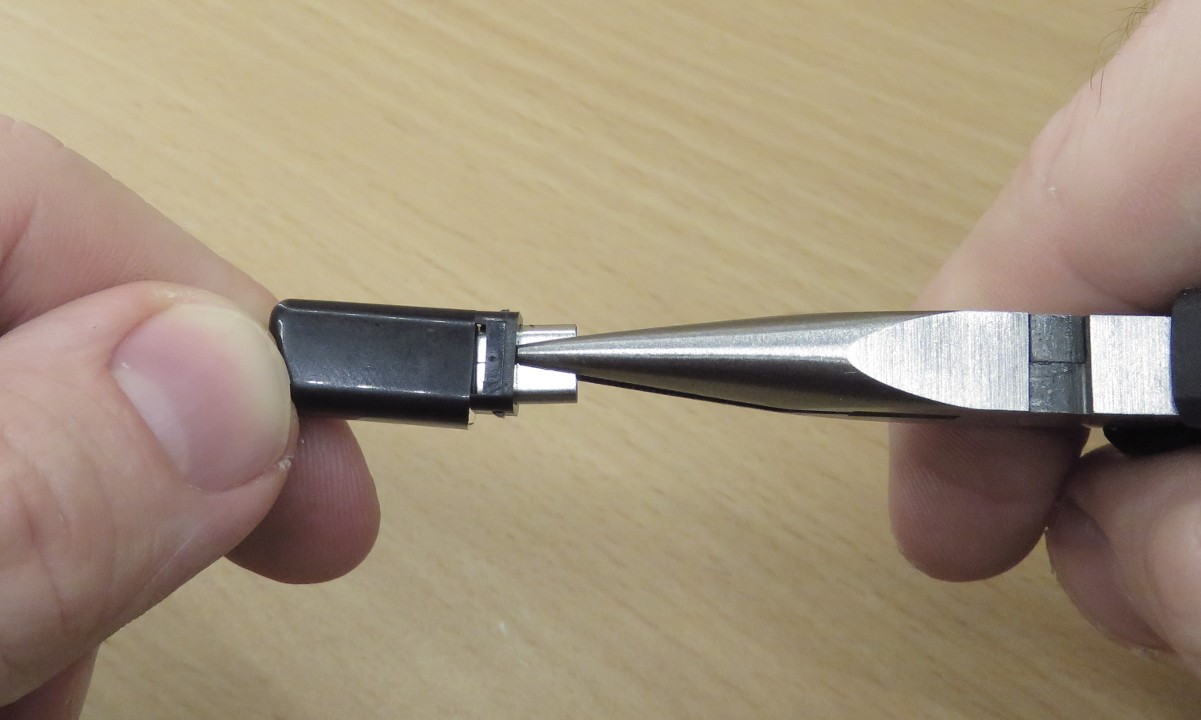
Removing the Old Micro USB Connector
Removing the old micro USB connector is a delicate process that requires attention to detail and precision. Follow these steps to safely extract the damaged connector from the circuit board:
- Prepare the Work Area: Ensure that the work area is well-lit and free from any clutter or obstructions. A clean and organized workspace minimizes the risk of misplacing small components and facilitates a focused approach to the connector removal process.
- Apply Flux to the Connector Pins: Using a flux pen, apply a small amount of flux to the solder joints connecting the old micro USB connector to the circuit board. The flux aids in the desoldering process by promoting the flow of solder and facilitating the removal of the connector.
- Heat the Solder Joints: With the soldering iron set to the appropriate temperature, carefully heat the solder joints on the connector pins. Apply gentle pressure to the connector to ascertain if the solder has sufficiently melted, indicating readiness for removal.
- Utilize Desoldering Tools: Employ a desoldering pump or desoldering wick to extract the molten solder from the connector’s pins. With the solder removed, gently wiggle the connector to assess its readiness for detachment from the circuit board.
- Exercise Patience and Precision: Approach the connector removal with patience, ensuring that the solder is adequately removed from all pins before attempting to lift the connector. Avoid applying excessive force that may damage the circuit board or surrounding components.
- Inspect for Residual Solder: After removing the connector, carefully inspect the solder pads on the circuit board for any residual solder or debris. Use a magnifying glass or loupe to verify that the pads are clean and free from obstructions before proceeding with the new connector installation.
By meticulously following these steps and exercising precision and caution, you can safely remove the old micro USB connector, preparing the circuit board for the installation of the new connector. Attention to detail and a methodical approach are key to ensuring a successful and seamless removal process.
Preparing the New Micro USB Connector
Before installing the new micro USB connector, it’s essential to prepare the connector and the circuit board to ensure a secure and reliable connection. Follow these steps to meticulously prepare the new connector for installation:
- Verify Connector Compatibility: Confirm that the new micro USB connector is compatible with the device model and matches the specifications of the original connector. Check for alignment and pin configuration to ensure a proper fit on the circuit board.
- Clean the Circuit Board Pads: Using a small amount of isopropyl alcohol and a clean, lint-free cloth or cotton swab, gently clean the solder pads on the circuit board where the new connector will be installed. Ensure that the pads are free from debris, oxidation, or residual flux that may hinder the soldering process.
- Apply Flux to the Solder Pads: Using a flux pen, carefully apply flux to the cleaned solder pads on the circuit board. The flux promotes solder flow and enhances the quality of the solder joints, facilitating a secure electrical connection between the new connector and the circuit board.
- Position the New Connector: Align the new micro USB connector with the solder pads on the circuit board, ensuring that the pins are correctly oriented and positioned for soldering. Gently hold the connector in place, maintaining alignment as you prepare for the soldering process.
- Inspect Connector Alignment: Verify that the new connector is securely positioned and aligned with the solder pads, allowing for a seamless and accurate soldering process. Double-check the orientation and placement of the connector to prevent misalignment during soldering.
- Prepare Soldering Equipment: Ensure that your soldering iron is set to the appropriate temperature for soldering the new connector. Additionally, have solder wire and desoldering tools readily available to address any unforeseen issues during the installation process.
By meticulously preparing the new micro USB connector and the circuit board, you can lay the groundwork for a successful installation, promoting a durable and reliable connection that restores the functionality of the device’s charging and data transfer capabilities.
Soldering the New Connector
Once the new micro USB connector is meticulously prepared, the soldering process is a critical step in establishing secure electrical connections and ensuring the functionality of the repaired connector. Follow these steps to effectively solder the new connector to the circuit board:
- Preheat the Soldering Iron: Preheat the soldering iron to the appropriate temperature for soldering the new micro USB connector. A well-regulated temperature ensures proper solder flow and prevents overheating that may damage the circuit board or the connector.
- Tin the Soldering Iron Tip: Apply a small amount of solder to the soldering iron tip to “tin” it, promoting better heat transfer and soldering efficiency. A properly tinned tip facilitates the transfer of heat to the connector pins and solder pads.
- Solder the Connector Pins: With the soldering iron at the ready, carefully solder the connector pins to the corresponding solder pads on the circuit board. Apply the solder to the junction of the pin and pad, ensuring a sufficient amount of solder for a secure and reliable connection.
- Manage Solder Flow: Control the flow of solder to prevent bridging or excessive solder buildup between adjacent pins. Maintain a steady hand and precise application of solder to create distinct and reliable connections between the connector and the circuit board.
- Inspect Solder Joints: After soldering each pin, inspect the solder joints using a magnifying glass or loupe to ensure the integrity and quality of the connections. Verify that the solder joints exhibit a smooth, shiny appearance, indicating proper wetting and adhesion to the connector pins and solder pads.
- Clean Excess Flux: Once the soldering is complete, use isopropyl alcohol and a clean, lint-free cloth or cotton swab to remove any excess flux residue from the solder joints. Cleaning the flux enhances the visual clarity of the solder joints and prevents potential long-term corrosion.
By meticulously following these steps and exercising precision and care during the soldering process, you can establish robust electrical connections between the new micro USB connector and the circuit board. A methodical approach to soldering ensures the longevity and reliability of the repaired connector, restoring the device’s essential connectivity features.
Reassembling the Device
After successfully repairing the micro USB connector, reassembling the device is a crucial phase that ensures the restoration of its structural integrity and functionality. Follow these steps to methodically reassemble the device:
- Organize Disassembled Components: Gather all the components, including screws, cables, and internal elements, and organize them in a systematic manner. Utilize any documentation or labeling created during the disassembly process to streamline the reassembly.
- Secure Internal Components: Carefully reattach any detached internal components, ensuring that ribbon cables and flex cables are properly aligned and securely connected to their respective ports. Exercise caution to avoid damaging delicate connectors during reattachment.
- Align and Secure the Casing: Position the device’s casing or housing, aligning it meticulously with the internal components and ensuring that any clips or fastening mechanisms are engaged securely. Apply gentle pressure to secure the casing without exerting excessive force.
- Reinstall External Screws: Utilize the appropriate screwdriver to reinstall the external screws, following the documented or remembered placement of each screw. Tighten the screws to the specified torque, ensuring that the casing is firmly secured and aligned.
- Test Functionality: Before completing the reassembly, conduct a preliminary functionality test to verify that the device powers on, and the repaired micro USB connector facilitates charging and data transfer. This test ensures that the repair was successful before finalizing the reassembly.
- Document Reassembly Process: If necessary, document the reassembly process, noting any challenges or observations that may assist in future repairs or troubleshooting. This documentation serves as a valuable reference for subsequent maintenance or repairs.
By diligently following these steps and exercising care and precision during the reassembly process, you can ensure that the device is fully restored to its operational state, with the repaired micro USB connector functioning optimally. A methodical approach to reassembly promotes the longevity and reliability of the repair, providing a seamless user experience.
Testing the Repaired Micro USB Connector
After completing the repair and reassembly process, it’s essential to conduct thorough testing to validate the functionality and reliability of the repaired micro USB connector. Follow these steps to methodically test the repaired connector:
- Charging Test: Connect the device to a compatible power source using the repaired micro USB connector and verify that the device successfully charges. Monitor the charging progress to ensure that the connector maintains a stable connection without interruptions.
- Data Transfer Test: Connect the device to a computer or compatible peripheral using the repaired micro USB connector and initiate a data transfer. Verify that the device establishes a reliable data connection, allowing for seamless file transfers and synchronization.
- Cable Fit Test: Test the fit and retention of the micro USB cable in the repaired connector, ensuring that the cable securely locks into place without excessive play or instability. A snug and secure fit indicates the successful restoration of the connector’s functionality.
- Continuity and Resistance Check: Utilize a multimeter to measure the continuity and resistance of the repaired connector’s pins. Verify that the connector maintains proper electrical continuity and exhibits the expected resistance values, indicating a robust and reliable repair.
- Stress Test: Subject the repaired connector to a stress test by gently manipulating the connected cable and assessing the connector’s resilience to movement and bending. A well-repaired connector should withstand typical usage stresses without compromising its electrical connections.
- Long-Term Functionality Assessment: Monitor the device’s charging and data transfer capabilities over an extended period to assess the long-term functionality of the repaired micro USB connector. Observing consistent and reliable performance reinforces the effectiveness of the repair.
By meticulously conducting these tests and assessments, you can validate the successful repair of the micro USB connector, ensuring that it reliably facilitates charging, data transfer, and enduring connectivity. Thorough testing provides confidence in the repair’s quality and durability, ultimately enhancing the device’s usability and longevity.