
Checking Email Settings
Before setting up your email on your iPhone 10, it's essential to ensure that you have the correct email settings. This step is crucial as it ensures a seamless configuration process and prevents any potential issues with sending or receiving emails on your device.
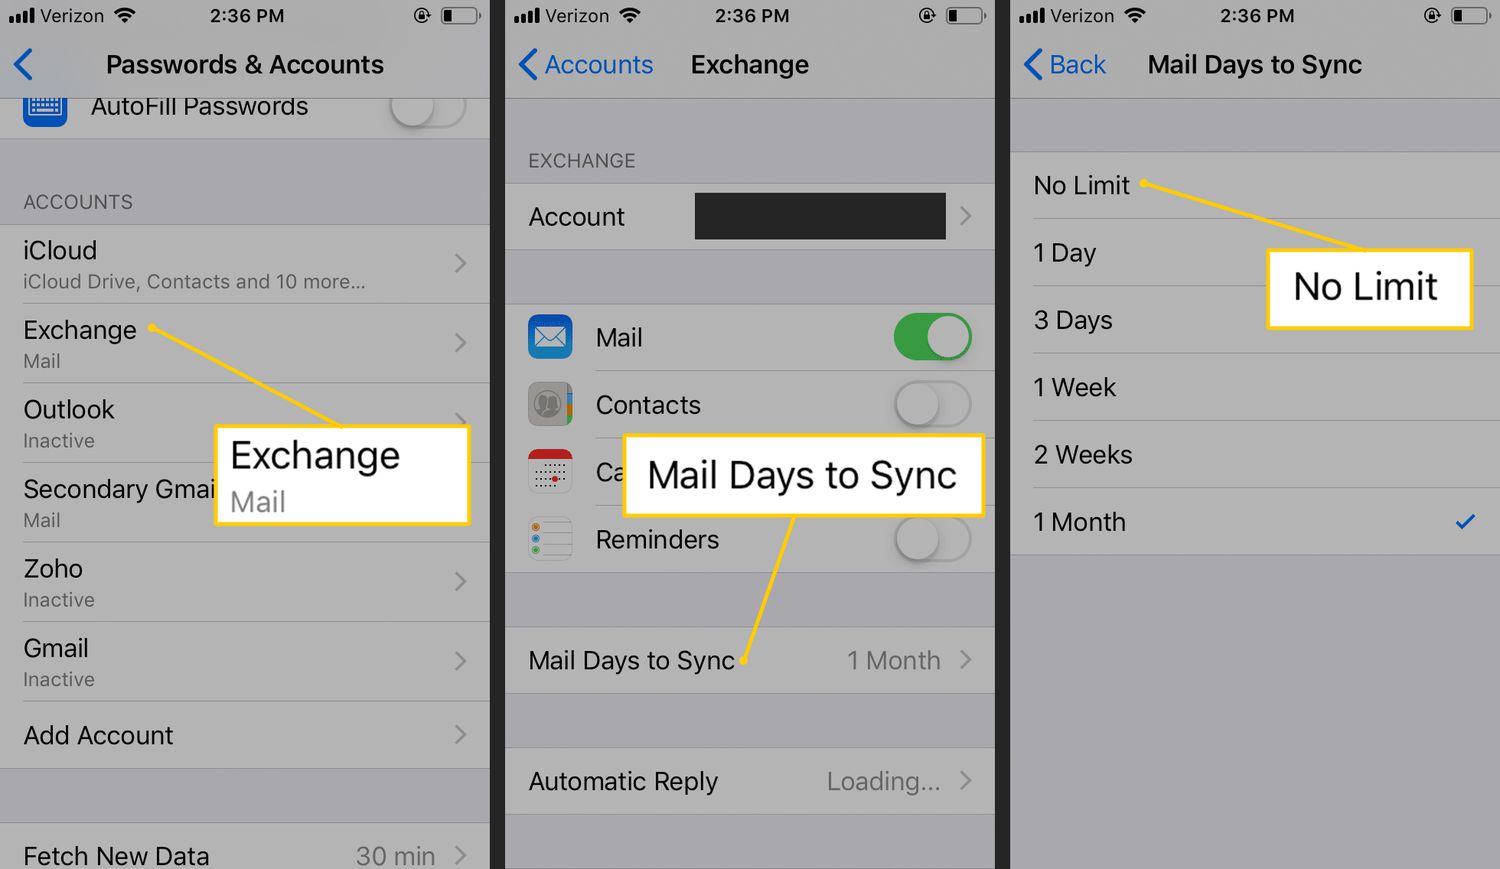
To begin, navigate to the Settings app on your iPhone 10 and scroll down to find the "Mail" option. Tap on "Mail" to access the email settings. Once inside the Mail settings, select "Accounts" to view the existing email accounts configured on your device.
Here, you can review the settings for each email account, including the incoming and outgoing mail server details, the email address associated with the account, and any additional configurations such as SSL settings and server ports.
It's important to verify the accuracy of the incoming and outgoing mail server details, as well as the associated email addresses and usernames. Ensure that the server addresses are correctly entered, and the email addresses and usernames are spelled correctly to avoid any potential login or authentication issues.
Additionally, check the SSL settings to confirm whether SSL is enabled for both incoming and outgoing mail servers. SSL encryption is crucial for securing your email communications and should be enabled to protect your sensitive information.
Furthermore, take note of the server ports configured for both incoming and outgoing mail. These ports are essential for establishing a connection with the email server, and any discrepancies in the port settings can lead to connectivity issues.
By meticulously reviewing and confirming the email settings on your iPhone 10, you can preemptively address any inaccuracies or discrepancies, ensuring a smooth and hassle-free email setup process. Once you have verified the email settings, you are ready to proceed with adding your email account to your iPhone 10.
Next, let's delve into the process of adding an email account to your iPhone 10, setting the stage for seamless email access on the go.
Adding Email Account
Adding an email account to your iPhone 10 is a straightforward process that empowers you to access your emails conveniently from your mobile device. Whether it's a personal email account or one associated with your work, the iPhone 10's intuitive interface makes it easy to set up and manage multiple email accounts in one centralized location.
To initiate the setup, begin by navigating to the Settings app on your iPhone 10. Once inside the Settings, scroll down and locate the "Mail" option. Tap on "Mail" to access the email settings, where you will find the "Accounts" section. Here, select "Add Account" to commence the process of adding a new email account to your device.
Upon selecting "Add Account," you will be presented with a list of popular email service providers such as Google, Yahoo, Outlook, and others. If your email provider is listed, simply choose the corresponding option and proceed to enter your email address and password. The iPhone 10 will then automatically configure the email settings, streamlining the setup process for a seamless experience.
In the event that your email provider is not listed, you can select the "Other" option and manually input the required details, including your name, email address, password, and a description for the account. This manual setup option accommodates a wide range of email providers, ensuring compatibility with various email services.
After entering the necessary account details, the iPhone 10 will verify the information and establish a connection with the email server. Once the verification process is complete, you will have the option to select the type of content you wish to synchronize with your device, such as Mail, Contacts, Calendars, and Notes. This customization feature allows you to tailor the synchronization settings based on your preferences and requirements.
Upon selecting the content to synchronize, the iPhone 10 will finalize the setup process, and your email account will be seamlessly integrated into the Mail app. You can then access your emails, manage your contacts, and stay organized with your calendar events directly from your iPhone 10.
By adding your email account to your iPhone 10, you gain the convenience of accessing your emails on the go, staying connected and informed wherever you are. This streamlined setup process ensures that you can effortlessly manage your email communications, enhancing your productivity and efficiency while using your iPhone 10.
With your email account successfully added to your device, the next step involves configuring the incoming mail server settings to enable seamless email retrieval. Let's delve into the intricacies of configuring the incoming mail server to optimize your email experience on the iPhone 10.
Configuring Incoming Mail Server
Configuring the incoming mail server settings on your iPhone 10 is a pivotal step in ensuring the seamless retrieval of your emails directly to your device. By accurately configuring the incoming mail server, you establish a secure and efficient connection with your email provider's server, enabling you to access your emails with ease and reliability.
To commence the configuration process, navigate to the Settings app on your iPhone 10 and select the "Mail" option. Within the Mail settings, tap on "Accounts" to access the list of configured email accounts on your device. Choose the specific email account for which you wish to configure the incoming mail server settings.
Once inside the account settings, locate the "Incoming Mail Server" section, where you will input the essential details to establish a connection with the email server. Begin by entering the hostname of the incoming mail server, which is typically provided by your email service provider. Ensure that the hostname is accurately entered to facilitate a seamless connection with the server.
Next, input your email address and password associated with the account to enable authentication with the incoming mail server. This step is crucial for verifying your credentials and gaining access to your emails securely. It's important to double-check the accuracy of the email address and password to prevent any authentication errors during the setup process.
Additionally, confirm the port number designated for the incoming mail server. The port number serves as the communication endpoint for connecting with the server, and it's essential to input the correct port to establish a reliable connection. Depending on your email provider, the standard port for incoming mail servers is typically 993 for IMAP and 995 for POP3, both of which support SSL encryption for secure communication.
Furthermore, ensure that SSL is enabled for the incoming mail server to encrypt the data transmitted between your device and the email server. SSL encryption safeguards your email communications, protecting sensitive information from unauthorized access and interception.
Once you have input the necessary details, such as the hostname, email address, password, port number, and SSL settings, the iPhone 10 will verify the incoming mail server configuration. Upon successful verification, your email account will be primed to retrieve incoming emails seamlessly, allowing you to stay updated and informed with your latest messages directly on your device.
By meticulously configuring the incoming mail server settings on your iPhone 10, you establish a robust and secure connection with your email provider, ensuring that you can access your emails effortlessly and without interruptions. This meticulous configuration process sets the stage for a streamlined email experience, empowering you to stay connected and informed while using your iPhone 10.
Configuring Outgoing Mail Server
Configuring the outgoing mail server settings on your iPhone 10 is a pivotal step in ensuring seamless email transmission directly from your device. By accurately configuring the outgoing mail server, you establish a reliable and secure connection with your email provider's server, enabling you to send emails with ease and confidence.
To initiate the configuration process, navigate to the Settings app on your iPhone 10 and select the "Mail" option. Within the Mail settings, tap on "Accounts" to access the list of configured email accounts on your device. Choose the specific email account for which you wish to configure the outgoing mail server settings.
Once inside the account settings, locate the "Outgoing Mail Server" section, where you will input the essential details to establish a connection with the email server for outgoing mail transmission. Begin by entering the hostname of the outgoing mail server, which is typically provided by your email service provider. It is crucial to ensure that the hostname is accurately entered to facilitate a seamless connection with the server.
Next, input your email address and password associated with the account to enable authentication with the outgoing mail server. This step is essential for verifying your credentials and authorizing the sending of emails securely. Double-check the accuracy of the email address and password to prevent any authentication errors during the setup process.
Additionally, confirm the port number designated for the outgoing mail server. The port number serves as the communication endpoint for sending emails through the server, and it is essential to input the correct port to establish a reliable connection. Depending on your email provider, the standard port for outgoing mail servers is typically 587 or 465, both of which support SSL encryption for secure communication.
Furthermore, ensure that SSL is enabled for the outgoing mail server to encrypt the data transmitted between your device and the email server. SSL encryption plays a crucial role in safeguarding your email communications, protecting sensitive information from unauthorized access and interception during the transmission process.
Once you have input the necessary details, such as the hostname, email address, password, port number, and SSL settings, the iPhone 10 will verify the outgoing mail server configuration. Upon successful verification, your email account will be primed to send outgoing emails seamlessly, allowing you to communicate effectively and professionally directly from your device.
By meticulously configuring the outgoing mail server settings on your iPhone 10, you establish a robust and secure connection with your email provider, ensuring that you can send emails effortlessly and without interruptions. This meticulous configuration process sets the stage for a streamlined email experience, empowering you to communicate seamlessly and stay connected while using your iPhone 10.
Testing Email Configuration
Testing the email configuration on your iPhone 10 is a crucial step to ensure that the setup process is successful and that you can seamlessly send and receive emails without any issues. By conducting thorough testing, you can verify the functionality of both the incoming and outgoing mail servers, confirm the synchronization of your email content, and address any potential discrepancies before fully relying on your device for email communications.
To initiate the testing process, access the Mail app on your iPhone 10 and navigate to the inbox of the newly configured email account. Begin by sending a test email to an alternate email address or to a trusted contact. This test email serves as a practical way to verify the functionality of the outgoing mail server and to confirm that you can send emails from your device without encountering any errors.
Once the test email has been sent, monitor the outgoing mail activity to ensure that the email is successfully dispatched from your device. Check for any error messages or delivery failures, as these indicators can highlight potential issues with the outgoing mail server configuration. If the test email is sent without any complications, it signifies that the outgoing mail server is functioning as intended, and you can confidently send emails from your iPhone 10.
Subsequently, proceed to test the incoming mail functionality by checking for the arrival of the test email in the inbox of your iPhone 10. Upon receiving the test email, open it to confirm that the content is displayed accurately, and the email attachments, if any, are accessible. This step validates the incoming mail server configuration and ensures that your device can retrieve emails seamlessly, allowing you to stay updated with your incoming messages.
Furthermore, verify the synchronization of additional content, such as contacts, calendars, and notes, if you opted to synchronize these items during the email setup process. Ensure that the synchronized content is accessible and up to date on your device, reflecting any changes made on other devices or platforms associated with your email account.
In addition to testing the core email functionalities, it is advisable to conduct a comprehensive review of the email settings on your iPhone 10. Double-check the configured server details, SSL settings, and port numbers for both the incoming and outgoing mail servers to confirm their accuracy and alignment with the requirements of your email provider.
By meticulously testing the email configuration on your iPhone 10, you can preemptively identify and address any potential issues, ensuring a seamless and reliable email experience on your device. This proactive approach allows you to leverage the full capabilities of your iPhone 10 for email communications, empowering you to stay connected, informed, and productive while on the go.
Once you have successfully tested the email configuration and confirmed the seamless functionality of both incoming and outgoing mail servers, you can confidently rely on your iPhone 10 as a versatile platform for managing your email communications, enhancing your productivity and connectivity in various personal and professional contexts.