
Setting Up the Messages App
The Messages app on your iPhone 10 is a powerful tool for staying connected with friends, family, and colleagues. Before you can start scheduling messages, it's essential to ensure that the Messages app is set up and ready to go. Here's a step-by-step guide to help you get started.
-
Open the Messages App: To begin, locate the Messages app on your iPhone 10's home screen and tap on it to open the application. The app icon features a speech bubble with three dots inside.
-
Verify Your Phone Number: Upon opening the Messages app for the first time, you may be prompted to verify your phone number. This step is crucial for ensuring that your contacts can reach you via the Messages app using your phone number.
-
Enable iMessage: If you haven't already done so, you'll need to enable iMessage, Apple's messaging service that allows you to send texts, photos, videos, and more to other Apple users. To enable iMessage, go to Settings > Messages and toggle the iMessage switch to the on position.
-
Set Up Your Apple ID: If you haven't already signed in with your Apple ID, you'll be prompted to do so. Your Apple ID is essential for using iMessage and allows you to sync your messages across all your Apple devices.
-
Customize Your Settings: Take a moment to explore the settings within the Messages app. Here, you can customize various options, such as message effects, tapbacks, and message filtering. Adjust these settings according to your preferences to enhance your messaging experience.
-
Sync with iCloud: Consider syncing your messages with iCloud to ensure that your message history is backed up and accessible across all your Apple devices. To do this, navigate to Settings > [Your Name] > iCloud and toggle the Messages switch to the on position.
By following these steps, you can set up the Messages app on your iPhone 10 and ensure that it's ready for scheduling messages. Once the app is configured to your liking, you'll be ready to explore the scheduling feature and leverage it to send messages at the perfect time for your recipients.
Selecting a Contact
Once you have the Messages app set up on your iPhone 10, you can begin the process of scheduling messages. The first step in scheduling a message is selecting the contact to whom you want to send the message. Here's a detailed guide on how to select a contact and prepare to schedule your message effectively.
-
Open the Messages App: To initiate the process, open the Messages app on your iPhone 10. The app icon, featuring a speech bubble with three dots inside, can be easily located on your home screen.
-
Tap the Compose Button: Within the Messages app, look for the compose button, typically located in the top-right or bottom-right corner of the screen. It is represented by a pencil and paper icon and is used to start a new conversation.
-
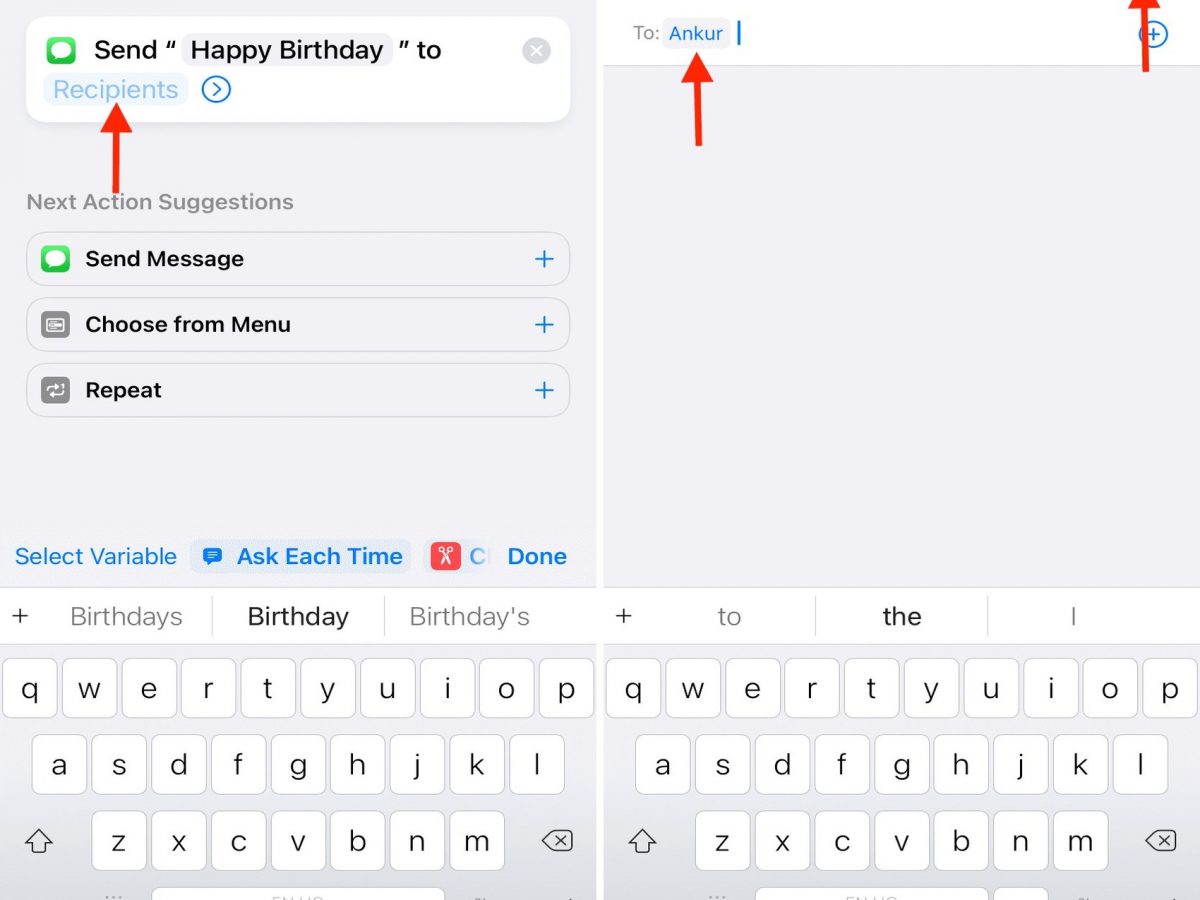
Choose a Contact: Upon tapping the compose button, you will be directed to a new message screen. Here, you can select the recipient of your scheduled message. Tap the "To:" field and start typing the name of the contact you wish to message. As you type, the Messages app will display matching contacts from your address book. Select the desired contact from the list by tapping on their name.
-
Select Multiple Contacts (Optional): If you want to send the scheduled message to multiple recipients, you can easily do so by tapping the "+" icon next to the first contact's name. This allows you to add additional recipients from your address book.
-
Verify the Recipient: Before proceeding, double-check that you have selected the correct contact(s) to ensure that your message reaches the intended recipient(s).
By following these steps, you can effectively select the contact or contacts to whom you want to send a scheduled message. Once the recipient is chosen, you can proceed to the next steps of setting the date and time for your message, crafting the message itself, and scheduling it for delivery. This process ensures that your scheduled messages are sent to the right recipients at the right time, enhancing your communication experience on your iPhone 10.
Choosing the Date and Time
After selecting the recipient for your scheduled message, the next crucial step is choosing the date and time for its delivery. The Messages app on your iPhone 10 offers a user-friendly interface for setting the precise timing of your messages, allowing you to ensure that they reach your contacts at the most opportune moments. Here's a detailed guide on how to choose the date and time for your scheduled message:
-
Access the Message Options: Once you have selected the recipient(s) for your message, you will notice an input field at the bottom of the message composition screen. This field typically displays the text "iMessage" or "Text Message" and a blue arrow to the right. Tap on this field to access additional message options.
-
Select the Schedule Message Option: Upon tapping the message options field, a menu will appear with various message features. Look for the "Schedule Message" option, which may be labeled as "Send Later" or a similar term. Tap on this option to proceed to the scheduling interface.
-
Choose the Date: In the scheduling interface, you will be presented with a calendar view, allowing you to select the desired date for your message. Scroll through the calendar to find the specific date on which you wish to schedule the message. Tap on the date to confirm your selection.
-
Set the Time: Once the date is chosen, you will have the opportunity to set the exact time for your message. The interface typically includes a time picker, enabling you to select the hour and minute for delivery. Adjust the time according to your preference and the recipient's time zone if applicable.
-
Review and Confirm: After setting the date and time, take a moment to review your selection. Ensure that the date and time align with your intended schedule for the message. Once you are satisfied with your choices, proceed to the next step.
By following these steps, you can effectively choose the date and time for your scheduled message, leveraging the scheduling feature within the Messages app to send messages at the most convenient and impactful moments. This capability empowers you to plan your communication effectively, whether you want to send birthday wishes at midnight, deliver reminders during specific hours, or reach out to contacts in different time zones at suitable times. With the ability to precisely schedule messages, you can enhance the relevance and impact of your communication on your iPhone 10.
Writing and Scheduling the Message
Once you have selected the recipient and chosen the date and time for your scheduled message, the next step is to craft the message itself and schedule it for delivery. The Messages app on your iPhone 10 provides a seamless interface for composing and scheduling messages, allowing you to personalize your communication and ensure that it reaches your contacts at the perfect moment. Here's a detailed guide on how to write and schedule your message effectively.
-
Compose Your Message: After setting the date and time for your message, you will find yourself in the message composition interface. Here, you can type your message using the on-screen keyboard. Whether you're sending a heartfelt birthday wish, a friendly reminder, or a thoughtful greeting, take the time to craft your message with care. Consider the tone, content, and any relevant details that will resonate with your recipient.
-
Add Media (Optional): The Messages app allows you to enrich your messages with media, including photos, videos, and audio recordings. If you wish to include multimedia content in your scheduled message, you can easily do so by tapping the camera icon to attach a photo or video, or the microphone icon to record a voice message. Adding multimedia elements can enhance the impact and personalization of your message.
-
Emojis and Stickers: Expressing emotions and adding a touch of fun to your messages is made easy with the inclusion of emojis and stickers. The Messages app offers a wide array of expressive icons and stickers that can be incorporated into your message to convey sentiments, humor, or visual appeal. Explore the emoji keyboard and sticker options to find the perfect additions to your message.
-
Message Effects (Optional): For an extra touch of flair, consider using message effects to animate your message. The Messages app features various effects, such as balloons, confetti, and fireworks, which can add a delightful visual element to your scheduled message. To apply an effect, press and hold the send button after composing your message to access the effects menu.
-
Schedule the Message: Once your message is crafted to your satisfaction, it's time to schedule its delivery. Look for the "Schedule Message" or "Send Later" option within the message composition interface. Tap on this option to confirm the scheduling details, including the recipient, date, and time. After verifying the scheduling information, tap "Send" or a similar confirmation button to schedule your message.
By following these steps, you can effectively write and schedule your message within the Messages app on your iPhone 10. This process empowers you to tailor your communication to the specific needs and preferences of your recipients, ensuring that your messages are delivered at the most impactful and convenient times. Whether you're sending a thoughtful message, sharing exciting news, or staying connected across time zones, the ability to write and schedule messages enhances your communication experience on your iPhone 10.
Managing Scheduled Messages
Once you've scheduled messages using the Messages app on your iPhone 10, it's essential to understand how to manage and interact with your scheduled messages effectively. The ability to view, edit, and cancel scheduled messages provides you with greater control over your communication and ensures that your messages align with your intended timing and content. Here's a comprehensive guide on managing scheduled messages to optimize your messaging experience.
Viewing Scheduled Messages
After scheduling a message, you may want to review your upcoming scheduled messages to ensure accuracy and relevance. The Messages app offers a straightforward method for accessing your scheduled messages, allowing you to stay informed about your upcoming communications. To view your scheduled messages:
- Open the Messages app on your iPhone 10.
- Tap on the conversation or message thread where you scheduled the message.
- Look for the scheduled message indicator, typically denoted by a clock icon or a "Scheduled" label. Tap on this indicator to access the details of your scheduled message.
Editing Scheduled Messages
In some cases, you may need to make changes to a scheduled message, such as adjusting the content, date, or time. The Messages app provides the flexibility to edit scheduled messages, enabling you to refine your communication before it's delivered. To edit a scheduled message:
- Locate the scheduled message within the conversation or message thread.
- Tap on the scheduled message indicator to access the message details.
- Look for the option to edit the scheduled message. This may involve tapping on the message content or accessing a dedicated editing interface.
- Make the necessary changes to the message content, date, or time, ensuring that the updated message aligns with your intentions.
- Confirm the changes and review the updated scheduling details before proceeding.
Canceling Scheduled Messages
There are instances where you may decide to cancel a scheduled message due to changes in plans, evolving circumstances, or simply a shift in your communication strategy. The Messages app allows you to cancel scheduled messages seamlessly, providing you with the freedom to adjust your messaging as needed. To cancel a scheduled message:
- Navigate to the scheduled message within the conversation or message thread.
- Access the message details by tapping on the scheduled message indicator.
- Look for the option to cancel the scheduled message. This may be represented by a "Cancel" button or a similar prompt.
- Confirm the cancellation of the scheduled message, ensuring that you review the decision before finalizing the cancellation.
By mastering the management of scheduled messages, you can optimize your messaging strategy and ensure that your communications are delivered with precision and relevance. Whether you need to review, edit, or cancel scheduled messages, the Messages app on your iPhone 10 empowers you to maintain control over your scheduled communications, enhancing your overall messaging experience.