
Overview
When sending important emails, it’s crucial to ensure that the recipient has received them. In Outlook, you can use the “Request a Delivery Receipt” feature to track the delivery status of your messages. By enabling this feature, you will receive a notification when the email reaches the recipient’s mailbox. This can provide peace of mind, especially when dealing with time-sensitive or critical information.
The “Request a Delivery Receipt” feature in Outlook offers a simple and effective way to confirm the successful delivery of your emails. It allows you to monitor the progress of your messages and take appropriate measures if any issues arise. Whether you’re sending business proposals, important memos, or personal communications, this feature ensures that your message reaches the intended recipient.
Enabling and using the “Request a Delivery Receipt” feature is straightforward. In just a few clicks, you can set it up for a single message or enable it for all outgoing messages. Once enabled, you can easily view the delivery receipts to track the status of your emails. However, it’s important to note that the recipients have the choice to decline sending the delivery receipt, which means you may not always receive a confirmation.
In this article, we will walk you through the steps of enabling and using the “Request a Delivery Receipt” feature in Outlook. We will also provide guidance on viewing delivery receipts and what to do if you don’t receive a delivery receipt. Whether you’re a business professional looking to track important emails or an individual seeking confirmation on personal messages, this feature will help you stay informed and ensure the successful delivery of your Outlook emails.
Enabling the Request a Delivery Receipt Feature
The “Request a Delivery Receipt” feature is a valuable tool in Outlook that allows you to track the delivery status of your emails. To enable this feature, follow these simple steps:
- Open Outlook and go to the “File” tab at the top left corner of the window.
- Select “Options” from the dropdown menu to open the Outlook Options window.
- In the Outlook Options window, click on “Mail” in the left-hand menu.
- Scroll down to the “Tracking” section and check the box that says “Request a delivery receipt for this message.”
- Click “OK” to save the changes and close the Outlook Options window.
Once you have enabled the “Request a Delivery Receipt” feature, you can proceed to send your email as usual. When the recipient receives your email, they will see a notification asking if they want to send a delivery receipt. It’s important to note that the recipient has the option to decline sending the receipt.
It’s worth mentioning that you have the flexibility to enable the “Request a Delivery Receipt” feature for individual messages or for all outgoing emails. By enabling it for all outgoing messages, you can ensure that you receive delivery receipts automatically without having to manually enable it for each email.
Enabling the “Request a Delivery Receipt” feature in Outlook provides you with a valuable confirmation of your email’s delivery. It allows you to track the progress of your messages and follow up if needed. Whether you’re waiting for a response from a client, confirmation of an important document, or simply want peace of mind that your email has been received, this feature can be immensely helpful.
In the next sections, we will explore how to request a delivery receipt for a single message and how to view delivery receipts in Outlook. These steps will further enhance your ability to track and manage the delivery status of your emails.
Requesting a Delivery Receipt for a Single Message
If you want to specifically request a delivery receipt for a single message in Outlook, follow these steps:
- Compose your email as usual, addressing it to the intended recipient and adding the subject and content.
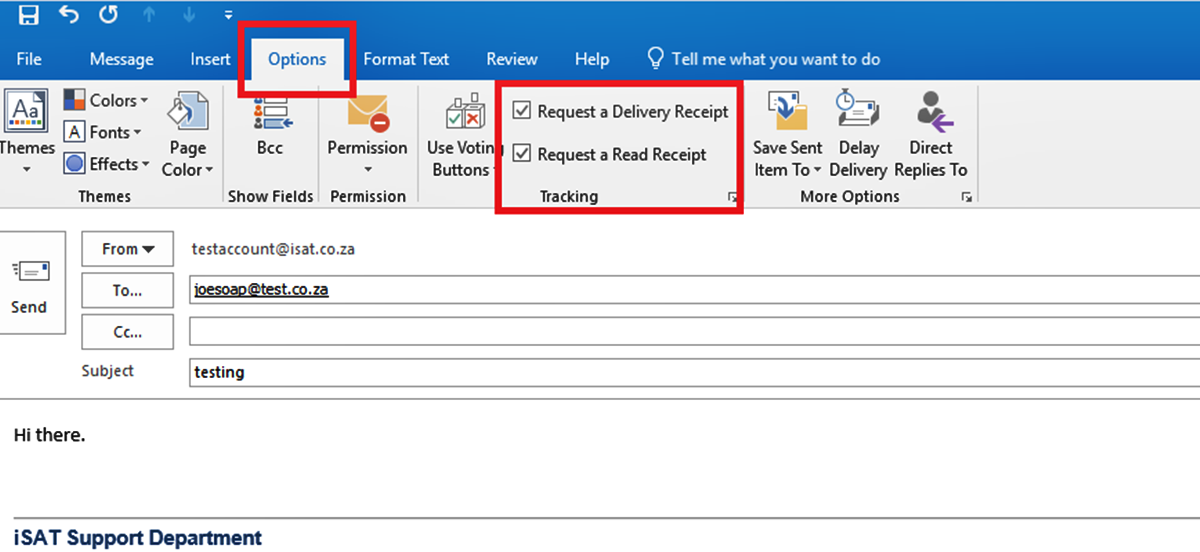
- At the top of the email composition window, go to the “Options” tab.
- In the “Tracking” group, check the box that says “Request a Delivery Receipt.”
- Once you have finished composing your email, click on the “Send” button.
When the recipient receives your email and opens it, they will be prompted with a notification asking if they want to send a delivery receipt. They have the choice to either send the receipt or decline it. If they choose to send the receipt, you will receive a notification confirming the successful delivery of the email.
Requesting a delivery receipt for a single message provides you with a way to track the progress of that specific email. It can be especially useful when you need to ensure that a critical email has reached its destination. By receiving a delivery receipt, you can have peace of mind and confidence that your message has been successfully delivered.
However, it’s important to note that not all recipients may choose to send a delivery receipt. Some individuals or organizations may have policies in place that restrict them from sending such receipts. Therefore, while requesting a delivery receipt can provide valuable information, it’s not a foolproof method for confirming delivery.
In the next section, we will explore how to enable the “Request a Delivery Receipt” feature for all outgoing messages. This feature allows you to automatically request delivery receipts for all your emails, saving you time and effort.
Requesting a Delivery Receipt for all Outgoing Messages
If you want to streamline the process of requesting delivery receipts for all your outgoing messages in Outlook, you can enable the feature to automatically apply to every email. Follow the steps below to implement this:
- Open Outlook and go to the “File” tab at the top left corner of the window.
- Select “Options” from the dropdown menu to open the Outlook Options window.
- In the Outlook Options window, click on “Mail” in the left-hand menu.
- Scroll down to the “Tracking” section and check the box that says “Request a delivery receipt for all messages I send.”
- Click “OK” to save the changes and close the Outlook Options window.
After enabling the feature for all outgoing messages, every email you send will automatically include a request for a delivery receipt. This eliminates the need to manually enable the feature for each email, saving you time and effort.
Please note that even when this feature is enabled, recipients still have the option to decline sending a delivery receipt. Keep in mind that some individuals or organizations may have settings in place that prevent them from sending such receipts. Therefore, while this feature increases the likelihood of receiving delivery receipts, it’s not guaranteed for every email you send.
By requesting a delivery receipt for all outgoing messages, you can easily track the progress of your emails and ensure that important communications reach their intended recipients. This can be particularly beneficial when dealing with sensitive or time-critical information.
In the next section, we will discuss how to view delivery receipts in Outlook. This will allow you to stay informed about the delivery status of your emails and take appropriate action if necessary.
Viewing Delivery Receipts
Once you have enabled the “Request a Delivery Receipt” feature and sent your emails, you may want to check the status of the delivery and view any received delivery receipts. Outlook provides a simple way to access and view these receipts. Follow these steps to view delivery receipts:
- Open Outlook and go to the “Sent Items” folder. This folder contains all the emails you have sent.
- Locate the email for which you want to view the delivery receipt.
- Double-click on the email to open it in a separate window.
- In the email window, go to the “Message” tab at the top of the window.
- In the “Show” group, click on the “Tracking” button.
- A dialog box will appear, displaying the delivery information for the email.
- If a delivery receipt has been received, it will be listed under the “Delivery Receipts” section.
- If a delivery receipt has not been received or if it was declined by the recipient, it will be mentioned under the “Not Read” or “Not Delivered” section.
- Close the dialog box once you have reviewed the delivery status and receipt information.
By following these steps, you can easily access and view the delivery receipts for your sent emails. This information can provide valuable insights into the delivery status of your messages and help you stay informed.
However, it’s important to note that not all recipients may choose to send a delivery receipt. As mentioned earlier, some individuals or organizations may have policies in place that restrict them from sending such receipts. If a delivery receipt is not received or if it was declined, it does not necessarily mean that the email was not delivered. There could be various factors that affect the receipt of delivery confirmation.
If you do not receive a delivery receipt for an important email and need confirmation of its delivery, we will discuss what to do in the next section.
What to Do if You Don’t Receive a Delivery Receipt
If you have requested a delivery receipt for an important email but haven’t received one, there are a few steps you can take to determine the status of the email and ensure its delivery:
- Double-check your email’s Sent items: Go to the “Sent Items” folder in Outlook and verify that the email is present and has been successfully sent. Sometimes, the absence of a delivery receipt may be due to an issue with the recipient’s email system.
- Resend the email or follow up: If you are concerned about the email’s delivery status, you can consider resending the email to the recipient or reaching out to them directly to confirm if they have received it.
- Check the recipient’s email settings: It’s possible that the recipient has disabled the option to send delivery receipts or has a policy in place that prevents them from sending such notifications. In such cases, you may not receive a delivery receipt even if the email has been delivered successfully.
- Contact your email administrator: If you are using Outlook in a professional setting, reach out to your email administrator or IT support for further guidance. They may be able to provide additional insights or troubleshoot any potential issues with the delivery receipt feature.
- Consider alternative confirmation methods: If delivery receipts are not reliable or available in your situation, you may want to explore alternative methods of confirming email delivery. This could include requesting a read receipt (which confirms that the recipient has opened the email) or following up with the recipient via another communication channel.
It’s important to keep in mind that while the “Request a Delivery Receipt” feature in Outlook can provide valuable confirmation of email delivery, it is ultimately dependent on the recipient’s email settings and their decision to send a receipt. Therefore, it may not be the most reliable method for ensuring delivery in all cases.
By following the above steps and considering alternative confirmation methods, you can take proactive measures to confirm the delivery of important emails, even if a delivery receipt is not received.