
Step 1: Power off the BlackBerry Torch
Before removing the SIM card from your BlackBerry Torch, it's crucial to power off the device to prevent any potential damage and ensure a smooth process. Follow these simple steps to power off your BlackBerry Torch:
First, locate the power button on your device. It is typically located on the top or the sides of the phone, depending on the model. Press and hold the power button until the power-off menu appears on the screen.
Next, tap the "Power Off" option on the screen. This action will initiate the shutdown process, and you will see a confirmation message indicating that the device is powering off.
Once the device has completely powered down, you can proceed to the next steps to remove the SIM card from your BlackBerry Torch.
It's essential to power off the device before removing the SIM card to avoid any potential data loss or damage to the card or the device itself. By following this initial step, you can ensure a safe and hassle-free process as you continue with the SIM card removal procedure.
Powering off your BlackBerry Torch is a simple yet crucial step that sets the stage for the subsequent actions involved in removing the SIM card. Taking the time to power off the device properly demonstrates care for your device and helps maintain its optimal functionality.
Now that your BlackBerry Torch is powered off, you are ready to proceed with the next steps to remove the SIM card from your device. Let's move on to the next step in this process: locating the SIM card slot.
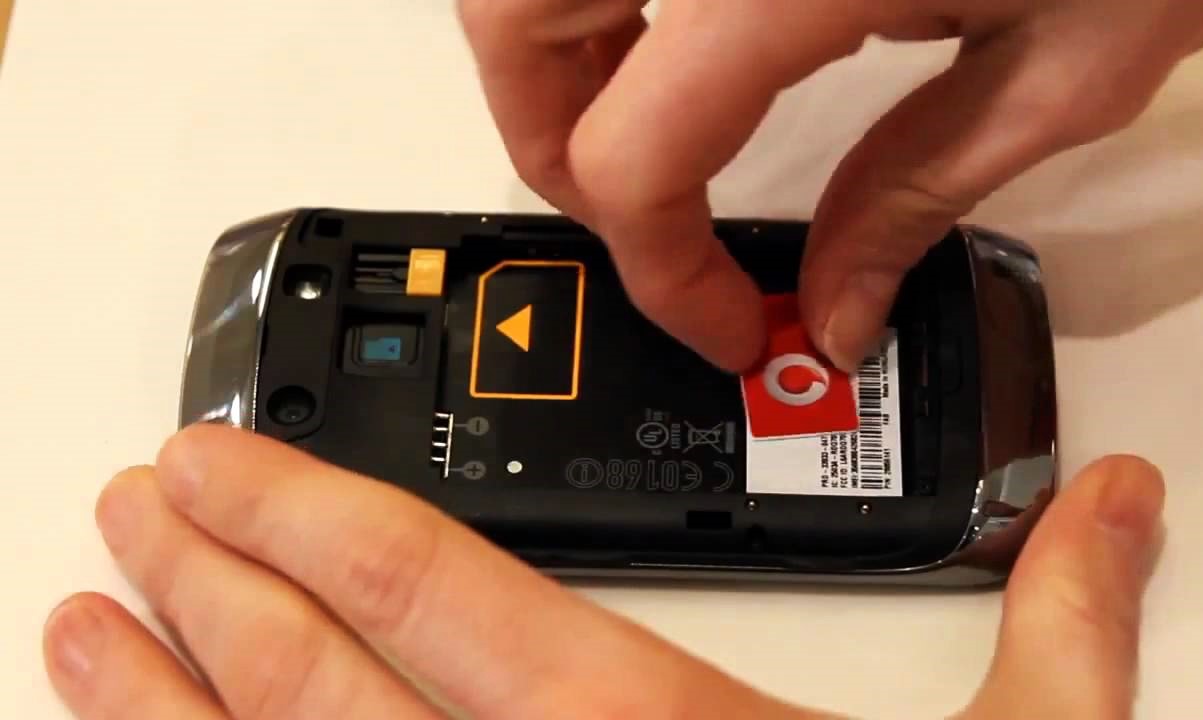
Step 2: Locate the SIM Card Slot
Locating the SIM card slot on your BlackBerry Torch is the next crucial step in the process of removing the SIM card. The SIM card slot is where the SIM card is housed within the device. Follow these steps to locate the SIM card slot:
Begin by examining the exterior of your BlackBerry Torch. The SIM card slot is typically located on the side of the device. Look for a small, discreet slot with a pinhole or a removable cover. This slot is designed to securely hold the SIM card and can usually be found near the top or bottom edge of the phone, depending on the specific model.
If you have difficulty locating the SIM card slot, consult the user manual or online resources specific to your BlackBerry Torch model for detailed guidance. Many manufacturers provide online support and visual aids to assist users in locating essential components of their devices.
Once you have identified the SIM card slot, take a moment to familiarize yourself with its location and the mechanism for accessing it. Understanding the physical layout of the SIM card slot will prepare you for the next step of the process: ejecting the SIM card tray.
Locating the SIM card slot is a crucial step in the process of removing the SIM card from your BlackBerry Torch. By taking the time to identify the slot and understand its location, you are setting the stage for a smooth and successful removal process. With the SIM card slot now located, you are ready to proceed to the next step: ejecting the SIM card tray.
Step 3: Eject the SIM Card Tray
After locating the SIM card slot on your BlackBerry Torch, the next step is to eject the SIM card tray. This process allows you to access the SIM card and prepare it for removal. Follow these steps to eject the SIM card tray:
First, ensure that your BlackBerry Torch is still powered off to avoid any potential damage during the tray ejection process. With the device powered off, locate the small pinhole or the designated area on the SIM card slot that allows for the ejection of the tray.
Once you have identified the ejection mechanism, gently insert the provided SIM card ejection tool or a paperclip into the pinhole. Apply light pressure to the tool, and you should feel the tray begin to release from the slot.
Continue to apply gentle pressure until the SIM card tray is partially ejected from the slot. Be cautious and avoid using excessive force to prevent any damage to the tray or the device.
Once the tray is partially ejected, carefully remove it from the device using your fingers. Take care to handle the tray and the SIM card with caution to avoid any potential damage or misplacement of the card.
With the SIM card tray now removed from the BlackBerry Torch, you have successfully completed the ejection process. This step sets the stage for the next crucial action: removing the SIM card from the tray, which will be covered in the following step.
Ejecting the SIM card tray is a critical step in the process of removing the SIM card from your BlackBerry Torch. By following these steps carefully and with precision, you are ensuring a smooth and safe removal process. With the tray now ejected, you are ready to proceed to the next step: removing the SIM card from the tray.
Step 4: Remove the SIM Card
With the SIM card tray ejected from your BlackBerry Torch, the next step is to carefully remove the SIM card from the tray. Follow these steps to safely remove the SIM card:
First, examine the SIM card tray to locate the position of the SIM card. The SIM card is typically placed within a designated area on the tray, and it may be held in place by a small clip or slot. Take a moment to familiarize yourself with the placement of the SIM card within the tray.
Next, gently remove the SIM card from the tray by sliding it out or carefully releasing it from any securing mechanism. Handle the SIM card with care to avoid any damage to its delicate components, such as the metal contacts or the chip.
Inspect the SIM card and the tray for any signs of damage or debris. Ensure that the metal contacts on the SIM card are clean and free from any obstructions, which could affect its functionality when reinserted into the device.
Once the SIM card has been safely removed from the tray, place it in a secure location, such as a protective case or a small container, to prevent loss or damage. It is essential to keep the SIM card in a safe and easily accessible place until it is ready to be reinserted into the device.
By carefully removing the SIM card from the tray, you have completed a crucial step in the process of removing the SIM card from your BlackBerry Torch. Taking the time to handle the SIM card with care ensures that it remains in optimal condition for reinsertion into the device. With the SIM card now removed, you are ready to proceed to the next step: reinserting the SIM card tray into the BlackBerry Torch.
Step 5: Reinsert the SIM Card Tray
After removing the SIM card from your BlackBerry Torch, the next step is to reinsert the SIM card tray back into the device. Follow these steps to securely reinsert the SIM card tray:
Begin by ensuring that the SIM card tray and the SIM card are free from any dust, debris, or damage. Inspect the tray and the SIM card to verify that they are in optimal condition and ready for reinsertion into the device.
Next, align the SIM card tray with the slot on the BlackBerry Torch, ensuring that it is positioned correctly for insertion. Take care to orient the tray in the proper direction to avoid any potential misalignment or damage during the reinsertion process.
Gently slide the SIM card tray back into the slot, applying light pressure to ensure a secure fit. Take your time to carefully insert the tray, avoiding any abrupt movements or force that could cause damage to the tray or the device.
Once the SIM card tray is fully inserted into the device, ensure that it sits flush with the exterior of the BlackBerry Torch. A secure and proper fit of the tray indicates that it has been successfully reinserted into the device.
With the SIM card tray securely reinserted into your BlackBerry Torch, you have completed a critical step in the process of removing and reinserting the SIM card. By following these steps with precision and care, you are ensuring that the SIM card tray is properly seated within the device, setting the stage for the final step in the process: powering on the BlackBerry Torch.
Reinserting the SIM card tray is a pivotal step that ensures the proper functioning of the device and the secure placement of the SIM card. With the tray now securely in place, you are ready to proceed to the final step: powering on your BlackBerry Torch.
Step 6: Power on the BlackBerry Torch
Now that the SIM card tray has been securely reinserted into your BlackBerry Torch, the final step is to power on the device. Follow these simple steps to power on your BlackBerry Torch:
Press and hold the power button located on the top or side of your device until the screen lights up and the BlackBerry logo appears. Release the power button once the device begins to power on.
Wait for the device to complete the startup process. You will see the screen illuminate, and the device will display the home screen or lock screen, indicating that it has successfully powered on.
Once the device has powered on, you may be prompted to enter your SIM card PIN or unlock code, depending on your specific settings. Enter the required information to unlock the device and gain access to its features and functions.
With the BlackBerry Torch powered on and fully operational, you have successfully completed the process of removing and reinserting the SIM card. Take a moment to ensure that the device recognizes the SIM card and connects to the network, indicating that the reinsertion process was completed successfully.
Powering on your BlackBerry Torch is the final step in the process of removing and reinserting the SIM card. By following these steps, you have ensured that the device is ready for use and that the SIM card is securely in place, allowing you to resume normal use of your BlackBerry Torch.
With the device powered on and the SIM card functioning correctly, you have completed the process of removing and reinserting the SIM card in your BlackBerry Torch. Congratulations on successfully completing this essential task, and enjoy using your device with the reassurance that the SIM card is securely in place.