
Checking the Blocked Contacts List
When it comes to managing your contacts on your iPhone 12, it's essential to be aware of who is on your blocked contacts list. Whether you've intentionally blocked someone or it was done inadvertently, it's crucial to have the ability to review and modify this list. Here's how you can check the blocked contacts list on your iPhone 12:
-
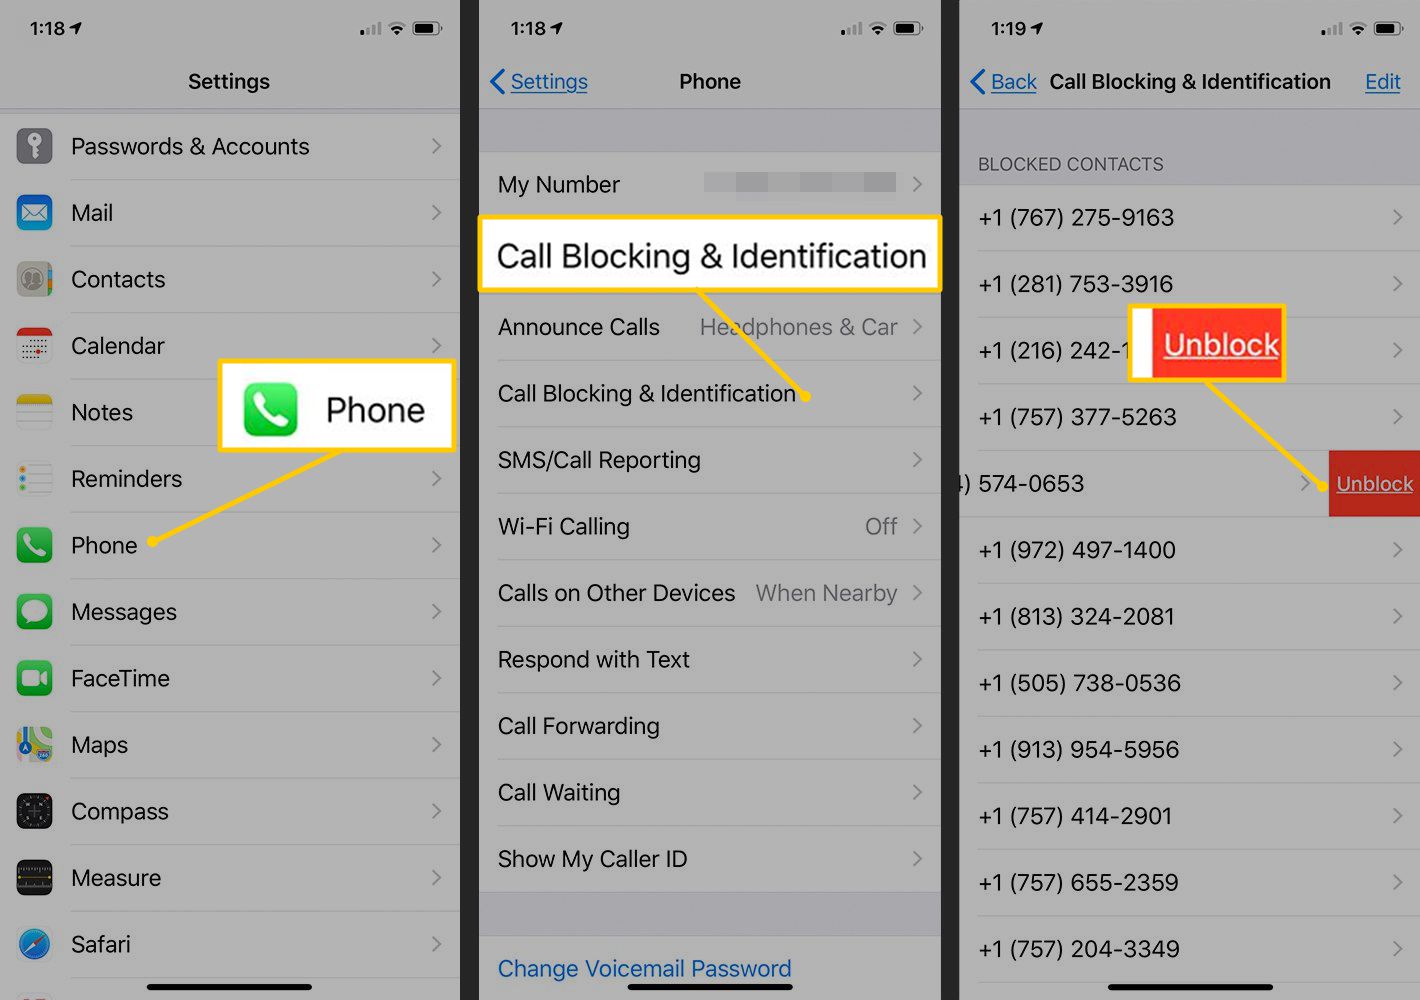
Open the Settings App: Begin by locating and tapping the "Settings" app on your iPhone 12's home screen. The Settings app is represented by a gear icon and is typically found on the first page of your apps.
-
Scroll Down and Tap "Phone": Once you're in the Settings app, scroll down until you find the "Phone" option. Tap on it to access the phone settings.
-
Select "Call Blocking & Identification": Within the "Phone" settings, you'll find the "Call Blocking & Identification" option. Tap on it to proceed.
-
Review the Blocked Contacts List: Under the "Call Blocking & Identification" section, you'll see an option labeled "Blocked Contacts." Tap on this option to view the list of contacts that you have blocked on your iPhone 12.
-
Check for the Desired Contact: Once you're in the "Blocked Contacts" list, you can scroll through to review the contacts that are currently blocked on your device. This allows you to verify if a specific contact is on the list.
By following these steps, you can easily check the blocked contacts list on your iPhone 12. This process empowers you to stay informed about the contacts that are currently blocked and provides the opportunity to unblock them if desired.
Accessing the Settings Menu
Accessing the Settings menu on your iPhone 12 is a fundamental step in managing various aspects of your device, including call blocking and contact management. The Settings menu serves as the control center for customizing and configuring your iPhone's functionalities. Here's a detailed exploration of how to access the Settings menu and navigate to the relevant options:
-
Locate the Settings App: The Settings app icon, featuring a gear symbol, is a pivotal element of your iPhone's home screen. It is typically positioned among the array of app icons, easily accessible with a single tap.
-
Understanding the Settings Interface: Upon launching the Settings app, you are greeted with a clean and organized interface. The layout is designed to facilitate seamless navigation, with various options neatly categorized for user convenience.
-
Scrolling Through the Settings: As you delve into the Settings menu, you'll notice a plethora of configurable options, ranging from general preferences to specific app settings. The intuitive design allows for effortless scrolling, enabling you to explore the diverse settings available.
-
Locate and Tap "Phone": To manage call blocking and identification settings, you need to locate the "Phone" option within the Settings menu. This step is crucial as it directs you to the specific settings related to call management and contact blocking.
-
Accessing Call Blocking & Identification: Within the "Phone" settings, you will find the "Call Blocking & Identification" option. This section is pivotal for managing blocked contacts and configuring call-related features, providing a comprehensive suite of tools to enhance your calling experience.
By following these steps, you can seamlessly access the Settings menu on your iPhone 12 and navigate to the pertinent options for managing call blocking and contact settings. This foundational process empowers you to take control of your device's communication functionalities, ensuring a personalized and tailored experience in managing your contacts and call preferences.
Finding and Selecting the Blocked Contact
Once you have accessed the "Call Blocking & Identification" section within the Settings menu of your iPhone 12, the next crucial step is to locate and select the specific contact that you intend to unblock. This process involves navigating through the blocked contacts list and identifying the contact that you wish to unblock. Here's a detailed exploration of how to find and select the blocked contact on your iPhone 12:
-
Navigate to the Blocked Contacts List: Upon accessing the "Call Blocking & Identification" section, you will be presented with the list of contacts that are currently blocked on your device. This comprehensive roster includes the names and numbers of the blocked contacts, providing a clear overview of the individuals who have been restricted from contacting you.
-
Scroll Through the Blocked Contacts: As you peruse the blocked contacts list, take the time to scroll through the entries to locate the specific contact that you intend to unblock. The list is designed for easy navigation, allowing you to swiftly identify the contact amidst the roster of blocked individuals.
-
Identify the Desired Contact: Once you have located the contact that you wish to unblock, tap on the entry to select it. This action enables you to access the contact's details and initiate the unblocking process. By selecting the contact from the blocked list, you are one step closer to reinstating communication with the individual.
-
Review Contact Information: Upon selecting the blocked contact, you may have the opportunity to review the contact's information, including their name, number, and any additional details associated with their entry in your contacts list. This review ensures that you are unblocking the intended individual, preventing any inadvertent actions.
-
Initiate the Unblocking Process: With the contact selected, proceed to the unblocking action, which may involve tapping an "Unblock" or "Remove from Blocked List" option. This affirmative step signifies your intent to restore communication with the contact, effectively removing the block and allowing them to reach out to you once again.
By following these steps, you can effectively find and select the blocked contact on your iPhone 12, paving the way for the subsequent unblocking process. This meticulous approach ensures that you accurately identify and unblock the intended contact, fostering seamless reconnection and communication on your device.
Unblocking the Contact
After successfully locating and selecting the contact you wish to unblock from the blocked contacts list on your iPhone 12, the final step involves unblocking the contact to reinstate communication. This pivotal process ensures that the previously restricted individual is granted access to reach out to you once again. Here's a comprehensive guide on unblocking the contact and facilitating seamless reconnection:
-
Initiate the Unblocking Action: Upon selecting the blocked contact from the list, look for an option that allows you to unblock the contact. This may be labeled as "Unblock" or "Remove from Blocked List." Tap on this affirmative action to proceed with unblocking the contact.
-
Confirmation Prompt: In some instances, your iPhone 12 may prompt you to confirm the unblocking action. This serves as a safeguard against inadvertent unblocking and ensures that you are intentionally lifting the block on the selected contact. Confirm the unblocking action to proceed.
-
Verification of Unblocked Status: Once the unblocking process is initiated and confirmed, take a moment to verify that the contact has been successfully unblocked. This can be done by reviewing the updated status of the contact within the blocked contacts list, ensuring that the individual is no longer restricted from contacting you.
-
Resumed Communication: With the contact successfully unblocked, they are now able to reach out to you through calls, messages, and other communication channels. This seamless reconnection fosters the restoration of communication, allowing for continued interaction with the unblocked individual.
-
Review of Unblocked Contacts: After unblocking the contact, it's beneficial to review the updated list of unblocked contacts to ensure that the intended individual has been reinstated. This proactive step provides reassurance that the unblocking process was executed accurately and that the contact is now accessible on your device.
By following these steps, you can effectively unblock a contact on your iPhone 12, enabling the resumption of communication with the previously restricted individual. This process empowers you to manage your contacts with precision, ensuring that you have full control over the communication channels on your device.