
Why Proper Cleaning is Important
Wireless earbuds have become an indispensable part of our daily lives, accompanying us during workouts, commutes, and leisure time. However, many users underestimate the significance of keeping their earbuds clean. Proper cleaning is crucial for maintaining not only the hygiene of the earbuds but also the quality of sound and the longevity of the device.
First and foremost, regular cleaning of wireless earbuds is essential for hygiene purposes. When earbuds are used frequently, they come into contact with sweat, earwax, and environmental debris, creating an environment where bacteria and germs can thrive. Without proper cleaning, these contaminants can accumulate on the earbuds, posing potential health risks. By incorporating a cleaning routine, users can mitigate the risk of ear infections and other hygiene-related issues.
Moreover, the accumulation of dirt, earwax, and debris can compromise the performance and sound quality of the earbuds. When the speaker grills and sound ports are clogged, it can lead to distorted sound and reduced volume. Additionally, earwax buildup on the ear tips can affect the fit and seal, diminishing the overall audio experience. By regularly cleaning the earbuds, users can ensure that they continue to deliver optimal sound quality and maintain their functionality over time.
Furthermore, proper cleaning can significantly extend the lifespan of wireless earbuds. Dust and debris can infiltrate the internal components, potentially causing damage to the delicate electronics. By implementing a cleaning regimen, users can prevent the accumulation of debris that may lead to technical issues, thereby prolonging the longevity of their earbuds.
In essence, the importance of proper cleaning cannot be overstated. By prioritizing hygiene, sound quality, and device longevity, users can maximize their enjoyment of wireless earbuds while safeguarding their investment in these modern technological marvels.
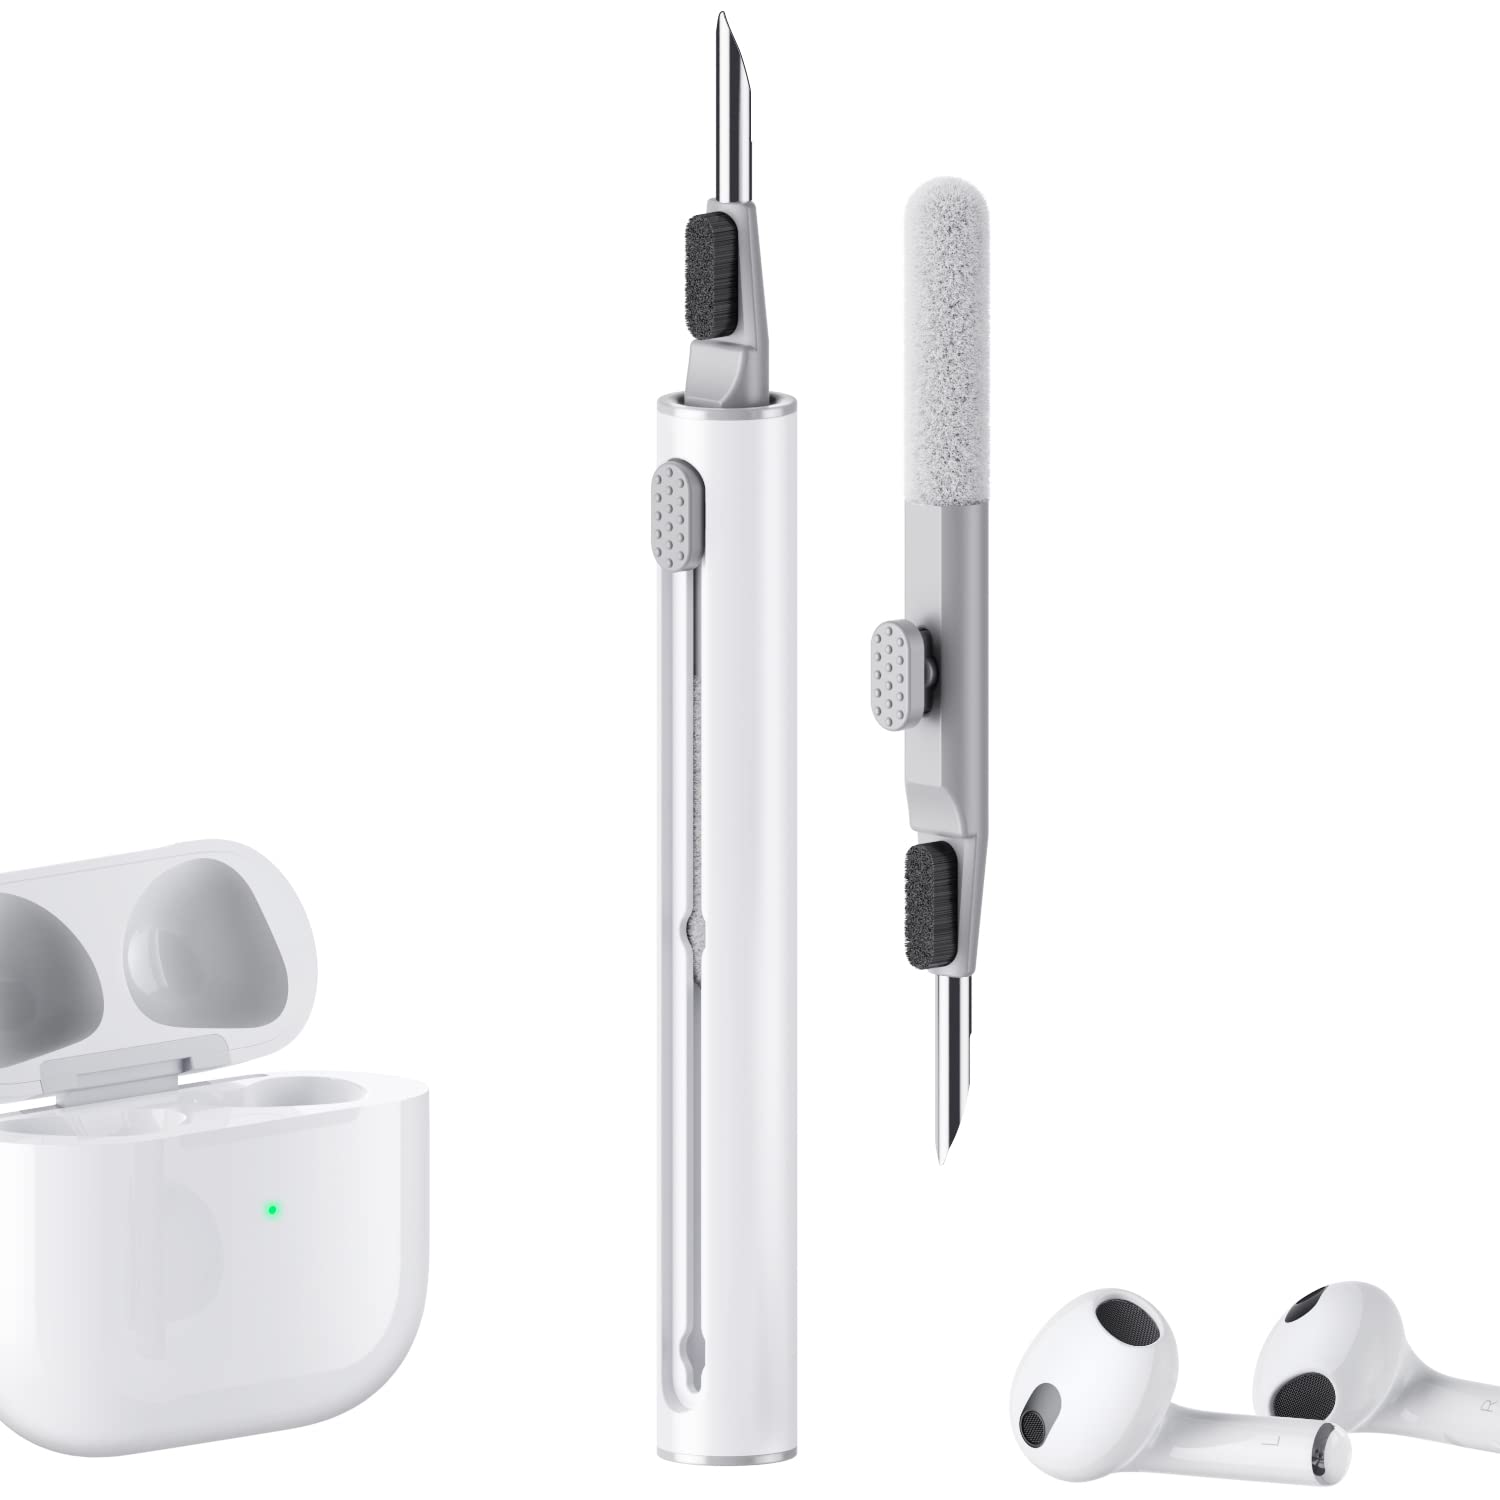
Step 1: Gather the Necessary Supplies
Before embarking on the cleaning process, it is essential to assemble the required supplies to ensure a thorough and effective cleaning of wireless earbuds. The following items are recommended for this purpose:
- Soft, Lint-Free Cloth: A gentle, non-abrasive cloth is essential for wiping down the earbuds without causing any damage to the delicate surfaces. Microfiber cloths are particularly suitable for this task, as they are effective in capturing dust and grime without leaving behind lint.
- Mild Soap or Cleaning Solution: A mild soap or specialized cleaning solution designed for electronic devices can be used to remove stubborn dirt and grime from the earbuds. It is important to avoid harsh chemicals or abrasive cleaners that may damage the earbuds’ finish.
- Cotton Swabs: These are useful for reaching small crevices and intricate areas of the earbuds, allowing for detailed cleaning without causing any damage.
- Small Brush: A soft-bristled brush, such as a clean makeup brush or a specialized electronic cleaning brush, can be utilized to dislodge debris and dust from hard-to-reach areas, such as the speaker grills and charging ports.
- Isopropyl Alcohol: This can be used for disinfecting the earbuds and eliminating bacteria and germs that may have accumulated on the surfaces.
- Clean, Dry Toothbrush: A toothbrush with soft bristles can be repurposed for cleaning ear tips and ear fins, ensuring that they remain free from earwax and debris.
By ensuring that these supplies are readily available, users can streamline the cleaning process and achieve optimal results without compromising the integrity of their wireless earbuds. With the necessary tools at hand, the subsequent cleaning steps can be executed with ease and precision, allowing for a thorough restoration of the earbuds’ cleanliness and functionality.
Step 2: Remove Ear Tips and Ear Fins
Prior to initiating the cleaning process, it is imperative to carefully remove the ear tips and ear fins from the wireless earbuds. These components are often designed to be detachable, allowing for easier cleaning and maintenance. The following steps outline the process of removing the ear tips and ear fins:
- Identify the Ear Tips and Ear Fins: Examine the earbuds to locate the ear tips and ear fins. These components are typically made of soft silicone and are attached to the earbuds to provide a comfortable and secure fit within the ear.
- Gently Detach the Ear Tips: Grasp the base of the ear tip and carefully pull it away from the earbud. It is important to exercise caution and avoid applying excessive force to prevent damaging the ear tips or the earbuds themselves.
- Remove the Ear Fins: If the earbuds are equipped with ear fins, gently detach them from the earbuds as well. Ear fins are designed to provide additional stability and support during physical activities, and their removal facilitates thorough cleaning of the earbuds.
- Organize the Components: Once the ear tips and ear fins have been removed, it is advisable to keep them organized and easily accessible. This ensures that they can be cleaned effectively and reattached to the earbuds without any confusion or misplacement.
By carefully removing the ear tips and ear fins, users can prepare the earbuds for comprehensive cleaning, ensuring that all components are thoroughly sanitized and free from dirt and debris. This initial step sets the stage for the subsequent cleaning procedures, allowing for a systematic and meticulous restoration of the earbuds’ cleanliness and functionality.
Step 3: Use a Soft, Dry Cloth to Wipe Down the Earbuds
After removing the ear tips and ear fins, the next step in the cleaning process involves using a soft, dry cloth to meticulously wipe down the surfaces of the wireless earbuds. This crucial step aims to eliminate surface-level dirt, sweat, and grime that may have accumulated on the earbuds during regular use. The following guidelines outline the process of using a soft, dry cloth to clean the earbuds:
- Select a Lint-Free Cloth: Choose a soft, lint-free cloth, such as a microfiber cloth, to avoid leaving behind any residue or fibers on the earbuds. This type of cloth is gentle on the earbuds’ surfaces and effectively captures dust and particles without causing damage.
- Gently Wipe the Earbuds: With the cloth in hand, delicately wipe the exterior surfaces of the earbuds, including the main body and any control buttons. Pay attention to detail, ensuring that all visible dirt and smudges are effectively removed during this process.
- Avoid Excessive Pressure: It is important to refrain from applying excessive pressure while wiping down the earbuds, as this could potentially damage the delicate electronic components or push dirt and debris further into the earbuds’ crevices.
- Focus on Intricate Areas: Use the cloth to access intricate areas and small crevices where dirt and grime may be concealed. Thoroughly clean around the speaker grills, charging ports, and any other recessed areas to ensure a comprehensive removal of surface-level contaminants.
- Inspect for Residue: After wiping down the earbuds, inspect the surfaces to ensure that no residue or moisture remains. This step is crucial in preparing the earbuds for the subsequent cleaning procedures, ensuring that they are free from visible impurities.
By meticulously wiping down the earbuds with a soft, dry cloth, users can effectively eliminate external dirt and grime, setting the stage for more detailed cleaning processes. This step contributes to the overall cleanliness and maintenance of the earbuds, ensuring that they remain hygienic and free from surface-level contaminants.
Step 4: Clean the Ear Tips and Ear Fins
Once the ear tips and ear fins have been removed from the wireless earbuds, it is essential to focus on cleaning these components thoroughly. The ear tips, in particular, come into direct contact with the ear canal, making their cleanliness crucial for hygiene and comfort. The following steps outline the process of cleaning the ear tips and ear fins:
- Inspect for Debris: Examine the ear tips and ear fins for any visible dirt, earwax, or residue. It is common for these components to accumulate debris over time, especially if they are used during physical activities or in environments with high levels of dust and sweat.
- Use Mild Soap and Water: Prepare a gentle cleaning solution by mixing mild soap with water. Dip the ear tips and ear fins into the solution, ensuring that they are thoroughly coated to facilitate the removal of dirt and earwax.
- Gently Scrub the Components: With the ear tips and ear fins submerged in the cleaning solution, use a soft-bristled brush or a clean, dry toothbrush to gently scrub the surfaces. Pay close attention to any grooves or textured areas to ensure that all debris is effectively dislodged.
- Rinse and Dry Thoroughly: After scrubbing the ear tips and ear fins, rinse them under running water to remove the soapy residue. Once cleaned, pat them dry with a clean, lint-free cloth, ensuring that no moisture remains before reattaching them to the earbuds.
- Inspect for Cleanliness: Before reattaching the ear tips and ear fins, inspect them to ensure that they are free from any remaining debris or moisture. This step is crucial in maintaining the hygiene and comfort of the earbuds during subsequent use.
By dedicating attention to cleaning the ear tips and ear fins, users can ensure that these components remain hygienic and free from accumulated debris, contributing to a comfortable and enjoyable listening experience. Additionally, the thorough cleaning of these components enhances the overall maintenance and longevity of the wireless earbuds, preserving their functionality and performance over time.
Step 5: Use a Small Brush to Remove Debris
After addressing the external surfaces and detachable components of the wireless earbuds, the next step involves utilizing a small brush to meticulously remove debris from intricate areas and hard-to-reach spots. This meticulous process ensures that any remaining dirt and grime are effectively dislodged, contributing to the overall cleanliness and functionality of the earbuds. The following steps outline the process of using a small brush to remove debris from the earbuds:
- Select a Soft-Bristled Brush: Choose a small brush with soft bristles, such as a clean makeup brush or a specialized electronic cleaning brush. The gentle nature of the bristles prevents any potential damage to the delicate surfaces of the earbuds while effectively dislodging debris.
- Focused Cleaning: Use the small brush to target intricate areas, such as the speaker grills, charging ports, and any recessed sections where dirt and debris may have accumulated. Employ gentle, precise movements to dislodge the particles without causing any harm to the internal components.
- Remove Loose Particles: As the brush is maneuvered across the earbuds, ensure that any loose particles and debris are effectively dislodged and removed. This process contributes to the prevention of potential blockages or malfunctions caused by the accumulation of dirt within the earbuds.
- Inspect for Residue: After using the brush, inspect the earbuds to ensure that no residual debris or particles remain. This careful inspection ensures that the earbuds are thoroughly cleaned and prepared for the subsequent disinfection and drying processes.
By employing a small brush to remove debris from the earbuds, users can effectively address hard-to-reach areas and intricate sections, ensuring that the earbuds remain free from accumulated dirt and grime. This meticulous cleaning step contributes to the overall maintenance and longevity of the wireless earbuds, preserving their functionality and performance for extended periods of use.
Step 6: Disinfect the Earbuds
Disinfecting the wireless earbuds is a crucial step in the cleaning process, as it serves to eliminate bacteria, germs, and other potentially harmful microorganisms that may have accumulated on the surfaces. This step is particularly important for maintaining hygiene and safeguarding the user from potential ear-related infections. The following guidelines outline the process of disinfecting the earbuds:
- Use Isopropyl Alcohol: Isopropyl alcohol is an effective disinfectant that can be used to sanitize the surfaces of the earbuds. Apply a small amount of isopropyl alcohol to a clean, lint-free cloth, ensuring that it is damp but not excessively wet.
- Wipe Down the Earbuds: Gently wipe down the exterior surfaces of the earbuds with the cloth dampened with isopropyl alcohol. Pay attention to detail, ensuring that all areas are thoroughly sanitized to eliminate any lingering bacteria or germs.
- Focus on High-Touch Areas: Concentrate on disinfecting high-touch areas, such as the control buttons, touch-sensitive surfaces, and any other areas that come into direct contact with the user’s skin. Thorough disinfection of these areas is essential for preventing the spread of germs.
- Allow for Drying Time: After disinfecting the earbuds with isopropyl alcohol, allow them to air dry completely before proceeding to the next step. This ensures that any residual alcohol evaporates, leaving the earbuds clean and free from moisture.
By diligently disinfecting the earbuds with isopropyl alcohol, users can effectively eliminate bacteria and germs, contributing to a hygienic and safe listening experience. This critical step not only safeguards the user’s health but also ensures that the earbuds remain free from potentially harmful microorganisms, promoting peace of mind and comfort during use.
Step 7: Let the Earbuds Dry Completely
After the disinfection process, allowing the wireless earbuds to dry completely is essential to ensure that they are free from moisture before being reassembled and used. Proper drying contributes to the maintenance of the earbuds’ functionality and prevents potential damage that may result from residual moisture. The following steps outline the process of letting the earbuds dry completely:
- Air Drying: Place the disinfected earbuds in a clean, dry area with ample airflow. Allowing the earbuds to air dry is the most effective method, as it facilitates the evaporation of any remaining moisture without exposing the earbuds to excessive heat or potential damage.
- Patience is Key: Exercise patience and allow an adequate amount of time for the earbuds to dry thoroughly. The duration may vary based on environmental factors such as humidity and airflow, but ensuring complete dryness is paramount before reassembling the earbuds.
- Avoid Heat Sources: Refrain from using heat sources such as hairdryers or direct sunlight to expedite the drying process, as excessive heat can potentially damage the delicate electronic components of the earbuds.
- Confirm Dryness: Before proceeding to reassemble the earbuds, confirm that they are completely dry by inspecting the surfaces for any remaining moisture or dampness. This careful examination ensures that the earbuds are ready for use without the risk of potential damage.
By allowing the earbuds to dry completely, users can safeguard the integrity of the delicate electronic components and prevent potential malfunctions caused by residual moisture. This critical step ensures that the earbuds are prepared for reassembly and subsequent use, contributing to their longevity and optimal performance over time.
Step 8: Reassemble the Earbuds
Once the earbuds have been thoroughly cleaned, disinfected, and allowed to dry completely, the next step is to reassemble the components to restore the wireless earbuds to their original configuration. Proper reassembly ensures that the earbuds are ready for use and that all components are securely attached. The following steps outline the process of reassembling the earbuds:
- Retrieve the Ear Tips and Ear Fins: Ensure that the cleaned and dried ear tips and ear fins are readily available for reassembly. Organize the components to facilitate a seamless and efficient reassembly process.
- Align and Attach the Ear Tips: Align the ear tips with the corresponding earbud housings and gently press them into place. Ensure that the ear tips are securely attached, providing a comfortable and secure fit within the ear canal.
- Reattach the Ear Fins (If Applicable): If the earbuds feature detachable ear fins for added stability, reattach them to the earbud housings according to their designated orientation. Verify that the ear fins are firmly secured to prevent any displacement during use.
- Confirm Secure Attachment: After reassembling the earbuds, confirm that all components are securely attached and properly aligned. This step ensures that the earbuds are ready for use and that the components are positioned optimally for comfort and functionality.
By meticulously reassembling the earbuds, users can ensure that all components are securely attached and properly aligned, setting the stage for a comfortable and enjoyable listening experience. This step signifies the completion of the cleaning process, preparing the wireless earbuds for subsequent use with the assurance of optimal hygiene and functionality.
Step 9: Store the Earbuds Properly
Proper storage of wireless earbuds is essential for maintaining their cleanliness, functionality, and longevity. By storing the earbuds appropriately, users can mitigate the risk of damage, contamination, or misplacement, ensuring that the earbuds remain in optimal condition for extended periods. The following guidelines outline the process of storing the earbuds properly:
- Utilize a Protective Case: Store the wireless earbuds in a designated protective case to shield them from dust, moisture, and physical damage. A well-fitted case provides a secure and cushioned environment for the earbuds, safeguarding them during storage and transport.
- Secure the Charging Case (If Applicable): If the earbuds are accompanied by a charging case, ensure that they are securely placed within the case and that the lid is closed properly. This prevents exposure to external elements and maintains the integrity of the earbuds and their charging functionality.
- Avoid Exposure to Extreme Conditions: Store the earbuds in a cool, dry environment away from direct sunlight, excessive heat, or moisture. Exposure to extreme conditions can compromise the performance and longevity of the earbuds and their accompanying accessories.
- Organize Cables and Accessories: If the earbuds are accompanied by charging cables or additional accessories, organize and store them alongside the earbuds in a designated compartment within the protective case. This ensures that all components are readily accessible and prevents misplacement.
- Maintain Regular Cleaning: Incorporate regular cleaning and maintenance of the protective case to prevent the accumulation of dirt and debris. A clean case ensures that the earbuds remain hygienic and free from potential contaminants during storage.
By adhering to proper storage practices, users can prolong the lifespan of their wireless earbuds and preserve their pristine condition. Effective storage not only safeguards the earbuds from damage and contamination but also ensures that they are readily available for use, providing a seamless and reliable listening experience whenever needed.