
Checking the Location of the SIM Card Slot
Before you can access the SIM card slot on your iPhone SE, it’s crucial to locate its position. The SIM card slot on the iPhone SE is typically found on the right-hand side of the device. It’s important to note that the exact location may vary based on the model of your iPhone SE, but most often, it can be spotted on the right edge of the phone.
When holding the iPhone SE in a standard position, the SIM card slot is usually situated just below the power button. This positioning makes it convenient to access the slot without any obstructions. If you’re unsure about the precise location, you can refer to the user manual that came with your device for detailed instructions on finding the SIM card slot.
Alternatively, you can also visit the official Apple website and access the support section for the iPhone SE. Here, you’ll find visual aids and step-by-step guides to help you pinpoint the SIM card slot on your specific iPhone SE model. Taking the time to familiarize yourself with the location of the SIM card slot will streamline the process of opening it and ensure that you can swiftly swap or insert a new SIM card as needed.
Using the SIM Card Ejector Tool
Once you’ve located the SIM card slot on your iPhone SE, the next step is to prepare the SIM card ejector tool. This tool is typically included in the packaging of your iPhone SE and resembles a small, metallic pin. In the event that you can’t locate the ejector tool, a suitable alternative can be found in the form of a paperclip, provided it has been straightened out to create a similar shape to the original ejector tool.
Before proceeding, it’s essential to power off your iPhone SE to avoid any potential damage to the device or the SIM card. Once the device is powered down, you can retrieve the SIM card ejector tool and hold it firmly between your fingers. Take a moment to examine the tool and identify the sharp, pointed end that will be inserted into the SIM card slot.
It’s important to handle the ejector tool with care and precision to avoid any accidental damage to the delicate components of the SIM card slot. With the tool in hand, you’re now ready to proceed to the next crucial step in accessing the SIM card slot on your iPhone SE and managing your SIM card effectively.
Inserting the Ejector Tool into the Hole
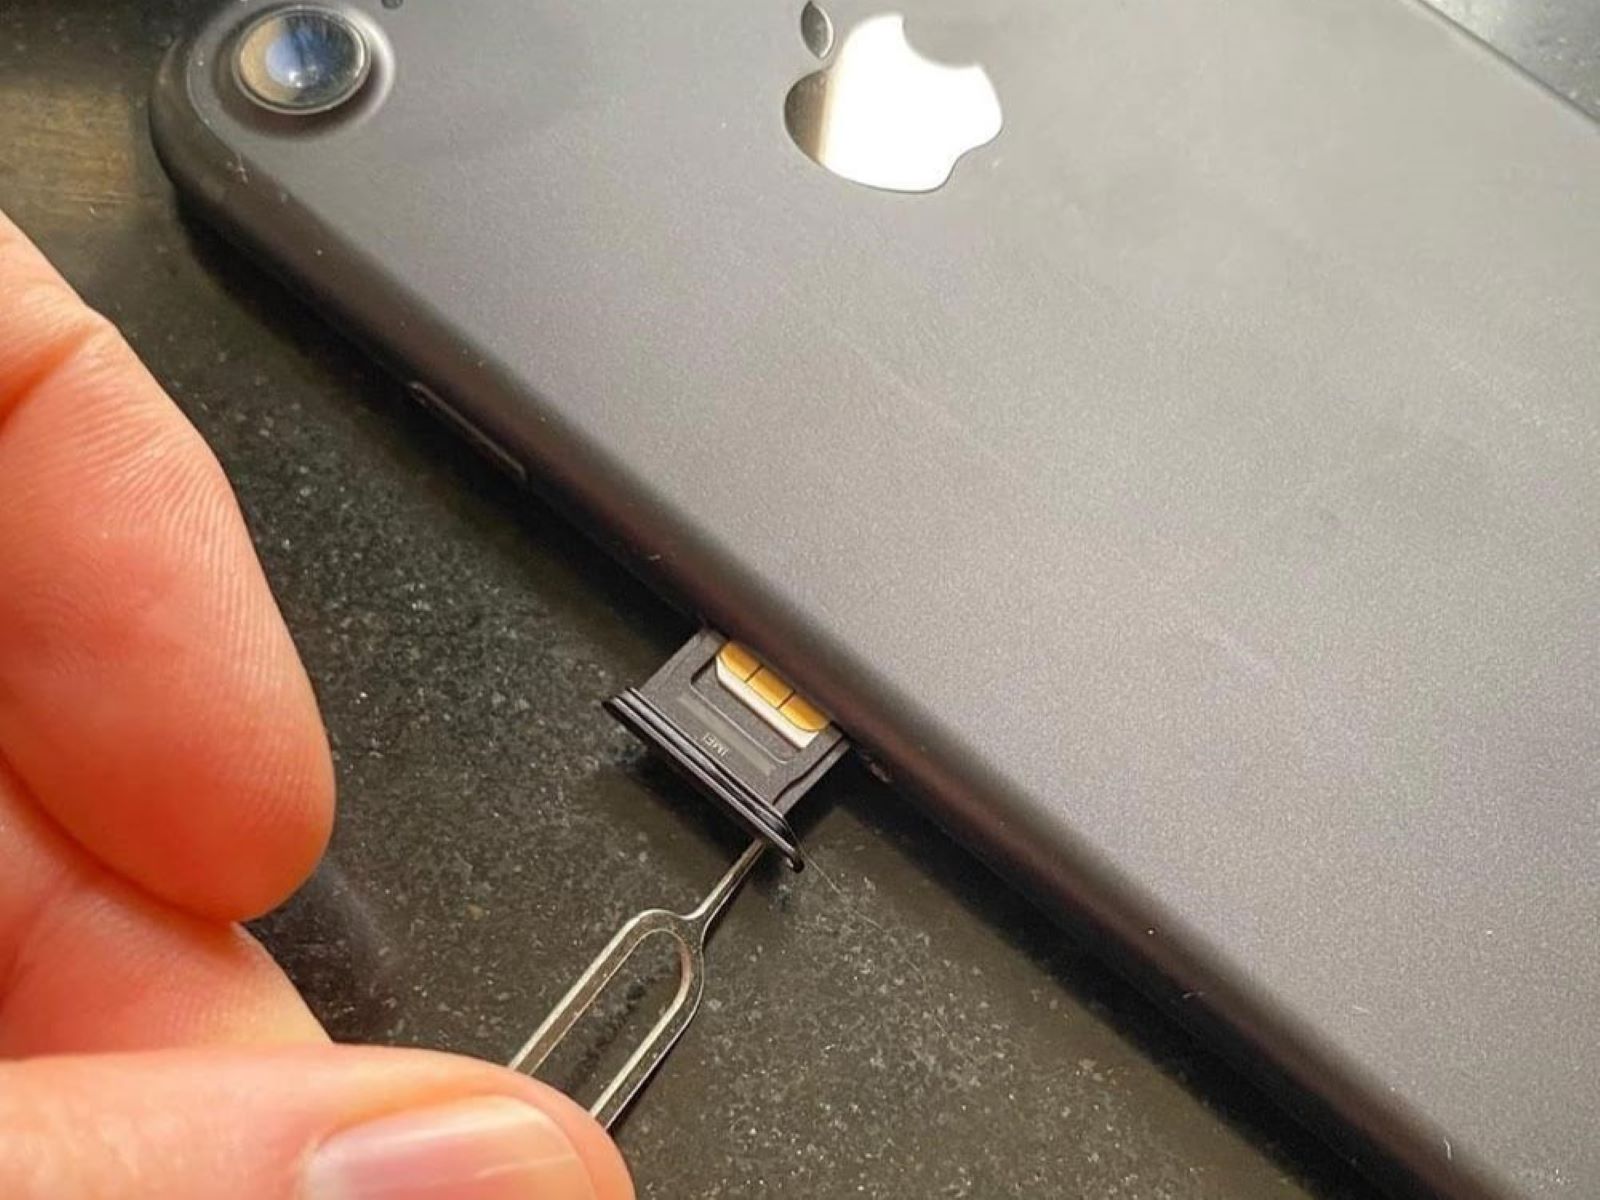
With the SIM card ejector tool in hand, it’s time to proceed with the process of accessing the SIM card slot on your iPhone SE. Carefully examine the right-hand side of your device to locate the small pinhole adjacent to the SIM card slot. This pinhole is specifically designed to accommodate the SIM card ejector tool and facilitate the removal of the SIM card tray.
Position the pointed end of the ejector tool directly over the pinhole, ensuring that it is aligned with the opening. Apply gentle pressure and insert the tool into the pinhole until you encounter a slight resistance. It’s imperative to exercise caution and avoid using excessive force, as this may result in damage to the SIM card slot or the ejector tool itself.
As you insert the ejector tool into the pinhole, you may feel a subtle click or resistance, indicating that the tool has engaged with the internal mechanism of the SIM card slot. At this point, it’s essential to maintain a steady hand and proceed with the process of removing the SIM card tray from your iPhone SE, allowing you to access the SIM card and make any necessary adjustments.
Removing the SIM Card Tray
As the SIM card ejector tool engages with the internal mechanism of the SIM card slot, you’re now ready to remove the SIM card tray from your iPhone SE. With a steady hand, apply gentle pressure to the ejector tool while maintaining a firm grip on the device. As you exert this pressure, you’ll feel the SIM card tray gradually disengaging from its position within the iPhone SE.
Continue to exert gentle pressure until the SIM card tray slides out partially from the device, allowing you to grasp it securely and complete its removal. It’s crucial to exercise patience and avoid rushing this step, as a gradual and controlled approach minimizes the risk of causing any damage to the SIM card tray or the internal components of your iPhone SE.
Once the SIM card tray has been partially ejected from the device, carefully pull it out entirely, ensuring that you maintain a firm grip to prevent any accidental drops or mishandling. With the SIM card tray now in your possession, you can proceed to access the SIM card housed within it, whether for the purpose of replacing it with a new SIM card or making any necessary adjustments.
Replacing the SIM Card Tray
After successfully removing the SIM card tray from your iPhone SE and making the necessary adjustments to the SIM card, it’s time to carefully reinsert the tray back into the device. Begin by aligning the SIM card tray with the slot from which it was removed, ensuring that it is positioned correctly to facilitate a smooth reinsertion process.
With the SIM card tray aligned and positioned directly over the slot, gently slide it back into the iPhone SE until it seamlessly re-engages with the internal mechanism. It’s essential to exercise caution and avoid applying excessive force during this step, as a gentle and controlled approach will safeguard the delicate components of both the device and the SIM card tray.
As the SIM card tray slides back into place, you may feel a subtle click or resistance, indicating that it has securely reconnected with the device. Once the tray is fully inserted, take a moment to ensure that it sits flush with the exterior of the iPhone SE, signifying that it has been successfully repositioned within the device.
With the SIM card tray securely reinstalled, power on your iPhone SE to verify that the SIM card is recognized and functioning as expected. By following these steps with precision and care, you can seamlessly manage your SIM card and ensure that it is correctly situated within your iPhone SE, allowing you to stay connected and make the most of your device’s capabilities.