
What is Open Broadcaster Software (OBS)?
Open Broadcaster Software (OBS) is a free and open-source software that allows you to record and stream videos on various platforms. It is widely used by content creators, gamers, and professionals for its flexible features and user-friendly interface.
OBS enables you to capture and record your screen, as well as add multiple sources such as webcam, images, text, and audio to your scene. This makes it a versatile tool for creating professional-looking videos, live streams, tutorials, and presentations.
One of the key advantages of OBS is its cross-platform compatibility, which means you can use it on Windows, macOS, and Linux operating systems. It supports a wide range of video and audio formats, allowing you to customize your recordings according to your specific needs.
With OBS, you have full control over the recording settings, including resolution, frame rate, bitrate, and output format. This ensures that you can achieve high-quality recordings that meet the requirements of different platforms and devices.
Furthermore, OBS offers advanced features such as scene transitions, filters, and effects. You can seamlessly switch between scenes, apply filters to enhance your video, and add effects to create a more dynamic and engaging visual experience for your viewers.
Whether you are recording gameplay, creating online tutorials, or streaming live events, OBS provides a powerful and flexible solution for capturing and sharing your content with the world. Its community-driven nature also means that you can find an extensive library of plugins and resources to enhance your OBS experience.
Setting up OBS for Recording
Before you start recording with OBS, you need to set it up properly to ensure optimal performance and quality. Here are the steps to get you started:
- Download and Install OBS: Visit the official website of OBS and download the appropriate version for your operating system. Follow the installation instructions to set it up on your computer.
- Create a New Scene: A scene is a collection of sources that will appear in your recording. To create a new scene, right-click on the Scenes box in the bottom left corner of the OBS interface and select “Add.” You can name your scene based on the content you intend to record.
- Add Sources: Sources refer to the elements you want to capture or display in your recording. To add sources, click on the plus (+) icon under the Sources box, choose the desired source (e.g., Display Capture, Window Capture, Audio Input), and configure the settings as needed. You can add multiple sources to your scene.
- Configure Audio Settings: Click on the Settings button at the bottom right corner of OBS and navigate to the Audio tab. Here, you can choose the audio devices for recording and monitoring. Adjust the volume levels and ensure that your microphone and other audio sources are working properly.
- Adjust Video Settings: In the Settings window, go to the Video tab. Set the Base (Canvas) Resolution and Output (Scaled) Resolution to your desired values. You can also select the desired Downscale Filter to optimize the video quality. Don’t forget to choose the appropriate FPS (Frames Per Second) for your recording.
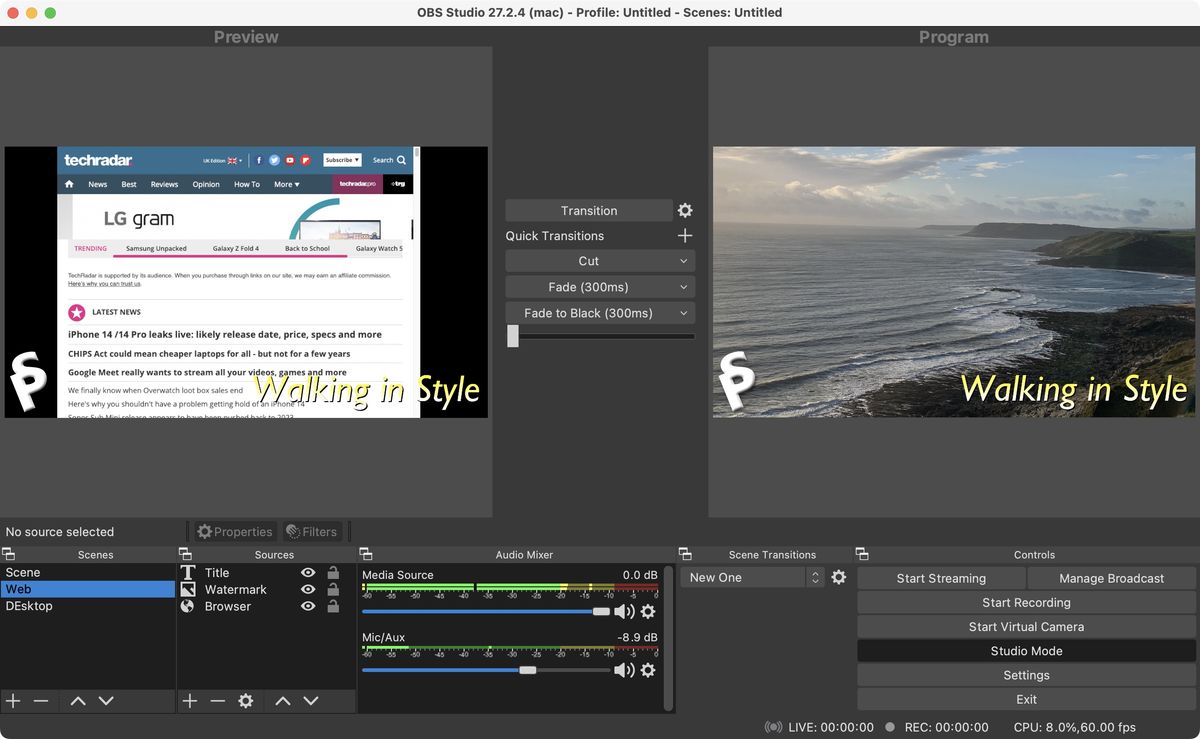
- Preview and Test: Switch to the Preview mode by clicking the Studio Mode button at the top right corner of the OBS interface. This allows you to see how your scene will appear in your recording. Make any necessary adjustments to the positioning, size, and properties of the sources in your scene to ensure everything looks as desired.
- Configure Hotkeys: Hotkeys are keyboard shortcuts that allow you to control various functions in OBS, such as starting/stopping the recording. To set up hotkeys, go to the Hotkeys tab in the Settings window, and assign the desired keys or key combinations for the actions you frequently use.
Once you have completed these steps, OBS is ready for recording. However, it is important to fine-tune the settings based on your specific requirements and experiment with different configurations to achieve the best results for your recordings.
Configuring Audio Settings
Properly configuring the audio settings in OBS is crucial for ensuring high-quality recordings with clear and balanced audio. Here’s how you can configure the audio settings:
- Select Audio Devices: Click on the Settings button at the bottom right corner of OBS, and navigate to the Audio tab. Under the “Devices” section, you can select the audio devices you want to use for recording and monitoring. Choose the appropriate devices for your microphone, speakers, and other audio sources.
- Adjust Volume Levels: OBS provides individual volume sliders for each audio source. You can adjust the volume levels by dragging the slider for each source. It is essential to ensure that the audio levels are balanced and that no source is too loud or too soft compared to others. You can test and make fine adjustments while monitoring the audio levels during a test recording.
- Enhance Audio Quality: OBS offers the option to enable audio filters to enhance the audio quality. To access the filters, right-click on an audio source in the Mixer section of the OBS interface, and select “Filters.” Here, you can add filters such as Noise Gate, Noise Suppression, and Compressor to reduce background noise and enhance the clarity of your audio.
- Monitor Audio During Recording: It is crucial to monitor your audio levels while recording to ensure that the volume and quality remain consistent. In OBS, you can enable audio monitoring by clicking on the gear icon next to an audio source in the Mixer section and selecting “Advanced Audio Properties.” Check the box labeled “Monitor and Output” to enable monitoring. This allows you to listen to the audio in real-time while recording.
- Test and Adjust: Before starting your actual recording, it is highly recommended to perform a test recording and check the audio playback. This will help you identify any issues, such as background noise, distortion, or imbalanced audio levels. Based on the test recording, make necessary adjustments to the audio settings to achieve optimal audio quality.
By configuring the audio settings in OBS properly, you can ensure that your recordings have clear and balanced audio that enhances the overall quality of your content. Remember to regularly test and monitor your audio levels to maintain a high standard of audio recording.
Adjusting Video Settings
Adjusting the video settings in OBS is vital to ensure that your recordings are of high quality and meet the requirements of your intended platform. Here’s how you can optimize the video settings:
- Base (Canvas) Resolution: In the Settings window, go to the Video tab. Set the Base (Canvas) Resolution to the resolution that best suits your needs. It is recommended to use the native resolution of your monitor or the resolution you plan to record at for optimal clarity and fidelity.
- Output (Scaled) Resolution: Set the Output (Scaled) Resolution to the desired resolution for your recording. Depending on the platform or purpose of your recording, you may need to consider factors such as aspect ratios and practical file sizes. Choosing a resolution that aligns with your target platform’s guidelines ensures optimal compatibility.
- FPS (Frames Per Second): Set the desired FPS for your recording. Consider factors such as the nature of your content and the platform you will be sharing it on. Most commonly, 30 or 60 FPS are used for smooth and fluid playback. Higher FPS values can result in larger file sizes.
- Downscale Filter: OBS offers various downscale filters, such as Lanczos, Bicubic, and Bilinear, which affect the quality of the downscaled video. Experiment with different filters to find the one that best balances image quality and performance for your specific recording setup.
- Video Bitrate: The video bitrate determines the amount of data used to encode the video. Selecting an appropriate bitrate is crucial to strike a balance between file size and video quality. Higher bitrates result in larger files but better image quality. It is recommended to use a bitrate that aligns with the platform’s recommendations.
- Recording Format: OBS supports various video formats for recording, such as MP4, FLV, and MOV. Choose the format that provides the best compatibility and quality for your intended platform. MP4 is often a popular choice for its wide compatibility and compression capabilities.
Once you have adjusted these settings, it is essential to perform test recordings and review the output to ensure that the video quality meets your expectations. Make any necessary tweaks to the settings based on the test recordings to achieve the desired video quality for your recordings.
Adding Sources to Your Scene
One of the key features of Open Broadcaster Software (OBS) is the ability to add various sources to your scene. Sources are the elements that you want to capture or display in your recording. Here’s how you can add sources to your scene:
- Display Capture: If you want to capture your entire screen or a specific display, add a Display Capture source. Click on the plus (+) icon under the Sources box, select “Display Capture,” and choose the appropriate display from the list. You can adjust the position, size, and other properties of the captured display within your scene.
- Window Capture: To capture a specific window on your screen, add a Window Capture source. Click on the plus (+) icon, select “Window Capture,” and choose the desired window from the available options. OBS will capture the content within the selected window and display it in your scene.
- Webcam: If you want to include yourself in the recording, add a Webcam source. Click on the plus (+) icon, select “Video Capture Device,” and choose your webcam from the list. You can adjust the position, size, and other properties of the webcam source to fit your scene.
- Audio Input Capture: To capture audio from your microphone or another input device, add an Audio Input Capture source. Click on the plus (+) icon, select “Audio Input Capture,” and choose the desired audio device from the list. OBS will capture the audio input from the selected device and include it in your recording.
- Image: You can add images to your scene by clicking on the plus (+) icon, selecting “Image,” and choosing the image file from your computer. OBS allows you to adjust the position, size, opacity, and other properties of the image within your scene.
- Text: To add text to your scene, click on the plus (+) icon, select “Text (GDI+),” and input the desired text in the Text Properties window. OBS allows you to customize the font, color, size, alignment, and other text properties. You can also add multiple text sources for different purposes.
You can add multiple sources to your scene and arrange them in layers to achieve the desired visual layout. Simply click and drag the sources within the scene preview to position them as desired. You can also adjust the order of the sources in the Sources box to determine their priority or visibility in the scene.
By utilizing various sources in your scene, you can create dynamic and engaging recordings that incorporate different elements, such as your screen, webcam, images, and text. Experiment with different combinations and configurations to find the setup that best suits your content and enhances the overall visual appeal of your recordings.
Recording Your Screen
Recording your screen with Open Broadcaster Software (OBS) is a straightforward process. Once you have set up OBS and added sources to your scene, follow these steps to start recording:
- Select Your Scene: Ensure that the correct scene is selected by clicking on its name in the Scenes box. The active scene will be the one that is recorded.
- Preview Mode: While optional, it is recommended to enable Studio Mode by clicking the Studio Mode button at the top right corner of the OBS interface. This allows you to preview your scene and make any necessary adjustments before starting the recording.
- Start Recording: To begin recording, click on the Start Recording button, typically located at the bottom right corner of the OBS interface. OBS will start capturing your scene according to the configured settings, including audio and video sources.
- During Recording: While recording, you can monitor the recording status in the OBS interface. OBS provides visual cues, such as a red recording indicator, to indicate that the recording is in progress. Keep an eye on the recording timer to track the duration of your recording.
- Pause or Stop Recording: If needed, you can pause the recording by clicking on the Pause button. This temporarily halts the recording process without ending it. To stop the recording, click on the Stop Recording button. OBS will finalize the recording and save it to your specified location.
- Review the Recording: Once the recording is complete, you can review it by locating the saved file on your computer. Play back the recording using a media player to ensure that it meets your expectations in terms of quality, content, and any additional effects or filters applied.
When recording your screen with OBS, keep in mind the importance of maintaining consistent source positioning and proper audio levels to ensure a smooth and professional-looking recording. It is also helpful to perform test recordings and review them before starting your actual recording to avoid any unexpected issues or mistakes.
By following these steps, you can effectively use OBS to record your screen and create engaging and informative videos, tutorials, gaming sessions, or any other type of content you wish to share.
Managing Audio Levels
Managing audio levels in Open Broadcaster Software (OBS) is crucial for ensuring balanced and clear audio in your recordings. Here are some tips for effectively managing audio levels:
- Monitor Audio Levels: During your recording, it is important to regularly monitor the audio levels to ensure that they are balanced and not peaking or too low. OBS provides a mixer area where you can see the audio levels of each selected source. Keep an eye on these levels and adjust them as needed to maintain a consistent and pleasing audio mix.
- Adjust Source Volume: OBS allows you to adjust the volume levels of individual audio sources. To do this, click on the gear icon next to an audio source in the mixer area, and use the volume slider to increase or decrease the volume. Make sure to adjust the volume of each audio source so that they are balanced and blend well together.
- Use VST Plugins: OBS supports Virtual Studio Technology (VST) plugins, which can enhance your audio by applying effects, filters, and adjustments. By utilizing VST plugins, you can improve the audio quality and manage levels more effectively. For example, you can use plugins for noise reduction, compression, equalization, or spatial effects.
- Apply Compression: Compression is a useful tool for managing audio levels. It helps to even out volume disparities and prevent sudden loud peaks. OBS allows you to add a compressor filter to your audio sources. Adjust the compressor settings, such as threshold, ratio, attack, and release, to achieve an even audio level throughout your recordings.
- Prevent Clipping: Clipping occurs when the audio levels go beyond the maximum limit and result in distorted or unpleasant sound. To prevent clipping, OBS provides an audio limiter filter. Add this filter to your audio sources and set the maximum level to prevent any audio peaks from distorting the sound.
- Use Noise Gate: If you have background noise in your recordings, consider using a noise gate filter. This filter helps to suppress or eliminate background noise when the audio falls below a certain threshold. Adjust the noise gate settings to suit your specific environment and minimize any distracting or unwanted noise.
- Test and Adjust: It is essential to perform test recordings and review the audio playback for quality and levels. Listening to the test recording allows you to identify any issues, such as imbalanced audio or unwanted noise. Based on the test recording, make necessary adjustments to the audio levels and settings in OBS to achieve the desired sound quality.
By effectively managing audio levels in OBS, you can ensure that your recordings have balanced and clear audio, enhancing the overall quality and user experience. Regularly review and fine-tune your audio settings to maintain a high standard of audio quality in your recordings.
Setting up Hotkeys for Recording
Setting up hotkeys in Open Broadcaster Software (OBS) can greatly improve your recording workflow by allowing you to control various functions with a simple keyboard shortcut. Here’s how you can set up hotkeys for recording:
- Open Hotkey Settings: Click on the Settings button at the bottom right corner of OBS and navigate to the Hotkeys tab. This is where you can configure hotkeys for different actions.
- Select Action: Choose the action for which you want to set a hotkey. For recording, the main actions are Start Recording and Stop Recording. Click on the empty box next to the desired action.
- Assign Hotkey: Press the key or combination of keys that you want to use as the hotkey for the selected action. Make sure to choose a key or combination that is easy to remember and doesn’t conflict with any other applications or system shortcuts.
- Repeat for Other Actions: Repeat the process for other recording-related actions that you frequently use, such as Pause/Resume Recording or Start/Stop Replay Buffer, if applicable. OBS provides a range of actions that you can assign hotkeys to, depending on your specific needs.
- Test and Adjust: After assigning hotkeys, make sure to test them to ensure they work as intended. Start a test recording and use the hotkeys to initiate and stop the recording. Verify that the hotkeys are correctly triggering the actions you’ve assigned.
- Customize as Needed: OBS allows you to customize the hotkeys further by using modifiers such as Shift, Ctrl, or Alt in combination with the assigned key. This allows for more complex and personalized hotkey setups. Experiment with different combinations to find the configuration that works best for you.
- Remember Your Hotkeys: Once you have set up your hotkeys, it’s important to remember them. Consider creating a cheat sheet or keeping a note of your assigned hotkeys until they become second nature. This will help you to efficiently control your recording process and streamline your workflow.
Setting up hotkeys in OBS can save you time and effort by allowing you to quickly perform actions without having to navigate through menus. Whether you’re starting or stopping a recording, pausing and resuming, or triggering other actions, hotkeys provide a convenient way to control OBS while focusing on your content.
Remember to regularly review and familiarize yourself with your assigned hotkeys to ensure a smooth recording experience and to maximize the efficiency of your workflow.
Applying Filters and Effects
Open Broadcaster Software (OBS) offers a range of filters and effects that can enhance the visual quality and overall appeal of your recordings. Here’s how you can apply filters and effects in OBS:
- Accessing Filters: To apply filters, right-click on a source in the mixer area and select “Filters.” This will open the Filters window, where you can add and configure various filters for a specific source.
- Video Filters: OBS provides video filters that can be applied to video sources, such as Display Capture or Webcam. These filters allow you to adjust brightness, contrast, color correction, and more. You can experiment with different filters to find the look and feel that matches your desired style or enhances the visual quality of your recordings.
- Audio Filters: OBS also provides audio filters that can be used to enhance audio sources. These filters include noise reduction, noise gate, equalization, and more. Apply audio filters to your microphone source or any other audio sources to reduce background noise, improve clarity, or fine-tune the audio for your specific needs.
- Scene Transition Effects: OBS allows you to add scene transition effects. These effects determine how one scene transitions to another during your recording or live stream. To add a scene transition effect, right-click on a scene in the Scenes box and select “Properties.” In the Scene Transition section, choose the desired effect from the dropdown menu.
- Image and Text Effects: For image and text sources, you can apply effects such as chroma key (green screen), opacity, rotation, and more. These effects help you integrate images or text seamlessly into your scene, allowing for creative and engaging content.
- Virtual Studio Technology (VST) Plugins: OBS supports VST plugins, which can be used to apply additional effects and filters to your audio sources, such as reverb, echo, or special vocals effects. These can add depth, character, and professional polish to your recordings. Install compatible VST plugins and apply them to your audio sources through the audio filters section.
When applying filters and effects in OBS, it is important to strike a balance. Avoid overusing filters or effects, as it can potentially distract or detract from the main content. Experiment with different settings and combinations to find the right balance that enhances your recording without overpowering it.
Remember to test your filters and effects by performing test recordings and reviewing the output to ensure they achieve the desired result. Fine-tune and adjust the filters as needed to achieve the optimal visual and audio quality for your recordings.
Choosing the Right Output Settings
Choosing the right output settings in Open Broadcaster Software (OBS) is crucial for ensuring that your recordings are of high quality and compatible with your intended platform. Here’s how you can select the appropriate output settings:
- Recording Format: OBS supports various recording formats, including MP4, FLV, and MOV. Consider the compatibility of the recording format with your editing software and the platform where you plan to share your recordings. MP4 is a popular choice due to its wide compatibility and compression capabilities.
- Video Bitrate: The video bitrate determines the amount of data used to encode the video. Higher bitrates result in larger files but better image quality. Consider the specific requirements of your intended platform. For online platforms, a bitrate of 3,500-6,000 kbps is often recommended for 1080p recordings, while higher bitrates may be necessary for 4K recordings.
- Audio Bitrate: The audio bitrate affects the quality of the audio in your recordings. Consider the balance between audio quality and file size. For most applications, a bitrate of 128-192 kbps is recommended for a good balance between quality and file size. However, you can adjust this based on your specific needs and quality requirements.
- Resolution and Aspect Ratio: Choose the resolution and aspect ratio that best suits your needs. Consider the requirements of your intended platform, as different platforms may have specific guidelines for resolution and aspect ratio. Common resolutions include 720p (1280×720) and 1080p (1920×1080) for high-definition recordings.
- Frame Rate (FPS): The frame rate determines the number of frames recorded per second. Common frame rates include 30 FPS and 60 FPS. Consider the nature of your content and the platform where you will share your recordings. Higher frame rates result in smoother and more fluid motion, but also larger file sizes.
- Keyframe Interval: The keyframe interval, also known as the GOP size, determines the frequency of I-frames in your recordings. This affects seekability and editing performance. Generally, a keyframe interval of 2 seconds or 1 second is recommended for smooth playback and editing. However, some platforms may have specific requirements for keyframe intervals.
- File Location and Naming: Choose the directory where you want your recordings to be saved. Consider using a dedicated folder to keep your recordings organized. You can also customize the naming convention of your recordings to assist with easy identification and sorting.
It is crucial to choose output settings that align with the requirements of your intended platform, taking into account factors such as resolution, aspect ratio, bitrate, and file format. Additionally, consider the balance between quality and file size to optimize playback and storage.
Regularly review and adjust your output settings based on the requirements of different projects and platforms to ensure that your recordings are of the highest quality and best suited for their intended purpose.
Saving and Exporting Your Recording
After you have finished recording in Open Broadcaster Software (OBS), it’s time to save and export your recording for further use or sharing. Here’s how you can save and export your recording:
- Stop the Recording: To finalize your recording, click on the Stop Recording button in OBS. This will stop the recording process and save the recorded video file.
- Locate the Recorded File: By default, OBS saves your recordings in the location you specified in the output settings. If you didn’t specify a location, OBS will save the recording in its default folder. Locate the recorded file on your computer.
- Preview the Recording: Before exporting, it is recommended to preview the recorded file using a media player to ensure that the recording meets your expectations in terms of quality, content, and any additional effects or filters applied.
- Trim and Edit (If Necessary): If you need to trim or make edits to your recording, you can use video editing software. Import the recorded file into your preferred editing software and make any necessary adjustments, such as cutting unwanted sections or adding transitions or overlays.
- Export in Desired Format: Once you’re satisfied with the edits (if any), export the recording in the desired format. Consider the intended platform or use of your recording to determine the appropriate format and settings. Common formats include MP4, MOV, or AVI, depending on your specific needs.
- Compression and Encoding: Depending on the file size and compression settings you desire, you may need to adjust the compression and encoding settings during the export process. Pay attention to the bitrate, resolution, and other settings to strike a balance between file size and video quality.
- Save in Preferred Location: Select the directory or folder where you want to save the exported recording. Be sure to choose a location that is easily accessible and organized for future use.
- Naming and Metadata: Give your exported recording a descriptive and informative filename to help with identification and organization. You can also add important metadata, such as title, description, and tags, if applicable.
- Finalize the Export: Initiate the export process and wait for your editing software to complete the export. This may take some time depending on the length and complexity of your recording, as well as the settings you have chosen.
- Verify the Exported Recording: Once the export is complete, verify the exported recording by playing it back using a media player to ensure that it has exported correctly and retains the desired quality and content.
By following these steps, you can ensure that your recording is saved, exported, and ready for further use or sharing. Remember to keep the original recorded file as a backup in case you need to make additional edits or export it in a different format in the future.
Troubleshooting Common Issues
While Open Broadcaster Software (OBS) is a powerful and reliable tool, you may encounter some common issues during your recording process. Here are some troubleshooting tips for common OBS issues:
- Black Screen: If you are experiencing a black screen in your recordings, make sure that the source you want to capture is selected and properly configured. Check if there are any conflicting programs or overlays that may be causing the issue. Restarting OBS or your computer can also help resolve this problem.
- No Audio: If you are not getting any audio in your recordings, check that the audio sources are selected and properly configured in OBS. Ensure that the correct audio devices are chosen, and the volume levels are adjusted accordingly. Verifying that your computer’s audio settings are properly configured can also help resolve this issue.
- Low Frame Rate or Lag: If your recording has a low frame rate or appears laggy, consider reducing the resolution or adjusting the encoding settings to reduce the strain on your computer’s resources. You can also experiment with the “Process Priority” setting in OBS to allocate more CPU resources to OBS and improve performance.
- Freezing or Crashing: If OBS freezes or crashes during the recording process, ensure that you are using the latest version of OBS, as updates often include bug fixes. Check for conflicting programs or overlays that may be causing compatibility issues. Adjusting the settings, such as reducing the bitrate or adjusting the video encoding options, can also help alleviate this issue.
- Audio/Video Sync Issues: If you notice that the audio and video in your recordings are not in sync, you can try adjusting the “Sync Offset” setting in the Advanced Audio Properties for the audio source. Experiment with small adjustments to sync the audio and video properly.
- Encoding Overload Warning: If you receive an “Encoding Overload” warning in OBS, it means that your computer is struggling to handle the encoding process. To resolve this, you can try lowering the resolution, frame rate, or video quality settings to reduce the strain on your computer’s resources.
If you encounter any of these issues or other technical problems while using OBS, it is recommended to search for solutions and tips in the OBS forums or online communities. These resources often provide valuable insights and troubleshooting steps based on common issues faced by OBS users.
Remember to keep OBS and other software, such as drivers and plugins, up to date to ensure optimal performance and compatibility. Regularly testing your setup and configurations, as well as seeking assistance from the OBS community if needed, can help you overcome and troubleshoot any issues that may arise during your recording process.