
What are Light Trails?
Light trails are mesmerizing streaks of light that are captured in photographs. They are created when a moving light source, such as the headlights of cars, streetlights, or fireworks, is captured over an extended period of time. This unique photography technique captures the movement and light in a way that is visually stunning.
Light trails can add a sense of dynamism, energy, and excitement to your photographs. They create a visual narrative, showing the passage of time and movement in a still image. The streaks of light can lend a sense of motion and capture the essence of a bustling cityscape or a lively event.
Photographing light trails can be done with any camera, including smartphones. It is a versatile technique that allows you to experiment with different light sources and settings to achieve a variety of beautiful and captivating effects in your images.
Whether you’re shooting in a busy urban environment, capturing the flow of traffic on a highway, or photographing the movement of stars in the night sky, light trails offer a unique and creative way to elevate your photography skills.
Equipment Needed for Light Trail Photography
Light trail photography can be achieved with minimal equipment, making it accessible to photographers of all levels. Here are the essential items you’ll need to get started:
- Camera: While a DSLR or mirrorless camera will provide the best results, you can also capture impressive light trails with a smartphone camera. Look for a camera that allows you to adjust exposure settings and shoot in manual mode.
- Sturdy Tripod: A tripod is crucial for keeping your camera steady during long exposure shots. Choose a tripod that can withstand different weather conditions and provides stability for capturing sharp images.
- Remote Shutter Release: Using a remote shutter release or a timer function on your camera ensures that you don’t introduce any camera shake when you press the shutter button.
- Wide-angle Lens: A wide-angle lens allows you to capture a larger field of view, which is ideal for including more of the light trails in your frame. However, you can also experiment with different focal lengths to achieve unique perspectives.
- ND Filters: Neutral density (ND) filters help control the amount of light entering the camera, allowing you to use longer shutter speeds even in bright conditions. They are particularly useful when photographing light trails during the daytime.
- Flashlight or Light Source: In some cases, you may want to introduce additional light sources during your long exposure shots. A flashlight or a colored light source can be used to create interesting effects or to illuminate specific elements in your composition.
- Spare Batteries and Memory Cards: Long exposure photography can quickly drain your camera’s battery, so it’s always a good idea to have extra batteries on hand. Additionally, make sure you have enough memory cards to store your images without interruption.
Remember, while having the right equipment can enhance your results, creativity and experimentation are key in light trail photography. So, don’t be afraid to get out there with whatever gear you have and start capturing stunning light trail images!
Choosing the Right Location for Light Trails
When it comes to capturing captivating light trail photographs, choosing the right location is essential. Here are some factors to consider when selecting your shooting location:
- Traffic Flow: Look for areas with steady traffic flow, such as busy intersections, highways, or bridges. These locations offer a constant stream of light trails, providing ample opportunities for creative compositions.
- Cityscapes: Urban environments with skyscrapers, city lights, and bustling streets are great choices for dramatic light trail photography. The juxtaposition of the stationary buildings and the streaks of light adds a dynamic element to your images.
- Landmarks and Iconic Structures: Choose locations that feature iconic landmarks or structures. The combination of light trails and recognizable landmarks creates visually striking images that capture the essence of a place.
- Natural Landscapes: Don’t limit yourself to just cityscapes – natural landscapes can also yield stunning light trail photographs. Look for areas with winding roads, water bodies, or starry skies, and experiment with capturing light trails against these scenic backdrops.
- Consider Safety: It’s important to prioritize your safety when choosing a location for light trail photography. Avoid shooting on busy roads or in hazardous areas. Always be aware of your surroundings and find a safe vantage point where you can capture the light trails without any risks.
- Time of Day: The time of day can greatly impact the lighting conditions and the appearance of light trails. Consider shooting during the golden hour (the hour after sunrise or before sunset) when the natural light is soft and warm. Alternatively, shooting at night allows for longer shutter speeds and more defined light trails.
- Weather Conditions: Different weather conditions can add mood and interest to your light trail images. Rainy or foggy weather can create a unique atmosphere and enhance the reflections and light trails. Experiment with different weather conditions to add drama to your compositions.
- Experiment and Explore: Don’t be afraid to explore and experiment with various locations. Be open to discovering hidden gems and unique perspectives that can result in truly captivating light trail photographs.
Remember, the location you choose will greatly impact the overall mood and composition of your light trail photos. So, take your time to scout different locations, and let your creativity guide you in capturing stunning light trail images.
Setting Up Your Smartphone for Light Trail Photography
Smartphones have become increasingly capable of capturing stunning light trail photos. Here are some key settings and techniques to optimize your smartphone for light trail photography:
- Manual Mode: If your smartphone has a manual mode, use it to have more control over important settings like ISO, shutter speed, and white balance. Manual mode allows you to adjust these settings based on the specific lighting conditions.
- Stabilize Your Phone: Use a tripod or a stable surface to prevent camera shake during long exposure shots. A shaky camera can result in blurry images, so it’s crucial to keep your smartphone steady throughout the capture process.
- Turn Off HDR and Flash: HDR (High Dynamic Range) and flash modes can interfere with long exposure photography. To ensure consistent light trails, disable these features to maintain the correct exposure and avoid unwanted lighting effects.
- ISO Setting: Keep the ISO setting as low as possible to minimize noise in your photos. Start with the lowest ISO setting and increase it gradually only if necessary for better exposure in low-light conditions.
- Shutter Speed: Adjust the shutter speed to a longer duration to capture the movement and trails of light effectively. A slow shutter speed, typically around 2-10 seconds, allows enough time for the light trails to form in your photos.
- Focus: Tap on the area where you want to focus to ensure that the desired part of your composition is sharp. You can manually adjust the focus point by using the touch-to-focus feature of your smartphone’s camera app.
- Burst Mode: Try using the burst mode feature on your smartphone to capture multiple shots in quick succession. Burst mode can help you capture a variety of light trail compositions and increase your chances of getting that perfect shot.
- Experiment with Apps: Explore third-party camera apps that offer more advanced features and greater control over settings such as exposure, shutter speed, and ISO. These apps can provide additional flexibility for achieving the desired light trails.
- Review and Adjust: After capturing an image, review it on your smartphone’s screen. If necessary, make adjustments to settings like exposure compensation or shutter speed to refine your results. Don’t be afraid to experiment and try different settings until you achieve the desired effect.
By understanding and utilizing these smartphone settings and techniques, you can optimize your device for capturing stunning light trail photographs without the need for expensive camera equipment.
Choosing the Right Exposure Settings
Proper exposure settings are crucial in light trail photography to capture the desired effect. Here are some tips for selecting the right exposure settings:
- Shutter Speed: Set your camera’s shutter speed to a longer duration to capture the trails of light effectively. Experiment with different shutter speeds, starting from a few seconds and extending to several minutes, to achieve different effects. Remember that longer shutter speeds will result in more pronounced light trails, while shorter shutter speeds can capture shorter, more defined trails.
- Aperture: In light trail photography, a smaller aperture (larger f-number) is generally preferred to ensure a larger depth of field. However, this depends on the scene and the creative effect you want to achieve. A smaller aperture can also help reduce the amount of light entering the lens, allowing you to use longer shutter speeds without overexposing the image.
- ISO: To maintain the image quality and minimize noise, keep the ISO as low as possible. Start with a low ISO value, such as 100 or 200, and increase it only when necessary to maintain the desired exposure in low-light conditions.
- White Balance: Adjust the white balance setting according to the lighting conditions. Experiment with different white balance presets or manually set the white balance based on the specific lighting situation. Keep in mind that certain light sources may have a color cast, and adjusting the white balance can help neutralize it.
- Bracketing: Utilize exposure bracketing if your camera supports it. Bracketing captures multiple images at different exposures in quick succession, ensuring you have options to choose from when editing. This technique can be particularly useful in situations with varying intensity of light trails or when the overall exposure is challenging to determine.
- Exposure Compensation: Use exposure compensation to adjust the overall exposure if the light trails are consistently overexposed or underexposed. Increase exposure compensation to make the light trails brighter or decrease it if they appear too bright. Continue to fine-tune exposure compensation until you achieve the desired result.
- Histogram: Refer to the histogram on your camera’s display to assess the exposure. The histogram graphically represents the distribution of brightness in your image. Ensure that the histogram is balanced without significant clipping at the extremes, indicating that you have captured a good range of light in the frame.
- Test Shots: Take test shots and review them to evaluate the exposure settings. Check if the light trails are well-exposed and have the desired level of brightness. Make adjustments to the exposure settings as needed until you achieve the desired result.
Remember, finding the ideal exposure settings may require some trial and error. Experiment with different combinations of shutter speeds, apertures, and ISO values to achieve the creative vision you have in mind for your light trail photographs.
Techniques for Capturing Light Trails
There are several techniques you can employ to capture stunning light trail photographs. Here are some key techniques to keep in mind:
- Long Exposure: Use long exposure techniques to capture the movement of light over an extended period. Set your camera to a slow shutter speed, typically a few seconds or more, to allow enough time for the light trails to form. Experiment with different exposure times to achieve the desired effect.
- Use a Tripod: Stability is crucial in light trail photography to avoid blurry images. Use a sturdy tripod to keep your camera steady during long exposures. This ensures that the stationary elements in your composition remain sharp while the light trails create beautiful streaks of light.
- Experiment with Different Perspectives: Don’t be afraid to explore different angles and viewpoints to capture unique compositions. Try shooting from a low angle or getting closer to the light source for more dynamic and creative light trail images.
- Combine Light Trails with Stationary Elements: To add depth and interest to your composition, include stationary elements such as buildings, trees, or people in the frame alongside the light trails. This contrast between the stationary subjects and the streaks of light can create visually compelling images.
- Zoom Burst: Zoom burst is a technique where you zoom in or out during a long exposure. This creates a dramatic effect with the light trails appearing to burst out from a central point or converge towards it. Experiment with different zooming speeds and focal lengths to achieve various results.
- Panning: Panning involves tracking a moving subject while using a slower shutter speed. This technique allows you to capture sharp subjects against a blurred background, emphasizing the sense of movement. Incorporating light trails into your panning shots can create dynamic and striking images.
- Modify Light Trails: Get creative by modifying light trails using props or tools such as flashlights, colored filters, or fiber optic lights. You can create unique patterns, shapes, and colors by manipulating the light source during the exposure.
- Capture Multiple Exposures: For more complex and layered light trail images, capture multiple exposures of the same scene and blend them together during post-processing. This technique allows you to combine different instances of light trails to create more intricate and captivating compositions.
- Create Silhouettes: By exposing for the bright light trails and intentionally underexposing the foreground, you can create striking silhouette images. Experiment with different compositions and subject placements to achieve visually compelling results.
- Patience and Timing: Timing is crucial in light trail photography. Pay attention to the flow and patterns of the light sources and wait for the right moment to capture the perfect light trail. Be patient and take multiple shots to increase your chances of capturing that epic light trail moment.
By utilizing these techniques and experimenting with different approaches, you can create visually stunning light trail photographs that will captivate viewers and showcase your creative vision.
Tips for Getting Creative with Light Trails
Light trail photography offers endless opportunities for creativity and artistic expression. Here are some tips to help you push the boundaries and explore different creative possibilities with light trails:
- Experiment with Different Light Sources: Light trails don’t have to be limited to car headlights or streetlights. Try capturing light trails created by bicycles, boats, or even handheld light sources. Play around with different light sources to add variety and interest to your images.
- Combine Light Painting with Light Trails: Light painting involves using a handheld light source to paint or write in the frame during a long exposure. Combine light painting techniques with the movement of light trails to create intricate and visually appealing compositions.
- Create Double Exposures: Explore the world of double exposures by combining light trails with other subjects or scenes. Overlaying light trails onto portraits, landscapes, or architecture can produce captivating and unique imagery.
- Try Different Time-Lapse Techniques: Use time-lapse photography to capture the continuous movement of light trails over an extended duration. This technique adds a dynamic element to your images and allows you to showcase the passage of time in a single frame.
- Experiment with Different Colors: Place colored filters in front of your lens or use post-processing techniques to add vibrant colors to your light trails. This adds a touch of creativity and can transform your images into eye-catching works of art.
- Use Reflections to Your Advantage: Look for reflective surfaces such as water puddles, windows, or shiny objects to capture light trails with interesting reflections. Reflections can add depth, symmetry, and visual interest to your compositions.
- Play with Different Perspectives: Don’t limit yourself to shooting light trails from a stationary position. Experiment with unique angles, viewpoints, and camera movements to add a sense of dynamism and perspective to your images.
- Incorporate People or Subjects in Motion: Include people, animals, or other moving subjects in your light trail photographs to add a sense of scale and narrative. This can create a compelling visual story and add an element of human interest to your images.
- Embrace Imperfections: Light trail photography is a creative process, and sometimes unexpected results can turn out to be the most interesting. Embrace imperfections, such as ghosting, overlapping lights, or unexpected light drips, as they can add a touch of uniqueness and intrigue to your images.
- Experiment and Have Fun: Don’t be afraid to step out of your comfort zone and try new techniques and ideas. Light trail photography is all about experimentation and creative expression. Allow yourself to have fun and let your imagination run wild.
Remember, there are no hard and fast rules in light trail photography. Let your creativity guide you and explore different techniques and ideas to capture truly unique and visually captivating light trail images.
Editing Your Light Trail Photos
After capturing your light trail photos, the editing process is where you can bring out the full potential of your images. Here are some tips for editing your light trail photos:
- Adjust Exposure and Contrast: Start by adjusting the overall exposure and contrast of your image. Fine-tune the brightness, highlights, shadows, and contrast to bring out the details in the light trails and other elements in the composition.
- Enhance Colors: If your light trail photos feature vibrant colors, consider increasing the saturation or vibrance to make the colors pop. Experiment with the color balance or use selective color adjustments to emphasize specific colors in the light trails.
- Sharpen and Reduce Noise: Apply sharpening techniques to enhance the details and make the light trails and other elements appear crisp. Use noise reduction tools to reduce any digital noise that may be present in the image, especially in low-light situations.
- Crop and Composition: Consider cropping the image to improve the composition and remove any distractions. Experiment with different cropping ratios or try straightening the horizon to create a more visually pleasing and balanced image.
- Spot Corrections: Use spot healing tools or clone stamp tools to remove any unwanted elements or distractions in the frame. This could include stray lights, sensor dust, or any other imperfections that may detract from the main subject of your light trail photo.
- Apply Filters or Presets: Try applying filters or presets to enhance the mood and style of your light trail photos. Experiment with different presets or create your own custom filters to give your images a unique and consistent look.
- Play with Light and Shadows: Adjust the highlights and shadows to create a dramatic look or enhance the contrast between the light trails and the surrounding elements. Experiment with different tonal adjustments to achieve the desired effect.
- Consider Black and White: Converting your light trail photos to black and white can add a timeless and artistic quality. Experiment with different black and white conversion techniques to emphasize the contrast and textures in the light trails.
- Add Creative Effects: Explore creative effects such as adding motion blur, vignettes, or lens flares to enhance the dynamic and artistic aspects of your light trail images. Just be mindful not to overdo it and maintain a natural-looking result.
- Experiment and Trust Your Artistic Vision: Editing is an opportunity to express your unique creative vision. Experiment with different techniques, styles, and edits to achieve the desired aesthetic and create light trail photos that truly stand out.
Remember, the editing process should be an extension of your creative vision. Don’t be afraid to try new techniques, trust your instincts, and let your personal style shine through in the final result of your edited light trail photos.
Common Mistakes to Avoid in Light Trail Photography
Light trail photography can be challenging, but with a little practice and avoiding common mistakes, you can capture stunning images. Here are some common mistakes to avoid:
- Inadequate Tripod Stability: Using an unstable or shaky tripod can result in blurry images. Invest in a sturdy tripod and ensure it is properly set up and securely locked to avoid any camera movement during long exposures.
- Insufficient Planning and Scout: Failing to plan and scout for suitable locations can lead to missed opportunities and less captivating light trail photographs. Research potential locations in advance, take test shots, and find the best angles and viewpoints for your desired compositions.
- Overexposure: Allowing too much light to enter the camera can cause overexposed light trails, resulting in loss of detail and blown-out highlights. Adjust your exposure settings carefully and be aware of the intensity of the light sources in your frame.
- Underexposure: On the other hand, underexposing your light trail photos can result in dark and lackluster images. Ensure that your exposure settings allow enough light to capture the trails effectively. Use the histogram and test shots to ensure a well-exposed image.
- Starting and Stopping Too Abruptly: Avoid starting and stopping the camera abruptly when capturing light trails. This can lead to jagged or incomplete light trails. Instead, use a remote shutter release or the timer function to initiate and end the exposure smoothly.
- Lack of Patience: Light trail photography requires patience and timing. Don’t be impatient and give up too quickly. Wait for the right moment to capture the perfect light trail that meets your creative vision. Be prepared to take multiple shots to increase your chances of capturing that wow moment.
- Forgetting to Check for Unwanted Light Spill: Light spill from nearby sources can inadvertently affect your light trail photos. Be mindful of any sources of light that may interfere with your composition and adjust your framing or use flags or barriers to block unwanted light.
- Ignoring Composition: Pay attention to the composition of your light trail photos. A well-composed image can greatly enhance the impact of the light trails. Consider using the rule of thirds, leading lines, or incorporating interesting foreground or background elements to create visually compelling compositions.
- Not Experimenting with Different Techniques: Light trail photography offers numerous creative possibilities. Don’t stick to a single technique or perspective. Experiment with different shutter speeds, angles, and creative approaches to capture unique and captivating light trail images.
- Neglecting Post-Processing: Post-processing plays a crucial role in optimizing and enhancing your light trail photos. Avoid skipping the editing step and ensure you take the time to fine-tune exposure, contrast, colors, and other adjustments to bring out the best in your images.
By avoiding these common mistakes and continuously practicing and refining your skills, you can produce impressive light trail photographs that truly shine.
Examples of Stunning Light Trail Photos
Light trail photography has the potential to produce stunning and visually captivating images. Here are a few examples of light trail photos that showcase the creativity and beauty of this genre:
- Cityscape Light Trails: A photograph of a bustling cityscape at night with vibrant light trails streaking through the frame. The trails of car lights create dynamic lines and patterns, adding a sense of movement and energy to the urban scene.
- Starlight Trails: A long exposure image of stars moving across the night sky, creating beautiful arcs of light. The mesmerizing trails of stars against the backdrop of a serene landscape evoke a sense of wonder and awe.
- Waterfall Light Trails: An image of a waterfall captured using a slow shutter speed, transforming the flowing water into graceful light trails. The cascading light trails against the backdrop of lush foliage create a dreamy and ethereal effect.
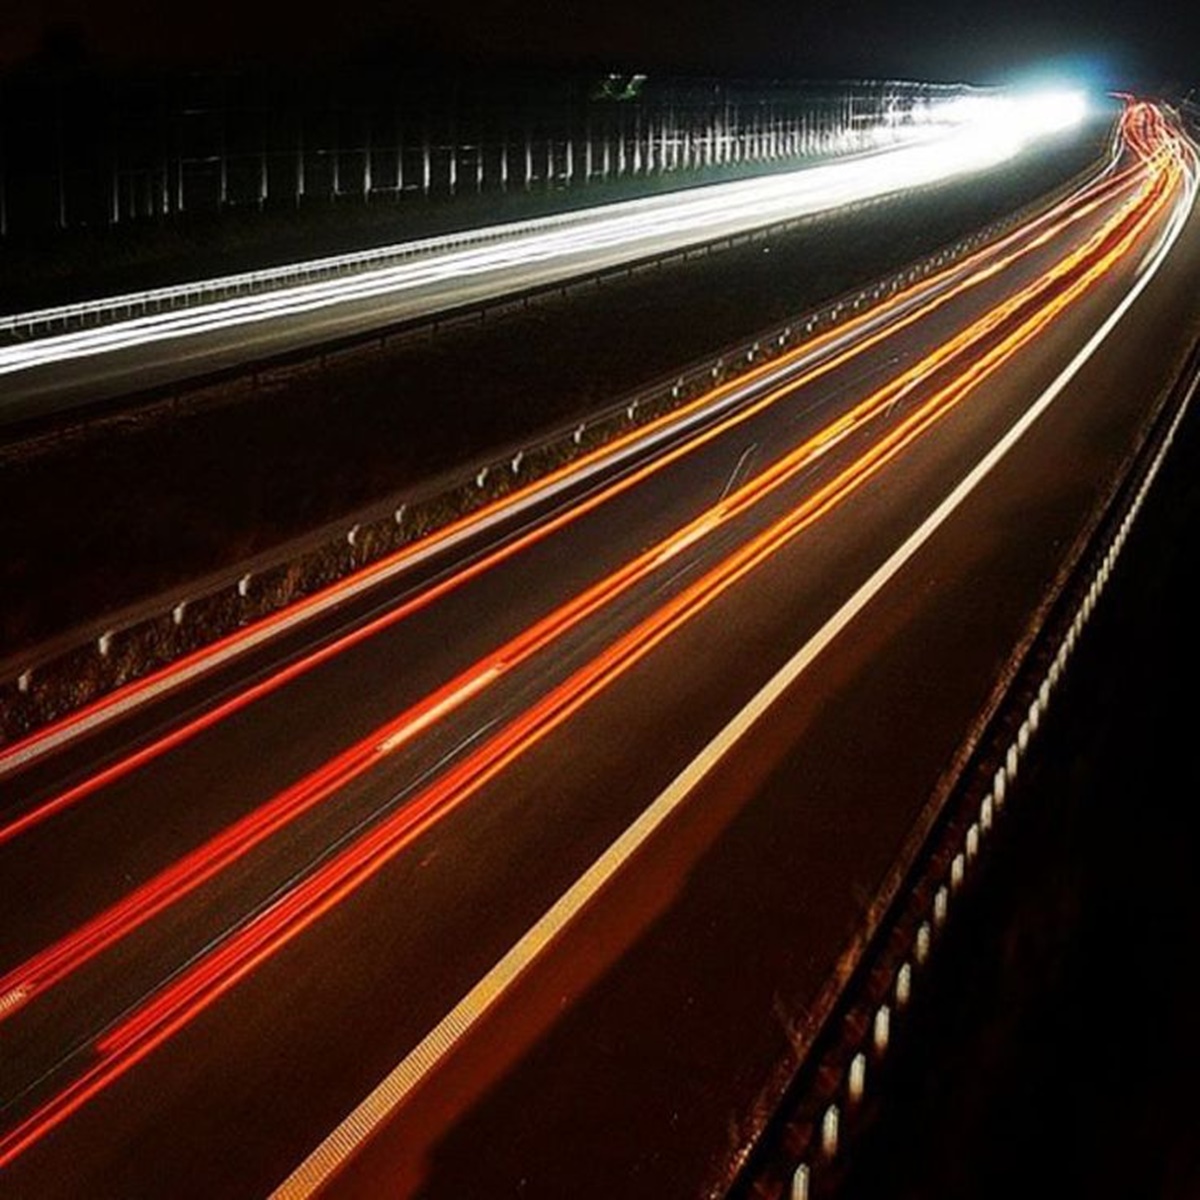
- Highway Light Trails: A photograph capturing the flow of vehicles on a busy highway at night. The long exposure creates dynamic light trails of different colors and shapes, resulting in a mesmerizing display of movement and energy.
- Firework Light Trails: A vibrant image capturing the trails of fireworks in the night sky. The colorful light trails against the darkness create a sense of celebration and joy, transforming ordinary fireworks into a spectacular visual display.
- Bridge Light Trails: An iconic bridge illuminated with streaks of light from passing cars, boats, or trains. The light trails against the architectural backdrop of the bridge create a striking composition, showcasing the beauty of man-made structures against the movement of light.
- Motion Blur Light Trails: An image of a moving subject, such as a cyclist or a runner, captured using panning technique. The subject remains sharp while the background is transformed into streaks of light, conveying a sense of speed and action.
- Light Painting with Light Trails: A creative photograph combining light painting techniques with the movement of light trails. The result is an intricate and visually captivating image where the light trails become part of the overall light painting composition.
- Reflection Light Trails: A photograph capturing light trails reflected on a calm body of water, such as a lake or a river. The reflection adds depth and symmetry to the light trails, resulting in a visually captivating and balanced composition.
- Colorful Light Trails: A striking image featuring vibrant and colorful light trails created by playing with light sources, colored filters, or gels. The vivid colors against the dark surroundings create a visually dynamic and captivating photograph.
These examples demonstrate the creative potential of light trail photography. Each image tells a unique story, showcases the photographer’s artistic vision, and highlights the beauty and wonder of capturing light in motion.