
Enabling and Disabling Private Browsing Mode
Private Browsing mode is a useful feature in Safari for macOS that allows users to browse the web without leaving a trace of their online activities. When enabled, this mode prevents Safari from storing browsing history, cookies, and other data related to the browsing session. This can be particularly helpful when you’re using a shared computer or want to keep your online activities private.
To enable Private Browsing mode in Safari for macOS, follow these steps:
- Open Safari on your Mac.
- Go to the Safari menu in the top-left corner of the screen.
- Select the “Private Browsing” option from the dropdown menu.
Once activated, Safari will open a new window indicating that you are in Private Browsing mode. You can now browse the web without worrying about leaving any traces behind.
Keep in mind that Private Browsing mode only applies to the Safari browser on your Mac. It doesn’t affect other browsers or apps on your computer. Additionally, any files you download or bookmarks you create while in Private Browsing mode will be saved to your computer.
If you want to disable Private Browsing mode in Safari for macOS, simply close the window or go back to the Safari menu and deselect the “Private Browsing” option. Once deactivated, Safari will return to its regular browsing mode, and your browsing history and other data will be stored as usual.
Overall, enabling and disabling Private Browsing mode in Safari for macOS is a straightforward process that offers users an extra layer of privacy and security. Whether you’re using a public computer or want to keep your browsing habits private, this feature gives you the freedom to explore the web without leaving a digital footprint.
Clearing Browsing History
Clearing your browsing history in Safari for macOS is essential for maintaining privacy and freeing up storage space on your computer. By clearing your browsing history, you remove a record of the websites you’ve visited, making it harder for others to track your online activities. Here’s how you can do it:
- Open Safari on your Mac.
- In the top menu, click on “History”.
- From the dropdown menu, select “Clear History”.
- In the pop-up window, choose the timeframe for which you want to clear your history. You can choose to clear the history from the last hour, today, today and yesterday, or all history. Alternatively, you can select “All history” to remove your entire browsing history.
- Click on “Clear History” to confirm your selection.
Once you’ve completed these steps, Safari will remove your browsing history for the selected timeframe. Keep in mind that clearing your browsing history does not affect other stored data, such as bookmarks, cookies, or saved passwords.
In addition to clearing your browsing history, Safari also provides the option to clear other types of data. This includes clearing your cache, cookies, and other browsing data. To access these options, go to the Safari menu and select “Preferences”. In the preferences window, navigate to the “Privacy” tab, where you’ll find the option to manage and clear various types of browsing data.
Clearing your browsing history is a simple yet effective way to maintain your privacy and keep your browsing habits private. By regularly clearing your history, you can ensure that your online activities remain confidential and secure.
Managing Cookies
Cookies are small text files that websites store on your computer to remember information about your browsing preferences and activities. While cookies can enhance your online experience by remembering your login information and personalized settings, they can also be used to track your online behavior. Managing cookies in Safari for macOS allows you to control how websites handle and store these files.
Here’s how you can manage cookies in Safari:
- Open Safari on your Mac.
- Go to the Safari menu and select “Preferences”.
- In the preferences window, click on the “Privacy” tab.
- Under the “Cookies and website data” section, you have several options to manage how Safari handles cookies:
- Always block: This option prevents all websites from storing cookies on your computer.
- Allow from current website only: Safari only allows cookies from the website you are currently visiting, blocking all others.
- Allow from websites I visit: Safari permits cookies from websites you visit, but not third-party cookies.
- Always allow: This option allows all websites, including third-party ones, to store cookies on your computer.
You can select the option that best fits your privacy preferences. Keep in mind that blocking all cookies may affect the functionality and user experience of certain websites, as some rely on cookies for proper operation.
In addition to managing cookies, you can also take advantage of Safari’s ability to remove specific cookies or all cookies stored on your computer. To remove specific cookies, go to the “Preferences” window, click on the “Privacy” tab, and then select “Manage Website Data”. From there, you can search for specific websites and remove their cookies individually. If you want to remove all cookies, click on the “Remove All” button.
By managing cookies in Safari, you can strike a balance between convenience and privacy, allowing you to control how websites track and store your browsing information. Regularly reviewing and managing your cookies can help protect your online privacy while ensuring a smooth browsing experience.
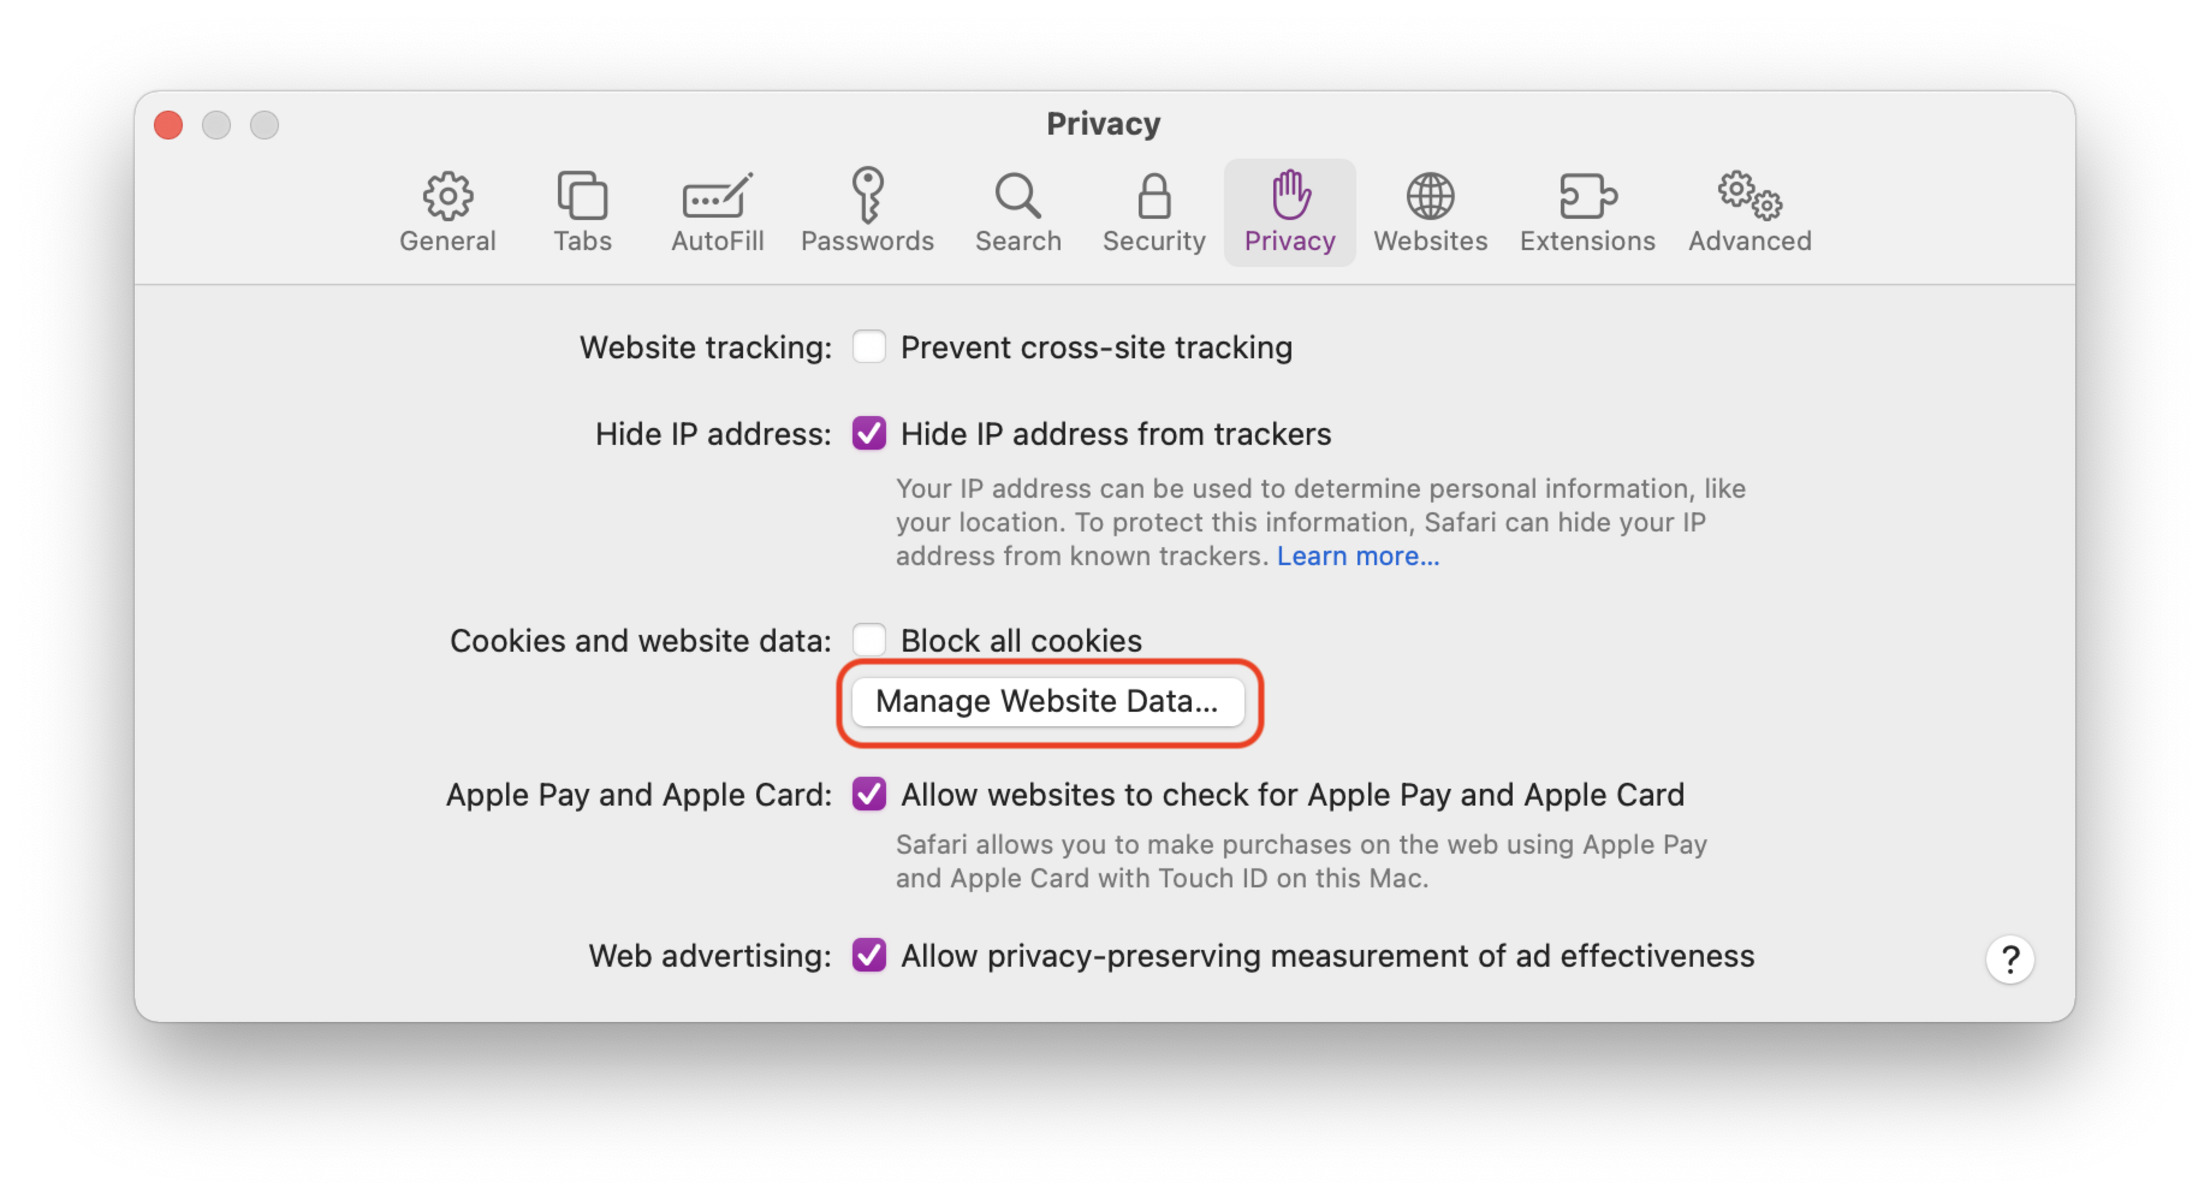
Managing Website Data
When browsing the web, websites often store data on your computer in the form of cache, local storage, and databases. This data, collectively known as website data, helps websites load faster and remember your preferences. However, managing website data in Safari for macOS is crucial for maintaining privacy and freeing up storage space on your computer.
To manage website data in Safari, follow these steps:
- Open Safari on your Mac.
- Go to the Safari menu and select “Preferences”.
- In the preferences window, click on the “Privacy” tab.
- Under the “Cookies and website data” section, click on the “Manage Website Data” button.
In the “Manage Website Data” window, you’ll find a list of websites that have stored data on your computer. You can search for specific websites using the search bar or scroll through the list to find the ones you want to manage.
Here are some options you can choose:
- Remove: Select a website and click on the “Remove” button to delete its data from your computer.
- Remove All: Click on the “Remove All” button to delete all website data stored on your computer.
- Details: Click on the arrow next to a website to view the individual files stored by that site. From here, you can remove specific files if needed.
Managing website data allows you to control the information stored by websites on your computer, ensuring your privacy and freeing up storage space. Regularly reviewing and removing unnecessary website data helps keep your browsing experience smooth while minimizing the potential for tracking and data accumulation.
It’s worth noting that removing website data may result in websites taking slightly longer to load the next time you visit them since the browser needs to retrieve fresh data. However, this minor inconvenience is usually outweighed by the increased privacy and improved performance of your web browsing experience.
Blocking Pop-ups
Pop-up windows can be disruptive and annoying while browsing the web. These windows can contain advertisements, alerts, or other unwanted content. However, you can easily block pop-ups in Safari for macOS to enhance your browsing experience and maintain a clutter-free environment.
To block pop-ups in Safari, follow these steps:
- Open Safari on your Mac.
- Go to the Safari menu and select “Preferences”.
- In the preferences window, click on the “Websites” tab.
- In the left sidebar, scroll down to find “Pop-up Windows”. Click on it.
- You’ll see an option to block pop-up windows on the right side. Make sure the box is checked to enable pop-up blocking.
With pop-up blocking enabled, Safari will automatically prevent pop-up windows from appearing while you browse the web.
In addition to enabling pop-up blocking globally, you can also manage exceptions for specific websites. By allowing pop-ups on trusted websites, you ensure that legitimate content and functions are not blocked. To add exceptions, follow these steps:
- In the “Pop-up Windows” section of the “Websites” tab, click on the “Options” button.
- A new window will appear, showing a list of websites that have attempted to open pop-up windows. You can allow or block pop-ups for each specific site by selecting the appropriate option from the dropdown menu beside it.
- Click on “Done” once you’ve made your changes.
By blocking pop-ups in Safari, you can ensure a smoother and more focused browsing experience. Additionally, you reduce the risk of encountering malicious or unwanted content that can potentially harm your computer or compromise your privacy.
However, it’s important to note that some legitimate websites may use pop-ups for important functions or content. If you encounter any issues with a specific website, you can always adjust your settings to allow pop-ups temporarily or add the website to your exceptions list.
Configuring Autofill
Autofill is a convenient feature in Safari for macOS that automatically fills in forms, such as login credentials, contact information, and credit card details. Configuring Autofill settings allows you to customize how Safari handles and saves this information, making it easier and faster to fill out online forms.
To configure Autofill settings in Safari, follow these steps:
- Open Safari on your Mac.
- Go to the Safari menu and select “Preferences”.
- In the preferences window, click on the “AutoFill” tab.
Under the “AutoFill” tab, you’ll find several options for configuring Autofill:
- Using Contact information: Safari can automatically fill in forms with your contact information, such as your name, address, email, and phone number. To enable this feature, make sure the corresponding box is checked and click on the “Edit…” button to review or update your contact details.
- Usernames and passwords: If you want Safari to remember your login credentials for websites, ensure that the “Usernames and passwords” box is checked. You can view and manage your saved passwords by clicking on the “Edit…” button. For enhanced security, Safari can also suggest strong passwords for you when creating new accounts. To enable this feature, check the “Suggest passwords” box.
- Credit cards: Safari can store your credit card information securely for autofilling payment forms. To enable this feature, check the “Credit cards” box. You can manage and view your saved credit card information by clicking on the “Edit…” button.
You can customize Autofill settings based on your preferences and privacy concerns. For example, if you prefer not to use Autofill for credit card details, you can choose to disable that option. Similarly, if you don’t want Safari to suggest and save passwords, you can uncheck the corresponding box.
By configuring Autofill in Safari, you can streamline your online form-filling experience, saving time and effort. However, it is important to maintain caution with sensitive information such as credit card details and passwords. Ensure that your Mac is secure and protected with strong passwords to prevent unauthorized access to your personal information.
Regularly reviewing and updating your Autofill settings ensures that the information Safari fills in forms with is accurate and up-to-date. Additionally, it allows you to have better control over your personal information and enhances your browsing experience by eliminating the need to repeatedly enter the same information on different websites.
Managing Saved Passwords
Safari for macOS offers a convenient feature that allows you to save and autofill passwords for various websites. Managing saved passwords ensures that your login credentials are secure, easily accessible, and up-to-date. By effectively managing your saved passwords, you can streamline your browsing experience and strengthen your online security.
To manage saved passwords in Safari, follow these steps:
- Open Safari on your Mac.
- Go to the Safari menu and select “Preferences”.
- In the preferences window, click on the “Passwords” tab.
Under the “Passwords” tab, you’ll find a list of websites for which Safari has saved passwords. You can search for specific websites using the search bar or scroll through the list to find the ones you want to manage.
Here are some options you can choose:
- Viewing passwords: To view a saved password, select the website from the list and click on the “Show passwords” button. You might need to authenticate with your macOS user account password to access this information.
- Adding passwords: When you log in to a website and Safari asks if you want to save the password, you can choose to save it. If you declined to save the password earlier or want to add a password manually, click on the “+” button at the bottom left corner of the passwords window. Enter the website URL, username, and password in the fields provided.
- Removing passwords: If you no longer want Safari to save a password or if you want to remove a saved password, select the website from the list, and click on the “Remove” button. Confirm your action when prompted.
- Editing passwords: To edit a saved password, select the website from the list, click on the “Edit” button, and make the necessary changes to the username and password fields. Click on “Save” to update the changes.
Managing saved passwords allows you to maintain control over your accounts and ensure that your login credentials are secure. It also makes it easier to sign in to your favorite websites with just a few clicks, saving you time and effort.
It’s important to note that while Safari stores your passwords securely using your macOS keychain, it’s still crucial to follow best practices for online security. Regularly updating your passwords, enabling two-factor authentication whenever possible, and maintaining a strong and unique password for each website are essential measures to safeguard your online accounts.
By managing your saved passwords in Safari, you can effectively balance the convenience of automatic logins with the importance of maintaining strong security practices. Regularly reviewing and updating your saved passwords ensures that your online accounts remain safe and secure.
Enabling and Disabling Location Services
Location Services is a feature in Safari for macOS that allows websites to access your computer’s location information. While this feature can enhance your browsing experience by providing localized content and services, you may have privacy concerns or wish to conserve battery life by disabling it. Enabling and disabling Location Services in Safari gives you the flexibility to control when websites can access your location data.
To enable or disable Location Services in Safari, follow these steps:
- Open Safari on your Mac.
- Go to the Safari menu and select “Preferences”.
- In the preferences window, click on the “Websites” tab.
- In the left sidebar, scroll down and select “Location”.
Under the “Location” tab, you have several options to manage how Safari handles location requests from websites:
- Ask: Safari will prompt you for permission whenever a website requests your location information. You can then choose to allow or deny the request on a case-by-case basis.
- Deny: Safari will automatically block websites from accessing your location information without prompting you.
- Allow: Safari will allow websites to access your location information without prompting you.
Choose the option that best suits your privacy preferences and browsing needs. Keep in mind that allowing websites to access your location information can provide a personalized browsing experience, such as finding nearby stores or displaying local weather information. However, it’s important to evaluate the privacy implications and consider the trustworthiness of the websites you allow access to your location data.
In addition to managing Location Services in Safari’s preferences, you can also control location access for individual websites. When a website requests your location information, Safari will display a prompt asking for your permission. You can choose to allow or deny the request, and you also have the option to remember your decision for future visits to that website.
By enabling and disabling Location Services in Safari, you can strike a balance between convenience and privacy. Assess your comfort level with location tracking and make informed decisions about when and which websites should have access to your computer’s location information.
Managing Notifications
Safari for macOS allows websites to send notifications to your desktop, providing real-time updates and alerts. While notifications can be helpful for staying up-to-date with important information, they can also be distracting or unwanted. Managing notifications in Safari gives you control over which websites can send notifications and allows you to customize your browsing experience.
To manage notifications in Safari, follow these steps:
- Open Safari on your Mac.
- Go to the Safari menu and select “Preferences”.
- In the preferences window, click on the “Websites” tab.
- In the left sidebar, scroll down and select “Notifications”.
Under the “Notifications” tab, you’ll find a list of websites that have requested permission to send notifications. You can customize the settings for each website individually:
- Allow: Safari allows the selected website to send notifications. This is the default setting when you grant a website permission to send notifications for the first time.
- Deny: Safari blocks notifications from the selected website.
- Prompt: Safari prompts you to allow or deny notifications each time the website tries to send them.
You can click on the dropdown menu next to each website to change its notification settings. This allows you to have fine-grained control over which websites can send notifications to your desktop.
By managing notifications in Safari, you can prevent websites from sending unwanted or distracting notifications. This helps you maintain focus and control over your browsing experience. However, it’s worth noting that some websites provide valuable and relevant notifications. Be selective in your choices and consider allowing notifications from websites that provide meaningful updates or important information.
In addition to managing individual website settings, you can also customize general notification preferences for Safari in the macOS system settings. To access these settings, go to the Apple menu, select “System Preferences”, and click on “Notifications”. From there, you can adjust notifications on a global level, including the style and behavior of notifications for all applications, including Safari.
Regularly reviewing and managing your notifications in Safari helps ensure that you only receive the notifications that are relevant and valuable to you. Take control of your browsing experience by customizing notification settings to your preferences.
Configuring Content Blockers
Content blockers are powerful tools that allow you to control the types of content loaded by websites, such as ads, trackers, and other potentially unwanted elements. Configuring content blockers in Safari for macOS can significantly improve your browsing experience by enhancing page load times, reducing distractions, and protecting your privacy.
To configure content blockers in Safari, follow these steps:
- Open Safari on your Mac.
- Go to the Safari menu and select “Preferences”.
- In the preferences window, click on the “Websites” tab.
- In the left sidebar, scroll down and select “Content Blockers”.
Under the “Content Blockers” tab, you’ll find a list of content blockers that you have installed on your Mac. These content blockers are third-party extensions that are designed to block specific types of content or ads. You can install additional content blockers from the Mac App Store or other trusted sources.
Each content blocker in the list has a checkbox next to it. Checking the box enables the content blocker, while unchecking it disables the content blocker. This allows you to selectively enable or disable content blockers based on your preferences and the websites you visit.
Configuring content blockers provides you with options to customize your browsing experience. You can experiment with different content blockers to find the ones that best suit your needs and preferences.
Remember that content blockers may affect the way websites appear and function, as they selectively block certain elements. Some websites may have restrictions or anti-adblock measures, causing content blockers to have limited effectiveness.
By using content blockers, you have the ability to take greater control over the content you see while browsing the web. This can lead to a faster, more streamlined experience with fewer distractions. Additionally, content blockers can enhance your privacy by preventing tracking scripts and other undesirable elements from loading.
Keep in mind that it’s important to regularly update your content blockers to ensure they include the latest rules and filters. These updates help to stay on top of evolving ad and tracking techniques, providing you with an optimal browsing experience.
Take advantage of the flexibility and customization options offered by content blockers in Safari to create a browsing environment that suits your preferences and browsing goals.
Restricting Camera and Microphone Access
Safari for macOS provides control over the access that websites have to your computer’s camera and microphone. Restricting camera and microphone access is an important security measure to protect your privacy and prevent unauthorized use of these hardware components. By managing these settings in Safari, you can determine which websites are allowed to access your camera and microphone.
To restrict camera and microphone access in Safari, follow these steps:
- Open Safari on your Mac.
- Go to the Safari menu and select “Preferences”.
- In the preferences window, click on the “Websites” tab.
- In the left sidebar, scroll down and select “Camera” or “Microphone”.
Under the “Camera” or “Microphone” tab, you’ll find a list of websites that have requested permission to access your camera or microphone. You have several options for managing this access:
- Ask: Safari will prompt you for permission each time a website wants to access your camera or microphone. You can then choose to allow or deny the request on a case-by-case basis.
- Deny: Safari blocks websites from accessing your camera or microphone by default, without prompting you for permission.
- Allow: Safari automatically allows websites to access your camera or microphone without prompting you for permission.
Click on the dropdown menu next to each website to change its camera or microphone access settings. This allows you to manage and control which websites can use these hardware components on your computer.
Restricting camera and microphone access is an essential step in protecting your privacy and preventing unauthorized access to these sensitive components. It ensures that websites cannot secretly activate your camera or microphone without your knowledge or consent.
However, keep in mind that certain legitimate websites may require camera or microphone access to provide specific features or services. Consider the trustworthiness of the websites and the necessity of camera or microphone access before making a decision to allow or deny access.
Regularly reviewing and managing camera and microphone access in Safari helps safeguard your privacy and maintain control over your hardware components. Stay vigilant and grant access only to trusted websites that genuinely require camera or microphone functionality.
Managing Search Engine Suggestions
Safari for macOS provides search engine suggestions as you type in the address bar, offering helpful predictions or completing your search queries based on popular searches. While search engine suggestions can save time and provide relevant search results, you might prefer to manage or disable these suggestions for privacy reasons or to customize your browsing experience.
To manage search engine suggestions in Safari, follow these steps:
- Open Safari on your Mac.
- Go to the Safari menu and select “Preferences”.
- In the preferences window, click on the “Search” tab.
Under the “Search” tab, you’ll find the option to enable or disable search engine suggestions. Here’s what you can do:
- Enable search engine suggestions: When this option is checked, Safari will show search engine suggestions as you type in the address bar to assist you in finding relevant search results quickly.
- Disable search engine suggestions: If you prefer not to see search engine suggestions, simply uncheck this option. Safari will no longer display suggestions as you type in the address bar.
By managing search engine suggestions, you can customize your browsing experience according to your preferences. Enabling suggestions can be helpful for discovering popular search queries or getting instant search results, while disabling them can provide more privacy and a cleaner interface.
Keep in mind that search engine suggestions are typically provided by the search engine itself, so managing these suggestions in Safari’s preferences may not have an effect on suggestions from other sources (such as the search engine’s own website or other browsers).
It’s worth noting that disabling search engine suggestions might limit the convenience of autofill and recommended search queries, depending on your browsing habits and preferences. However, if privacy is a primary concern, disabling search engine suggestions can help minimize the amount of data shared with search engines.
Regularly reviewing and managing search engine suggestions in Safari ensures that your browsing experience aligns with your preferences. Personalize your search experience by enabling or disabling these suggestions based on your comfort level and privacy considerations.
Customizing Safari Preferences
Safari for macOS offers a range of customization options through its preferences, allowing you to tailor your browsing experience to suit your preferences and needs. By customizing Safari preferences, you can optimize privacy settings, adjust browser behavior, and personalize various aspects of the browser.
To customize Safari preferences, follow these steps:
- Open Safari on your Mac.
- Go to the Safari menu and select “Preferences”.
In the preferences window, you’ll find several tabs that represent different aspects of Safari’s customization options. Let’s explore some key areas you can customize:
- General: In the “General” tab, you can set your Safari homepage, choose how new windows and tabs open, and configure Safari’s startup behavior.
- Tabs: The “Tabs” tab allows you to manage how tabs behave, such as whether new links open in a new tab or the same tab, and the behavior of tab previews.
- AutoFill: In the “AutoFill” tab, you can customize settings related to autofilling forms, such as contact information, usernames, and passwords.
- Search: The “Search” tab lets you choose your default search engine and manage search engine suggestions.
- Privacy: In the “Privacy” tab, you can configure settings related to cookies, location access, and website tracking protection.
- Websites: Under the “Websites” tab, you can manage individual website settings for various features, including camera access, microphone access, content blockers, and notifications.
- Extensions: The “Extensions” tab allows you to manage and customize your installed Safari extensions.
- Advanced: In the “Advanced” tab, you can adjust advanced settings, such as enabling or disabling the development menu and choosing how Safari handles website certificates.
Customizing Safari preferences empowers you to have control over how the browser behaves and interacts with websites. These settings can enhance your browsing experience, protect your privacy, and personalize your workflow.
Regularly exploring and reviewing Safari preferences can lead to a more optimized and tailored browsing experience. Take advantage of the customization options available to make Safari work according to your preferences and specific browsing needs.
Remember that while customizing preferences in Safari can enhance your browsing experience, it’s important to strike a balance between convenience and privacy. Be mindful of the privacy implications when making changes to settings related to cookies, location access, and website permissions.
By customizing Safari preferences, you can truly make the browser your own and ensure that it caters to your specific requirements and browsing habits.