
RAID Basics
RAID, which stands for Redundant Array of Independent Disks, is a technology that combines multiple physical hard drives into a single logical unit. It offers improved performance, data redundancy, and increased storage capacity. RAID arrays are commonly used in server environments to ensure data integrity and availability, but they can also be set up on individual systems running macOS using Disk Utility.
There are several RAID levels to choose from, each with its own advantages and considerations:
- RAID 0: Also known as striping, RAID 0 combines multiple drives into a single logical unit without redundancy. It improves read and write performance as data is distributed across all drives. However, the failure of a single drive results in the loss of all data.
- RAID 1: Known as mirroring, RAID 1 duplicates data across two or more drives. It provides excellent data redundancy, ensuring that if one drive fails, the system can still access all the data from the remaining drives. However, it doesn’t increase storage capacity and may impact write performance slightly.
- RAID 5: RAID 5 offers both striping and parity for increased performance and fault tolerance. Data is spread across multiple drives, with parity information distributed among the drives. If a drive fails, the system can reconstruct the lost data using the parity information from the remaining drives. It offers a good balance between performance, redundancy, and storage capacity.
- RAID 10: Also known as RAID 1+0, RAID 10 combines mirroring and striping. It requires a minimum of four drives, with data mirrored across pairs of drives and then striped across the mirrored pairs. It offers excellent performance, fault tolerance, and increased storage capacity but requires more drives than other RAID levels.
It’s important to note that setting up a RAID array involves erasing all existing data on the selected drives. Therefore, it’s crucial to backup any important data before proceeding with the RAID creation process.
Now that we have a basic understanding of RAID and its different levels, let’s explore how to create various RAID arrays using macOS Disk Utility.
Understanding macOS Disk Utility
macOS Disk Utility is a powerful built-in tool that allows users to manage and configure storage devices, including the creation and management of RAID arrays. It provides a user-friendly interface for performing various disk-related tasks, such as formatting, partitioning, and repairing drives.
When it comes to creating RAID arrays, Disk Utility offers an intuitive and straightforward process. Here are the basic steps:
- Launch Disk Utility: Open Finder, go to the Applications folder, then click on Utilities and select Disk Utility.
- Select the Drives: Identify the drives you want to include in the RAID array. Make sure they are connected and recognized by your macOS system.
- Create the Array: Click on the “File” menu and select “RAID Assistant.” This will open the RAID Assistant window.
- Choose RAID Level: From the RAID Assistant window, select the desired RAID level based on your requirements and the characteristics explained in the previous section.
- Select Drives: In the RAID Assistant window, select the drives you want to include in the array by checking the corresponding checkboxes.
- Configure the Array: Depending on the RAID level chosen, you may be prompted to configure additional settings, such as chunk size or stripe size. Disk Utility will provide recommendations, but you can customize these settings as per your needs.
- Verify and Create the Array: Review the summary of the RAID configuration and click “Create” to start the array creation process. Disk Utility will initialize and format the drives accordingly.
Once the RAID array has been successfully created, it will be visible as a single logical volume in Disk Utility. You can then proceed to mount, partition, and use the RAID array just like any other storage device.
It’s worth mentioning that Disk Utility also provides options for rebuilding or deleting existing RAID arrays, as well as monitoring their health and status. These features allow you to maintain and manage your RAID arrays effectively.
Now that you have a better understanding of how Disk Utility works, let’s dive into the specific steps to create different RAID arrays using this powerful tool.
Creating a RAID 0 Array
RAID 0, also known as striping, is a RAID level that provides enhanced performance by striping data across multiple drives without redundancy. Creating a RAID 0 array using macOS Disk Utility is a straightforward process. Here’s a step-by-step guide:
- Launch Disk Utility: Open Finder, go to the Applications folder, then click on Utilities and select Disk Utility.
- Select the Drives: Identify the drives you want to include in the RAID 0 array. Make sure they are connected and recognized by your macOS system.
- Create the Array: Click on the “File” menu and select “RAID Assistant.” This will open the RAID Assistant window.
- Choose RAID Level: From the RAID Assistant window, select “RAID 0 – Performance” as the desired RAID level for your array.
- Select Drives: In the RAID Assistant window, select the drives you want to include in the array by checking the corresponding checkboxes.
- Configure the Array: For RAID 0 arrays, Disk Utility will not prompt any additional configuration. However, you can customize the chunk size if desired.
- Verify and Create the Array: Review the summary of the RAID configuration, making sure all the selected drives are shown correctly. Click “Create” to begin the array creation process.
During the creation process, Disk Utility will erase all the data on the selected drives and configure them as a RAID 0 array. Once the process is complete, the RAID 0 array will be available as a single logical volume in Disk Utility.
Keep in mind that RAID 0 does not provide any data redundancy. If one drive fails, the entire array may become inaccessible, resulting in potential data loss. Therefore, it’s important to have proper backup measures in place when using a RAID 0 array.
Now that you know how to create a RAID 0 array using macOS Disk Utility, let’s move on to exploring the steps to create other types of RAID arrays.
Creating a RAID 1 Array
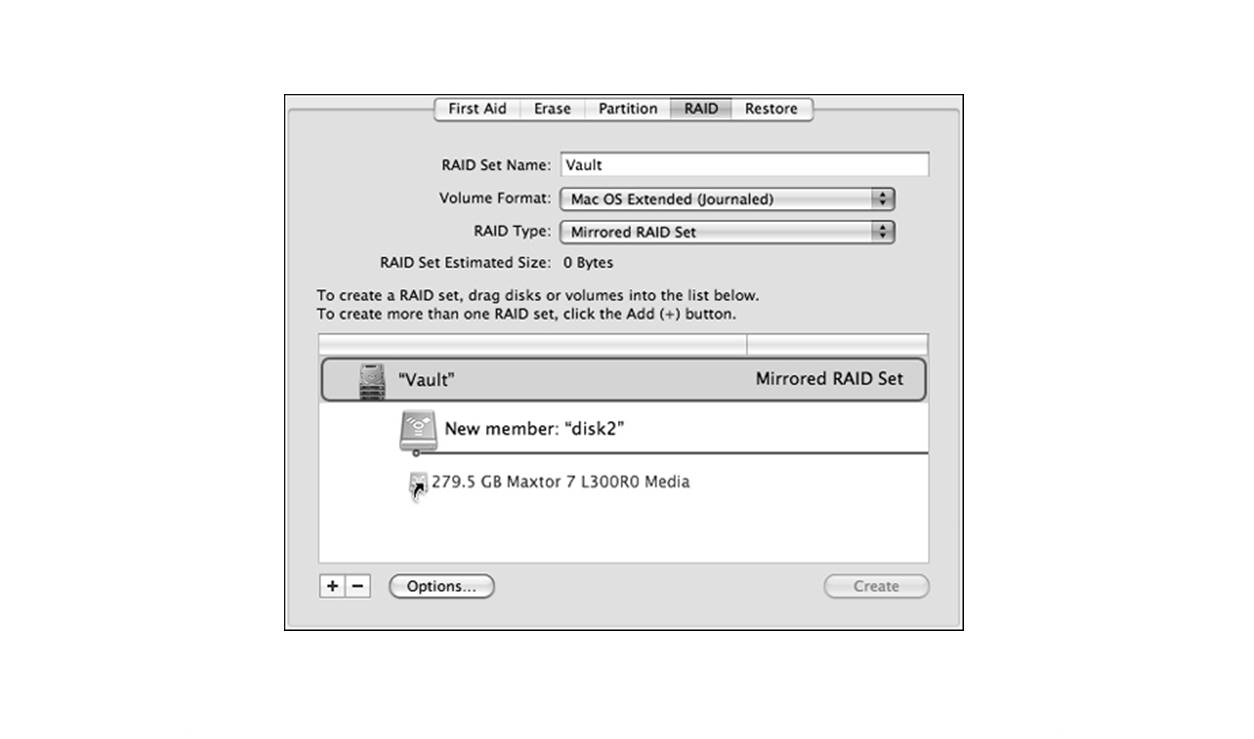
RAID 1, known as mirroring, provides data redundancy by duplicating data across multiple drives. This RAID level offers increased data integrity and availability. Here’s how you can create a RAID 1 array using macOS Disk Utility:
- Launch Disk Utility: Open Finder, go to the Applications folder, then click on Utilities and select Disk Utility.
- Select the Drives: Identify the drives you want to include in the RAID 1 array. Make sure they are connected and recognized by your macOS system.
- Create the Array: Click on the “File” menu and select “RAID Assistant.” This will open the RAID Assistant window.
- Choose RAID Level: From the RAID Assistant window, select “RAID 1 – Mirrored” as the desired RAID level.
- Select Drives: In the RAID Assistant window, select the drives you want to include in the array by checking the corresponding checkboxes.
- Configure the Array: Disk Utility will not require any additional configuration for RAID 1 arrays. The selected drives will be automatically configured as mirrored devices.
- Verify and Create the Array: Review the summary of the RAID configuration, ensuring that all the selected drives are shown correctly. Click “Create” to start the array creation process.
As the RAID 1 array is created, Disk Utility will duplicate the data on the selected drives, providing redundancy. This means that if one drive fails, the system can still access all the data from the remaining drives. However, it’s important to note that RAID 1 does not increase the storage capacity.
Keep in mind that creating a RAID 1 array requires an equal number of drives to ensure proper mirroring. It’s advisable to use drives of the same size and speed for optimal performance.
Now that you have learned how to create a RAID 1 array using macOS Disk Utility, let’s proceed to explore the steps for creating other types of RAID arrays.
Creating a RAID 5 Array
RAID 5 is a popular RAID level that combines striping and parity for increased performance and fault tolerance. It offers a good balance between performance, redundancy, and storage capacity. If you’re looking to create a RAID 5 array using macOS Disk Utility, follow these steps:
- Launch Disk Utility: Open Finder, go to the Applications folder, then click on Utilities and select Disk Utility.
- Select the Drives: Identify the drives you want to include in the RAID 5 array. Ensure they are connected and recognized by your macOS system.
- Create the Array: Click on the “File” menu and select “RAID Assistant.” This will open the RAID Assistant window.
- Choose RAID Level: From the RAID Assistant window, select “RAID 5 – Distributed Parity” as the desired RAID level for your array.
- Select Drives: In the RAID Assistant window, choose the drives you want to include in the array by checking the corresponding checkboxes.
- Configure the Array: For RAID 5 arrays, Disk Utility may prompt you to configure additional settings, such as the chunk size or stripe size. You can stick with the recommended settings or customize them according to your needs.
- Verify and Create the Array: Review the summary of the RAID configuration, ensuring that all the selected drives are displayed correctly. Click “Create” to initiate the array creation process.
During the creation process, Disk Utility will erase all data on the selected drives and set them up as a RAID 5 array. The array will distribute data across the drives and also include parity information that allows for fault tolerance. If a drive fails, the system can reconstruct the lost data using the parity information from the remaining drives.
Creating a RAID 5 array typically requires a minimum of three drives, but it can support more for increased performance and storage capacity. It’s recommended to use drives of the same size and speed for optimal performance.
Now that you know how to create a RAID 5 array using macOS Disk Utility, let’s move on to exploring the steps to create other types of RAID arrays.
Creating a RAID 10 Array
RAID 10, also known as RAID 1+0, combines mirroring and striping to provide both data redundancy and enhanced performance. It offers excellent fault tolerance and increased storage capacity. Here’s how you can create a RAID 10 array using macOS Disk Utility:
- Launch Disk Utility: Open Finder, go to the Applications folder, then click on Utilities and select Disk Utility.
- Select the Drives: Identify the drives you want to include in the RAID 10 array. Ensure they are connected and recognized by your macOS system.
- Create the Array: Click on the “File” menu and select “RAID Assistant.” This will open the RAID Assistant window.
- Choose RAID Level: From the RAID Assistant window, select “RAID 10 – Striped Mirrors” as the desired RAID level.
- Select Drives: In the RAID Assistant window, choose the drives you want to include in the array by checking the corresponding checkboxes. RAID 10 requires a minimum of four drives.
- Configure the Array: Disk Utility may prompt you to configure additional settings such as the chunk size or stripe size. You can either stick with the recommended settings or customize them based on your requirements.
- Verify and Create the Array: Review the summary of the RAID configuration, ensuring that all the selected drives are displayed correctly. Click “Create” to initiate the array creation process.
During the creation process, Disk Utility will erase all data on the selected drives and set them up as a RAID 10 array. The array will create mirrored pairs from the selected drives, and then data will be striped across the mirrored pairs for optimal performance and fault tolerance.
RAID 10 provides excellent data redundancy, allowing for the failure of multiple drives without losing accessibility to data. However, it does require a larger number of drives compared to other RAID levels.
It is important to note that using drives of the same size and speed is recommended for optimal performance in a RAID 10 array.
Now that you know how to create a RAID 10 array using macOS Disk Utility, let’s move on to exploring the steps to create other types of RAID arrays.
Tips for Using Disk Utility and RAID Arrays in macOS
Now that you have learned how to create different RAID arrays using macOS Disk Utility, here are some useful tips to enhance your experience with Disk Utility and manage your RAID arrays effectively:
- Regular Backups: While RAID arrays offer redundancy and fault tolerance, it’s still crucial to have regular backups of your important data. RAID arrays can protect against drive failures, but they cannot prevent data loss from other causes such as accidental deletion or file corruption.
- Monitoring Drive Health: Disk Utility provides the ability to monitor the health and status of your drives within the RAID array. Keeping an eye on drive health can help you proactively identify potential issues and take necessary actions, such as replacing a failing drive before it causes data loss.
- Hot Spare Drives: Consider adding hot spare drives to your RAID arrays. A hot spare is an extra drive that remains unused until a drive in the array fails. When a failure occurs, the RAID array automatically rebuilds onto the hot spare without interruption, providing an added layer of protection.
- Regular Maintenance: Perform regular maintenance tasks on your RAID arrays, such as checking for firmware updates for your drives and running periodic drive integrity checks to identify any underlying issues that may impact performance or data integrity.
- Expansion and Reconfiguration: Disk Utility allows you to expand the capacity of your RAID arrays by adding more drives or reconfigure the array to a different RAID level. However, it’s essential to have backups and carefully follow the necessary steps, as these actions may involve data migration and potential risks.
- Proper Cooling and Power Backup: RAID arrays, especially those with multiple drives, can generate heat and consume power. Ensuring proper cooling and providing a power backup solution, such as an uninterruptible power supply (UPS), can safeguard your data and prevent potential data loss or hardware damages.
By following these tips, you can optimize the performance, reliability, and longevity of your RAID arrays while maintaining the integrity of your valuable data.
With macOS Disk Utility, you have a versatile and user-friendly tool at your disposal. Take advantage of its features to create, manage, and optimize your RAID arrays efficiently. Whether you’re using RAID 0, RAID 1, RAID 5, RAID 10, or any other level, Disk Utility empowers you to harness the benefits of RAID technology on your macOS system.