
Checking for SD Card Slot in Moto G Phone
Before you can insert an SD card into your Moto G phone, it's essential to locate the SD card slot. The Moto G series typically features a slot for a microSD card, which allows you to expand the device's storage capacity. To begin the process, you'll need to identify the specific location of the SD card slot on your Moto G phone.
-
Locating the SD Card Slot: The SD card slot on the Moto G phone is usually situated on the side of the device. To find it, gently examine the edges of your phone, looking for a small tray or compartment. The slot may be concealed by a small cover that can be opened using a SIM ejector tool or a paperclip. Once you've located the slot, you can proceed with the next steps for inserting the SD card.
-
Referencing the User Manual: If you're having trouble locating the SD card slot, it's a good idea to consult the user manual that came with your Moto G phone. The manual often contains detailed illustrations and instructions for accessing the various components of the device, including the SD card slot. Additionally, you can visit the official website of the manufacturer to access digital copies of the user manual for further guidance.
-
Ensuring Compatibility: Before inserting the SD card, it's important to ensure that it is compatible with your Moto G phone. The Moto G series typically supports microSD cards with capacities ranging from 16GB to 128GB. It's advisable to use a reputable brand of SD card to guarantee optimal performance and compatibility with your device.
By following these steps, you can successfully locate the SD card slot on your Moto G phone, setting the stage for the subsequent steps involved in preparing and inserting the SD card. Once you've identified the slot and verified the compatibility of the SD card, you'll be ready to proceed with the next phase of the process.
Preparing the SD Card for Insertion
Before inserting the SD card into your Moto G phone, it's crucial to prepare the card to ensure a seamless and successful insertion process. Proper preparation involves handling the SD card with care and making necessary adjustments to optimize its compatibility with the device. Here's a detailed guide on how to prepare the SD card for insertion:
-
Check the SD Card Capacity: Begin by verifying the capacity of the SD card. The Moto G series typically supports microSD cards with capacities ranging from 16GB to 128GB. It's essential to ensure that the capacity of the SD card aligns with the specifications outlined for your Moto G phone. This step helps prevent compatibility issues and ensures that the SD card can be effectively utilized to expand the device's storage capacity.
-
Backup Data: If the SD card contains any data, such as photos, videos, or documents, it's advisable to create a backup before proceeding with the insertion process. This precautionary measure helps safeguard your valuable data in case of any unforeseen events during the insertion or initialization of the SD card. You can transfer the data to a computer or cloud storage to ensure that it is securely preserved.
-
Format the SD Card (Optional): In some cases, it may be necessary to format the SD card before inserting it into the Moto G phone. Formatting the SD card can help optimize its performance and ensure compatibility with the device. However, it's important to note that formatting the SD card will erase all existing data. Therefore, if you choose to format the card, be sure to back up any important data beforehand.
-
Inspect the SD Card: Before proceeding with the insertion, carefully inspect the SD card for any physical damage or foreign objects. Ensure that the contacts on the SD card are clean and free from any debris or obstruction. Additionally, check for any signs of wear or damage to the card itself. If you notice any issues, it's advisable to address them before proceeding with the insertion process.
By following these steps to prepare the SD card for insertion, you can ensure that the card is ready to be seamlessly integrated into your Moto G phone. Proper preparation not only facilitates a smooth insertion process but also helps optimize the performance and compatibility of the SD card with your device. Once the SD card is adequately prepared, you can proceed with the next phase of inserting it into your Moto G phone.
Inserting the SD Card into Moto G Phone
Now that you've located the SD card slot and prepared the SD card for insertion, it's time to proceed with the actual process of inserting the SD card into your Moto G phone. This step-by-step guide will walk you through the seamless insertion of the SD card, ensuring that it is securely integrated into your device.
-
Power Off the Device: Before inserting the SD card, it's advisable to power off your Moto G phone. This precautionary step helps prevent any potential data corruption or damage to the SD card during the insertion process. Ensure that the device is completely powered down before proceeding to the next step.
-
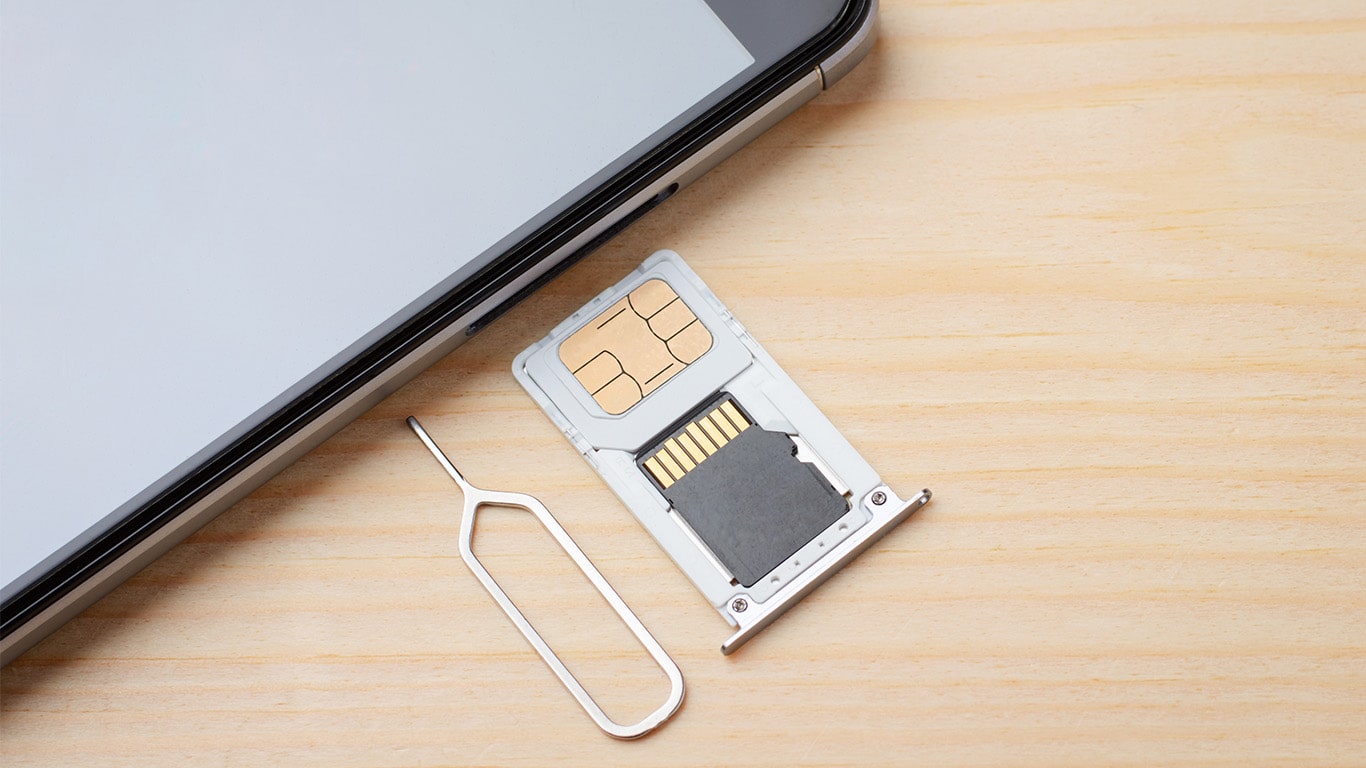
Locate the SD Card Slot: Once the device is powered off, locate the SD card slot on your Moto G phone. As mentioned earlier, the slot is typically situated on the side of the device and may be concealed by a small cover. Use a SIM ejector tool or a paperclip to gently open the cover and access the SD card slot.
-
Position the SD Card: Take the prepared SD card and carefully position it for insertion. The SD card features a notched edge that aligns with the slot in the tray. Ensure that the orientation of the SD card matches the slot to avoid any potential misalignment or damage during insertion.
-
Insert the SD Card: With the SD card properly positioned, gently insert it into the designated slot on your Moto G phone. Apply light pressure to ensure that the card is securely seated in the slot. Take care to avoid forcing the card or causing any unnecessary strain on the device's components.
-
Close the Cover: If the SD card slot features a cover, carefully close it after inserting the SD card. Ensure that the cover is securely fastened to prevent any accidental dislodging of the SD card. The cover helps protect the SD card and ensures that it remains firmly in place within the device.
-
Power On the Device: Once the SD card is successfully inserted and secured, power on your Moto G phone. Allow the device to initialize and recognize the newly inserted SD card. After powering on the device, navigate to the settings menu to verify the status of the SD card and ensure that it has been correctly detected by the device.
By following these steps, you can effectively insert the SD card into your Moto G phone, expanding the device's storage capacity and enhancing its functionality. With the SD card seamlessly integrated into your device, you can enjoy the benefits of extended storage for your photos, videos, apps, and other digital content.
Checking the SD Card Status in Moto G Phone
After successfully inserting the SD card into your Moto G phone, it's essential to verify the status of the card to ensure that it has been recognized and is functioning as intended. Checking the SD card status allows you to confirm its presence, capacity, and operational status within the device. Here's a detailed guide on how to check the SD card status in your Moto G phone:
Accessing the Settings Menu
To begin the process of checking the SD card status, navigate to the settings menu on your Moto G phone. The settings menu provides access to various device configurations and status indicators, including the storage settings related to the SD card.
Selecting Storage Settings
Within the settings menu, locate and select the "Storage" or "Storage & USB" option, depending on the specific interface of your Moto G phone. This section of the settings menu displays detailed information about the device's internal storage as well as any external storage, such as the inserted SD card.
Viewing SD Card Details
Upon accessing the storage settings, you will be presented with an overview of the device's storage configuration. Look for the section that specifically pertains to the SD card. Here, you can view essential details such as the total capacity of the SD card, the amount of available space, and the type of content stored on the card.
Verifying Mount Status
As you inspect the SD card details, pay attention to the mount status of the card. The mount status indicates whether the SD card has been successfully recognized and integrated into the device's storage system. A "mounted" status signifies that the SD card is actively accessible and available for use within the device.
Checking for Errors
While reviewing the SD card status, be on the lookout for any error messages or indicators that may suggest issues with the card. Common error messages related to the SD card include "SD card not detected" or "SD card corrupted." If any errors are detected, it may be necessary to troubleshoot the card or reinsert it to ensure proper recognition.
Utilizing the SD Card
Once you have confirmed the successful recognition and status of the SD card, you can proceed to utilize the expanded storage capacity for various purposes. This may include storing media files, installing apps, or configuring the device to save data directly to the SD card.
By following these steps to check the SD card status in your Moto G phone, you can ensure that the card has been properly recognized and integrated into the device's storage system. Verifying the SD card status provides peace of mind and allows you to make the most of the expanded storage capacity offered by the inserted SD card.