
Insert CD into your computer’s disk drive
Copying music from CDs to your computer using Windows Media Player is a quick and easy process. The first step is to insert the CD into your computer’s disk drive. Most computers have a CD/DVD drive located on the front panel or on the side of the computer tower.
Make sure that your computer is turned on and unlocked before you insert the CD. When inserting the CD, gently push it into the drive until it clicks into place. Windows will automatically detect the CD and launch Windows Media Player if it is not already open.
If Windows Media Player does not open automatically, you can open it manually by clicking on the Start Menu, searching for “Windows Media Player,” and selecting it from the list of applications. Once opened, the Windows Media Player interface will appear on your screen.
Inserting the CD into the disk drive is an essential first step in the process of copying music. It allows your computer to read the contents of the CD and prepares it for extraction and conversion into digital audio files.
Ensure that the CD is clean and free from any scratches or damages before inserting it into the disk drive. Clean the CD with a soft, lint-free cloth to remove any dust or smudges that could potentially interfere with the reading process. A clean CD will result in a more accurate and efficient copying process.
Once you have successfully inserted the CD into the disk drive, you are ready to proceed with the next steps in copying music from CDs using Windows Media Player. This straightforward process allows you to create digital copies of your favorite music CDs, making them easily accessible for playback on your computer or portable audio devices.
Open Windows Media Player
After inserting the CD into your computer’s disk drive, the next step in copying music from CDs is to open Windows Media Player. Windows Media Player is a built-in media player software that comes with Windows operating systems.
To open Windows Media Player, you can click on the Start Menu and search for “Windows Media Player” in the search bar. Once you see the application in the search results, click on it to launch the program. Alternatively, you can also locate the Windows Media Player icon on your desktop or taskbar and double-click it to open the program.
Upon opening Windows Media Player, you will be greeted with a user-friendly interface that allows you to manage and play various types of media files, including music, videos, and streaming content.
Windows Media Player provides a range of features and options for managing your music library, creating playlists, and copying music from CDs. The interface typically consists of a navigation pane on the left side, a library pane on the right side, and a playback area in the center. You can customize the layout and appearance of Windows Media Player to suit your preferences.
If you have multiple versions of Windows Media Player installed on your computer, make sure to open the latest or the version that you prefer for copying music from CDs.
Opening Windows Media Player is an essential step in the process, as it provides the platform and tools needed to copy music files from CDs. With Windows Media Player open, you are now ready to proceed with selecting the CD you wish to copy and converting the audio tracks into digital files.
Windows Media Player is a versatile media player that offers a range of features beyond copying music from CDs. It allows you to organize and manage your music collection, create playlists, sync with portable devices, and even stream media content from the internet. Exploring the various capabilities of Windows Media Player can enhance your overall media experience.
Select the CD to be copied
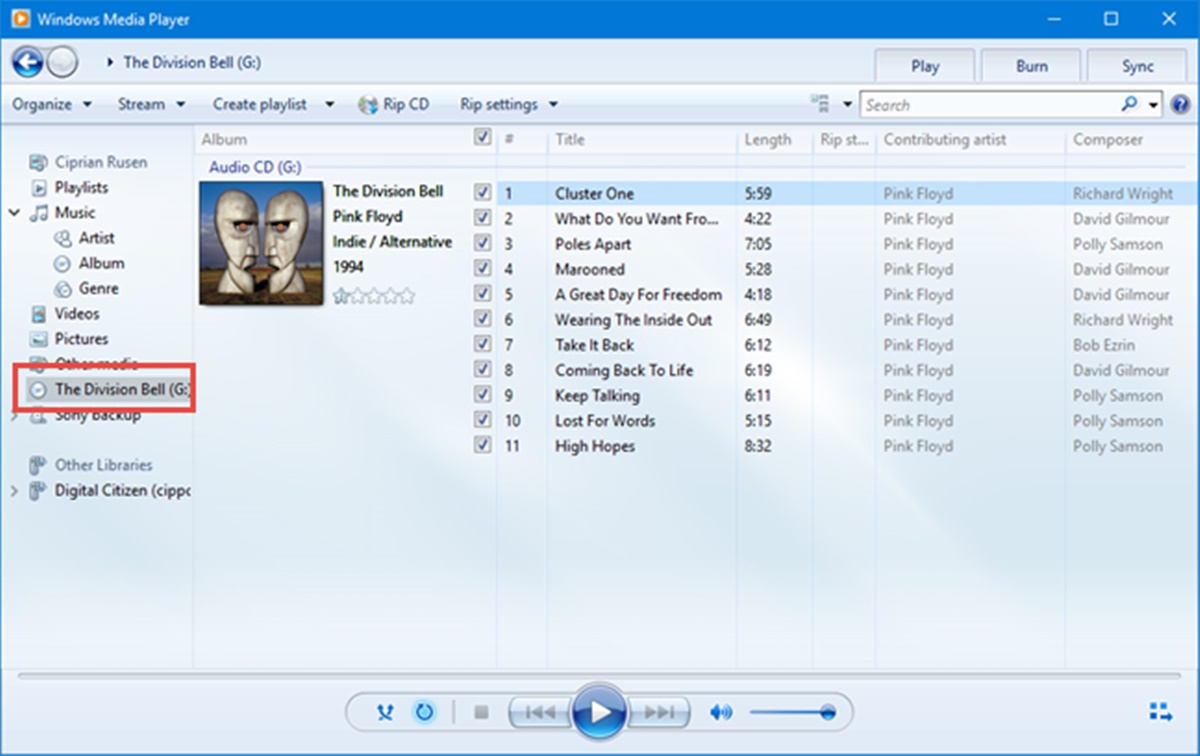
Once Windows Media Player is open, you need to select the CD that you want to copy. Windows Media Player automatically detects any CDs that are inserted into your computer’s disk drive and displays them in the navigation pane on the left side of the interface.
To select the CD, click on its name in the navigation pane. This will highlight the CD and display its contents in the library pane on the right side of the interface. The library pane will show the list of tracks available on the CD, along with their durations and other relevant information.
If you have multiple CDs inserted into your computer, make sure to select the appropriate one for copying. The selected CD will be the source from which Windows Media Player extracts the audio tracks and converts them into digital files.
Take a moment to verify that the CD you selected matches your intended choice. Double-check the CD’s label or album artwork to ensure that you are selecting the correct CD. This step is especially important when dealing with multiple CDs from the same artist or when working with compilation albums.
Windows Media Player offers additional options for managing and organizing your music collection. You can create playlists, edit track information, and even adjust the ripping settings for optimal quality. These features allow you to tailor the copying process to your preferences and requirements.
Selecting the CD to be copied is an essential step in the process of copying music from CDs using Windows Media Player. Once you have chosen the desired CD, you are ready to proceed with the next steps, such as checking the data and selecting the audio format for conversion.
By selecting the appropriate CD, you can ensure that you copy the correct music files and create an organized digital music library that is easy to navigate and enjoy.
Check the data and select the audio format for conversion
After selecting the CD to be copied in Windows Media Player, the next step is to check the data and select the audio format for conversion. This step allows you to customize the output format of the copied music files to suit your needs and preferences.
In the library pane of Windows Media Player, you will see a list of tracks available on the selected CD. Take a moment to review the track information, including the title, artist, album, and duration. This step ensures that the correct data is associated with each track and that any discrepancies or errors are addressed before copying.
If any of the track information is incorrect or missing, you can manually edit it in Windows Media Player. Right-click on a track, select “Edit” or “Properties,” and make the necessary changes in the dialog box that appears. This allows you to maintain a well-organized music library with accurate metadata for each song.
Once you have verified the data, you can proceed with selecting the audio format for conversion. Windows Media Player supports various audio formats, including MP3, WAV, WMA, and more. The choice of format depends on factors such as compatibility with your devices and the desired sound quality.
To select the audio format, click on the “Rip Settings” button located in the toolbar at the top of the Windows Media Player interface. This opens a drop-down menu where you can choose the format you prefer for the copied music files.
Each format has its own advantages and disadvantages. MP3 is the most widely supported format and offers a good balance between file size and audio quality. However, if you prefer higher fidelity audio, you may opt for formats like WAV or FLAC, which provide uncompressed or lossless compression options.
After selecting the audio format, you may also have the option to adjust the quality settings, such as bitrate or sample rate, depending on the chosen format. Higher quality settings generally result in larger file sizes, so consider your storage capacity and playback devices when making these adjustments.
Selecting the appropriate audio format ensures that the copied music files are in a format that suits your needs and preferences. Whether you prefer high-quality audio or smaller file sizes, Windows Media Player gives you the flexibility to customize the conversion process.
With the data checked and the audio format selected, you are ready to proceed with choosing the destination folder for the copied music files and starting the copying process.
Choose the destination folder for copied music files
After checking the data and selecting the audio format for conversion in Windows Media Player, the next step is to choose the destination folder for the copied music files. This is the location on your computer’s hard drive where the converted files will be saved.
In Windows Media Player, you have the option to customize the destination folder based on your personal preferences. By default, Windows Media Player creates a folder in your Music library and organizes the copied music files by album and artist.
If you prefer to save the copied music files to a different folder or location, you can easily change the destination. To do this, click on the “Organize” tab in Windows Media Player and then select “Options.” In the Options window, navigate to the “Rip Music” tab, where you will find the option to change the location.
Click on the “Change” button next to the “Rip music to this location” field and browse through your file system to select the desired folder. You can choose a specific folder, create a new one, or even select an external storage device such as a USB drive or an external hard drive.
Consider factors such as available storage space and organization when deciding on the destination folder. Choosing a dedicated folder for your copied music files can help you easily locate and manage them in the future.
If you have a large music collection or plan to copy multiple CDs, creating subfolders within the destination folder can help with organization. You can create subfolders based on genres, artists, or any other categorization that makes it easy for you to find and enjoy your music.
Windows Media Player also provides the option to automatically organize the copied music files based on tags and metadata. This feature helps ensure that the files are properly sorted and labeled, making it easier to navigate your music library.
Choosing the right destination folder for the copied music files ensures that they are saved in a location that is convenient for you and in a well-organized manner. It allows you to maintain a structured music library and facilitates easy access to your favorite songs.
With the destination folder selected, you are ready to proceed with the next steps in the process, such as starting the copying process and reviewing and editing the copied music files’ information.
Start the copying process
Once you have chosen the destination folder for the copied music files in Windows Media Player, it is time to start the copying process. This step initiates the extraction and conversion of the audio tracks from the selected CD into digital files.
To begin the copying process, make sure the selected CD is still inserted in your computer’s disk drive. In Windows Media Player, locate the “Rip CD” button, usually located in the top toolbar or prominently displayed in the interface.
Click on the “Rip CD” button to start the copying process. Windows Media Player will analyze the CD’s contents, extract the audio tracks, and convert them into the selected audio format. The progress of the copying process will be displayed on the screen, allowing you to monitor the status.
Depending on the speed of your computer and the length of the audio tracks, the copying process may take some time to complete. You can also enable the option to “Automatically sync when this device is connected” if you have a portable device connected to your computer and want to sync the copied music files directly to the device.
During the copying process, Windows Media Player may retrieve additional track information from an online database and automatically add it to the copied music files. This helps in organizing and providing accurate details for each track, including the title, artist, album, and album cover art.
While the copying process is underway, it is best to avoid using other resource-intensive applications or performing tasks that could interfere with the smooth progression of the process. Let Windows Media Player complete the copying process uninterrupted to ensure the integrity and quality of the copied music files.
Once the copying process is complete, Windows Media Player will notify you and display the copied music files in the destination folder you selected. You can then proceed with reviewing and editing the information of the copied music files as desired.
Starting the copying process in Windows Media Player allows you to convert the audio tracks from the selected CD into digital files easily. By following this step, you can create a digital music collection that is convenient to manage, access, and enjoy on various devices.
With the copying process started, you are one step closer to creating a digital music library filled with your favorite songs. The next step is to review and edit the information of the copied music files to ensure accuracy and completeness.
Review and edit the copied music files’ information
After the copying process is complete in Windows Media Player, it is important to review and edit the information of the copied music files. This step ensures that the metadata associated with each track is accurate and organized, making it easier to navigate and manage your digital music library.
In Windows Media Player, the copied music files will appear in the destination folder you selected earlier. You can browse through the folder to locate the files or use the search function within Windows Explorer to find specific tracks.
Right-click on a copied music file and select “Properties” or “Edit” from the context menu. This will open a dialog box that contains fields for various metadata such as the track title, artist, album, genre, and more.
Review the existing information for each track and make any necessary changes or additions. For example, if the track title is incorrect or incomplete, you can edit it to reflect the accurate name. You can also add or correct the artist’s name, album title, track number, and other relevant details.
In addition to basic metadata, you can further enhance the organization of your music library by including album artwork. If the copied music files do not already have album covers associated with them, you can search for the artwork online or add custom images from your computer.
Editing the information of the copied music files allows you to create a well-organized and personalized music library. Accurate metadata ensures that you can easily search, sort, and filter your music collection based on various criteria, such as genre, artist, or album.
Windows Media Player also provides the option to automatically retrieve and update track information from an online database. This can save time and ensure accuracy, especially when dealing with less common or obscure tracks.
Take the time to thoroughly review and edit the information of the copied music files to your satisfaction. This step helps create a comprehensive and user-friendly music library that reflects your personal preferences and ensures a smooth browsing and playback experience.
By reviewing and editing the information of the copied music files, you can curate a digital music collection that is organized, accurate, and tailored to your liking. You are now ready to add the copied music files to your Windows Media Player library and start enjoying your favorite tunes.
Add the copied music files to your Windows Media Player library
After reviewing and editing the information of the copied music files, the next step is to add them to your Windows Media Player library. This ensures that the files are properly organized, easily accessible, and ready for playback within the media player.
In Windows Media Player, you can add the copied music files to your library in a couple of different ways. The most common method is to simply drag and drop the files or the entire folder containing the copied music files directly into the Windows Media Player interface.
To do this, open Windows Media Player and navigate to the “Library” tab located at the top of the interface. You should see the library pane on the right side of the screen. Then, open the folder containing the copied music files from Windows Explorer or File Explorer on your computer.
With both Windows Media Player and the folder open side by side, click and hold the music files or folder in the file explorer and drag them into the library pane of Windows Media Player. Release the mouse button to drop the files into the player. Windows Media Player will automatically add and organize the files in your library.
An alternative method to add the copied music files to your library in Windows Media Player is to use the “Add to Library” feature. To access this feature, click on the “Organize” tab in Windows Media Player and select “Manage Libraries.” From the dropdown menu, choose “Music.”
In the “Music Library Locations” window, click on the “Add” button and navigate to the folder containing the copied music files. Select the folder and click “Include Folder.” Windows Media Player will scan the folder and add the music files to your library.
After adding the copied music files to your Windows Media Player library, they will be available for playback and management. You can access them by selecting “Music” from the navigation pane or by searching for specific tracks, albums, or artists using the search bar in Windows Media Player.
Within the library, you have various options for organizing and customizing your music collection. You can create playlists, sort your music by different criteria, and add additional metadata to further enhance the organization and management of your library.
By adding the copied music files to your Windows Media Player library, you ensure that they are easily accessible and integrated into your media player. This allows you to enjoy your favorite tunes whenever you want, with the convenience of Windows Media Player’s intuitive interface and playback controls.
With the copied music files successfully added to your Windows Media Player library, you are now ready to play and enjoy your favorite music within the media player.
Play the copied music files in Windows Media Player
Once you have added the copied music files to your Windows Media Player library, you can start playing them and enjoying your favorite tunes within the media player. Windows Media Player provides a user-friendly interface and a range of playback options to enhance your music listening experience.
To play the copied music files, navigate to the “Music” section in the navigation pane of Windows Media Player. This will display your music library, including the recently added copied music files. You can browse through your music collection by album, artist, or genre, or you can use the search bar to quickly find specific tracks.
Double-click on a music track to start playing it. Windows Media Player will begin playback, and you will hear the music through your computer’s speakers or headphones. The player interface will display the track’s title, artist, album, and duration.
Windows Media Player offers various playback controls to enhance your listening experience. You can pause, resume, and stop playback using the designated buttons in the player interface. You can also adjust the volume, create playlists, and repeat or shuffle tracks to customize your music playback.
If you prefer a visual representation of the music, Windows Media Player also supports visualizations. Visualizations display animated graphics or images that respond to the music being played. To enable visualizations, go to the “View” tab, select “Visualizations,” and choose the desired visual effect.
Windows Media Player also allows you to customize the audio settings according to your preferences. You can access the equalizer and adjust settings such as bass, treble, and balance to suit your listening experience. This level of customization ensures that you can enjoy your music the way you want.
In addition to local playback, Windows Media Player supports streaming services, allowing you to access and enjoy a wide variety of online music. You can explore radio stations or search for music directly in Windows Media Player, expanding your music library beyond the copied music files on your computer.
Playing the copied music files in Windows Media Player provides a convenient and enjoyable way to listen to your favorite music. The player’s intuitive interface, playback controls, and customization options make it a versatile media player for all your music needs.
Now that you know how to play the copied music files in Windows Media Player, you can immerse yourself in your music collection and enjoy your favorite tracks with ease.
Safely eject the CD from your computer’s disk drive
Once you have completed the process of copying music from the CD and are finished with it, it is important to safely eject the CD from your computer’s disk drive. Safely ejecting the CD ensures that it is removed without causing any damage or loss of data, and prepares your computer for other tasks or CD insertions.
In Windows, there are multiple ways to safely eject a CD from the disk drive. The simplest method is to right-click on the CD icon displayed in Windows Explorer or File Explorer. From the context menu, select the option to “Eject” or “Eject disc.” Windows will then proceed to prepare the CD for safe removal.
An alternative method is to use the physical eject button on your computer’s disk drive. This button is typically located on the front panel of the drive or on the side of a laptop. Simply press the button, and the drive will eject the CD.
It is important to wait until the drive finishes the ejection process before physically removing the CD. A light or indicator on the drive may indicate when it is safe to remove the CD, or you may hear a distinct sound signaling the completion of the ejection.
By safely ejecting the CD, you minimize the risk of data corruption or damage to the CD itself. Abruptly removing the CD while it is still being accessed by the computer can lead to errors and potential loss of data.
After safely ejecting the CD, take a moment to inspect it for any visible damages or scratches. Wipe the surface of the CD with a soft, lint-free cloth to remove any fingerprints or dust particles. Proper handling and storage of CDs can prolong their lifespan and maintain the integrity of the data on them.
With the CD safely ejected, you can now continue using your computer for other tasks or insert a different CD if necessary. Remember to handle CDs with care and always follow the proper procedure to safely eject them from your computer’s disk drive.
Ejecting the CD from your computer’s disk drive ensures the proper handling of the CD and prepares your computer for other tasks. Following this step helps maintain the overall performance and longevity of both the CD and your computer’s disk drive.