
Syntax of the FIND function
The FIND function in Excel is a powerful tool that allows you to search for a specific character or text within a given cell or text string. It helps you determine the position of the character or text you are searching for, making it a valuable function for data analysis and manipulation.
The basic syntax of the FIND function is as follows:
- =FIND(find_text, within_text, [start_num])
find_text: This is the character or text you want to find within the specified cell or text string. It can be a single character, a word, or a combination of characters.
within_text: This is the cell or text string where you want to search for the find_text. It can be a single cell reference or a text string enclosed in double quotes.
start_num (optional): This argument specifies the position in the within_text where the search should begin. If omitted, the search starts from the beginning of the within_text.
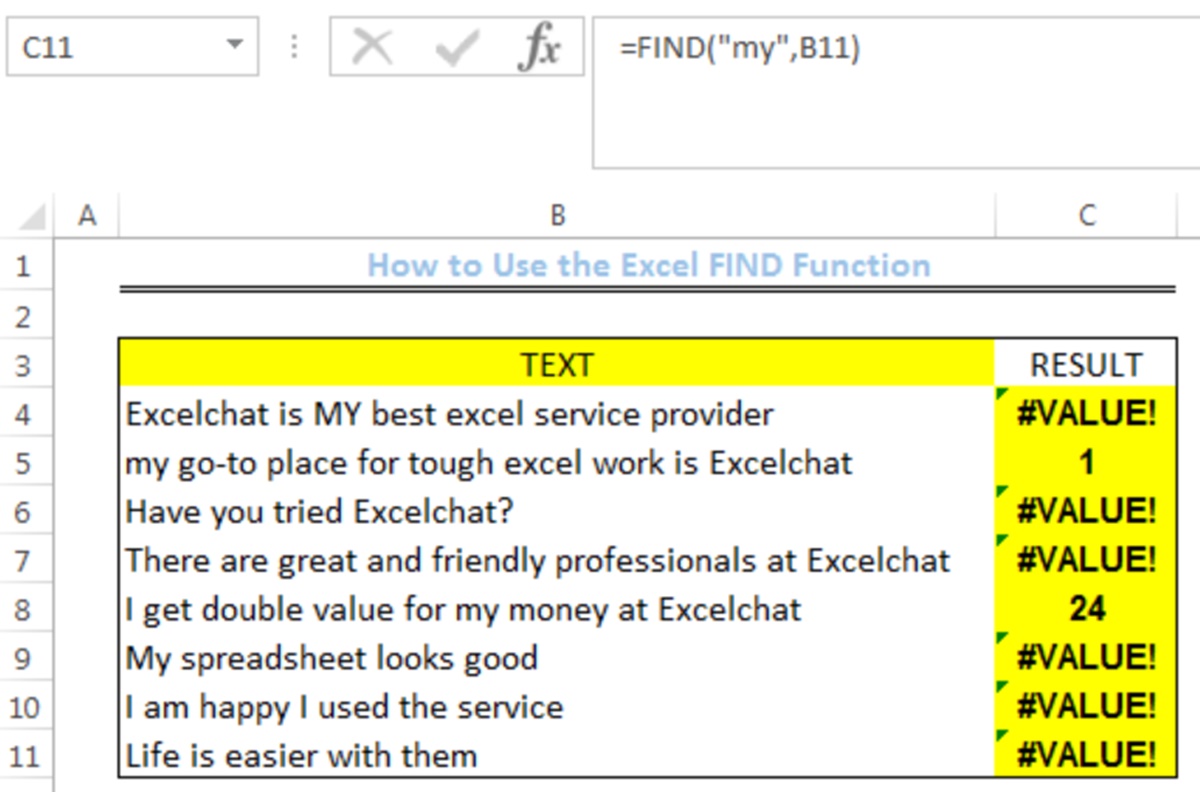
Once you have entered the FIND function with the required arguments, Excel will return the position of the find_text within the within_text. If the find_text is not found, the function will return an error value of #VALUE!.
It’s important to note that the FIND function is case-sensitive. This means that if you search for “A” in a text string that contains “a”, the function will not find a match.
Additionally, the FIND function only returns the position of the first occurrence of the find_text. If there are multiple occurrences, you may need to use other functions in combination with FIND to obtain the desired result.
Overall, the FIND function in Excel provides a convenient way to locate specific characters or text within a given cell or text string. By understanding the syntax and usage of the function, you can effectively utilize it for data analysis and manipulation in your Excel worksheets.
Example usage of the FIND function
To better understand how the FIND function works in Excel, let’s explore a few practical examples:
Example 1: Suppose you have a list of employee names in column A and you want to find the position of the letter “e” in each name. You can use the FIND function as follows:
=FIND("e", A1)
This formula will return the position of the first occurrence of the letter “e” in cell A1. Dragging the formula down will give you the positions for the rest of the employee names.
Example 2: Let’s say you have a text string in cell B1 that contains a combination of letters and numbers, such as “ABCD1234”. You want to find the position of the first number in the text string. You can use the FIND function in conjunction with the ISNUMBER function as follows:
=FIND(1, B1)
This formula will return the position of the first number in the text string “ABCD1234”. In this case, it will return 5, indicating that the number 1 is located at the fifth position.
Example 3: Suppose you have a sentence in cell C1 and you want to find the position of a space in the sentence. You can use the FIND function with a space as the find_text, as shown below:
=FIND(" ", C1)
This formula will return the position of the first space in the sentence. If there are multiple spaces, the function will only return the position of the first occurrence.
By utilizing the FIND function in various scenarios, you can effectively analyze and manipulate data within your Excel worksheets. Whether you need to locate specific characters, find the position of numbers, or identify the position of spaces, the FIND function offers a versatile solution.
Finding a specific character in a text string using the FIND function
The FIND function in Excel is particularly useful when you need to locate a specific character within a text string. This can be helpful for various tasks, such as extracting specific information or performing data analysis. By using the FIND function, you can effortlessly find the position of a character within a given text string.
Let’s take an example to illustrate how you can use the FIND function to find a specific character. Suppose you have a list of email addresses in column A, and you want to find the position of the “@” symbol in each email address.
To find the position of the “@” symbol, you can input the following formula in cell B1:
=FIND("@", A1)
This formula tells Excel to search for the “@” symbol in the text string in cell A1. Excel will then return the position of the first occurrence of the “@” symbol.
If you drag the formula down to apply it to the remaining cells in column B, you’ll get the position of the “@” symbol in each email address.
For example, if the email address in cell A2 is “example@example.com”, the formula =FIND("@", A2) will return 8, as the “@” symbol is located at the eighth position.
Using the FIND function allows you to quickly identify the position of a specific character within a text string. This knowledge can be utilized for various purposes, such as extracting specific information from a string or performing conditional calculations based on the position of a character.
By incorporating the FIND function into your Excel workflow, you can efficiently navigate and manipulate text-based data, making your data analysis tasks more efficient and accurate.
Using the FIND function to find the position of a space in a text string
The FIND function in Excel can also be utilized to find the position of a space within a text string. This can be particularly useful when you need to separate words or extract specific parts of a text string based on the position of spaces.
To find the position of a space in a text string, you can follow these steps:
- Step 1: Enter the text string in a cell. Let’s say the text string is in cell A1.
- Step 2: In another cell, input the following formula:
=FIND(" ", A1)
This formula tells Excel to search for a space within the text string in cell A1. Excel will then return the position of the first occurrence of the space.
If you drag the formula down to apply it to other cells, you can find the position of the space in each respective text string.
For example, if the text string in cell A2 is “Hello World!”, the formula =FIND(" ", A2) will return 6, as the space is located at the sixth position in the text string.
The FIND function provides a versatile way to locate the position of a space within a text string. Once you know the position of the space, you can use other functions like LEFT, RIGHT, or MID to extract specific parts of the text string based on the position.
By harnessing the power of the FIND function, you can efficiently analyze and manipulate text-based data in Excel, making your data processing tasks more streamlined and accurate.
Finding the position of a word within a text string using the FIND function
The FIND function in Excel can be a powerful tool for locating the position of a specific word within a text string. This can be useful for various tasks, such as identifying keyword occurrences, extracting relevant information, or performing data analysis.
To find the position of a word within a text string, you can follow these steps:
- Step 1: Enter the text string in a cell, for example, in cell A1.
- Step 2: In another cell, input the following formula:
=FIND("word", A1)
This formula tells Excel to search for the specified word within the text string in cell A1. Excel will then return the position of the first occurrence of the word.
If you drag the formula down to apply it to other cells, you can find the position of the word in each respective text string.
For example, if the text string in cell A2 is “The quick brown fox jumps over the lazy dog,” and you want to find the position of the word “quick,” the formula =FIND("quick", A2) will return 5, as the word “quick” starts at the fifth position in the text string.
This method can be helpful when you need to identify the position of specific words within a text string and perform further analysis or extraction based on that position.
It’s important to note that the FIND function is case-sensitive. This means that if you search for “word” in a text string that contains “Word,” the function will not find a match. If you want a case-insensitive search, you can use the SEARCH function instead.
By leveraging the power of the FIND function, you can efficiently locate the position of specific words within text strings, enabling you to extract valuable information and perform advanced data analysis in Excel.
Using the FIND function with additional functions to extract text
The FIND function in Excel becomes even more powerful when combined with other functions, allowing you to not only find the position of specific characters or words but also extract relevant text based on that position. By incorporating additional functions like LEFT, RIGHT, or MID, you can manipulate text strings and extract the desired portions of data.
Let’s explore a few examples of how you can use the FIND function with other functions to extract text:
- Extracting text after a specific character: Suppose you have a text string in cell A1 that contains a name followed by a comma and space, like “Smith, John”. If you want to extract the first name (text after the comma and space), you can use the MID function along with the FIND function:
=MID(A1, FIND(", ", A1) + 2, LEN(A1) - FIND(", ", A1) - 1)- Extracting text before a specific character: Assume you have a text string in cell B1 that contains an email address within square brackets, like “[example@example.com]”. If you want to extract just the email address (text before the opening square bracket), you can use the LEFT function along with the FIND function:
=LEFT(B1, FIND("[", B1) - 1)- Extracting a specific number of characters after a certain position: Let’s say you have a text string in cell C1 that represents a product code, like “ABC123456”. If you want to extract the last six digits of the product code, you can use the RIGHT function along with the FIND function:
=RIGHT(C1, LEN(C1) - FIND("D", C1))
By combining the FIND function with other functions, you can easily extract specific portions of text based on the position of characters, providing you with more control and flexibility in data extraction and manipulation.
These are just a few examples of how you can use the FIND function with other functions to extract text. With some creativity and an understanding of various Excel functions, you can perform advanced text manipulation and data extraction tasks to meet your specific needs.