
How to Access the Control Center on your Apple Watch
The Apple Watch Control Center is a convenient feature that allows you to access essential settings and functions with just a swipe and a tap. Whether you want to adjust the brightness, control your music playback, or toggle the silent mode, the Control Center provides quick and easy access to these options. Here’s how you can access the Control Center on your Apple Watch:
1. Start by raising your wrist or tapping the screen to wake up your Apple Watch.
2. On your watch face, swipe up from the bottom of the screen. This gesture will reveal the Control Center.
3. You can now see various icons representing different settings and functions.
4. To access a specific setting or function, simply tap on the respective icon.
That’s it! You have successfully accessed the Control Center on your Apple Watch. Now, let’s explore some of the key features and functions available in the Control Center.
Note: If you’re using an Apple Watch Series 4 or later, you can access the Control Center by swiping down from the top-right corner of the screen instead of swiping up from the bottom.
Adjusting the Brightness and Volume from the Control Center
The Control Center on your Apple Watch allows you to easily adjust the brightness and volume settings without navigating through menus or settings. Here’s how you can do it:
Brightness:
1. Access the Control Center as mentioned in the previous section.
2. Look for the brightness icon, which looks like a sun.
3. Tap on the brightness icon to toggle between different brightness levels. Each tap will adjust the brightness incrementally, allowing you to find the perfect brightness setting for your watch face.
Volume:
1. Access the Control Center on your Apple Watch.
2. Locate the volume icon, which is represented by speakers.
3. Tap on the volume icon to raise or lower the volume level. Each tap will adjust the volume incrementally, allowing you to find the desired level.
It’s worth noting that adjusting the brightness and volume from the Control Center on your Apple Watch will not affect your paired iPhone or other connected devices. The settings you make will only apply to your Apple Watch.
By having the ability to quickly adjust the brightness and volume settings from the Control Center, you can easily adapt to different lighting conditions and enjoy an optimal audio experience on your Apple Watch.
Using the “Do Not Disturb” Mode from the Control Center
The “Do Not Disturb” mode on your Apple Watch allows you to temporarily silence incoming notifications and alerts, ensuring uninterrupted focus or a peaceful environment. With the Control Center, enabling and disabling this mode is a breeze. Here’s how you can use the “Do Not Disturb” mode from the Control Center:
1. Open the Control Center on your Apple Watch by following the steps mentioned earlier.
2. Look for the “Do Not Disturb” icon, which resembles a crescent moon.
3. Tap on the “Do Not Disturb” icon to toggle it on or off.
When the “Do Not Disturb” mode is enabled, your Apple Watch will not vibrate or play any sound for incoming notifications. However, you can still view the notifications by raising your wrist or tapping the screen. This mode is especially useful in scenarios such as meetings, workouts, or when you simply need a break from constant alerts.
If you wish to schedule “Do Not Disturb” mode to automatically activate during specific times, you can customize this setting in the Watch app on your connected iPhone. Simply go to the “My Watch” tab, select “Do Not Disturb,” and then tap on “Scheduled.” From there, you can set the start and end time for “Do Not Disturb” mode to automatically activate and deactivate.
Keep in mind that enabling the “Do Not Disturb” mode from the Control Center on your Apple Watch will only affect notifications and alerts on your watch. Your paired iPhone’s “Do Not Disturb” settings will remain unaffected.
By utilizing the “Do Not Disturb” mode from the Control Center, you can have peace of mind knowing that your Apple Watch won’t be a source of interruptions when you need some quiet time or a focused environment.
Controlling your Music Playback from the Control Center
The Control Center on your Apple Watch provides convenient controls for managing your music playback, allowing you to easily play, pause, skip tracks, and adjust the volume without having to navigate through multiple menus or apps. Here’s how you can control your music playback from the Control Center:
1. Open the Control Center on your Apple Watch by swiping up from the bottom of the watch face.
2. Look for the music icon, which resembles a music note.
3. Tap on the music icon to open the music controls.
4. You’ll now see the controls for your currently playing music, including play/pause, previous track, and next track buttons.
5. Tap on the play/pause button to start or pause the music playback.
6. To skip to the previous or next track, tap on the corresponding button.
7. Adjust the volume by using the digital crown on the side of your Apple Watch. Turning it clockwise will increase the volume, while turning it counterclockwise will decrease the volume.
In addition to basic music controls, the music playback controls in the Control Center also provide information about the currently playing track, such as the title and artist. You can even control music playback on your iPhone and other connected devices using the Control Center on your Apple Watch.
Whether you’re going for a run, working out, or simply enjoying some music, the Control Center on your Apple Watch allows for seamless music playback control, bringing convenience right to your wrist.
How to Quickly Toggle the Silent Mode on your Apple Watch
The silent mode feature on your Apple Watch allows you to quickly silence incoming calls, notifications, and alerts without having to dig into complex settings. With the Control Center, toggling the silent mode on or off is a simple and convenient process. Here’s how you can do it:
1. Open the Control Center on your Apple Watch.
2. Look for the silent mode icon, which is represented by a bell with a slash through it.
3. Tap on the silent mode icon to quickly toggle the mode on or off.
When the silent mode is enabled, your Apple Watch will not produce any sound or vibration for incoming calls, messages, or notifications. However, you will still receive the notifications visually on your watch face, allowing you to stay updated without any audible interruptions.
If you prefer to completely disable all notifications and alerts, you can enable the “Do Not Disturb” mode as described in a previous section. This will ensure that all notifications are muted until you manually disable the “Do Not Disturb” mode.
It’s important to note that enabling the silent mode from the Control Center on your Apple Watch will not impact the volume settings on your paired iPhone or other connected devices. The silent mode setting you make will only apply to your Apple Watch specifically.
By utilizing the silent mode feature from the Control Center on your Apple Watch, you can quickly and easily control the sound and vibration settings, ensuring that your Apple Watch remains discreet in certain situations or when you simply need some peace and quiet.
Changing the Airplane Mode Settings from the Control Center
The Airplane Mode feature on your Apple Watch allows you to quickly disable all wireless connections, including cellular, Wi-Fi, and Bluetooth, with just a tap. This is especially useful when you’re on an airplane or in an environment where you need to cut off all connections. With the Control Center, changing the Airplane Mode settings on your Apple Watch is a simple process. Here’s how you can do it:
1. Open the Control Center on your Apple Watch.
2. Look for the Airplane Mode icon, which resembles an airplane.
3. Tap on the Airplane Mode icon to enable or disable the mode.
When the Airplane Mode is enabled, you’ll see a small airplane icon in the top left corner of your Apple Watch face. This indicates that all wireless connections have been turned off. You won’t be able to make or receive calls, send messages, or use any internet-related features until you disable Airplane Mode.
It’s important to note that enabling Airplane Mode on your Apple Watch will also enable Airplane Mode on your paired iPhone if it’s within range. This ensures that both devices comply with airline regulations and do not interfere with aircraft systems.
To disable Airplane Mode and restore wireless connectivity, simply repeat the above steps and tap on the Airplane Mode icon again to deactivate it.
By utilizing the Airplane Mode feature from the Control Center on your Apple Watch, you can easily control all wireless connections with a single tap, ensuring compliance with airline regulations and conserving battery life when necessary.
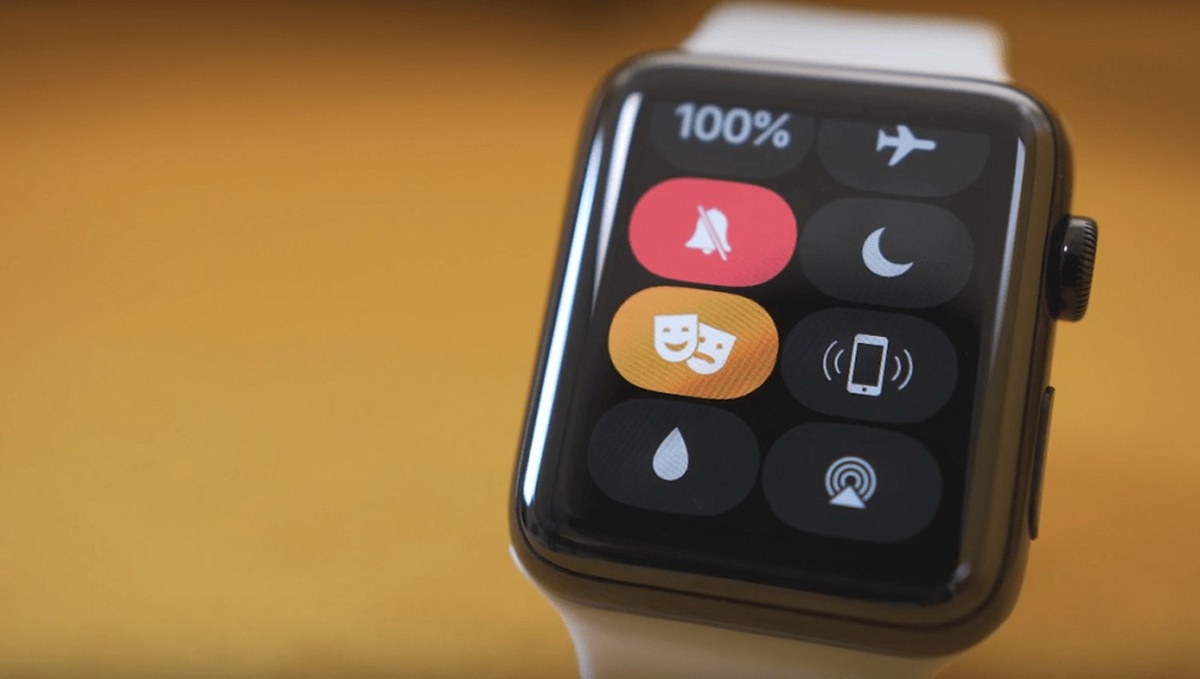
Enabling the Theater Mode on your Apple Watch from the Control Center
The Theater Mode feature on your Apple Watch allows you to enjoy movies, performances, or any other situation where you don’t want your watch to illuminate or make noise with incoming notifications. It essentially mutes the sound and turns off the raise-to-wake feature. With the Control Center, enabling Theater Mode on your Apple Watch is a seamless process. Here’s how you can do it:
1. Open the Control Center on your Apple Watch.
2. Look for the Theater Mode icon, which is represented by two theater masks.
3. Tap on the Theater Mode icon to enable or disable the mode.
When Theater Mode is enabled, you’ll see a small theater masks icon in the top right corner of your watch face. This indicates that Theater Mode is active, and your Apple Watch’s screen won’t light up when you raise your wrist, preserving the overall ambience. You’ll also receive haptic alerts instead of sound notifications when you receive messages or other notifications.
It’s important to note that even with Theater Mode enabled, you can still access your notifications and messages by tapping the screen or pressing the digital crown. This allows you to discreetly check any important updates without disturbing others.
To disable Theater Mode, simply repeat the steps above and tap on the Theater Mode icon in the Control Center again.
Enabling Theater Mode on your Apple Watch from the Control Center provides a convenient way to limit distractions in situations where you want to focus on the moment or enjoy a performance without any interruptions from your watch’s display or sound.
Accessing the Battery Saving Mode from the Control Center
The Battery Saving Mode on your Apple Watch is a useful feature that helps preserve battery life when your watch’s battery is running low. It temporarily disables certain power-intensive features to extend the remaining battery life so that you can continue using your watch for essential functions. With the Control Center, accessing the Battery Saving Mode on your Apple Watch is a simple process. Here’s how you can do it:
1. Open the Control Center on your Apple Watch by swiping up from the bottom of the watch face.
2. Look for the battery icon, which resembles a battery symbol.
3. Tap on the battery icon to access the Battery Saving Mode.
When the Battery Saving Mode is enabled, you’ll see a small yellow percentage sign in the top right corner of your watch face, indicating that the battery life is being conserved. In this mode, your Apple Watch will disable certain features like the always-on display, background app refresh, and some haptic feedback to maximize the remaining battery life.
It’s important to note that while the Battery Saving Mode helps extend battery life, it may limit certain functionalities and features for a temporary period. Once your Apple Watch’s battery level is back to a sufficient level, you can disable the Battery Saving Mode to restore full functionality.
To exit the Battery Saving Mode, simply repeat the same steps mentioned above and tap on the battery icon in the Control Center. This will disable the Battery Saving Mode, allowing your Apple Watch to resume normal operation with all its features and functionalities.
By accessing the Battery Saving Mode from the Control Center on your Apple Watch, you can effectively manage your watch’s battery life and ensure that it lasts longer, even when you’re running low on power and need to extend its usage.
Using the Water Lock Mode from the Control Center
The Water Lock mode on your Apple Watch is a handy feature that allows you to use your watch while swimming or engaging in water-based activities. It ensures that water doesn’t accidentally activate the screen or interact with the device. With the Control Center, enabling and disabling the Water Lock mode on your Apple Watch is a straightforward process. Here’s how you can do it:
1. Open the Control Center on your Apple Watch.
2. Look for the water droplet icon, which signifies the Water Lock mode.
3. Tap on the water droplet icon to enable the Water Lock mode.
When Water Lock mode is enabled, your Apple Watch’s screen will lock to prevent accidental touches or interactions. The speaker will also emit sound vibrations to expel any water that may be trapped in the device. This helps protect your Apple Watch from potential water damage while allowing you to enjoy aquatic activities without worry.
It’s important to note that when the Water Lock mode is enabled, you won’t be able to use the touch screen. Instead, you can use the Digital Crown to navigate and scroll through content or the side button to access the Control Center.
After you’re done with your water-based activities, it’s necessary to disable the Water Lock mode to regain full functionality. Here’s how you can do it:
1. Turn the Digital Crown on your Apple Watch counterclockwise to unlock the screen. This will activate the Eject Water screen.
2. Tap on the “Turn Digital Crown to unlock and eject water” message on the screen.
3. Continue turning the Digital Crown until you see and hear a series of beeping sounds. This helps expel any water that may be trapped in the speaker.
4. Once the water is cleared, you can use the touch screen as usual.
By utilizing the Water Lock mode from the Control Center on your Apple Watch, you can confidently engage in water activities without worrying about potential water damage or accidental interactions with the screen.
How to Customize the Control Center on your Apple Watch
The Control Center on your Apple Watch provides quick access to various settings and functions. Did you know that you can customize the Control Center to include the specific features you use most? This allows you to personalize your Apple Watch experience and tailor the Control Center to your needs. Here’s how you can customize the Control Center on your Apple Watch:
1. Open the Control Center on your Apple Watch by swiping up from the bottom of the watch face.
2. Scroll down to the bottom of the Control Center.
3. Tap on the “Edit” button.
You’ll now see a list of available features that can be added or removed from the Control Center. Here, you can customize which options are readily accessible and reorder them to your preference. To add an option to the Control Center:
1. Tap the green “+” button next to the feature you want to add.
2. The added feature will now appear in the “Included” section of the Control Center.
To remove a feature from the Control Center:
1. Tap the red “-” button next to the feature you want to remove.
2. The feature will be removed from the “Included” section and placed in the “Not Included” section below.
To reorder the features in the Control Center:
1. Tap and hold the”≡” icon next to the feature in the “Included” section.
2. Drag it to your desired position in the list.
Once you’ve customized the Control Center to your liking, simply press the Digital Crown or swipe down on the screen to exit the editing mode and save your changes.
By customizing the Control Center on your Apple Watch, you can ensure that the features you use most frequently are easily accessible in a single swipe, enhancing the efficiency and convenience of your Apple Watch experience.
Troubleshooting Common Issues with the Control Center on your Apple Watch
The Control Center on your Apple Watch is a handy tool that provides quick access to various settings and functions. However, like any technology, you may encounter some issues or glitches with the Control Center. Here are some common issues you may face and troubleshooting steps to resolve them:
Issue 1: Control Center not opening
If the Control Center is not opening on your Apple Watch, try restarting your watch. To do this, press and hold the side button until the power off slider appears. Then, drag the slider to turn off your watch. After a few seconds, press and hold the side button again until the Apple logo appears, indicating that your watch is restarting. Try accessing the Control Center again after the restart.
Issue 2: Control Center icons not responding
If the icons in the Control Center are not responding when tapped, make sure your Apple Watch screen is clean. Sometimes, sweat, moisture, or dirt can interfere with touch sensitivity. Use a soft, lint-free cloth to gently wipe the screen, ensuring it is free from any debris. If the issue persists, try restarting your watch as mentioned in the previous step.
Issue 3: Control Center customization not saving
If you’re having trouble customizing the Control Center and your changes are not saving, ensure that you’re exiting the editing mode properly. Press the Digital Crown or swipe down on the screen to exit the editing mode and save your changes. If the customization still doesn’t save, try restarting your watch and reattempt the customization process.
Issue 4: Missing or hidden Control Center features
If you notice that certain features are missing from the Control Center or are hidden, you may need to add them back. Open the Control Center and scroll to the bottom. Tap the “Edit” button and look for the feature in the “Not Included” section. If you find the missing feature, tap the green “+” button to add it back to the Control Center. If the feature is not listed, make sure it is available on your watch model and software version.
Issue 5: Control Center freezing or unresponsive
If the Control Center freezes or becomes unresponsive, try force quitting the Control Center app. Press the side button of your Apple Watch until the power off slider appears. Then, press and hold the Digital Crown until the Control Center app closes. Wait a few seconds, and then press the side button again to reopen the Control Center.
If none of the troubleshooting steps resolve the issues with the Control Center on your Apple Watch, consider updating your watch’s software to the latest version. Go to the Watch app on your iPhone, navigate to “General,” and select “Software Update.” Follow the on-screen instructions to update your watch.
By following these troubleshooting steps, you can fix common issues with the Control Center on your Apple Watch and ensure smooth access to its convenient features and settings.