
Setting Up your Amazon Alexa App
Welcome to the world of Amazon Alexa, a virtual assistant that can make your life easier and more convenient. To get started, you’ll need to set up the Amazon Alexa app on your smartphone or tablet. This app is available for both iOS and Android devices and serves as the central hub for managing your Alexa-enabled devices and accessing various features, including the shopping list function.
Here’s a step-by-step guide to help you set up your Amazon Alexa app:
- Download and install the Amazon Alexa app from the App Store or Google Play Store. Make sure you are connected to a reliable Wi-Fi network.
- Open the app and log in using your Amazon account credentials. If you don’t have an Amazon account, you can create one for free.
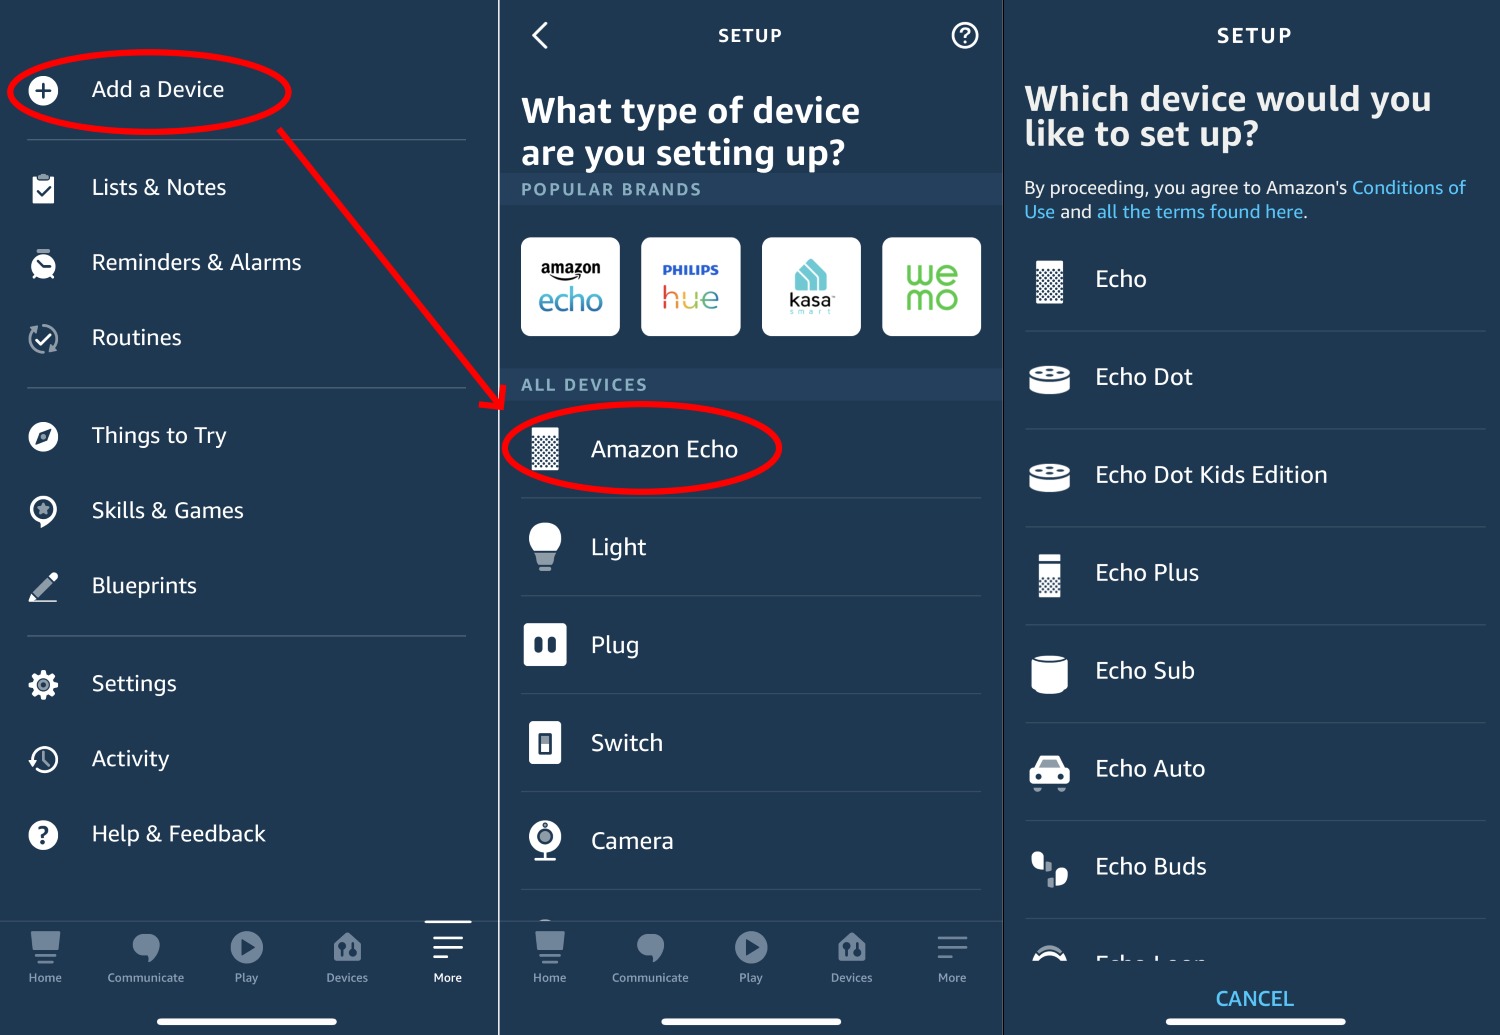
- Once you’re logged in, the app will prompt you to set up a new device. Tap on the “+” icon in the top right corner of the screen and select the type of Alexa-enabled device you want to set up. Follow the on-screen instructions to complete the device setup process.
- After setting up your device, you’ll be presented with a list of available skills and features. Tap on “Shopping List” to enable the shopping list function.
- Next, you may be asked to grant permission for the app to access your device’s microphone and location. These permissions are necessary for Alexa to fulfill voice commands and provide accurate information.
- Once you’ve completed the setup process, you’re ready to start using the shopping list function. Tap on the menu icon in the top left corner of the app to access the main navigation menu. From there, select “Shopping List” to view and manage your shopping list.
Setting up your Amazon Alexa app is quick and easy, and it’s the first step towards enjoying the convenience of managing your shopping list with just your voice. With the app properly configured, you can now move on to creating, adding, editing, and sharing your shopping list with ease.
Connecting your Alexa Device to your Amazon Account
In order to fully utilize the features of your Alexa device, you need to connect it to your Amazon account. This allows your device to access your personalized preferences, shopping lists, and other Alexa-related information. Here’s how you can connect your Alexa device to your Amazon account:
- Ensure that your Alexa device is properly set up and connected to a power source.
- Open the Amazon Alexa app on your smartphone or tablet and sign in using your Amazon account credentials.
- Tap on the Devices icon at the bottom-right corner of the app to access the Devices screen.
- On the Devices screen, tap on the “+” icon to add a new device.
- Follow the on-screen instructions to select the type of Alexa device you want to connect. This could be an Amazon Echo, Echo Dot, or any other Alexa-enabled device.
- The app will guide you through the setup process, which may involve connecting your device to your Wi-Fi network and configuring other settings.
- Once the setup is complete, you will be prompted to give permission for your device to access your Amazon account. Confirm the connection by selecting “Yes.”
- Your Alexa device will then be linked to your Amazon account, and you can start enjoying all the benefits of Alexa, including managing your shopping lists.
Connecting your Alexa device to your Amazon account is a crucial step in the setup process. It allows your device to access your personalized information and preferences, making your Alexa experience seamless and tailored to your needs. With your device successfully linked to your account, you can proceed to explore and utilize other features available through the Amazon Alexa app.
Accessing the Shopping List Function
Once you have set up your Amazon Alexa app and connected your Alexa device to your Amazon account, accessing the shopping list function is a breeze. The shopping list feature is designed to make it convenient for you to create, manage, and access your shopping lists through your Alexa-enabled devices. Here’s how you can access the shopping list function:
- Launch the Amazon Alexa app on your smartphone or tablet.
- Sign in to your Amazon account if you haven’t already done so.
- Tap on the menu icon in the top-left corner of the app to open the main navigation menu.
- From the menu, select “Shopping List” to access your shopping lists.
Once you’re in the shopping list section, you’ll be able to see any existing shopping lists you have created. If you’re using the shopping list function for the first time, you may see a blank slate. Don’t worry; you can create a new shopping list in no time.
Accessing the shopping list function through the Amazon Alexa app allows you to conveniently manage your lists from the comfort of your smartphone or tablet. By having your shopping lists readily available, you can quickly add or remove items, check off completed items, and keep track of what you need to buy, all in one place.
Next, let’s explore how to create a new shopping list using the Amazon Alexa app.
Creating a New Shopping List
The Amazon Alexa app makes it easy to create and manage multiple shopping lists, ensuring that you stay organized while shopping. Here’s how you can create a new shopping list using the app:
- Open the Amazon Alexa app on your smartphone or tablet.
- If you’re not already in the shopping list section, tap on the menu icon in the top-left corner of the app to access the main navigation menu.
- From the menu, select “Shopping List” to enter the shopping list section.
- To create a new shopping list, tap on the “+” icon at the top-right corner of the app. You can give your list a name, such as “Groceries,” “Home Improvement,” or any other category you prefer.
- Once you’ve named your shopping list, hit the “Save” button to create it.
Congratulations! You’ve successfully created a new shopping list in the Amazon Alexa app. Now you can start populating it with items that you need to buy.
Creating separate shopping lists based on different categories or stores can help you stay organized and streamline your shopping experience. For example, you can create a list specifically for groceries, another for household items, and so on. This way, you can access the appropriate list when you need it, making your shopping trips more efficient.
Now that you have a shopping list ready, it’s time to learn how to add items to your list using the Amazon Alexa app.
Adding Items to your Shopping List
With the Amazon Alexa app, adding items to your shopping list is a simple and convenient process. Whether you’re at home or on the go, you can easily add items to your list using your voice or manually entering them. Here’s how:
- Open the Amazon Alexa app on your smartphone or tablet.
- Navigate to the shopping list section by tapping on the menu icon in the top-left corner of the app and selecting “Shopping List.”
- Once you’re in the shopping list section, look for the “Add Item” button. This button may be represented by a “+” or a similar icon.
- To add items using your voice, tap on the microphone icon and say, “Add [item name] to my shopping list.” Alexa will recognize your voice command and add the item to your list.
- If you prefer to manually enter items, tap on the text field provided and type in the name of the item you want to add. Hit “Enter” to save the item to your list.
- You can repeat the process to add multiple items to your shopping list. Alexa will keep track of all the items you add.
Adding items to your shopping list is quick and intuitive, allowing you to capture grocery items, household essentials, or any other items you need to purchase. By using your voice or manually typing them in, you can ensure that everything you need is added to your list, making your shopping trips more efficient.
Now that you know how to add items to your shopping list, let’s explore how you can edit and delete items as needed.
Editing and Deleting Items on your Shopping List
The Amazon Alexa app provides you with the flexibility to edit and delete items on your shopping list, ensuring that your list remains up to date and reflects your current needs. Here’s how you can make changes to your shopping list:
- Launch the Amazon Alexa app on your smartphone or tablet.
- Navigate to the shopping list section by tapping on the menu icon in the top-left corner of the app and selecting “Shopping List.”
- Scroll through your shopping list and locate the item you want to edit or delete.
- To edit an item, tap on the item’s name to select it. This will allow you to modify the item’s name or any other relevant details.
- To delete an item, swipe left on the item or tap on the three-dot menu icon next to the item. From the menu that appears, select “Delete” to remove the item from your list.
- Make any necessary changes to your list by editing or deleting items as needed.
The ability to edit and delete items on your shopping list gives you the flexibility to make adjustments based on changes in your needs or preferences. Whether you want to update an item’s name, remove completed items, or make any other modifications, the Amazon Alexa app allows you to do so with ease.
Now that you know how to edit and delete items, let’s explore how to sync your shopping list with your Alexa devices.
Syncing your Shopping List with Alexa Devices
The beauty of the Amazon Alexa ecosystem is its seamless integration across devices. This extends to syncing your shopping list, ensuring that it is accessible on all your Alexa-enabled devices. Here’s how you can sync your shopping list with your Alexa devices:
- Make sure that your Alexa-enabled devices, such as an Echo speaker or Echo Show, are connected to the same Amazon account as your Alexa app.
- Open the Amazon Alexa app on your smartphone or tablet.
- Tap on the menu icon in the top-left corner of the app to open the main navigation menu.
- From the menu, select “Settings” to access the settings section.
- In the settings section, choose the device you want to sync with from the list of available devices.
- Scroll down to the “Shopping & To-do Lists” section and toggle the switch to enable syncing of your shopping list with the selected device.
- Repeat this process for each Alexa-enabled device you want to sync with your shopping list.
By syncing your shopping list with your Alexa devices, you can access and manage your list hands-free. This means you can add items, cross off completed items, and review your shopping list by simply using your voice commands. Whether you’re in the kitchen, living room, or any other area of your home, your shopping list is always accessible through your Alexa devices.
Now that your shopping list is synced across your Alexa devices, let’s explore how you can share your shopping list with others.
Sharing your Shopping List with Others
Sharing your shopping list with family members, roommates, or anyone else can be incredibly useful, especially when multiple people are responsible for shopping or contributing to the list. The Amazon Alexa app allows you to easily share your shopping list with others, ensuring seamless collaboration and coordination. Here’s how you can share your shopping list:
- Open the Amazon Alexa app on your smartphone or tablet.
- Navigate to the shopping list section by tapping on the menu icon in the top-left corner of the app and selecting “Shopping List.”
- Tap on the three-dot menu icon at the top-right corner of the shopping list screen.
- From the menu that appears, select “Manage List”
- Scroll down to the “Share List” section and tap on it.
- You will be prompted to enter the email address or Amazon account of the person you want to share the list with. Enter the necessary information.
- Choose the level of access you want to grant to the person, such as “Read only” or “Full access.”
- Tap on “Send” to share the shopping list.
Once you share your shopping list, the person you invited will receive an email notification or a notification within the Amazon Alexa app. They can then access and collaborate on the shopping list, adding or deleting items as needed. Any changes made by them will be reflected in real-time and vice versa.
Sharing your shopping list with others simplifies the coordination of shopping tasks and ensures that everyone is on the same page. Whether it’s a roommate adding items they need or a family member checking off completed items, the shared shopping list makes it easy to collaborate and stay organized.
Now that you know how to share your shopping list, let’s explore how you can use Alexa to manage your list seamlessly.
Using Alexa to Manage your Shopping List
One of the key benefits of having an Alexa-enabled device is the ability to manage your shopping list hands-free. With just your voice, you can add, edit, and check off items on your shopping list. Here’s how you can use Alexa to effortlessly manage your shopping list:
- Ensure that your Alexa-enabled device is connected to the same Amazon account as your Alexa app and your synced shopping list.
- Start by waking up your Alexa device with the wake word (default is “Alexa”).
- To add items, simply say, “Alexa, add [item name] to my shopping list.” Alexa will confirm the addition by stating, “I’ve added [item name] to your shopping list.”
- If you want to remove an item, say, “Alexa, remove [item name] from my shopping list.” Alexa will acknowledge the removal.
- To check off completed items, say, “Alexa, mark [item name] as completed.” Alexa will indicate that the item has been checked off your list.
- You can also ask Alexa to read out your shopping list by saying, “Alexa, what’s on my shopping list?” Alexa will then provide an auditory list of the items.
Using Alexa to manage your shopping list allows for a seamless and hands-free experience. Whether you’re in the kitchen, getting ready to head out, or simply need to add an item quickly, Alexa is ready to assist you. With the ability to add, remove, and check off items on your list through simple voice commands, managing your shopping list has never been easier.
Now that you know how to utilize Alexa to manage your shopping list, let’s explore how you can check off items and keep track of your progress.
Checking Items off your Shopping List
Checking off items on your shopping list is a satisfying way to keep track of your progress and ensure that you don’t miss anything. With the Amazon Alexa app and your Alexa-enabled devices, you can easily mark items as completed. Here’s how:
- If you’re using the Amazon Alexa app on your smartphone or tablet, open the app and navigate to the shopping list section.
- If you’re using an Alexa-enabled device, wake it up by saying the wake word (default is “Alexa”).
- To check off an item on your shopping list using the app, tap on the checkbox or the item itself. This action will mark the item as completed.
- If you’re using an Alexa-enabled device, simply say, “Alexa, mark [item name] as completed.” Alexa will acknowledge the completion of the item and cross it off your list.
By checking off items on your shopping list, you can easily see what you have already purchased or completed. It helps you stay organized while shopping and ensures that you don’t forget anything on your list.
Keep in mind that the ability to check off items varies depending on the device you’re using. Some devices, such as Echo Show, allow you to visually see and interact with your shopping list, making it even more convenient to track your progress.
Now that you know how to check off items on your shopping list, you’ll have no trouble staying organized and ensuring a successful shopping trip.