
What is Slide Master in PowerPoint?
The Slide Master is a powerful feature in Microsoft PowerPoint that allows you to design and customize the layout, formatting, and style of your presentation. It serves as a template for other slides in your presentation, providing consistency and a professional look throughout. Think of the Slide Master as the blueprint for your entire presentation.
By using the Slide Master, you can easily apply changes to your entire presentation with just a few clicks, saving you time and effort. Whether you want to modify fonts, colors, placeholders, background images, or any other visual elements, the Slide Master is your go-to tool.
When you create a new PowerPoint presentation, it automatically includes a default Slide Master with predefined layouts. These layouts determine the positioning of elements like titles, text boxes, images, and other content placeholders on your slides. However, you are not limited to these default layouts – you can create your own unique layouts or modify the existing ones to suit your specific needs.
One of the main advantages of using the Slide Master is its ability to ensure consistency across all slides. When you make changes to the Slide Master, those changes are automatically applied to all slides based on that master. This eliminates the tedious task of manually updating each slide individually, making it ideal for large presentations and corporate branding.
The Slide Master also allows you to create custom themes, which can include a combination of font styles, colors, backgrounds, and effects. This enables you to create a unified and visually appealing presentation that aligns with your brand or personal preferences.
Creating a Slide Master
To create a Slide Master in PowerPoint, follow these simple steps:
- Open PowerPoint and navigate to the “View” tab.
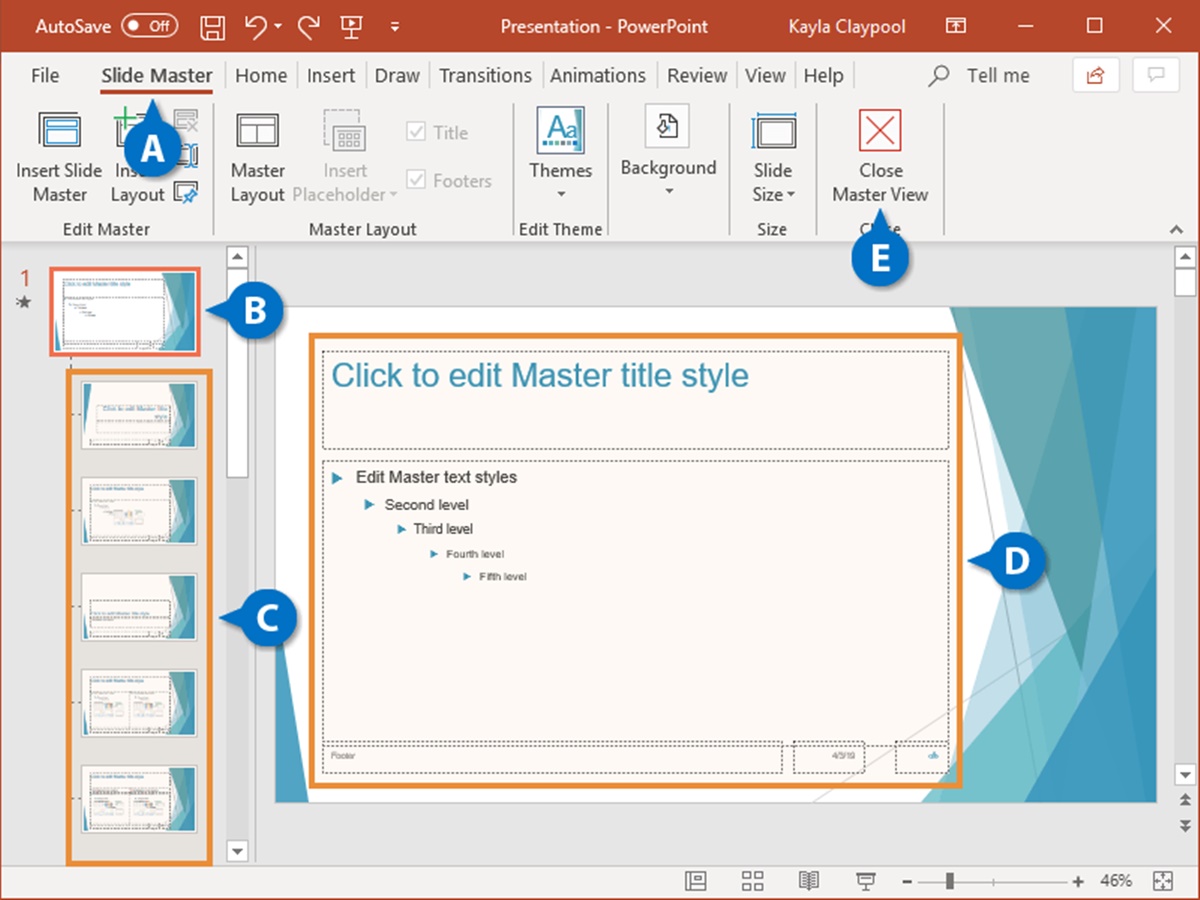
- Click on “Slide Master” in the “Master Views” section. This will open the Slide Master view, displaying a thumbnail of the default Slide Master on the left pane and a larger view of the selected master on the right.
- On the left pane, you will see the available slide layouts under the Slide Master. To create a new layout, right-click on any existing layout and select “Insert Layout” from the context menu.
- A new layout will be added below the selected one. Customize the new layout by adding elements such as a title, text placeholders, or any other objects you want to appear in your slides.
- To modify the layout, use the options in the “Slide Master” tab, such as changing the background, font styles, or adding placeholders for specific content.
- If you want to remove a layout, right-click on it and select “Delete Layout”. Confirm the deletion in the popup window.
- Repeat the steps above to create additional layouts or make further modifications to existing ones.
Remember that changes made to the Slide Master will affect all slides based on that master, ensuring consistency throughout your presentation. Furthermore, the slide layouts you create in the Slide Master view can be accessed and used in the normal slide view when you are creating or editing slides.
By taking the time to customize your Slide Master, you can create a visually compelling and well-organized presentation that captures and holds your audience’s attention.
Customizing Slide Layouts
Customizing slide layouts in PowerPoint allows you to tailor the design and structure of individual slide types to fit your specific content and presentation style. By customizing slide layouts, you can create a consistent and visually appealing presentation that effectively communicates your message. Here’s how to customize slide layouts:
- Open your PowerPoint presentation and switch to the “View” tab.
- Click on “Slide Master” in the “Master Views” section to access the Slide Master view.
- In the left pane, you’ll see a series of thumbnail images representing different slide layouts. Select the layout you would like to customize.
- To add elements to the layout, navigate to the “Slide Master” tab and click on the desired option. You can add placeholders for text, images, tables, charts, or any other content you want to include in your slides.
- You can also adjust the positioning and formatting of existing placeholders by selecting them and using the various formatting options available in the “Slide Master” tab.
- To change the background color or add a background image to the slide layout, click on the “Background Styles” button in the “Background” group of the “Slide Master” tab.
- Furthermore, you can modify the fonts, colors, and effects applied to the slide layout by selecting the “Fonts”, “Colors”, and “Effects” buttons, respectively, in the “Edit Theme” group of the “Slide Master” tab.
- If you want to remove a placeholder from the slide layout, simply select it and press the “Delete” key on your keyboard.
- Repeat the process for any other slide layouts you want to customize in your presentation.
Customizing slide layouts is a powerful way to create a cohesive and visually engaging presentation. By tailoring the design and elements of each slide layout, you can effectively convey your message and engage your audience. Remember to save your changes and exit the Slide Master view to apply the customized slide layouts to your presentation.
Applying Slide Master to Existing Slides
If you have already created slides in your PowerPoint presentation and want to apply the Slide Master to them, you can easily do so by following these steps:
- Open your PowerPoint presentation and navigate to the “View” tab.
- Click on “Normal” in the “Presentation Views” section to enter the normal slide view.
- Select the slide or slides you want to apply the Slide Master to. You can hold down the Ctrl key on your keyboard while clicking to select multiple slides.
- In the “Home” tab, click on the “Layout” button in the “Slides” group.
- A dropdown menu will appear, displaying the available slide layouts. At the top of the dropdown menu, you’ll find the layouts based on the Slide Master. Choose the desired layout to apply it to the selected slides. The content on the slides will be rearranged based on the new layout.
By applying the Slide Master to existing slides, you can quickly and easily update their design and formatting to match the rest of your presentation. This ensures a consistent look and feel throughout your slides, enhancing the overall professionalism and visual appeal.
Note that when you apply the Slide Master to existing slides, the changes made in the Slide Master will be reflected in those slides. However, if you have made any modifications to the individual slides, such as changing the font or resizing objects, they won’t be affected by the Slide Master.
To further customize the slides based on the Slide Master, you can make changes directly to the Slide Master itself, such as adjusting the background, font styles, or content placeholders. These changes will then be applied to the corresponding slides automatically.
Applying the Slide Master to existing slides streamlines the design process and allows you to update your entire presentation with just a few clicks. It is a handy feature that saves time and ensures a cohesive and professional presentation design.
Modifying Slide Master Elements
The Slide Master in PowerPoint gives you full control over the design and formatting of your presentation. By modifying Slide Master elements, you can customize the overall look and feel of your slides to perfectly align with your branding or personal preferences. Here’s how to modify Slide Master elements:
- Open your PowerPoint presentation and go to the “View” tab.
- Click on “Slide Master” in the “Master Views” section to access the Slide Master view.
- In the left pane, you will see the Slide Master and its associated layouts.
- To modify the Slide Master elements, select the Slide Master thumbnail on the left pane, and make the desired changes in the right pane.
- You can change the background color or add a background image to the Slide Master by using the “Background Styles” button in the “Background” group of the “Slide Master” tab.
- To change the font style used throughout the presentation, select the “Fonts” button in the “Edit Theme” group of the “Slide Master” tab and choose a new font set.
- If you want to change the color scheme of your presentation, use the “Colors” button in the “Edit Theme” group to select a pre-designed color scheme or create your own custom colors.
- Modifying the effects applied to the Slide Master, such as shadows, reflections, or bevels, can be done using the “Effects” button in the “Edit Theme” group.
- You can also edit the placeholders on the Slide Master, such as the title or content placeholders, by selecting them and applying formatting options such as font size, style, or alignment.
- Once you have made the desired changes to the Slide Master elements, you can exit the Slide Master view by clicking on the “Close Master View” button or by switching to the normal slide view using the “View” tab.
Modifying Slide Master elements allows you to create a consistent and visually appealing presentation design. By customizing the background, fonts, colors, and other elements on the Slide Master, you can significantly enhance the overall look and feel of your slides. Remember to save your changes to the Slide Master to apply them to all slides based on that master.
Adding Placeholder Text and Objects
In PowerPoint, placeholder text and objects provide predefined spaces on slides where you can easily add and format content. These placeholders serve as a guide for organizing your presentation. Here’s how to add and use placeholder text and objects:
- To add a text placeholder, click on the “Slide Master” view in the “View” tab.
- Select the layout you want to add the text placeholder to from the left pane.
- Click on the “Insert Placeholder” button in the “Master Layout” group of the “Slide Master” tab.
- From the dropdown, choose “Text” and click on the area of the layout where you want to add the placeholder. A text box will appear with a prompt such as “Click to edit Master text styles”.
- Click inside the text box and start typing your text. The text will automatically adopt the formatting set in the Slide Master.
- To add an object placeholder, repeat steps 1-3 above, but choose “Content” from the “Insert Placeholder” dropdown.
- A rectangular placeholder will appear on the layout. You can click inside it and insert an image, table, chart, SmartArt graphic, or any other object.
- Resize and position the placeholder as needed.
- If you want to customize the placeholder formatting or appearance, select the placeholder and use the formatting options available in the “Slide Master” tab.
- Once you have added and formatted the placeholders in the Slide Master, these changes will apply to all slides that use that particular layout.
Placeholder text and objects provide a consistent structure for your slides, making it easier to organize and add content. By using these placeholders, you can ensure that each slide adheres to the same design guidelines, maintaining a cohesive and professional presentation.
Remember, the actual content you add to the placeholders can be modified or deleted in the normal slide view without affecting the layout or formatting set in the Slide Master.
Formatting Slide Master Elements
Formatting the elements in the Slide Master allows you to create a visually appealing and cohesive presentation design. By customizing the fonts, colors, backgrounds, and other visual elements, you can establish a consistent and professional look across all slides in your PowerPoint presentation. Here are the steps to format Slide Master elements:
- Open your PowerPoint presentation and switch to the “View” tab.
- Click on “Slide Master” in the “Master Views” section to access the Slide Master view.
- To modify the font styles, click on the “Fonts” button in the “Edit Theme” group of the “Slide Master” tab. Select a font set from the available options or click on “Create New Theme Fonts” to customize your own font styles.
- To change the colors used in the Slide Master, click on the “Colors” button in the “Edit Theme” group. Choose a predefined color scheme or click on “Create New Theme Colors” to create your own custom color palette.
- If you want to apply effects to the Slide Master elements, such as shadows or reflections, click on the “Effects” button in the “Edit Theme” group. Select the desired effect from the list or click on “Customize Effects” to tailor the effects to your preference.
- To change the background color or add a background image to the Slide Master, click on the “Background Styles” button in the “Background” group. Choose a background style from the available options or click on “Format Background” to customize the background further.
- If you want to modify specific elements on the Slide Master, such as title or content placeholders, select the element and apply formatting changes using the options available in the “Slide Master” tab.
- Once you have made the desired formatting changes, you can exit the Slide Master view by clicking on the “Close Master View” button or by switching to the normal slide view using the “View” tab.
By formatting the Slide Master elements, you can establish a consistent visual identity for your presentation. This not only enhances the overall look and feel but also strengthens your brand image or personal style.
Remember to save your changes to the Slide Master, as they will be applied to all slides based on that master. This streamlines the design process and ensures a cohesive and professional presentation.
Creating Custom Themes
In PowerPoint, you have the ability to create custom themes, which allow you to design a unique and consistent look for your presentation. By creating custom themes, you can define your own font styles, color schemes, background designs, and effects. Here’s how to create custom themes in PowerPoint:
- Open your PowerPoint presentation and navigate to the “View” tab.
- Click on “Slide Master” in the “Master Views” section to enter the Slide Master view.
- In the “Slide Master” tab, you will find the “Themes” group.
- Click on the “Themes” button and select “Save Current Theme” from the dropdown menu.
- A dialog box will appear, prompting you to provide a name for your custom theme.
- Enter a name for your theme and click “Save”.
- To apply your custom theme to the presentation, go to the “Design” tab.
- In the “Themes” group, click on the “More” button (represented by three dots) to open the “Theme” dropdown menu.
- Scroll down to the “Custom” section, where you will find your custom theme listed.
- Select your custom theme to apply it to the entire presentation.
When you create a custom theme, PowerPoint saves the font styles, color schemes, backgrounds, and effects you have chosen. This way, you can easily apply your custom theme to any presentation and achieve a consistent and professional look.
Custom themes give you the flexibility to showcase your unique style, align your presentation with your branding, or create a visually cohesive experience for your audience. Whether you want to create a sleek and modern theme or a bold and vibrant one, custom themes allow you to unleash your creativity.
Remember to save your custom theme if you plan to use it in other presentations. This way, you can quickly access and apply it whenever you need to create a consistent and visually stunning presentation.
Saving and Sharing Slide Master Templates
Once you have customized the Slide Master to create a unique design for your presentation, you can save it as a template and easily share it with others. Saving and sharing Slide Master templates allows you and your team to maintain a consistent and branded look across multiple presentations. Here’s how you can save and share Slide Master templates:
- Open your PowerPoint presentation and access the Slide Master view by clicking on “Slide Master” in the “View” tab.
- Make any necessary modifications to the Slide Master, including formatting, placeholders, and other design elements.
- Once you are satisfied with the customization, go to the “Slide Master” tab.
- Click on the “Themes” button in the “Themes” group and select “Save Current Theme” from the dropdown menu.
- Give your template a name and choose a save location on your computer or network drive.
- Click “Save” to save the Slide Master template as a .potx file.
- To share the Slide Master template with others, simply send the .potx file to your colleagues or team members.
- They can then use the template by opening it in PowerPoint and selecting the “File” tab.
- Click on “New” to create a new presentation and choose the shared Slide Master template by clicking on “Custom” under “Available Templates and Themes”.
- Users can also place the .potx file in the designated templates folder on their computer, typically located in the Microsoft Office folder.
- This will make the template accessible within PowerPoint by selecting the “File” tab, clicking “New”, and choosing the template from the “Personal” or “Custom” section.
Saving and sharing the Slide Master template ensures that your unique design and formatting are easily accessible and applied to future presentations, saving time and maintaining a consistent visual identity. It also enables collaboration and ensures that all team members can utilize the same branded presentation materials.
Remember to update the template as needed, especially if there are changes to your branding, design guidelines, or corporate style. By regularly updating and sharing the Slide Master template, you can ensure that everyone uses the latest version and maintains consistent presentation design.
Using Slide Master for Consistent Presentation Design
The Slide Master feature in PowerPoint is an invaluable tool for achieving a consistent and professional presentation design. By utilizing the Slide Master, you can ensure that all slides in your presentation follow a predefined layout, style, and formatting. Here’s why using Slide Master is essential for maintaining consistent presentation design:
- Consistency: The Slide Master allows you to create a unified look and feel throughout your presentation. By applying the same layout, formatting, and design elements to all slides, you create a cohesive visual identity that reinforces your message and enhances understanding.
- Efficiency: With the Slide Master, you can make design changes to multiple slides at once. By updating the Slide Master, all slides based on that master will automatically adopt the modifications. This saves time and effort, especially when working with large presentations.
- Branding: The Slide Master enables you to incorporate your brand’s visual identity into the presentation design. By customizing fonts, colors, and backgrounds to match your brand guidelines, you create a professional and recognizable brand presence.
- Visual Appeal: Consistent design elements and aesthetically pleasing layouts contribute to a visually appealing presentation. The Slide Master allows you to create visually engaging slides that make a lasting impression on your audience.
- Flexibility: The Slide Master offers flexibility in adapting your presentation to different formats or styles. Whether you need to create a slide deck for a conference, sales pitch, or internal meeting, you can easily customize the Slide Master to suit the specific requirements.
- Uniformity: The Slide Master ensures that everyone on your team follows the same design guidelines. By sharing the Slide Master template, team members can easily access and use the predefined layouts and formatting, resulting in a consistent visual representation of your message.
Using the Slide Master for consistent presentation design not only enhances the overall professionalism of your slides but also improves audience engagement and comprehension. By maintaining a cohesive appearance, your audience can focus on the content of your presentation rather than being distracted by inconsistent design elements.
Remember, the impact of a well-designed and visually coherent presentation can make all the difference in effectively conveying your message and leaving a positive impression on your audience.
Tips and Tricks for Using Slide Master Layouts
Using Slide Master layouts in PowerPoint can greatly enhance your presentation design and streamline the formatting process. Here are some tips and tricks to make the most out of Slide Master layouts:
- Plan your structure: Before diving into Slide Master, carefully plan the structure and organization of your presentation. Determine the types of slides you will have and how they will flow. This will help you determine the necessary layouts and placeholders needed in the Slide Master.
- Keep it consistent: Consistency is key in creating a professional and polished presentation. Maintain consistent fonts, colors, and backgrounds throughout all your slide layouts to ensure visual harmony.
- Preview your changes: Use the Slide Master view to preview how your changes impact all the slides. This allows you to catch any inconsistencies or formatting issues and make adjustments accordingly.
- Customize placeholders: Take advantage of placeholders to structure your content effectively. Customize the size, position, and formatting of placeholders to accommodate your specific content needs.
- Reuse layouts: If you have several slides with a similar layout, consider reusing an existing layout rather than creating a new one. Duplicate an existing layout in the Slide Master and make minor modifications as needed.
- Use multiple Slide Masters: For complex presentations with different sections or themes, consider utilizing multiple Slide Masters. This allows you to have distinct layouts and formatting for each section, while still maintaining overall consistency.
- Save a backup: Before making significant changes to the Slide Master, save a backup of the original template. This way, you can easily revert back to the original design if needed.
- Test on different screens: Preview your presentation on different devices or screens to ensure that the layout and formatting remain consistent. This will help you identify any potential issues and make adjustments as necessary.
- Consolidate common elements: If certain design elements, such as logos or headers, are consistent across slides, add them to the Slide Master to ensure uniformity. This saves time and effort in manually adding them to each individual slide.
- Experiment and refine: Don’t be afraid to experiment with different layouts and formatting options in the Slide Master. Adjust and refine until you achieve the desired design and visual impact.
By following these tips and tricks, you can maximize the benefits of Slide Master layouts and create stunning presentations that effectively communicate your message. Take advantage of the customizable options in the Slide Master to achieve a consistent, professional, and visually engaging presentation design.
