
Accessing the Files App
The Files app is a built-in tool on your iPhone or iPad that allows you to easily manage and organize your files. To access the Files app, simply locate and tap on its icon, which looks like a blue folder on a white background.
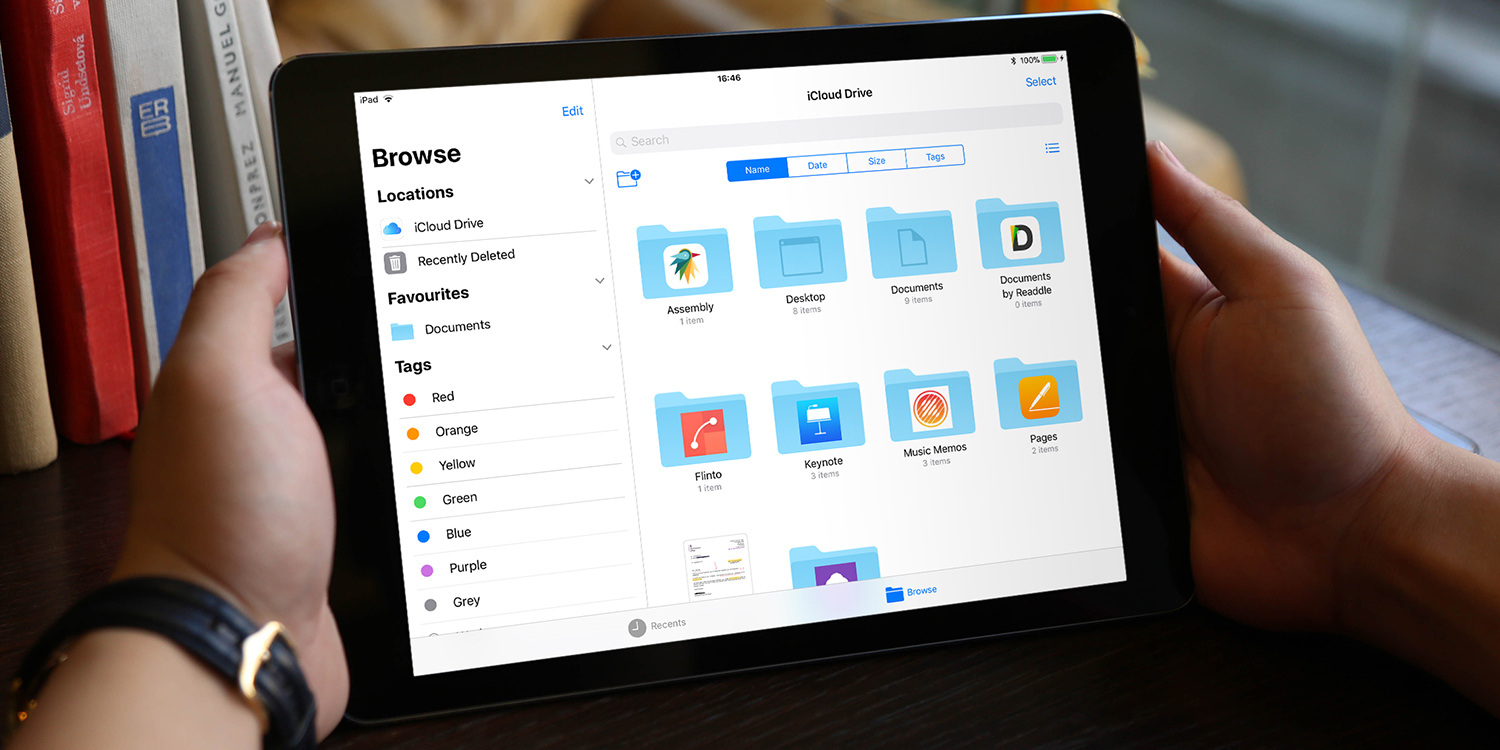
By default, the Files app opens to the “Browse” tab, where you can view your files organized by different locations, such as iCloud Drive, On My iPhone/iPad, and other cloud storage services that you have linked to your device.
If you want quick access to a specific location or folder, you can also consider adding it to your Favorites. To add a location to your Favorites, navigate to the desired location and tap the three-dot menu icon next to its name. From the options presented, select “Add to Favorites.”
Additionally, you can use the search bar at the top of the app’s interface to quickly find files and folders by name. Simply tap the search bar and enter your search query. The Files app will display results that match your search criteria, making it convenient to locate specific files.
When you tap on a file in the Files app, it will open in its associated app. For example, tapping on a PDF file will open it in the Books app, while tapping on a Word document will open it in the Pages app. This allows you to seamlessly work with your files using the appropriate apps on your device.
With the Files app, accessing your files and managing them becomes effortless. Whether you need to organize documents, access files from cloud storage services, or search for specific items, the Files app provides a user-friendly interface to meet all your file management needs.
Navigating the Files App Interface
Upon opening the Files app on your iPhone or iPad, you will be greeted with a user-friendly interface that simplifies file navigation and management. Let’s explore how to efficiently navigate the Files app interface:
1. Browsing Tabs: The Files app has three main tabs – Browse, Recents, and Favorites. The Browse tab displays your files organized by different locations and folders, allowing you to easily navigate through your file system. The Recents tab shows your recently accessed files, making it convenient to revisit important documents. The Favorites tab displays the locations and folders you have added as favorites for quick access.
2. Back and Forward Navigation: Similar to a web browser, the Files app allows you to navigate backward and forward through your file locations. To go back to a previous location, simply tap the back arrow at the top left corner of the screen. If you want to revisit a location you previously navigated away from, tap the forward arrow next to the back arrow.
3. Sidebar: The sidebar in the Files app offers an additional way to navigate through your files and folders. To access the sidebar, simply tap the three-line icon at the top left corner of the app. The sidebar displays your favorite locations, tags, and other categories, making it easy to jump to specific areas of your file system.
4. View Options: The Files app provides different view options to suit your preferences. By default, files and folders are displayed in a grid view. However, you can switch to a list view by tapping the three-dot menu icon at the top right corner of the app and selecting “List view”. The list view presents your files in a more detailed and compact format.
5. Multitasking: The Files app supports multitasking, allowing you to work with multiple files simultaneously. You can open a file in the Files app and then slide up from the bottom of the screen to open the app switcher. From there, you can open another app and access its files, creating a seamless multitasking experience.
With these navigation features, the Files app provides a smooth and intuitive interface, ensuring effortless browsing and file management on your iPhone or iPad.
Organizing Files and Folders
The Files app offers a range of tools and features to help you effectively organize your files and folders. Let’s explore some methods for keeping your files in order:
1. Creating Folders: Creating folders is a fundamental way to keep your files organized. To create a new folder, navigate to the location where you want the folder to be, then tap the “New Folder” icon (represented by a folder with a plus sign) at the bottom of the app. Give the folder a name and press “Done” to create it. You can then drag and drop files into the folder to keep them organized.
2. Moving Files and Folders: To move a file or folder to a different location, simply tap and hold on the item until it lifts up off the screen. While holding it, drag it to the desired location and release your finger. This allows you to easily rearrange your files and folders to achieve optimal organization.
3. Renaming Files and Folders: If you need to rename a file or folder, simply tap on its name once to select it and then tap on the name again. This will open an editing field where you can enter a new name for the item. Press “Done” to save the changes.
4. Selecting Multiple Items: To select multiple files or folders at once, tap and hold on an item until it lifts off the screen. Without releasing your finger, use another finger to tap on other items. This allows you to select and perform actions, such as moving or deleting, on multiple items simultaneously.
5. Sorting Options: The Files app provides different sorting options to help you organize your files. You can sort files and folders by name, date, size, or tags. To access the sorting options, tap the three-dot menu icon at the top right corner of the app and select “Sort By”. Choose your preferred sorting method, and the files in the current location will be rearranged accordingly.
By utilizing these organizing methods, you can maintain a tidy file system in the Files app, making it easier to locate and manage your files efficiently.
Creating New Folders
Creating new folders in the Files app allows you to keep your files organized and easily accessible. Follow these simple steps to create new folders on your iPhone or iPad:
1. Open the Files App: Locate and tap on the Files app icon on your device’s home screen to launch the app.
2. Navigate to the Desired Location: Use the Browse tab or the sidebar to navigate to the location where you want to create the new folder. This can be a cloud storage service, such as iCloud Drive, or your device’s local storage.
3. Tap the “New Folder” Icon: Once you are in the desired location, tap the “New Folder” icon at the bottom of the screen. This icon is represented by a folder with a plus sign.
4. Name the Folder: A dialog box will appear, allowing you to enter a name for the new folder. Choose a descriptive name that clearly indicates the contents of the folder.
5. Press “Done”: After entering the desired folder name, tap “Done” to create the new folder. The newly created folder will now appear in the current location.
6. Organize Your Files: To start organizing your files, simply drag and drop them into the new folder. You can also move existing files into the folder by selecting them and using the “Move” option from the action menu.
By creating new folders in the Files app, you can efficiently categorize and store your files, making it easier to find and access them when needed.
Moving and Renaming Files
The Files app offers convenient options for moving and renaming files, giving you flexibility in managing your documents. Here’s how you can easily move and rename files using the Files app on your iPhone or iPad:
Moving Files:
1. Select the File: Open the Files app and navigate to the location where the file you want to move is stored. Tap and hold on the file until it lifts off the screen.
2. Drag and Drop: While holding the file, drag it to the desired location where you want it to be moved. This can be another folder, a cloud storage service, or any other location within the Files app.
3. Release Your Finger: Once you have moved the file to the desired location, release your finger. The file will be placed in the new location, and you can now access it from there.
Renaming Files:
1. Select the File: In the Files app, navigate to the folder where the file you want to rename is located. Tap on the file to select it.
2. Tap the “…” Icon: At the top-right corner of the app, tap the three-dot menu icon to access the file’s options menu.
3. Choose “Rename”: From the options presented, select “Rename”. The file’s name should now become editable.
4. Edit the Name: Tap on the file’s name to enter edit mode. Use the on-screen keyboard to modify the file name to your desired new name.
5. Save the Changes: Once you have renamed the file, tap “Done” or “Return” on the keyboard to save the changes. The file will now have its new name in the designated location.
By being able to move and rename files with ease, you can stay organized and ensure your documents are properly labeled and stored in the Files app.
Deleting Files and Folders
In the Files app, you have the ability to delete files and folders, allowing you to declutter your storage and remove unnecessary items. Here’s how you can easily delete files and folders using the Files app on your iPhone or iPad:
Deleting Files:
1. Select the File: Open the Files app and navigate to the location where the file you want to delete is stored. Tap on the file to select it.
2. Tap the “…” Icon: At the top-right corner of the app, tap the three-dot menu icon to access the file’s options menu.
3. Choose “Delete”: From the options presented, select “Delete”. A confirmation prompt will appear, asking if you want to delete the file.
4. Confirm Deletion: To proceed with the deletion, tap “Delete File”. The selected file will be permanently removed from your storage.
Deleting Folders:
1. Select the Folder: In the Files app, navigate to the location where the folder you want to delete is located. Tap and hold on the folder until it lifts off the screen.
2. Tap the “…” Icon: At the top-right corner of the app, tap the three-dot menu icon to access the folder’s options menu.
3. Choose “Delete”: From the options presented, select “Delete”. A confirmation prompt will appear, asking if you want to delete the folder and its contents.
4. Confirm Deletion: To proceed with the deletion, tap “Delete Folder”. The selected folder, along with all its contents, will be permanently removed from your storage.
It’s important to note that once files and folders are deleted, they cannot be recovered unless you have a backup. Therefore, it’s recommended to double-check the items you are deleting to ensure you don’t inadvertently remove anything important.
By utilizing the delete feature in the Files app, you can keep your storage clean and organized, removing any unnecessary files and folders that are no longer needed.
Importing Files from External Sources
The Files app allows you to easily import files from various external sources, giving you the flexibility to add documents and media from different locations. Here are some methods to import files into the Files app on your iPhone or iPad:
iCloud Drive:
1. iCloud Drive: If you have iCloud Drive enabled, you can import files directly from the cloud storage service. Open the Files app, navigate to the desired location within iCloud Drive, and tap the “Upload” icon (represented by an upward arrow) at the bottom-right corner of the screen. Choose the files you want to import and tap “Upload”. The selected files will be added to your iCloud Drive location.
External Apps:
1. File Sharing: Some apps, such as document editors, photo editors, and file management apps, support file sharing through the “Sharing” feature. Open the app that contains the file you want to import, access the file, and tap the “Share” or “Export” option. From the sharing menu, choose “Save to Files” or “Copy to Files”. You can then select the location within the Files app where you want to import the file.
2. Safari and Mail: If you receive files through Safari or email, you can easily import them into the Files app. When viewing the file in Safari or in the email attachment, tap and hold on the file until the sharing options appear. Select “Save to Files” or “Copy to Files” from the sharing menu and choose the desired location within the Files app to import the file.
3. Other Apps: Depending on the apps installed on your device, you may have additional options to import files into the Files app. Explore the sharing or export options of various apps to see if they offer integration with the Files app for importing files.
By leveraging these import methods, you can effortlessly bring files from external sources into the Files app, allowing you to access and manage all your documents and media from a central location on your iPhone or iPad.
Saving Files to the Files App
The Files app provides a convenient platform for saving files, allowing you to keep all your documents and media organized in one place. Here’s how you can easily save files to the Files app on your iPhone or iPad:
From Apps with File Export:
1. Open the App: Launch the app that contains the file you want to save to the Files app.
2. Access the File: Locate the file within the app that you wish to save. This can be a document, photo, video, or any other type of file that the app supports.
3. Export the File: Depending on the app, there might be different options to export the file. Look for the “Share” icon (often represented by a box with an arrow) or the “Save” option within the app. Tap on it to open the sharing menu.
4. Save to Files: From the sharing menu, locate and select the “Save to Files” or “Copy to Files” option. The Files app will open, allowing you to choose the location within the app where you want to save the file. Select the appropriate folder, and then tap “Done” or “Save” to complete the process.
From Other Apps or Cloud Services:
1. Locate the File: If you have a file stored in another app or cloud service, use the respective app or service to access the file.
2. Export or Share the File: Depending on the app or service, there will be options to export or share the file. Look for the appropriate sharing or export options within the app or service and follow the prompts to access the sharing menu.
3. Save to Files: From the sharing menu, choose the “Save to Files” or “Copy to Files” option. This will open the Files app, allowing you to select the location within the app where you want to save the file. Choose the folder, and then tap “Done” or “Save” to save the file to the Files app.
The Files app serves as a central hub for storing and organizing your files, making it simple to access and manage your documents and media from one unified location on your iPhone or iPad. By utilizing the options to save files to the Files app, you can keep your files organized and easily accessible whenever you need them.
Using Tags to Organize Files
The Files app offers a useful feature known as tags, which allows you to categorize and organize your files in a personalized and efficient way. Tags provide a flexible method of organizing your files based on specific criteria or topics. Here’s how you can use tags to organize your files in the Files app:
Creating and Assigning Tags:
1. Open the Files App: Launch the Files app on your iPhone or iPad and navigate to the file or folder you want to tag.
2. Select the File/Folder: Tap and hold on the file or folder until it lifts off the screen, indicating that it is selected.
3. Tap the “…” Icon: At the top-right corner of the screen, tap the three-dot menu icon to access the file’s or folder’s options menu. From the menu, select “Tags”.
4. Add or Create Tags: In the Tags menu, you can choose from existing tags that are available, or you can create new tags by tapping the “+” icon. To add a tag, simply tap on it and it will be assigned to the selected file or folder.
Using Tags to Organize Files:
1. Filter by Tags: To view files and folders with a specific tag, tap the “Browse” tab in the Files app. In the sidebar, scroll down to the “Tags” section and select the desired tag. The Files app will display all the files and folders associated with that tag.
2. Search by Tags: You can also search for files and folders using tags. Tap the search bar at the top of the Files app, and enter the tag name preceded by the “@” symbol. The app will display all the files and folders that have been assigned that particular tag.
3. Manage Tags: If you want to edit or remove tags from a file or folder, select the file or folder and tap the “…” icon to access the options menu. From there, select “Tags” and manage the tags as desired.
The use of tags in the Files app allows you to create a personalized organizational system that suits your specific needs. By assigning tags to your files and folders, you can easily locate and retrieve them based on specific criteria or topics, saving you time and effort in managing your files.
Searching for Files and Folders
The Files app provides a powerful search function that allows you to quickly find specific files and folders within your storage. Whether you have a large collection of documents, photos, or other files, searching in the Files app can save you valuable time and effort. Here’s how you can effectively search for files and folders using the Files app on your iPhone or iPad:
1. Open the Files App: Launch the Files app on your device by tapping its icon on the home screen.
2. Access the Search Bar: At the top of the Files app interface, you will find a search bar. Tap on it to activate the search function.
3. Enter the Search Query: Using the on-screen keyboard, enter the name or keywords related to the file or folder you are looking for. The Files app will begin searching for matches as you type.
4. Review the Search Results: The Files app will display the search results in real-time as you type. The results will include files and folders that match your search query.
5. Filter the Search Results: If you have a large number of search results, you can use the filter options to narrow down the results. Tap on “Show All” at the top of the search results to reveal filter options such as “Folders,” “Documents,” “Images,” and more. Select the desired filter to refine the search results.
6. Tap on the Result: When you find the file or folder you were searching for, simply tap on it to open or access it within the Files app.
The search function in the Files app is especially useful when you have a vast array of files and folders spread across different locations. By utilizing the search feature, you can quickly locate specific items without manually browsing through each location. This ensures efficient file management and easy access to the files you need.
Viewing and Sharing Files
The Files app provides a seamless way to view and share your files, allowing you to easily access and collaborate on your documents, photos, and other media. Here’s how you can effectively view and share files using the Files app on your iPhone or iPad:
Viewing Files:
1. Open the Files App: Launch the Files app on your device by tapping its icon on the home screen.
2. Navigate to the File: Use the Browse tab or the sidebar to navigate to the location where the file you want to view is stored. Tap on the file to open and view it.
3. Choosing an App: Depending on the file type, the Files app will open the file in its associated app. For example, PDF files will open in the Books app, while image files will open in the Photos app. You can also choose to open files in different apps by tapping the Share button and selecting the desired app from the list.
Sharing Files:
1. Open the Files App: Launch the Files app on your device by tapping its icon on the home screen.
2. Navigate to the File: Use the Browse tab or the sidebar to navigate to the location where the file you want to share is stored. Tap on the file to select it.
3. Tap the “Share” Icon: At the bottom-left corner of the app, tap the Share button (usually represented by a box with an arrow pointing up). The sharing menu will appear.
4. Choose a Sharing Method: From the sharing menu, you can select various ways to share the file. This can include sharing via email, messaging apps, social media platforms, or even AirDrop. Tap on the desired sharing method and follow the prompts to complete the sharing process.
5. Adjust Sharing Options: Depending on the selected sharing method, you might have additional options to adjust the file’s permissions, add recipients, or customize the message. Review and modify the sharing options as needed.
The Files app enables you to view your files effortlessly and provides various options for sharing them with others. By utilizing the viewing and sharing functionality, you can seamlessly collaborate on your files and easily distribute them to colleagues, friends, or family members.
Working with iCloud Drive
iCloud Drive is Apple’s cloud storage service that seamlessly integrates with the Files app on your iPhone or iPad. It allows you to store your files securely in the cloud, access them from any device, and collaborate with others. Here’s how you can effectively work with iCloud Drive using the Files app:
Accessing iCloud Drive:
1. Open the Files App: Launch the Files app on your device by tapping its icon on the home screen.
2. Go to iCloud Drive: Tap on the “Browse” tab in the bottom menu bar. Then, locate and tap on “iCloud Drive” in the Locations section. This will take you to the main interface of your iCloud Drive.
Uploading and Downloading Files:
1. Upload Files: To upload files to your iCloud Drive, navigate to the desired folder within iCloud Drive. Tap the “Upload” icon (represented by an upward arrow) at the bottom-right corner of the screen. Select the files you want to upload and tap “Upload”. The selected files will be added to your iCloud Drive.
2. Download Files: To download files from iCloud Drive to your device, simply locate the file you want to download. Tap on the file to open it, and then tap the Share button. From the sharing menu, select the “Save to Files” or “Copy to Files” option, and choose the desired location on your device to save the file.
Collaborating on iCloud Drive:
1. Share Files: To share files stored in your iCloud Drive, locate the file within the drive. Tap on the file to select it, and then tap the Share button. Choose the desired sharing method, such as email or messaging apps, and follow the prompts to share the file with others.
2. Collaborate on Documents: If you’re working on iCloud Drive with compatible document types like Pages, Numbers, or Keynote files, you can collaborate in real-time with others. Open the document in the associated app, invite others to collaborate by sending them a link, and work together on the same document simultaneously.
Managing iCloud Drive Storage:
With the Files app, you can also manage your iCloud Drive storage by monitoring and organizing your files:
1. Free Up Storage: If you’re running out of storage space on iCloud Drive, you can manage your storage by deleting unnecessary files or moving them to other storage locations.
2. Manage Folders and Files: Use the Files app to create new folders, rename files, move files to different folders, and delete unwanted files. This will help you keep your iCloud Drive organized and easier to navigate.
Working with iCloud Drive in the Files app provides a convenient and seamless experience for managing your files, collaborating with others, and accessing your data from anywhere. Take advantage of its features to enhance your productivity and streamline your file management workflows.
Managing File Locations
The Files app allows you to manage the locations of your files, providing flexibility and control over where your documents, photos, and other media are stored. Here’s how you can effectively manage file locations using the Files app on your iPhone or iPad:
Creating New Locations:
1. Add Cloud Storage Services: The Files app supports integration with various cloud storage services, such as iCloud Drive, Google Drive, Dropbox, and more. To add a cloud storage service, tap the “Browse” tab in the bottom menu, tap “Edit” at the top-right corner of the screen, then tap “Add” under Locations. Select the desired cloud storage service and follow the prompts to link your account to the Files app.
2. Enable On My iPhone/iPad: The “On My iPhone” or “On My iPad” location allows you to store files locally on your device. To enable this feature, go to the Settings app, tap “Files,” then scroll down and toggle on the switch for “On My iPhone” or “On My iPad.”
3. Link Third-Party Apps: Some apps have the ability to create their own file locations within the Files app. Check if the app you’re using has this feature and follow the app-specific instructions to link it to the Files app.
Managing File Locations:
1. Move Files: To move a file to a different location, tap and hold on the file until it lifts off the screen. While continuing to hold the file, drag it to the desired location, whether it’s a different folder, a cloud storage service, or the local “On My iPhone” or “On My iPad” location. Release your finger to complete the move.
2. Create Folders: You can create new folders within any location to further organize your files. To create a new folder, navigate to the desired location, tap the “New Folder” icon (usually represented by a folder with a plus sign), and give the folder a name. Press “Done” to create the folder.
3. Remove Locations: If you want to remove a linked cloud storage service or third-party app location from the Files app, go to the “Browse” tab, tap “Edit” at the top-right corner of the screen, and tap the minus (“-“) button next to the location you want to remove. Confirm the deletion to remove the location.
Managing file locations in the Files app allows you to have greater control over where your files are stored and makes it easier to access and organize them. By utilizing these features, you can create an efficient file management system tailored to your specific needs.
Customizing Files App Settings
The Files app on your iPhone or iPad provides various settings that you can customize to enhance your file management experience. These settings allow you to tailor the app to your specific preferences and optimize your workflow. Here’s how you can customize the Files app settings:
Adjusting View Settings:
1. List View or Icon View: The Files app offers the option to choose between list view and icon view for file and folder display. To switch between the two, tap the three-dot menu icon at the top-right corner of the app and select “List view” or “Icon view” from the options menu.
2. Sort Order: You can modify the sort order of files and folders within the app to suit your preference. Tap the three-dot menu icon, select “Sort By,” and choose from options like name, date, size, or tags. Select the desired sort order, and the files will be rearranged accordingly.
Enabling or Disabling Locations:
1. On My iPhone/iPad: If you want to enable or disable the “On My iPhone” or “On My iPad” location, go to the Settings app on your device. Tap “Files” and toggle the switch for “On My iPhone” or “On My iPad” to the desired setting.
2. Cloud Storage Services: If you want to enable or disable specific cloud storage services in the Files app, go to the “Browse” tab, tap “Edit” at the top-right corner, and use the toggle switches to enable or disable the desired services.
Adjusting File Provider Settings:
1. iCloud Drive: To access iCloud Drive settings, go to the Settings app and tap your name at the top of the screen. From there, tap “iCloud” and select “iCloud Drive.” Here, you can enable or disable iCloud Drive, choose which apps can access iCloud Drive, and manage your iCloud storage.
2. Third-Party Apps: Some third-party apps have individual settings related to their file management capabilities. To access these settings, open the app and look for options related to file management, cloud storage, or integration with the Files app.
Other Settings:
1. Siri Suggestions: If you want to enable or disable Siri Suggestions in the Files app, go to the Settings app, tap “Siri & Search,” scroll down to the “Suggestions” section, and toggle the switch for “Suggestions when Sharing” to the desired setting.
2. Show Recently Deleted: By default, the Files app displays recently deleted files and folders for a limited period. To enable or disable this feature, tap the three-dot menu icon, select “Recently Deleted,” and use the toggle switch at the top of the screen.
By customizing the settings in the Files app, you can personalize your file management experience and tailor it to your specific needs and preferences. Take advantage of these customization options to optimize your workflow and streamline your file organization tasks.
Troubleshooting Common Issues
While the Files app provides a seamless file management experience, there may be times when you encounter common issues that can hinder your workflow. Here are some troubleshooting steps to resolve common problems in the Files app on your iPhone or iPad:
Files not Syncing:
1. Check iCloud Drive: If you have files stored in iCloud Drive that are not syncing, ensure that iCloud Drive is enabled in your device’s settings. Go to the Settings app, tap your name at the top of the screen, and select “iCloud”. Make sure that “iCloud Drive” is toggled on.
Unable to Access Files on External Storage:
1. Check Device Connection: If you are experiencing difficulty accessing files on external storage, such as a USB drive or SD card, ensure that your device is properly connected to the external storage device. Check the physical connection and try unplugging and reconnecting the device.
2. Verify File Compatibility: Some external storage devices may have specific file system formats or compatibility requirements. Ensure that the file you want to access is in a compatible format or consult the documentation or support resources for the external storage device to verify compatibility.
Files App Crashing or Freezing:
1. Update the App: Ensure that you are using the latest version of the Files app. Go to the App Store, search for the Files app, and update it if an update is available. Updating the app can often resolve performance issues and bugs.
2. Restart and Clear App Cache: Close the Files app and restart your device. If the app continues to crash or freeze, go to the Settings app, tap “General,” and select “iPhone Storage” or “iPad Storage”. Find the Files app in the list of installed apps and tap on it. From here, select “Offload App” or “Delete App” to remove the app and its cache. Then reinstall the app from the App Store.
Files Missing or Deleted:
1. Check Recently Deleted: If you accidentally deleted a file, it may still be recoverable from the “Recently Deleted” folder in the Files app. Tap the three-dot menu icon and select “Recently Deleted”. Locate the file in the list and select “Recover” to restore it to its original location.
2. Verify Storage Locations: Double-check the storage location where the missing files were supposed to be. Ensure that you are browsing the correct location, whether it’s iCloud Drive, a cloud storage service, or the local “On My iPhone” or “On My iPad” storage.
If the above troubleshooting steps do not resolve the issue, you can try restarting your device, updating your software, or contacting Apple Support for further assistance. They can provide specific guidance based on your device and the issue at hand.
By employing these troubleshooting techniques, you can resolve common issues that arise in the Files app and maintain a smooth and efficient file management experience on your iPhone or iPad.
Tips and Tricks for Efficient File Management
Managing files effectively is essential for staying organized and maximizing productivity. Here are some tips and tricks to help you efficiently manage your files in the Files app on your iPhone or iPad:
1. Organize with Folders:
Create folders to categorize and group similar files together. This helps to keep your files organized and makes it easier to find specific documents when needed.
2. Use Descriptive File Names:
Give your files meaningful and descriptive names to quickly identify their content. Avoid generic names or vague titles that can make it difficult to locate specific files later on.
3. Utilize Tags:
Take advantage of the tagging feature in the Files app to further categorize and organize your files. Assign relevant tags to files to make them easier to search for and filter by specific criteria.
4. Regularly Clean Up and Delete Unnecessary Files:
Periodically review your files and delete any that are no longer needed. This helps to declutter your storage space and ensures you’re only keeping essential files.
5. Take Advantage of Search Functionality:
Use the search bar in the Files app to quickly locate specific files or folders. Enter keywords or file names to find what you’re looking for without manually browsing through multiple locations.
6. Customize the Favorites List:
Add frequently used locations or folders to the Favorites list in the Files app for quick access. This allows you to directly navigate to your most frequently accessed files and folders.
7. Enable iCloud Drive to Sync Files:
If you use multiple devices, enable iCloud Drive in the Settings app to ensure your files are synced across all your devices. This way, you can access your files from any device with the Files app.
8. Take Advantage of Third-Party App Integrations:
Explore third-party apps that integrate with the Files app. Some apps offer enhanced file management features or specialized functionalities that can further improve your file organization and workflow.
9. Utilize Shortcut Actions:
Tap and hold on a file or folder to reveal shortcut actions, such as copying, duplicating, or moving. This allows for quick and efficient file management directly from the files list view.
10. Regularly Backup Your Files:
Back up your important files to an external storage device or cloud storage service to prevent data loss. This provides a safety net in case of accidental deletion or device failure.
By applying these tips and tricks, you can streamline your file management processes, save time, and maintain an organized and efficient workflow in the Files app on your iPhone or iPad.