
What is Android Recovery Mode?
Android Recovery Mode is a built-in feature in Android devices that provides a set of tools and functions for troubleshooting and performing maintenance tasks. It acts as a failsafe mechanism for resolving software issues that may arise on your Android device. Whether you’re facing booting problems, system crashes, or other software glitches, accessing the Android Recovery Mode can help you resolve these issues without the need for advanced technical knowledge or professional assistance.
When you enter Recovery Mode, your Android device boots into a separate partition of the device’s internal memory, which contains a minimal operating system with essential tools and functions. This partition is different from the regular Android operating system partition that you use for everyday activities on your device. By accessing this separate partition, you can perform a range of tasks to troubleshoot and repair your device.
Android Recovery Mode is commonly used for tasks such as wiping cache partitions, factory resetting the device, installing system updates, flashing custom ROMs or kernels, and even backing up and restoring your device’s data. These functions can be invaluable in situations where your Android device is experiencing software-related issues that prevent it from functioning properly.
It’s important to note that entering Recovery Mode should be done with caution, as some actions can result in the loss of data or even damage to your device. Therefore, it is recommended to have a backup of your important data before performing any operations in Recovery Mode.
The method for accessing Recovery Mode can vary slightly depending on the make and model of your Android device. However, the most common technique involves a combination of hardware buttons that need to be pressed during the device’s boot-up process. Once in Recovery Mode, you can navigate through the available options using the volume buttons and select options using the power button or touch screen, depending on your device’s capabilities.
Overall, Android Recovery Mode is a powerful tool that can help you troubleshoot and resolve software issues on your Android device. It offers a range of functions that can be useful in various situations, from basic system maintenance to advanced customization. By familiarizing yourself with Recovery Mode and its capabilities, you can gain greater control and flexibility over your Android device’s software.
How to Access Android Recovery Mode
Accessing Android Recovery Mode may vary slightly depending on the make and model of your device, but the general method involves using a combination of hardware buttons during the device’s boot-up process. Here is a step-by-step guide on how to access Android Recovery Mode:
- Power off your Android device completely.
- Once the device is powered off, press and hold the specific combination of buttons required to enter Recovery Mode. This combination typically includes the power button and volume up or down button(s), but it may differ depending on your device. You may need to consult your device’s user manual or search online for the correct button combination.
- Continue holding the buttons until the device enters Recovery Mode. This should typically be indicated by a menu that appears on the screen.
- Once you’re in Recovery Mode, you can use the volume up and volume down buttons to navigate through the options available.
- Highlight the desired option by using the volume buttons, then use the power button or touch screen (if available) to select the option.
It’s important to note that accessing Recovery Mode can be slightly different for devices from different manufacturers. For example, on some devices, you may need to press and hold the power button, volume down button, and home button simultaneously to access Recovery Mode.
Additionally, some devices have a dedicated “Recovery” option in the device’s settings menu, allowing you to access Recovery Mode without using any button combinations. This option can be found under “System” or “Advanced” settings, depending on your device.
It’s also worth mentioning that if you encounter any difficulties or the device doesn’t enter Recovery Mode using the specified button combination, it’s recommended to check the manufacturer’s support documentation or search online for specific instructions for your device.
Different Ways to Access Recovery Mode on Android Devices
Accessing Recovery Mode on Android devices can vary depending on the device’s make, model, and version of Android. While the most common method involves using hardware buttons during the device’s boot-up process, there are alternative ways to access Recovery Mode on certain devices. Here are some different ways to access Recovery Mode on Android devices:
- Hardware button combination: This is the most common method for accessing Recovery Mode. It involves pressing and holding a specific combination of hardware buttons on your device while powering it on. The exact button combination can vary based on your device, so it’s essential to consult your device’s user manual or search online for the correct combination.
- Through the device’s settings: Some Android devices have an option to access Recovery Mode directly from the settings menu. This option is usually located under “System” or “Advanced” settings and is labeled as “Recovery” or “Reboot to Recovery.” Tapping on this option initiates the device’s reboot into Recovery Mode.
- Third-party applications: There are several third-party apps available on the Google Play Store that allow you to access Recovery Mode without using hardware buttons. These apps work by sending commands to the device to initiate a reboot into Recovery Mode. However, it’s important to note that using third-party apps may require root access on your device and may not be supported or recommended by all device manufacturers.
- ADB commands: Advanced users and developers can use the Android Debug Bridge (ADB) tool to access Recovery Mode. ADB is a command-line tool that allows you to interact with your Android device from a computer. By connecting your device to a computer and using specific ADB commands, you can reboot your device into Recovery Mode.
It’s important to remember that the methods listed above may not be applicable or supported on all Android devices. Always refer to your device’s user manual or search online for instructions specific to your device to ensure you can access Recovery Mode correctly.
Regardless of the method you use to access Recovery Mode, it’s crucial to exercise caution and only perform actions that you understand and are comfortable with. Improper use of Recovery Mode can lead to data loss or even permanent damage to your device, so it’s always advisable to have a backup of your important data before performing any operations in Recovery Mode.
Common Options in Android Recovery Mode
Android Recovery Mode provides various options that allow you to perform different tasks for troubleshooting and maintenance purposes. These options can vary depending on the device’s make, model, and version of Android. Here are some of the common options you may come across in Android Recovery Mode:
- Reboot system: This option allows you to restart your device normally, exiting Recovery Mode and booting into the regular Android operating system.
- Wipe cache partition: This option clears temporary system files from the cache partition, which can help resolve issues such as app crashes or sluggish performance. It does not delete any personal data or settings.
- Factory reset: This option restores your device to its original factory settings, effectively erasing all data, settings, and installed apps. This is a drastic measure and should only be used as a last resort or when you want to completely wipe your device.
- Apply update from ADB: This option allows you to install system updates or patches using the Android Debug Bridge (ADB) tool. It requires a computer with the necessary drivers and ADB installed.
- Apply update from external storage: If you have downloaded a system update file onto an external storage device (such as an SD card), this option enables you to install the update from that external storage.
- Mount /system: This option is used to mount or unmount the /system partition, which contains the Android operating system files. It is typically used by advanced users for tasks such as modifying system files or installing custom software.
- Backup and restore: Some devices offer an option to back up and restore your data from a previously created backup. This can be useful when you need to restore your device to a previous state without performing a full factory reset.
It’s important to note that the options and their labels may vary slightly depending on the device and the version of Android installed. Additionally, not all devices will have all of these options available. The Recovery Mode menu is designed to provide essential tools and functions for troubleshooting, maintenance, and advanced customization.
When using any of the options in Recovery Mode, it’s crucial to read and understand the on-screen instructions, as well as exercise caution. Performing operations without proper knowledge can result in unintended consequences, such as data loss or device malfunction. If you’re unsure about a particular option or its consequences, it’s recommended to seek guidance from the device manufacturer or consult with a professional.
How to Navigate and Select Options in Recovery Mode
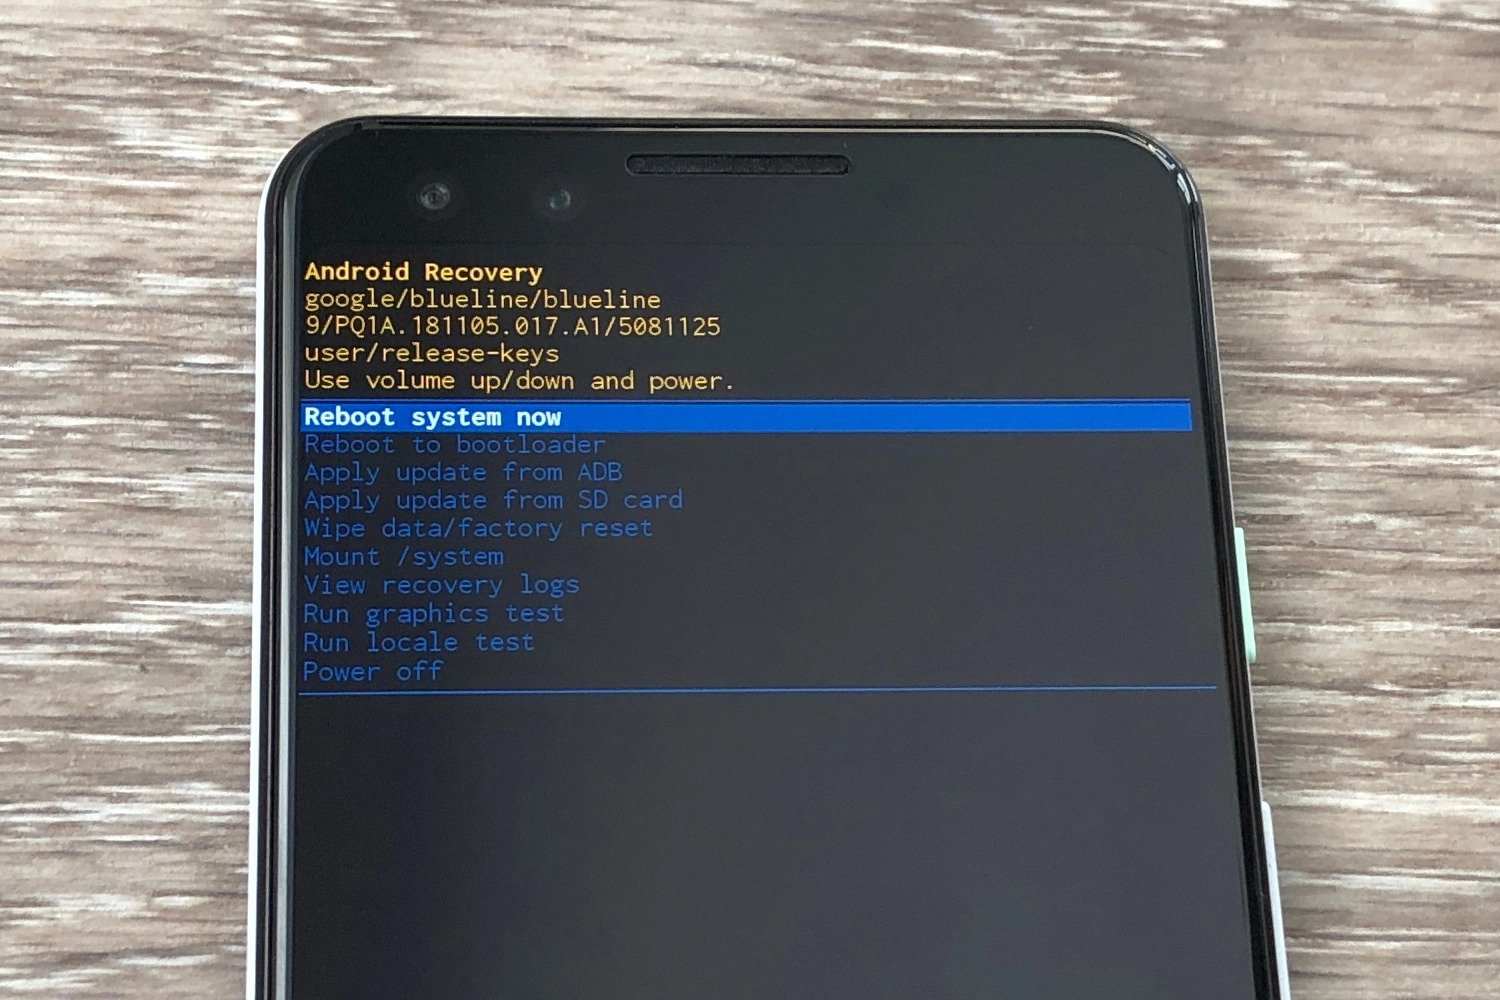
Once you have accessed Recovery Mode on your Android device, navigating through the menu and selecting options is typically done using the device’s volume buttons to scroll and the power button (or touch screen) to select. Here’s a guide on how to navigate and select options in Recovery Mode:
- Use the volume up and volume down buttons to scroll through the available options on the screen. The currently highlighted option is usually indicated by a different color or a selected marker.
- Once you’ve highlighted the desired option, use the power button or touch screen (if available) to select that option.
- Some devices may require you to press the power button multiple times to confirm your selection. For example, you may need to press the power button to “enter” or “execute” the highlighted option.
- If there is a submenu within the selected option, navigate through it using the same method with the volume buttons and select the desired sub-option using the power button or touch screen.
- To go back to the previous screen or exit a submenu, look for an option usually labeled “Go Back” or “Back.” Selecting this option will take you back to the previous screen or exit the submenu and return to the main Recovery Mode menu.
- To reboot your device and exit Recovery Mode, highlight the “Reboot system” option and select it using the power button. Your device will then perform a normal boot-up sequence and start running the regular Android operating system.
Note that the navigation method in Recovery Mode can slightly differ depending on your device’s make, model, and version of Android. Some devices may include touch screen support, while others may only rely on hardware buttons. It’s important to read the on-screen instructions or consult your device’s user manual to understand the specific navigation instructions for your device.
Additionally, keep in mind that different Recovery Modes may have different layouts and options. While the general navigation method is similar, there may be slight variations in the design and functionality of the menu, depending on the device manufacturer and the specific version of Android.
It’s advisable to pay close attention to the on-screen instructions and take your time when navigating and selecting options in Recovery Mode to ensure you choose the correct action and avoid any unintended consequences.
How to Restart or Reboot Android Device in Recovery Mode
Restarting or rebooting your Android device while in Recovery Mode is a straightforward process. Here’s a quick guide on how to restart or reboot your device in Recovery Mode:
- From the main menu in Recovery Mode, use the volume buttons to navigate and highlight the “Reboot system” option.
- Select the “Reboot system” option by pressing the power button or using the touch screen (if available).
- Wait for the device to complete the rebooting process. This may take a few moments.
- Once the reboot is complete, your device will exit Recovery Mode and start up normally, running the regular Android operating system.
It’s important to note that when you reboot your device in Recovery Mode, it does not make any changes to the device’s software or settings. The reboot simply exits Recovery Mode and restarts the device using the existing system configuration.
Rebooting your device in Recovery Mode can be helpful after performing certain actions or troubleshooting steps that require you to be in Recovery Mode. It allows you to restart your device and return to the normal operating state without making any further changes to the system.
Remember that the specific procedure to reboot may vary slightly depending on your device’s make and model. If you are unsure or encounter any difficulties during the process, consult your device’s user manual or search online for specific instructions applicable to your device.
It’s worth mentioning that if you encounter persistent software issues or your device continues to have difficulties even after rebooting in Recovery Mode, it may be necessary to seek further assistance from the device manufacturer or a professional technician.
How to Wipe Cache Partition in Recovery Mode
Wiping the cache partition in Recovery Mode can help resolve various software-related issues on your Android device. It involves clearing temporary system files stored in the cache partition, which can become corrupted or outdated over time. Here’s how you can wipe the cache partition in Recovery Mode:
- Access Recovery Mode on your Android device using the appropriate button combination during the device’s boot-up process. The specific button combination can vary, so refer to your device’s user manual or search online for the correct combination.
- Once you’re in Recovery Mode, use the volume buttons to navigate and highlight the “Wipe cache partition” option.
- Select the “Wipe cache partition” option by pressing the power button or using the touch screen (if available).
- A confirmation prompt will appear asking you to confirm the action. Use the volume buttons to highlight the “Yes” option and press the power button or select it using the touch screen.
- Wait for the process to complete. This may take a few moments, and you may see some progress indicators on the screen.
- Once the cache partition is wiped, you will be returned to the main Recovery Mode menu. From there, you can select other options or reboot your device to exit Recovery Mode.
It’s important to note that when you wipe the cache partition, you are not deleting any personal data or settings. Only temporary files accumulated in the cache partition are removed, which can help improve system performance and resolve certain issues.
After wiping the cache partition, it’s recommended to reboot your device by selecting the “Reboot system” option in Recovery Mode. This will allow your device to start with a clean cache and rebuild the necessary temporary files as you use it.
Remember that the process of wiping the cache partition may vary slightly depending on your device’s make and model. If you are unsure about the specific steps or encounter any difficulties, refer to your device’s user manual or search online for instructions tailored to your device.
Wiping the cache partition can be a useful troubleshooting step to resolve software-related issues on your Android device. However, if your device continues to experience problems, it may be necessary to seek further assistance from the device manufacturer or a professional technician.
How to Factory Reset Android Device in Recovery Mode
Performing a factory reset in Recovery Mode can be helpful when you encounter persistent software issues on your Android device or when you want to erase all data and restore the device to its original factory settings. It’s important to note that a factory reset will erase all data, settings, and installed apps on your device. Here’s how you can perform a factory reset in Recovery Mode:
- Access Recovery Mode on your Android device by following the appropriate button combination during the device’s boot-up process. The specific button combination can vary, so consult your device’s user manual or search online for the correct combination.
- In Recovery Mode, use the volume buttons to navigate and highlight the “Factory reset” or “Wipe data/factory reset” option.
- Select the “Factory reset” or “Wipe data/factory reset” option by pressing the power button or using the touch screen (if available).
- A confirmation prompt will appear, asking you to confirm the action. Use the volume buttons to highlight the “Yes” option and press the power button or select it using the touch screen.
- The factory reset process will begin, and you may see some progress indicators on the screen. Be aware that this process may take a few minutes to complete.
- Once the factory reset is finished, you will be returned to the main Recovery Mode menu. From there, you can select the “Reboot system” option to restart your device.
It’s important to emphasize that performing a factory reset will erase all data on your device, including contacts, messages, photos, videos, and installed apps. It is crucial to create a backup of any important data before proceeding with a factory reset.
Factory resetting your device can be a drastic solution, so it’s recommended to try less drastic troubleshooting steps before resorting to a factory reset. Additionally, if you are experiencing issues related to your device’s hardware, a factory reset may not resolve those problems.
Remember that the process of performing a factory reset may vary slightly depending on your device’s make and model. If you are unsure about the specific steps or encounter any difficulties, refer to your device’s user manual or search online for instructions tailored to your device.
Performing a factory reset in Recovery Mode should be done with caution and full understanding of its consequences. If you have any concerns or are unsure about the process, it’s advisable to seek guidance from the device manufacturer or consult with a professional technician.
How to Install System Updates in Recovery Mode
Installing system updates in Recovery Mode can be necessary when you want to manually update your Android device’s operating system or when your device is experiencing issues that require a system update. Here’s how you can install system updates in Recovery Mode:
- Access Recovery Mode on your Android device by using the appropriate button combination during the device’s boot-up process. The specific combination may differ, so refer to your device’s user manual or search online for the correct steps.
- In Recovery Mode, use the volume buttons to navigate and highlight the “Apply update from ADB” or “Apply update from external storage” option.
- For “Apply update from ADB” option:
- Connect your device to a computer using a USB cable.
- Ensure that you have the necessary drivers installed on your computer.
- On your computer, open a command prompt or terminal and navigate to the directory where the update file is located.
- Enter the ADB command to apply the update, typically, “adb sideload filename.zip”
- Follow the on-screen instructions and wait for the update to be installed.
- For “Apply update from external storage” option:
- If you have downloaded the update file onto an external storage device such as an SD card, ensure that it is connected to your device.
- Navigate to the location of the update file using the volume buttons.
- Select the update file by pressing the power button or using the touch screen.
- Follow the on-screen instructions and wait for the update to be installed.
- Once the update installation is complete, you will be returned to the main Recovery Mode menu. From there, you can select the “Reboot system” option to restart your device and start running the updated operating system.
It’s important to note that the steps and options mentioned above may vary depending on your device’s make, model, and version of Android. Always refer to your device’s user manual or search online for instructions specific to your device when installing system updates in Recovery Mode.
Additionally, ensure that you have a stable internet connection or have downloaded the correct update file from a trusted source before proceeding with the installation. It’s also recommended to have your device fully charged or connected to a power source during the update installation to avoid any disruptions.
Installing system updates can bring new features, security patches, and bug fixes to your device, improving its overall performance and stability. It’s generally recommended to stay up to date with the latest system updates to ensure your device is running optimally.
How to Flash Custom ROMs or Kernels in Recovery Mode
Flashing custom ROMs or kernels in Recovery Mode is a process that allows you to install modified versions of the Android operating system or custom kernels on your device. This can provide you with additional features, customization options, and performance enhancements. Here’s a step-by-step guide on how to flash custom ROMs or kernels in Recovery Mode:
- Access Recovery Mode on your Android device using the appropriate button combination during the device’s boot-up process. The specific combination may vary, so consult your device’s user manual or search online for the correct steps.
- Make sure you have a custom ROM or kernel file ready on your device or on an external storage device such as an SD card or USB flash drive.
- In Recovery Mode, use the volume buttons to navigate and find the “Install” or “Install from zip” option. Select it using the power button or touch screen.
- Navigate to the directory where the custom ROM or kernel file is located. Use the volume buttons to scroll and the power button or touch screen to select the file.
- Confirm the installation by selecting “Yes” or “Install” when prompted. The installation process will begin, and you might see a progress indicator on the screen.
- Wait for the process to complete. Once finished, you will be returned to the main Recovery Mode menu.
- Select the “Reboot system” option to restart your device and apply the newly flashed custom ROM or kernel. Your device will then boot up with the modified software.
It’s important to note that flashing custom ROMs or kernels carries certain risks and requires caution. Ensure that you have a compatible ROM or kernel for your specific device model, as flashing incompatible files can result in device malfunctions or even bricking.
Before flashing any custom ROM or kernel, it’s advisable to research and understand the specific installation instructions, potential risks, and compatibility requirements. Furthermore, it’s recommended to create a full backup of your device’s data to safeguard against potential data loss during the flashing process.
Flashing custom ROMs or kernels can provide you with a unique, customized Android experience, but it should be done with careful consideration and thorough understanding of the process. If you are unsure or uncomfortable with flashing custom software on your device, it’s best to seek guidance from experienced users or consult support forums dedicated to your specific device and ROM/kernel.
How to Backup and Restore Android Device in Recovery Mode
Backing up and restoring your Android device in Recovery Mode can help protect your data and provide an additional layer of safety when performing actions such as flashing custom ROMs or factory resetting your device. Here’s a guide on how to backup and restore your Android device using Recovery Mode:
- Access Recovery Mode on your Android device by using the appropriate button combination during the device’s boot-up process. The specific combination may vary, so refer to your device’s user manual or search online for the correct steps.
- In Recovery Mode, navigate using the volume buttons to find the “Backup” or “Backup and restore” option. Select it using the power button or touch screen.
- Depending on your device and the Recovery Mode version, you may have several backup options, such as “Backup to internal storage,” “Backup to external storage,” or “Backup to computer.”
- Select your desired backup option. If you choose to back up to external storage, make sure the storage device is connected to your device.
- Confirm the backup by selecting “Yes” or “Backup now” when prompted. The backup process will begin, and you might see a progress indicator on the screen. The duration of the backup process will depend on the amount of data being backed up.
- Once the backup is complete, you will be returned to the main Recovery Mode menu. From there, you can either proceed with other options or select the “Reboot system” option to exit Recovery Mode.
- To restore your device using the backup you created, access Recovery Mode once again.
- Navigate to the “Restore” or “Restore from backup” option and select it.
- Choose the backup file you want to restore from the available options. Use the volume buttons to scroll and the power button or touch screen to select.
- Confirm the restoration by selecting “Yes” or “Restore now” when prompted. The restore process will begin, and you might see a progress indicator on the screen. Note that restoring a backup will overwrite the existing data on your device.
- Wait for the restoration process to complete, and once finished, you can select the “Reboot system” option to restart your device. Your device will then start up with the restored data.
It’s important to note that the backup and restore options in Recovery Mode may vary depending on your device and the Recovery Mode version. Some Recovery Modes might offer more advanced backup and restore functionalities, such as selective data backup or multiple backup slots.
Backing up your Android device before performing any major actions or modifications is highly recommended. This way, you can restore your device to a working state if something goes wrong during the process.
Keep in mind that Recovery Mode backups are typically meant to restore your device on the same Android version. If you plan to switch to a different Android version or ROM, it’s advisable to research and use backup solutions specific to that ROM or version.
By utilizing the backup and restore options in Recovery Mode, you can safeguard your data and ensure a smooth recovery process in case of any unforeseen issues or changes to your Android device.
Important Tips and Precautions for Using Recovery Mode
While Recovery Mode can be a powerful tool for troubleshooting and performing maintenance tasks on your Android device, it’s essential to keep in mind some important tips and precautions to ensure a smooth and safe experience. Here are some key points to consider when using Recovery Mode:
- Backup Your Data: Before performing any actions in Recovery Mode, it’s crucial to back up your important data. Factory resets, flashing custom ROMs, or other operations in Recovery Mode can result in data loss. Having a backup ensures that you can restore your data in case of any unexpected issues.
- Follow Instructions: Read and follow the on-screen instructions carefully when navigating through the Recovery Mode menu. Each option may have specific implications, and selecting the wrong action can lead to unintended consequences.
- Use Caution with Advanced Options: Advanced options in Recovery Mode, such as flashing custom ROMs or kernels, can potentially void your device’s warranty. Moreover, they carry risks of causing device malfunction or data loss if not executed correctly. Always research and understand the process thoroughly before attempting advanced actions.
- Refer to Device-Specific Guides: Since the exact steps and options in Recovery Mode can vary by device and Android version, consult your device’s user manual or search online for guides specific to your device. This ensures that you have accurate instructions tailored to your device’s particularities.
- Double-Check Before Confirming: Before confirming any action in Recovery Mode, double-check the selected option to ensure it is the intended choice. Performing irreversible actions, such as a factory reset, without proper consideration can lead to irreversible data loss.
- Be Patient: Some operations in Recovery Mode, such as installing system updates or performing factory resets, may take some time to complete. Avoid interrupting the process or turning off your device during these operations to prevent potential issues and data corruption.
- Seek Professional Help if Needed: If you are uncertain or uncomfortable with any actions in Recovery Mode, don’t hesitate to seek assistance from the device manufacturer or a professional technician. They can provide guidance and ensure that you perform the necessary steps correctly and safely.
- Understand the Risks: It’s important to recognize that using Recovery Mode involves certain risks. While it can help resolve software issues, improper use or incorrect actions can lead to data loss, device malfunctions, or even permanent damage. Make sure to weigh the risks and benefits before proceeding.
By following these tips and taking necessary precautions, you can effectively and safely utilize Recovery Mode to troubleshoot, maintain, and customize your Android device. Always prioritize data backup, carefully read instructions, and exercise caution to prevent any potential issues or consequences.