
Enable Developer Mode
To turn your Nook Color into an Android tablet, the first step is to enable Developer Mode. This allows you to make changes to the device’s software and install custom ROMs. Follow these steps to enable Developer Mode:
- Go to the Settings menu on your Nook Color.
- Scroll down and tap on the “Device Info” option.
- Look for the “Serial Number” field and tap it repeatedly about 7 times.
- A new option called “Developer Mode” will appear in the Settings menu.
- Tap on the “Developer Mode” option and toggle the switch to enable it.
- You will be prompted to enter your password or PIN to confirm the change.
- Once Developer Mode is enabled, a warning message will appear. Read it carefully and tap “Enable” to proceed.
Enabling Developer Mode on your Nook Color is necessary to install custom ROMs and unlock the full potential of your device. However, please note that this process may void your warranty, so proceed with caution.
Now that you have Developer Mode enabled, you can proceed to the next steps to transform your Nook Color into an Android tablet.
Install ClockworkMod Recovery
After enabling Developer Mode on your Nook Color, the next step is to install ClockworkMod Recovery. ClockworkMod Recovery is a custom recovery that allows you to perform advanced tasks such as creating backups, installing custom ROMs, and wiping data on your device. Follow these steps to install ClockworkMod Recovery:
- Download the ClockworkMod Recovery image compatible with your Nook Color model from the official ClockworkMod website.
- Connect your Nook Color to your computer using a USB cable.
- Transfer the downloaded ClockworkMod Recovery image to the root directory of your Nook Color’s internal storage or SD card.
- Disconnect your Nook Color from the computer.
- Turn off your Nook Color.
- Press and hold the Volume Up button.
- While still holding the Volume Up button, press and hold the Power button until the Nook Color powers on.
- Release both buttons when you see the “Touch the Future of Reading” screen.
- Your Nook Color will boot into ClockworkMod Recovery.
- Using the volume buttons, navigate to the “Install” or “Install ZIP” option and select it using the Power button.
- Navigate to the location where you transferred the ClockworkMod Recovery image and select it.
- Confirm the installation by selecting “Yes” when prompted.
- Wait for the installation to complete.
- Once the installation is finished, select the “Reboot System Now” option.
After rebooting, your Nook Color will have ClockworkMod Recovery installed. This custom recovery is essential for the next steps of turning your Nook Color into an Android tablet.
Download CyanogenMod ROM
With ClockworkMod Recovery installed on your Nook Color, you are now ready to download and install the CyanogenMod ROM. CyanogenMod is a popular custom ROM that provides a close-to-stock Android experience with added features and customization options. Follow these steps to download CyanogenMod ROM:
- Visit the official CyanogenMod website and navigate to the downloads section.
- Find the CyanogenMod ROM that corresponds to your Nook Color model and download it to your computer.
- Connect your Nook Color to your computer using a USB cable.
- Transfer the downloaded CyanogenMod ROM to the root directory of your Nook Color’s internal storage or SD card.
- Disconnect your Nook Color from the computer.
- Turn off your Nook Color.
- Press and hold the Volume Up button.
- While still holding the Volume Up button, press and hold the Power button until the Nook Color powers on.
- Release both buttons when you see the “Touch the Future of Reading” screen.
- Your Nook Color will boot into ClockworkMod Recovery.
- Using the volume buttons, navigate to the “Install” or “Install ZIP” option and select it using the Power button.
- Navigate to the location where you transferred the CyanogenMod ROM and select it.
- Confirm the installation by selecting “Yes” when prompted.
- Wait for the installation to complete.
- Once the installation is finished, select the “Reboot System Now” option.
After rebooting, your Nook Color will be running the CyanogenMod ROM, giving you a fully functional Android tablet experience. This ROM provides additional features and customization options not found in the stock Nook Color software, allowing you to personalize and optimize your device to your liking.
Transfer Files to SD Card
Transferring files to the SD card of your Nook Color is an important step in the process of turning it into an Android tablet. This allows you to easily access and install apps, media files, and other content on your device. Follow these steps to transfer files to the SD card:
- Remove the SD card from your Nook Color (if one is already inserted) by gently pushing it in until it pops out.
- Insert the SD card into your computer’s SD card reader.
- Open the file explorer on your computer and locate the files you want to transfer to the SD card.
- Copy the files and navigate to the SD card folder.
- Paste the files into the SD card folder.
- Eject the SD card from your computer.
- Insert the SD card back into your Nook Color.
- Power on your Nook Color and navigate to the file explorer.
- Open the SD card folder to access the transferred files.
By transferring files to the SD card, you ensure that you have enough storage space to install apps and store media files on your Nook Color. This will allow you to fully utilize the capabilities of your Android tablet and enjoy a range of features and functionalities.
Enter Recovery Mode
Entering Recovery Mode is an essential step when you want to perform advanced tasks on your Nook Color, such as flashing custom ROMs or performing system backups. Recovery Mode provides a dedicated environment where you can access various options and functions that are not available in normal operating mode. Follow these steps to enter Recovery Mode on your Nook Color:
- Power off your Nook Color by holding down the power button.
- Once your device is completely turned off, press and hold the Volume Up button.
- While still holding the Volume Up button, press and hold the Power button until the device powers on.
- Continue holding both buttons until you see the screen displaying “Recovery Mode” or an image indicating you are in Recovery Mode.
- Once you are in Recovery Mode, you can release the Volume Up and Power buttons.
Entering Recovery Mode on your Nook Color allows you to access the custom recovery software, such as ClockworkMod Recovery, which you have previously installed. From here, you can perform tasks like installing custom ROMs, performing system backups and restores, and clearing cache and data partitions.
It’s important to note that accessing Recovery Mode requires caution and care, as making incorrect selections or modifications can potentially harm your device. Therefore, make sure to follow instructions carefully and proceed with caution when using Recovery Mode on your Nook Color.
Install CyanogenMod ROM
Installing the CyanogenMod ROM is a crucial step in transforming your Nook Color into an Android tablet. CyanogenMod provides a customizable and feature-rich Android experience, allowing you to unlock the full potential of your device. Follow these steps to install the CyanogenMod ROM:
- Ensure that your Nook Color is powered off.
- Boot your device into Recovery Mode by pressing and holding the Volume Up button, then pressing and holding the Power button until the device turns on.
- Using the volume buttons, navigate to the “Install” or “Install ZIP” option in the Recovery Mode menu and select it using the Power button.
- Navigate to the location where you saved the CyanogenMod ROM and select it.
- Confirm the installation by selecting “Yes” when prompted.
- Wait for the installation process to complete, which may take a few minutes.
- Once the installation is finished, select the “Reboot System Now” option.
After rebooting, your Nook Color will be running the CyanogenMod ROM. This custom ROM will provide you with a powerful and customizable Android experience, allowing you to enjoy the latest features and improvements. You can explore the CyanogenMod settings and personalize your device to suit your preferences.
Please note that installing custom ROMs may void your warranty and carry some risks. Ensure that you follow the instructions carefully and back up your data before proceeding with the CyanogenMod installation.
Reboot the Device
Once you have successfully installed the CyanogenMod ROM on your Nook Color, it’s time to reboot the device to ensure that all changes take effect. Rebooting your device will allow the CyanogenMod ROM to fully load and provide you with a fresh Android experience. Follow these simple steps to reboot your Nook Color:
- Make sure that any ongoing tasks or applications are closed.
- Press and hold the Power button on your Nook Color.
- Select the “Restart” or “Reboot” option from the available power options.
- Wait for your device to power off and then power back on.
As your Nook Color reboots, the CyanogenMod ROM will initialize and boot up, replacing the stock Nook Color software. Once the reboot is complete, you will be greeted with the CyanogenMod interface and a range of new features and customization options.
It’s important to note that the reboot process may take a few minutes, especially during the initial boot-up after installing CyanogenMod. This is normal, and you should allow your device ample time to complete the rebooting process.
Now that your Nook Color has been successfully rebooted, you can start exploring the CyanogenMod ROM and enjoy the benefits of having a fully functional Android tablet at your fingertips.
Configure Android Settings
After rebooting your Nook Color with the newly installed CyanogenMod ROM, it’s time to configure the Android settings to optimize your device and personalize your user experience. Follow these steps to configure the Android settings on your Nook Color:
- Swipe down from the top of the screen to access the notification panel.
- Tap on the gear-shaped icon to open the Settings menu.
- Explore the various settings sections, such as “Display,” “Sound,” “Storage,” “Wireless & networks,” and “System.”
- Adjust the display settings, including brightness, wallpaper, and screen timeout, to suit your preferences.
- Configure the sound settings, such as ringtone, notifications, and volume levels.
- Manage storage options to check available space and transfer files as needed.
- Set up and connect to Wi-Fi networks or mobile data, depending on your preference and available options.
- Customize system-related settings, such as language, date and time, accessibility, and security.
- Explore the “Developer options” section if you want to enable additional features or tweak advanced settings.
Take your time to navigate through the settings menus and customize your Nook Color according to your preferences. This will allow you to optimize your device for optimal performance, functionality, and usability.
Remember to experiment with different settings and options to make the most out of your CyanogenMod-powered Android tablet. You can always revisit the settings menu to make further adjustments or changes as desired.
Configuring the Android settings on your Nook Color will enable you to tailor your device to your liking and ensure a more enjoyable and personalized user experience.
Install Google Apps
One of the essential steps to fully transform your Nook Color into an Android tablet is to install Google Apps, also known as GApps. This package includes popular Google services and applications such as Gmail, Google Maps, Google Play Store, and more. Follow these steps to install Google Apps on your Nook Color:
- Visit the Open GApps website on your computer’s browser.
- Select the desired platform, architecture, Android version, and variant that match your Nook Color’s specifications.
- Choose the appropriate package size based on your preference and available storage space.
- Download the GApps package to your computer.
- Connect your Nook Color to your computer via USB cable.
- Transfer the downloaded GApps package to the root directory of your Nook Color’s internal storage or SD card.
- Disconnect your Nook Color from the computer.
- Power off your Nook Color.
- Boot your device into Recovery Mode by simultaneously holding the Volume Up button and the Power button.
- Using the volume buttons, navigate to the “Install” or “Install ZIP” option and select it using the Power button.
- Locate the GApps package in the file explorer and select it.
- Confirm the installation by selecting “Yes” when prompted.
- Wait for the installation process to complete.
- Once the installation is finished, select the “Reboot System Now” option.
After the reboot, your Nook Color will have Google Apps installed, providing you with access to a range of Google services and applications for a more complete Android experience. You can now sign in to your Google account, download apps from the Play Store, and enjoy various functionalities offered by Google’s suite of services.
Please keep in mind that installing Google Apps may require a stable internet connection, and the availability of certain apps may vary depending on your desired Android version and device compatibility.
Install Additional Apps
Now that you have successfully installed the CyanogenMod ROM on your Nook Color and added Google Apps to your device, you can further enhance your Android tablet experience by installing additional apps to meet your specific needs and interests. By exploring the vast collection of apps available on the Google Play Store, you can customize your device and make it truly your own. Follow these steps to install additional apps on your Nook Color:
- Launch the Google Play Store app on your Nook Color.
- Sign in to your Google account or create a new one if you don’t have an account yet.
- Use the search bar to find a specific app or browse through different categories to discover new and popular apps.
- Select an app to view its details, including a description, screenshots, reviews, and ratings.
- Tap on the “Install” button to download and install the app onto your Nook Color.
- Wait for the installation process to complete.
- Once the app is installed, you can open it from the app drawer or home screen.
- Repeat the process to install any other apps you desire.
When installing additional apps, consider your needs and interests. Whether you’re looking for productivity tools, social media platforms, entertainment apps, or games, the Google Play Store offers a wide variety of options to choose from.
Remember to explore user reviews and ratings to ensure the app is reputable and performs well. Additionally, regularly update your installed apps to benefit from the latest features and security patches.
By installing additional apps, you can expand the functionality of your Nook Color and tailor it to suit your preferences, making it a versatile Android tablet that caters to your specific needs.
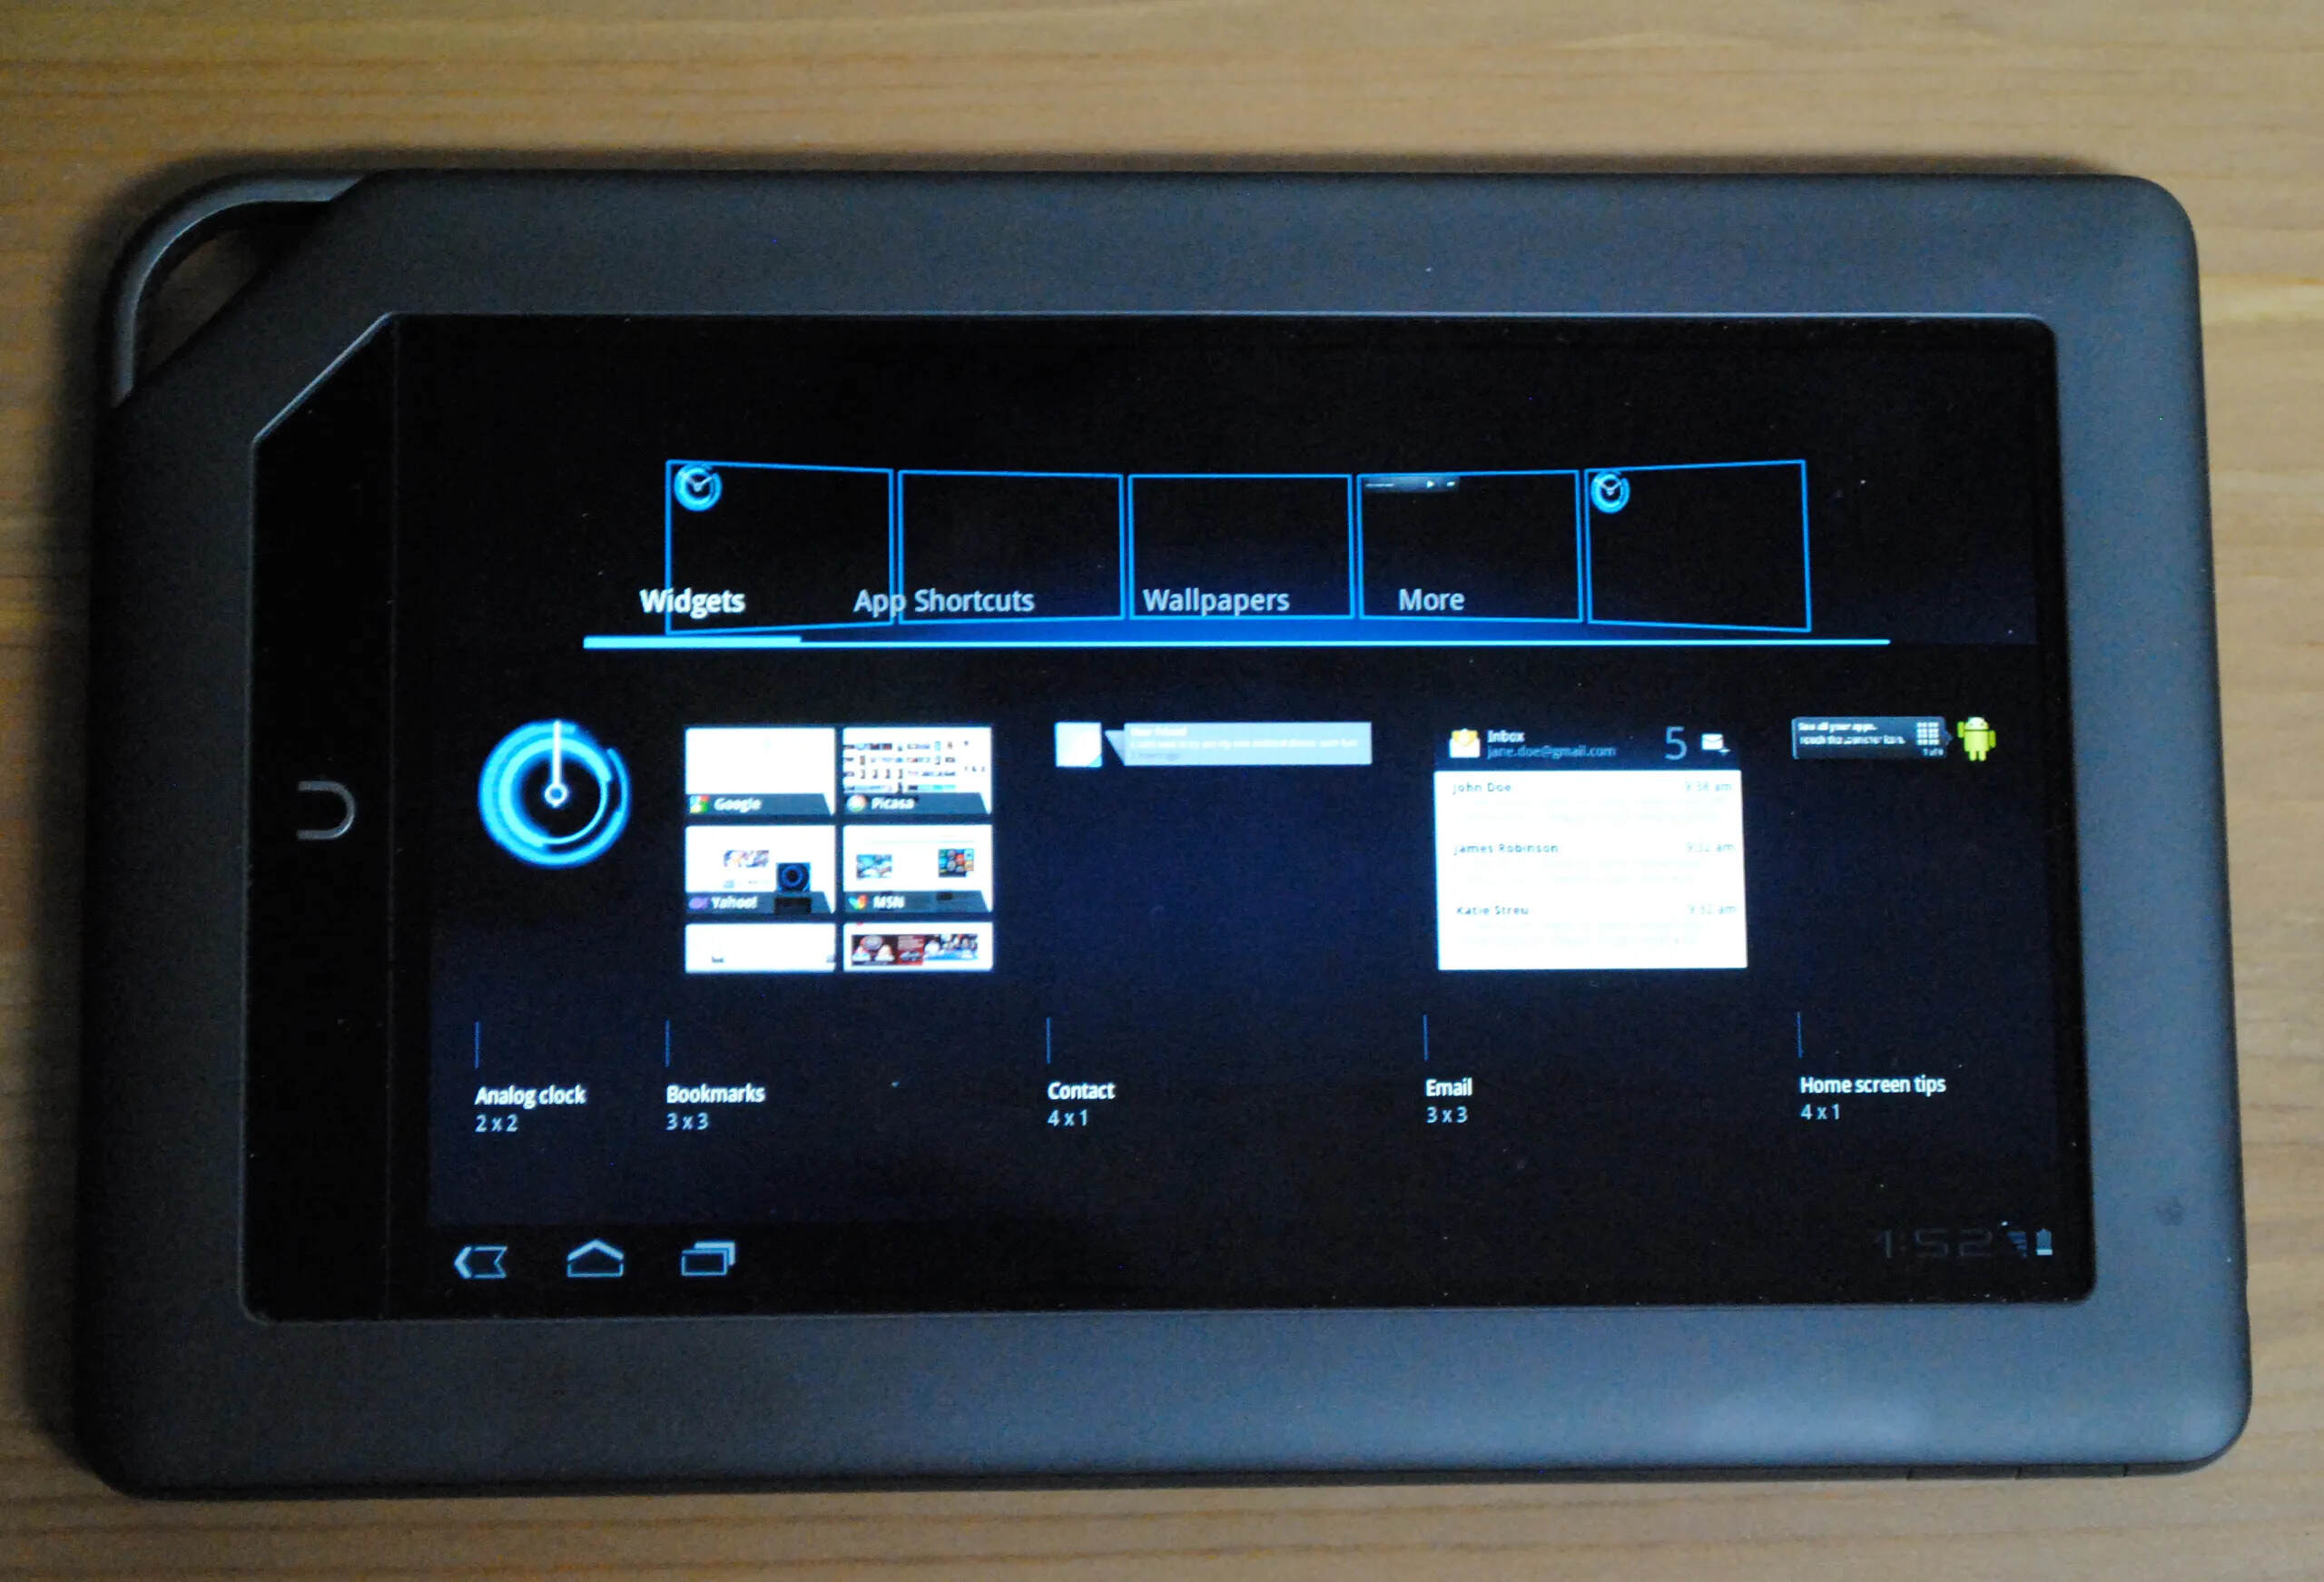
Customize Your Nook Color
Now that you have turned your Nook Color into an Android tablet with the CyanogenMod ROM, it’s time to unleash your creativity and personalize your device. Customizing your Nook Color will not only enhance its visual appeal but also allow you to optimize its functionality according to your preferences. Here are some ways you can customize your Nook Color:
- Wallpapers: Choose a custom wallpaper that reflects your style and personality. You can set a favorite photo, artwork, or scenic image as your device’s background.
- Widgets: Add widgets to your home screen for quick access to information and functions. Weather, calendar, news, and music widgets are just a few examples of what you can add to your Nook Color.
- App Icons: Install icon packs from the Google Play Store to change the look of your app icons. Choose from various styles and themes to give your Nook Color a unique and personalized touch.
- Launchers: Explore different launchers available on the Google Play Store to modify the overall look and feel of your home screen. Launchers offer customizable layouts, transitions, and additional features beyond the default interface.
- Notification Center: Customize the status bar and notification center to display or hide certain icons, rearrange their order, and choose which notifications to show. This allows you to have quick access to the information that matters most to you.
- Fonts: Install and apply different fonts to change the typography of your Nook Color’s interface. Experiment with various fonts to find one that suits your preferences and enhances readability.
- Lock Screen: Set a custom lock screen wallpaper and choose whether to display notifications, clock widgets, or media controls on your lock screen. You can even opt for security features like PIN, pattern, or fingerprint unlock.
- Navigation Bar: Customize the navigation bar by adding or removing keys and rearranging them to match your usage patterns. You can also modify the navigation bar’s color and transparency to complement your device’s theme.
- Themes: Explore the world of themes available for CyanogenMod to completely change the look and feel of your device. Themes allow you to customize the entire interface, including icons, wallpapers, fonts, and system colors.
Personalizing your Nook Color with these customizable options will make it feel uniquely yours. Experiment with different combinations and don’t hesitate to explore third-party apps and tools that offer additional customization features.
Remember to regularly backup your device and be cautious when using third-party customization tools or making system-level changes to avoid any potential issues.
Enjoy the freedom to express your style and design preferences with the customization options available on your Nook Color transformed into an Android tablet.
Troubleshooting Tips
While turning your Nook Color into an Android tablet is an exciting journey, you may encounter some challenges along the way. Here are a few troubleshooting tips to help you overcome common issues and ensure a smooth experience:
- Device Not Booting: If your device doesn’t boot after installing the CyanogenMod ROM, try rebooting into Recovery Mode and perform a factory reset. This can often resolve booting issues and allow your Nook Color to start up properly.
- App Compatibility: Some apps may not be compatible with the CyanogenMod ROM or your Nook Color’s hardware. If you encounter compatibility issues, consider alternative apps or seek help from the CyanogenMod community for workarounds or solutions.
- Battery Drain: If you notice excessive battery drain on your Nook Color, try adjusting the screen brightness, disabling unnecessary background processes, and closing unused apps to conserve battery life. Additionally, check for any battery optimization settings within the CyanogenMod ROM.
- Wi-Fi and Network Connectivity: If you experience Wi-Fi or network connection issues, try restarting your Nook Color and router, ensure your Wi-Fi password is correct, and check for any software updates or compatibility issues related to the CyanogenMod ROM.
- System Freezing or Lagging: If your device becomes unresponsive or exhibits lag, try clearing the app cache, uninstalling resource-intensive apps, and minimizing the use of live wallpapers or heavy widgets. You can also try a system reboot or perform a factory reset if necessary.
- Software Updates: Keep your CyanogenMod ROM up to date by regularly checking for software updates. These updates often bring bug fixes, performance improvements, and new features that can enhance the overall stability and functionality of your device.
When troubleshooting issues with your Nook Color, it’s always a good idea to consult online forums or communities dedicated to CyanogenMod ROMs and Nook Color modifications. These resources can provide valuable insights, tips, and solutions from experienced users who have faced similar challenges.
Remember to exercise caution when making changes to your device’s software and always backup your important data before attempting any troubleshooting steps or modifications.
By being proactive and patient during troubleshooting, you can effectively overcome common challenges and enjoy a stable and optimized Android experience on your Nook Color.