
What You Will Need
Before you can transform your Google Cardboard into an Oculus Rift, there are a few essential items you will need to gather:
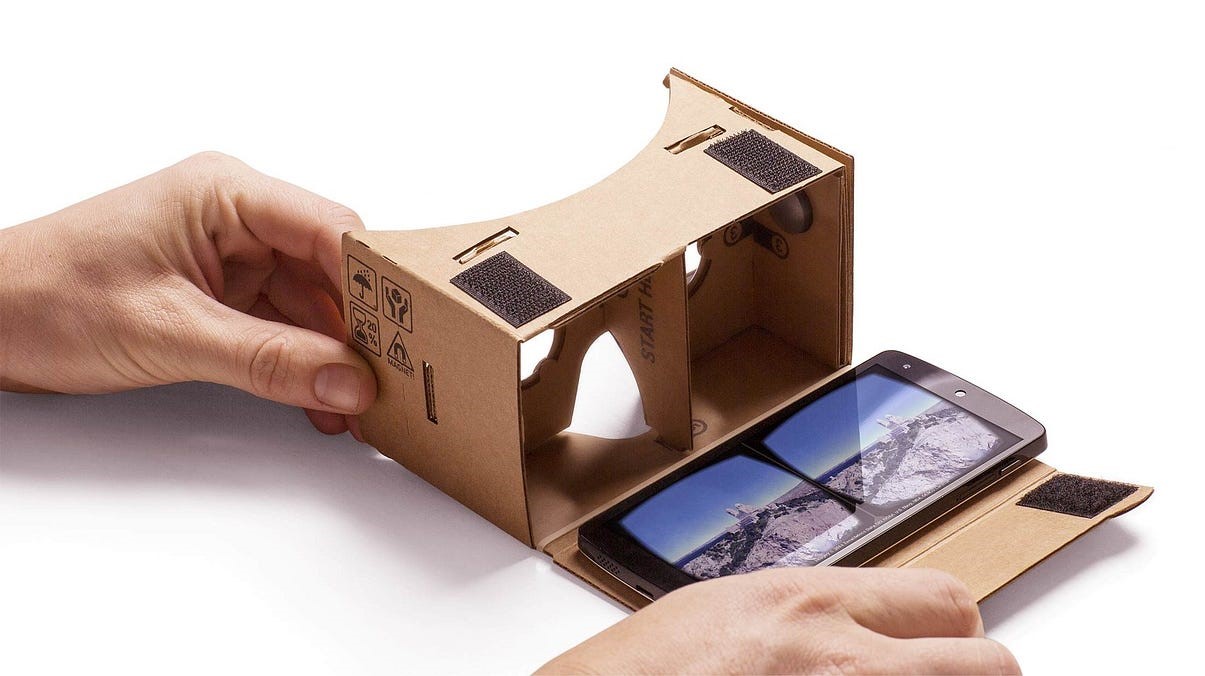
- Google Cardboard: This is the base device that you will be modifying to emulate the Oculus Rift experience. If you don’t already have one, you can easily find a Google Cardboard kit online or at your nearest tech store.
- A compatible smartphone: To power your virtual reality experience, you will need a smartphone that meets the Cardboard’s specifications. Make sure your phone has a gyroscope and supports the required software and apps.
- A PC or laptop: While not necessary for using the basic Cardboard features, you will need a computer to set up an extended VR experience. Make sure your PC meets the system requirements for running VR applications.
- USB cable: A USB cable will be used to connect your phone to your PC during the setup process. Ensure that you have a cable that is compatible with your phone’s connector.
- Oculus software: You will need to download and install the Oculus software on your PC to emulate the Oculus Rift experience. This software provides the necessary drivers and tools for the virtual reality functionality.
- VR content: To fully immerse yourself in the virtual reality experience, you will need to download VR content and games. Look for apps and games specifically designed for VR to get the most out of your modified Cardboard.
Once you have gathered all the necessary items, you will be ready to embark on the process of turning your Google Cardboard into an Oculus Rift-like device. The following steps will guide you through the setup and calibration process to ensure a smooth and enjoyable VR experience.
Step 1: Assemble the Cardboard
Before you can begin transforming your Google Cardboard into an Oculus Rift, you need to assemble the device properly. Follow these simple steps to ensure that your Cardboard is ready for the modification:
- Open the Cardboard kit: Carefully open the package containing your Cardboard kit, and make sure all the components are included.
- Identify the larger and smaller pieces: In most Cardboard kits, you will find two main pieces: a larger cardboard piece and a smaller cardboard piece with the lenses attached.
- Align the pieces: Align the larger cardboard piece with the smaller piece so that they fit together seamlessly. The sides should match up properly, and the smaller piece should sit snugly within the larger one.
- Fold the flaps: Fold the designated flaps on each piece inward to secure the cardboard structure. This will give your Cardboard the necessary stability to hold your smartphone.
- Insert the lenses: Gently insert the lenses provided with the Cardboard kit into the designated slots on the smaller cardboard piece. Make sure they are secure and fit well in the slots.
- Secure the straps: Depending on the Cardboard kit, you may have adjustable straps included. Attach them to the designated slots on the cardboard structure, ensuring that they are comfortable when worn.
Once you have assembled your Cardboard, it is ready to be modified and transformed into a virtual reality device similar to the Oculus Rift. The next steps will guide you through the process of downloading the necessary apps and software to prepare your Cardboard for an immersive VR experience.
Step 2: Download the Required Apps
Now that you have assembled your Google Cardboard, it’s time to download the required apps that will enable you to enjoy the immersive virtual reality experience similar to the Oculus Rift. Follow these steps to get your Cardboard equipped with the necessary software:
- Open the app store: Launch the app store on your smartphone. Whether you are using an Android device with the Google Play Store or an iOS device with the App Store, make sure you have a stable internet connection.
- Search for “Cardboard” app: In the app store’s search bar, enter “Cardboard”. Look for the official Google Cardboard app, which will provide you with a range of virtual reality experiences and games.
- Download and install the app: Once you have found the Cardboard app, tap on the “Download” or “Get” button to begin the installation process. Wait for the app to download and install on your smartphone.
- Explore VR content: After the Cardboard app is successfully installed, open it to explore various virtual reality experiences, educational content, and games specifically designed for VR. This will enhance and enrich your overall VR experience on your modified Cardboard.
- Additionally, you may want to download other VR apps: Besides the official Cardboard app, there are numerous other VR apps available in the app store. Explore different categories, such as games, educational apps, and video players, to find content that aligns with your interests.
By downloading the necessary apps, you are equipping your modified Cardboard with the tools to deliver a captivating virtual reality experience. In the next step, we will guide you through the process of calibrating your Cardboard to ensure optimal performance and functionality.
Step 3: Calibrate the Cardboard
Calibrating your Google Cardboard is an essential step to ensure that the virtual reality experience is smooth, accurate, and comfortable. Follow these steps to calibrate your Cardboard:
- Open the Cardboard app: Launch the Cardboard app you downloaded in the previous step on your smartphone.
- Choose your viewer: In the app, select your specific Cardboard viewer model from the list provided. This will optimize the VR experience for your specific Cardboard device.
- Follow the instructions: The Cardboard app will guide you through the process of calibrating your Cardboard. Follow the on-screen instructions to complete the calibration process.
- Adjust the lenses: While calibrating, you may be prompted to adjust the position and focus of the lenses. Follow the instructions to achieve clear and sharp visuals.
- Test the controls: After calibrating your Cardboard, you may be asked to perform certain actions using the Cardboard’s controls, such as tapping the screen or using the magnet switch. Verify that these controls are functioning correctly.
- Recalibrate if needed: If you encounter any issues with the VR experience or if the visuals appear distorted or misaligned, you can recalibrate the Cardboard by going back to the app’s settings and selecting the option to recalibrate.
Calibrating your Cardboard will ensure that the virtual reality visuals are aligned with your head movements, resulting in a more immersive and enjoyable experience. In the next step, you will learn how to connect your smartphone to your PC, which will allow you to enhance your Cardboard experience even further.
Step 4: Connect Your Phone to a PC
In order to unlock additional features and enhance your Google Cardboard experience, you’ll need to connect your smartphone to a PC. This step will allow you to install necessary software and configure settings on both your phone and PC. Follow these steps to connect your phone to a PC:
- Ensure USB Debugging is enabled: On your smartphone, go to the Developer Options in your Settings menu and enable USB Debugging. This will allow your PC to communicate with your phone.
- Connect your phone to your PC with a USB cable: Take the USB cable and connect one end to your phone’s charging port and the other end to an available USB port on your computer.
- Select File Transfer mode: When prompted on your phone, choose the option for File Transfer (MTP) mode. This will enable your PC to access your phone’s files and folders.
- Wait for the PC to detect your phone: After connecting your phone, wait for your computer to recognize and detect the device. This may take a few moments.
- Access your phone’s files on your PC: Once your phone is successfully connected to your PC, you can open File Explorer (Windows) or Finder (Mac) and navigate to your phone’s storage to access its files.
Connecting your phone to a PC allows you to transfer files, install software, and configure settings both on your phone and PC. This step is crucial for the next steps, where you will install the necessary software on your PC and establish a connection between your Cardboard and your computer. In the following section, we will guide you through the software installation process.
Step 5: Install the Necessary Software on Your PC
In order to fully emulate the Oculus Rift experience on your Google Cardboard, you will need to install the necessary software on your PC. This software will enable your computer to communicate with your smartphone and provide the virtual reality environment. Follow these steps to install the required software:
- Download the Oculus software: Visit the official Oculus website and navigate to the Downloads page. From there, download the Oculus software for your operating system (Windows or Mac).
- Run the installation file: Locate the Oculus software setup file that you downloaded, and double-click on it to begin the installation process.
- Follow the installation prompts: The installation wizard will guide you through the setup process. Read and accept the license agreement, choose the installation location, and select any additional options if prompted.
- Connect your Oculus account: If you have an existing Oculus account, you will be prompted to sign in during the installation process. If you don’t have an account, you can create one for free.
- Complete the installation: After the installation completes, you may be asked to restart your computer. Follow any on-screen instructions to finish the installation process.
- Launch the Oculus software: Once your PC has restarted, launch the Oculus software. You will be prompted to connect your Oculus headset, but since we are using a modified Cardboard, you can skip this step.
By installing the necessary software on your PC, you are preparing your computer to interface with your Google Cardboard and provide the virtual reality experience. In the next step, you will learn how to connect your Cardboard to your PC using a USB connection and begin the exciting VR journey.
Step 6: Connect the Cardboard to PC via USB
With the necessary software installed on your PC, you can now establish a connection between your Google Cardboard and your computer. This connection will allow you to take advantage of the extended features and capabilities offered by the Oculus software. Follow these steps to connect your Cardboard to your PC via USB:
- Ensure your smartphone is still connected to your PC: Make sure that your smartphone is still connected to your PC using the USB cable, as mentioned in Step 4.
- Unlock your smartphone: Unlock your smartphone and grant any necessary permissions to access your device’s files and folders.
- Open the Oculus software on your PC: Launch the Oculus software on your computer and make sure it is running.
- Locate the Device Setup section: In the Oculus software, navigate to the Device Setup section, which will guide you through the process of setting up your Cardboard.
- Follow the on-screen prompts: The Oculus software will provide instructions on connecting your Cardboard to your PC. Follow the on-screen prompts to establish the connection.
- Allow USB debugging on your smartphone: If prompted on your smartphone, grant permission for USB debugging, which will enable the communication between your Cardboard and your PC.
- Wait for the connection to be established: Once you have completed the necessary steps, wait for your PC to recognize the Cardboard and establish a connection.
By connecting your Cardboard to your PC via USB, you are enabling the extended features and functionalities offered by the Oculus software. This connection will enhance your VR experience and allow you to access a wider range of VR content and games. In the next step, we will explore how to start the VR experience using your connected Cardboard.
Step 7: Start the VR Experience
Now that your Google Cardboard is connected to your PC, you’re ready to dive into the immersive world of virtual reality. Follow these steps to start your VR experience:
- Put on your Cardboard: Place your smartphone into the designated slot on your Cardboard device. Make sure the screen is facing towards the lenses.
- Launch the Oculus software: Open the Oculus software on your PC. Ensure that it is running and properly connected to your Cardboard.
- Select your desired VR experience: Browse through the available VR content and games in the Oculus software. Choose the one that interests you the most and select it.
- Follow any additional on-screen prompts: Depending on the specific VR experience you selected, you may be prompted to set up certain preferences or adjust settings. Follow any additional on-screen instructions to tailor the experience to your liking.
- Wear your Cardboard: Place your Cardboard device securely on your head, adjusting the straps for a comfortable fit. Make sure it is aligned properly with your eyes to ensure optimum viewing.
- Enter the virtual reality: Once you are ready, start the VR experience through the Oculus software. You will be transported into the virtual reality environment, where you can explore, interact, and immerse yourself in the digital world.
- Use the Cardboard controls: Depending on the VR experience and the specific Cardboard model, you will have different controls available to navigate and interact with the virtual environment. Familiarize yourself with these controls and enjoy the VR experience.
With your Cardboard now connected to your PC and the VR experience launched, you are ready to embark on exciting virtual adventures, explore new worlds, and engage with immersive content. In the next step, we will discuss how to adjust the settings for an optimal VR experience.
Step 8: Adjust the Settings for Optimal Experience
To ensure that you have the best possible virtual reality experience with your Google Cardboard, it’s important to fine-tune and adjust the settings according to your preferences. Follow these steps to customize the settings for an optimal VR experience:
- In the Oculus software: Open the Oculus software on your PC and navigate to the settings section. Look for options specifically related to your connected Cardboard device.
- Visual settings: Adjust the visual settings to match your preference. You can modify the screen resolution, field of view, brightness, and other visual parameters to enhance the clarity and immersion of the VR experience.
- Audio settings: Customize the audio settings to ensure a rich and immersive sound experience. You may be able to adjust the volume, spatial audio effects, and other audio-related options.
- Motion settings: If you are using a Cardboard model that supports motion controls, configure the motion settings according to your comfort level. This may include sensitivity, dead zones, or other parameters that affect how your movements are translated in the virtual environment.
- Control settings: If there are specific control options available for your Cardboard model, such as a touchpad or a dedicated button, customize the control settings to your preference. This will ensure smooth and intuitive interaction within the VR environment.
- Experiment and fine-tune: Take the time to experiment with different settings and options to find what works best for you. Every individual has different preferences and comfort levels, so it’s important to adjust the settings accordingly.
By adjusting the settings to your liking, you can optimize your virtual reality experience and make it more enjoyable and immersive. Take some time to explore and experiment with the settings until you find the perfect combination for an optimal VR experience. In the next step, we will guide you on how to explore and discover VR content and games to broaden your Cardboard experience.
Step 9: Explore VR Content and Games
Now that you have set up and customized your Google Cardboard for an optimal virtual reality experience, it’s time to dive into a world of exciting VR content and games. Follow these steps to explore and discover a wide range of immersive experiences:
- Browse VR app stores: Open the app store on your smartphone and search for VR-specific app stores or sections. Explore popular VR platforms like Google Play Store (for Android) or App Store (for iOS) to find a variety of VR content.
- Search for VR experiences: Look for specific VR experiences, such as virtual tours, roller coaster simulations, educational content, 360-degree videos, or interactive games. Read the descriptions and user reviews to find the ones that resonate with your interests.
- Download and install VR apps: Once you have found an interesting VR app or game, download and install it on your smartphone. Ensure that the app is compatible with your Cardboard model and has positive reviews.
- Explore different genres: VR offers a wide range of experiences across various genres, including adventure, horror, simulation, puzzle, and more. Explore different genres to find the ones that captivate your imagination.
- Try popular VR apps: Look for recommended or frequently downloaded VR apps to get a taste of what the VR community enjoys. These popular apps often showcase the capabilities of VR technology and provide immersive experiences.
- Stay updated with new releases: Keep an eye out for new VR app releases and updates. VR content is constantly evolving and improving, so staying updated will ensure that you have access to the latest and most innovative experiences.
- Join VR communities: Engage with VR enthusiasts and join online communities or forums dedicated to virtual reality. These communities often share recommendations, tips, and tricks for finding the best VR content and games.
With a world of VR content and games at your fingertips, take your time to explore and discover new experiences that pique your interest. Immerse yourself in virtual worlds, engage in thrilling adventures, or use VR for educational purposes. Let your curiosity guide you as you unlock the full potential of your Google Cardboard. In the next step, we will provide troubleshooting tips to address any issues you may encounter during your VR journey.
Step 10: Troubleshooting Tips
While using your Google Cardboard as an Oculus Rift alternative, you may encounter some common issues or difficulties. Don’t worry! Here are some troubleshooting tips to help you address and overcome these challenges:
- Blurry visuals: If you experience blurry visuals, adjust the focus of the lenses by moving them closer or further from your eyes. Also, make sure to clean the lenses and the smartphone screen to ensure clarity.
- Intermittent or no response to Cardboard controls: Try removing and reinserting your smartphone into the Cardboard device to ensure a proper connection. Also, check if the Cardboard app is up to date and functioning correctly.
- Overheating: Extended VR sessions can cause your smartphone to overheat. If this happens, take a break and allow your device to cool down. You can also consider using a cooling pad or keeping the room cool to prevent overheating.
- Tracking issues: If you experience tracking issues with head movements not being accurately captured, make sure that your phone’s gyroscope is functioning properly. Additionally, try recalibrating your Cardboard following the steps mentioned in Step 3.
- Compatibility issues: Some VR apps may have specific device or operating system requirements. Ensure that your smartphone meets the necessary specifications and that the app is compatible with your Cardboard model.
- Connectivity problems: If you encounter connection issues when trying to connect your Cardboard to your PC, make sure that your USB cable is functioning properly. Try using a different cable or connecting to a different USB port on your computer.
- Software glitches: If you experience software glitches or crashes within the VR apps, try exiting the app and relaunching it. If the problem persists, make sure that your smartphone’s operating system and the VR app are up to date.
- Poor audio quality: If you are experiencing poor audio quality or no sound at all, ensure that the volume is turned up both on your smartphone and PC. Also, check the audio settings within the VR app to ensure they are properly configured.
By following these troubleshooting tips, you can overcome common challenges and enjoy a smoother VR experience with your Google Cardboard. Remember, patience and persistence are key. If one solution doesn’t work, try another until you find the right fix. In the final step, we will discuss how you can take your Cardboard experience to the next level by considering an upgrade.
Step 11: Upgrading Your Cardboard Experience
If you’ve enjoyed using your Google Cardboard as an Oculus Rift alternative and want to take your virtual reality experience to the next level, you might consider upgrading your setup. Here are some options to enhance your Cardboard experience:
- Invest in a higher-quality Cardboard viewer: While the standard Cardboard viewer provides a great entry point into virtual reality, you can upgrade to a more advanced viewer that offers better optics, durability, and comfort. Look for options like Google Daydream or Samsung Gear VR.
- Upgrade to a more capable smartphone: If you’re using an older or less powerful smartphone, consider upgrading to a newer model with a higher-resolution screen, better graphics capabilities, and improved processing power. This will enhance the visuals and overall performance of your VR experience.
- Explore standalone VR headsets: Standalone VR headsets, such as the Oculus Quest or the HTC Vive Focus, offer a more immersive and powerful VR experience without the need for a PC or smartphone. These devices provide higher-quality visuals, improved tracking, and a wider range of compatible apps and games.
- Consider motion controllers: Adding motion controllers to your Cardboard setup can greatly enhance interactivity in VR experiences. These controllers allow for more natural and precise hand movements, bringing a new level of immersion and gameplay possibilities.
- Expand your VR content library: Continuously explore and invest in a wider range of VR content and games. Many popular VR platforms offer an extensive library of immersive experiences that can take your virtual reality adventures to new heights.
- Join VR communities or events: Connect with fellow VR enthusiasts by joining online communities, attending VR events, or participating in virtual reality forums. Engaging with like-minded individuals can provide valuable insights, recommendations, and support for upgrading your Cardboard experience.
Upgrading your Cardboard experience allows you to unlock even more possibilities in the world of virtual reality. Whether it’s through better hardware, more advanced controllers, or a wider range of immersive content, taking the next step can significantly enhance your VR adventures. It’s an exciting journey of continued exploration and discovery.
Congratulations! By following these steps, you have transformed your Google Cardboard into an Oculus Rift-like virtual reality device. Enjoy your newfound virtual reality world and have an incredible immersive experience!