
Using AirDrop to Transfer Photos
One of the easiest ways to transfer photos from your iPhone to your MacBook Air is by using AirDrop. AirDrop allows you to wirelessly transfer files between Apple devices that are in close proximity to each other.
To transfer photos using AirDrop, follow these steps:
- Make sure both your iPhone and MacBook Air have Wi-Fi and Bluetooth turned on.
- On your iPhone, open the Photos app and select the photos you want to transfer.
- Tap the share button, usually indicated by a square with an arrow pointing up.
- You will see a list of available devices to share with. Choose your MacBook Air from the list.
- On your MacBook Air, you will receive a notification asking if you want to accept the photos from your iPhone. Click “Accept” to start the transfer.
- The photos will automatically be saved to your MacBook Air’s Downloads folder or the folder you specified.
Using AirDrop eliminates the need for cables or external apps, making it a convenient and quick way to transfer photos. It’s especially useful when you have a large number of photos to transfer or when you want to transfer photos in real-time without the hassle of physical connections.
Keep in mind that both devices need to be within close proximity to each other for AirDrop to work effectively. Also, ensure that AirDrop is enabled on both devices. You can do this by going to Settings > General > AirDrop on your iPhone and by clicking on the Finder icon in the Dock on your MacBook Air and selecting AirDrop from the sidebar.
AirDrop is a reliable and secure method for transferring photos between your iPhone and MacBook Air. It uses encryption to protect your data during the transfer process, ensuring your privacy and security.
Using iCloud Photos to Sync Photos
If you want a seamless and automatic way to transfer photos from your iPhone to your MacBook Air, using iCloud Photos is a great option. iCloud Photos allows you to sync your photos across all your Apple devices, including your iPhone and MacBook Air.
Here’s how to set up and use iCloud Photos to sync your photos:
- Make sure both your iPhone and MacBook Air are logged in with the same Apple ID.
- On your iPhone, go to Settings and tap on your name at the top.
- Select “iCloud” and then “Photos.”
- Ensure that “iCloud Photos” is turned on. This will upload your photos to iCloud and make them available on all devices.
- On your MacBook Air, click on the Apple menu and go to “System Preferences.”
- Select “iCloud” and sign in with the same Apple ID as your iPhone.
- Enable “Photos” under the iCloud section to sync your photos to your MacBook Air.
Once you have set up iCloud Photos on both devices, any photos you capture or save on your iPhone will automatically be synced to your MacBook Air. You can access them using the Photos app on your MacBook Air.
Syncing photos via iCloud Photos offers several advantages. First, it ensures that your photos are securely backed up in the cloud, protecting them from accidental loss or device damage. Second, it allows you to access your entire photo library on both your iPhone and MacBook Air, providing a seamless browsing experience.
However, keep in mind that using iCloud Photos may require a consistent internet connection for syncing to take place. Additionally, you may need to manage your iCloud storage if you have a large photo library, as there is a limited amount of free storage before additional fees may apply.
Overall, iCloud Photos is a convenient and efficient method for syncing your photos between your iPhone and MacBook Air. It saves you the hassle of manually transferring photos and ensures that you always have access to your entire photo collection on all your Apple devices.
Connecting iPhone to MacBook Air with a USB Cable
If you prefer a more traditional method of transferring photos, you can connect your iPhone to your MacBook Air using a USB cable. This method allows for a direct and reliable transfer of photos between the two devices.
Here’s how to connect your iPhone to your MacBook Air with a USB cable:
- Plug one end of the USB cable into the charging port of your iPhone.
- Connect the other end of the USB cable to an available USB port on your MacBook Air.
- On your iPhone, you may see a prompt asking if you trust this computer. Tap “Trust” to proceed.
- On your MacBook Air, the Photos app will launch automatically (or you can manually open it).
- In the Photos app, you will see a list of your connected devices. Click on your iPhone to view its photo library.
- Select the photos you want to transfer and click on the “Import” button to start the transfer process.
- Once the transfer is complete, the photos will be saved to your MacBook Air’s Photos library.
Connecting your iPhone to your MacBook Air with a USB cable is a straightforward and reliable method for transferring photos. It ensures a stable connection and allows for faster transfer speeds compared to wireless methods.
This method is particularly useful when you have a large number of high-resolution photos or videos to transfer, as it avoids potential bottlenecks related to wireless transfer speeds. It also allows you to quickly charge your iPhone while transferring photos.
However, keep in mind that this method requires a physical connection between your devices, which may not be as convenient as wireless options like AirDrop or iCloud Photos. Additionally, if you are using an older MacBook Air model with USB-A ports, you may need to use a USB-C to USB-A adapter to connect your iPhone.
Transferring Photos using the Photos App
If you prefer a dedicated app for managing and transferring your photos, the Photos app on both your iPhone and MacBook Air provides an efficient solution. The Photos app offers a straightforward and user-friendly interface for transferring photos between your devices.
Here’s how to transfer photos using the Photos app:
- Connect your iPhone to your MacBook Air using a USB cable or ensure that both devices are connected to the same Wi-Fi network.
- On your MacBook Air, open the Photos app.
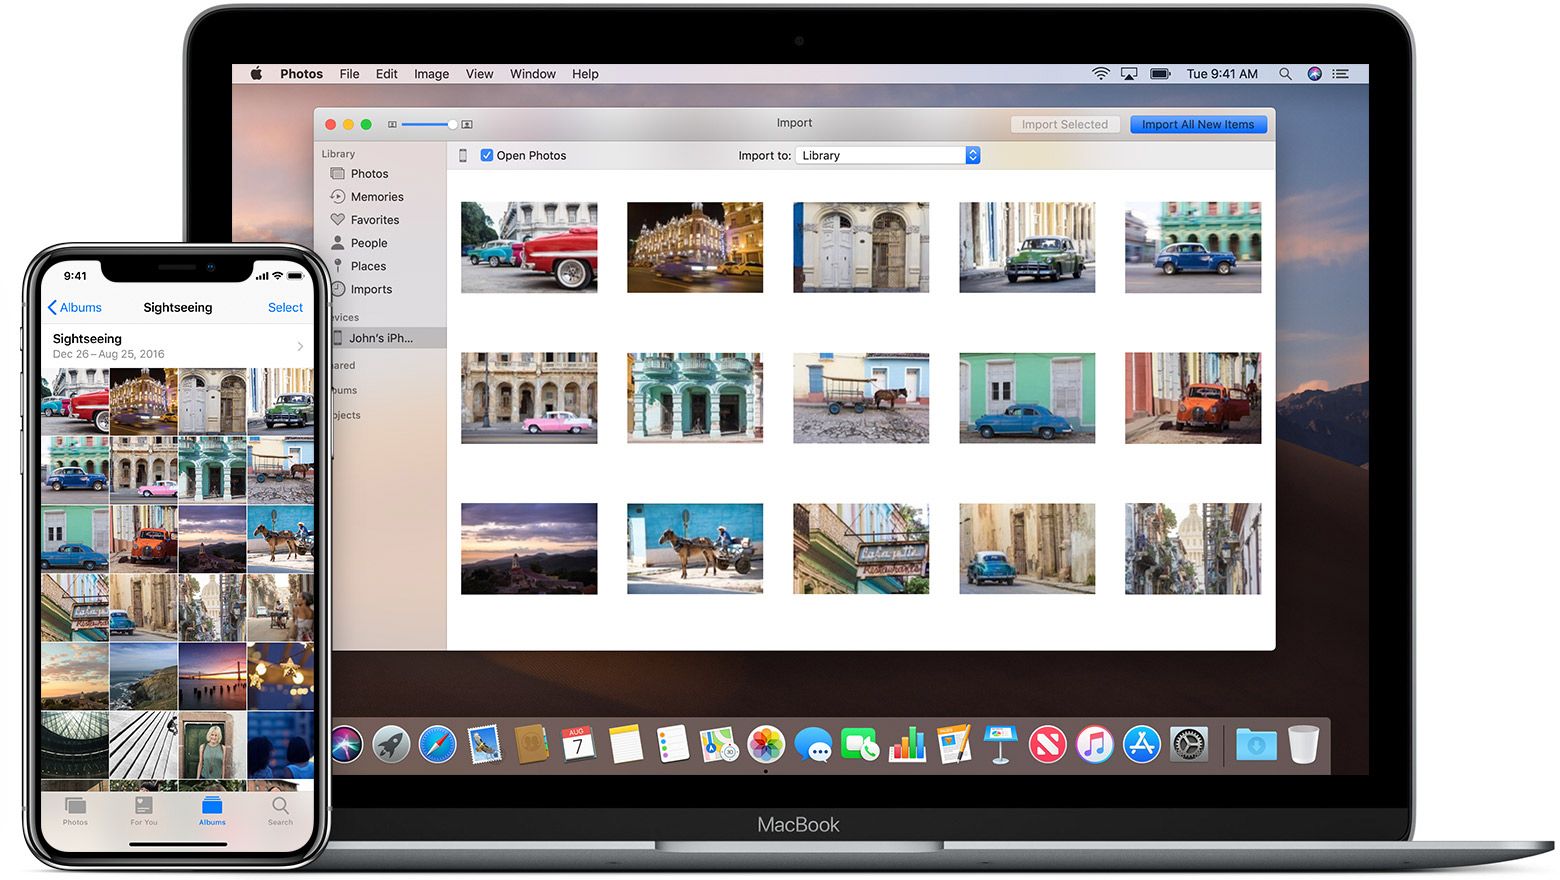
- Click on the “Import” tab located at the top of the Photos app.
- You will see a list of connected devices on the left-hand sidebar. Select your iPhone from the list.
- The Photos app will display the photos and videos available for import from your iPhone. Choose the ones you want to transfer.
- Click on the “Import Selected” button to start the transfer process.
- The selected photos will be copied from your iPhone to your MacBook Air and saved in the Photos library.
The Photos app provides various options for organizing and viewing your transferred photos. You can create albums, apply edits and filters, and easily search for specific images.
Transferring photos using the Photos app is a reliable and efficient method. It offers more control over the transfer process compared to wireless methods like AirDrop and iCloud Photos. Additionally, it allows you to manage and organize your photos directly within the Photos app on your MacBook Air.
However, keep in mind that using the Photos app requires a physical connection between your iPhone and MacBook Air or a reliable Wi-Fi network. It’s also important to ensure that you have enough storage space on your MacBook Air to accommodate the transferred photos.
Overall, the Photos app offers a convenient and versatile solution for transferring and managing your photos between your iPhone and MacBook Air.
Using Google Photos to Transfer Photos
If you prefer to use a cross-platform solution for transferring photos between your iPhone and MacBook Air, Google Photos provides a reliable and convenient option. With Google Photos, you can easily upload your photos from your iPhone and access them on your MacBook Air using a web browser.
Here’s how to transfer photos using Google Photos:
- Download the Google Photos app from the App Store and install it on your iPhone.
- Sign in to the app using your Google account or create a new account if you don’t have one.
- Open the Google Photos app and allow it to access your iPhone’s photos.
- Select the photos you want to transfer by tapping on them. Alternatively, you can choose to back up your entire photo library.
- Tap on the “Upload” button to start uploading the selected photos to your Google Photos account.
- On your MacBook Air, open a web browser and go to the Google Photos website (photos.google.com).
- Sign in to your Google account and navigate to the “Photos” section.
- You will find all your uploaded photos in your Google Photos library. You can view, download, or organize them as needed.
Using Google Photos provides several advantages. Firstly, it offers unlimited free storage for high-quality photos and videos (up to a certain resolution). This means you can back up your entire photo library without worrying about storage limitations.
Secondly, Google Photos allows you to access your photos from any device with an internet connection, including your iPhone and MacBook Air. This makes it convenient to view and download your photos without the need for physical connections or transferring files manually.
However, keep in mind that using Google Photos requires a stable internet connection for uploading and accessing your photos. Additionally, you may need to consider the privacy and security of your photos when using a third-party service like Google Photos.
Overall, Google Photos is a versatile and cross-platform solution for transferring and accessing your photos between your iPhone and MacBook Air. It provides easy storage, seamless synchronization, and accessibility across multiple devices.
Importing Photos using Image Capture
If you prefer a simple and straightforward method for importing photos from your iPhone to your MacBook Air, Image Capture is a built-in application that can help you accomplish this task. Image Capture allows you to import photos from your iPhone directly to your MacBook Air without the need for any additional software.
Here’s how to import photos using Image Capture:
- Connect your iPhone to your MacBook Air using a USB cable.
- Open the Image Capture application on your MacBook Air. You can find it in the Applications folder or by using the Spotlight search.
- Once Image Capture is open, your connected iPhone should appear in the device list on the left-hand side of the window.
- Click on your iPhone to reveal the photos and videos available for import.
- You can select specific photos by holding down the Command key and clicking on each photo. Alternatively, you can click on the “Import All” button to import all the photos.
- Select the destination folder for the imported photos. You can choose an existing folder or create a new one.
- Click on the “Import” button to start the import process.
- Once the import is complete, the photos will be saved to the specified destination folder on your MacBook Air.
Image Capture provides a straightforward and efficient way to import photos from your iPhone. It allows you to easily select and import specific photos or import your entire photo library, depending on your preference.
This method is particularly useful when you don’t want to rely on cloud storage or wireless transfer options. It offers more control over the import process and ensures that your photos are directly saved to your MacBook Air’s local storage.
Additionally, Image Capture allows you to delete photos from your iPhone after import. You can select the “Delete after Import” checkbox to automatically remove the imported photos from your iPhone, freeing up storage space.
Overall, Image Capture is a simple and effective solution for importing photos from your iPhone to your MacBook Air. It eliminates the need for additional software or cloud services, making it a convenient option for transferring your photos.
Transferring Photos via Email or Messaging Apps
If you want a quick and straightforward method to transfer a few photos from your iPhone to your MacBook Air, using email or messaging apps can be a convenient option. Email and messaging apps allow you to send the photos as attachments, making it easy to transfer them between devices.
Here’s how to transfer photos via email or messaging apps:
- Open the Photos app on your iPhone and select the photos you want to transfer.
- Tap on the share button, usually indicated by a square with an arrow pointing up.
- Select the email or messaging app you want to use. Options may include Mail, Messages, WhatsApp, or any other compatible app installed on your iPhone.
- If using email, compose a new email and enter your own email address as the recipient. If using a messaging app, select the contact or group chat to send the photos to.
- Add a subject or message if desired.
- Send the email or message.
On your MacBook Air, open your email or messaging app and access the email or message containing the photos.
If using email, you can simply open the email and download the attached photos. If using a messaging app, you can save the photos directly to your MacBook Air by clicking on the download or save button within the app.
Transferring photos via email or messaging apps is a quick and convenient method, especially for transferring a small number of photos. It doesn’t require any additional software or connections, making it accessible and easy to use.
However, keep in mind that transferring multiple or large-sized photos via email may not be the most efficient method, as there may be file size limitations and potential loss in image quality due to compression. Additionally, using messaging apps may require an internet connection to send and receive the photos.
Overall, using email or messaging apps for photo transfer is a viable option when you need to quickly share a few photos between your iPhone and MacBook Air. It’s simple, accessible, and doesn’t require any specialized tools or settings.
Using Third-Party Apps for Photo Transfer
If you’re looking for alternative methods to transfer photos from your iPhone to your MacBook Air, using third-party apps can provide additional functionality and flexibility. There are numerous apps available on the App Store that specialize in photo transfer and management, offering a range of features to suit your needs.
Here’s how to use third-party apps for photo transfer:
- Search for photo transfer apps on the App Store and choose one that suits your requirements. Popular options include Dropbox, Google Drive, OneDrive, and Files.
- Download and install the selected app on both your iPhone and MacBook Air.
- Launch the app on your iPhone and sign in with your account credentials or create a new account.
- Follow the app’s instructions for uploading your photos to their cloud storage or syncing your photo library.
- On your MacBook Air, launch the app and sign in with the same account you used on your iPhone.
- Access your photos within the app and download them to your MacBook Air’s local storage.
Using third-party apps for photo transfer provides several advantages. Firstly, these apps often offer larger storage capacities, allowing you to transfer and store a large number of photos without worrying about running out of space.
Additionally, third-party apps may provide advanced features such as automatic photo backup, photo organization, and the ability to access your photos from any device with an internet connection.
However, it’s important to consider the privacy and security aspects of using third-party apps. Make sure to read the app’s privacy policy and reviews to ensure that your photos are treated securely and your data is protected.
Furthermore, the functionality and features of third-party apps may vary, so it’s recommended to explore different options and choose the app that best suits your specific needs and preferences.
Overall, using third-party apps for photo transfer offers a versatile and customizable solution. It allows you to transfer, store, and access your photos in a way that aligns with your preferences and requirements.
Troubleshooting Common Issues with Photo Transfer
While transferring photos from your iPhone to your MacBook Air is typically a straightforward process, you may encounter some common issues along the way. Understanding these issues and their solutions can help you troubleshoot and successfully transfer your photos.
Here are some common issues you may encounter and tips for resolving them:
1. Connection Issues: If you’re using a wired method like connecting your iPhone to your MacBook Air with a USB cable, ensure that the cable is properly connected and functional. If you’re using a wireless method, such as AirDrop or iCloud Photos, check that both devices have Wi-Fi and Bluetooth turned on and are within close proximity to each other.
2. Lack of Storage Space: If you’re unable to transfer photos due to insufficient storage space on your MacBook Air or iPhone, free up some space by deleting unnecessary files or apps. Alternatively, consider using cloud storage or transferring your photos to an external hard drive to create more space for the transfer.
3. Disabled “Trust This Computer” on iPhone: When connecting your iPhone to your MacBook Air via USB, ensure that you have previously allowed your MacBook Air to access your iPhone by tapping “Trust” when the prompt appears on your iPhone. If you denied access or accidentally disabled it, go to “Settings” on your iPhone, navigate to “General” > “Reset”, and choose “Reset Location & Privacy” to reset the permissions.
4. Syncing and Timing Issues: If you’re using iCloud Photos, make sure that both your iPhone and MacBook Air are connected to the internet and syncing properly. It may take some time for all photos to sync, especially if you have a large library. Patience is key, and check your network connection if there are prolonged delays.
5. Software Updates: Ensure that both your iPhone and MacBook Air are running the latest software updates. Outdated software can sometimes cause compatibility issues or prevent smooth photo transfer. Check for updates in the Settings menu on your devices and install any available updates.
6. Photo Format Compatibility: Some photo formats may not be compatible with certain apps or devices. If you encounter issues transferring or viewing a specific photo, try converting the photo to a widely supported format like JPEG or PNG using a photo editing or conversion tool.
7. App-Specific Issues: If you’re using third-party apps or specialized photo transfer tools, check their documentation or support resources for troubleshooting tips. Often, these apps have specific troubleshooting guides and forums where you can find solutions to common issues.
By following these troubleshooting tips, you can overcome common issues that may arise during the photo transfer process. Remember to double-check your connections, ensure sufficient storage space, keep software up to date, and explore app-specific resources when necessary.