
Enable/Disable Auto-Rotate
When you tilt your iPhone, the screen usually rotates automatically to adjust to the new orientation. While this can be convenient in many situations, there are times when you may want to disable auto-rotate for better control over your screen orientation. Luckily, it’s easy to enable or disable this feature on your iPhone.
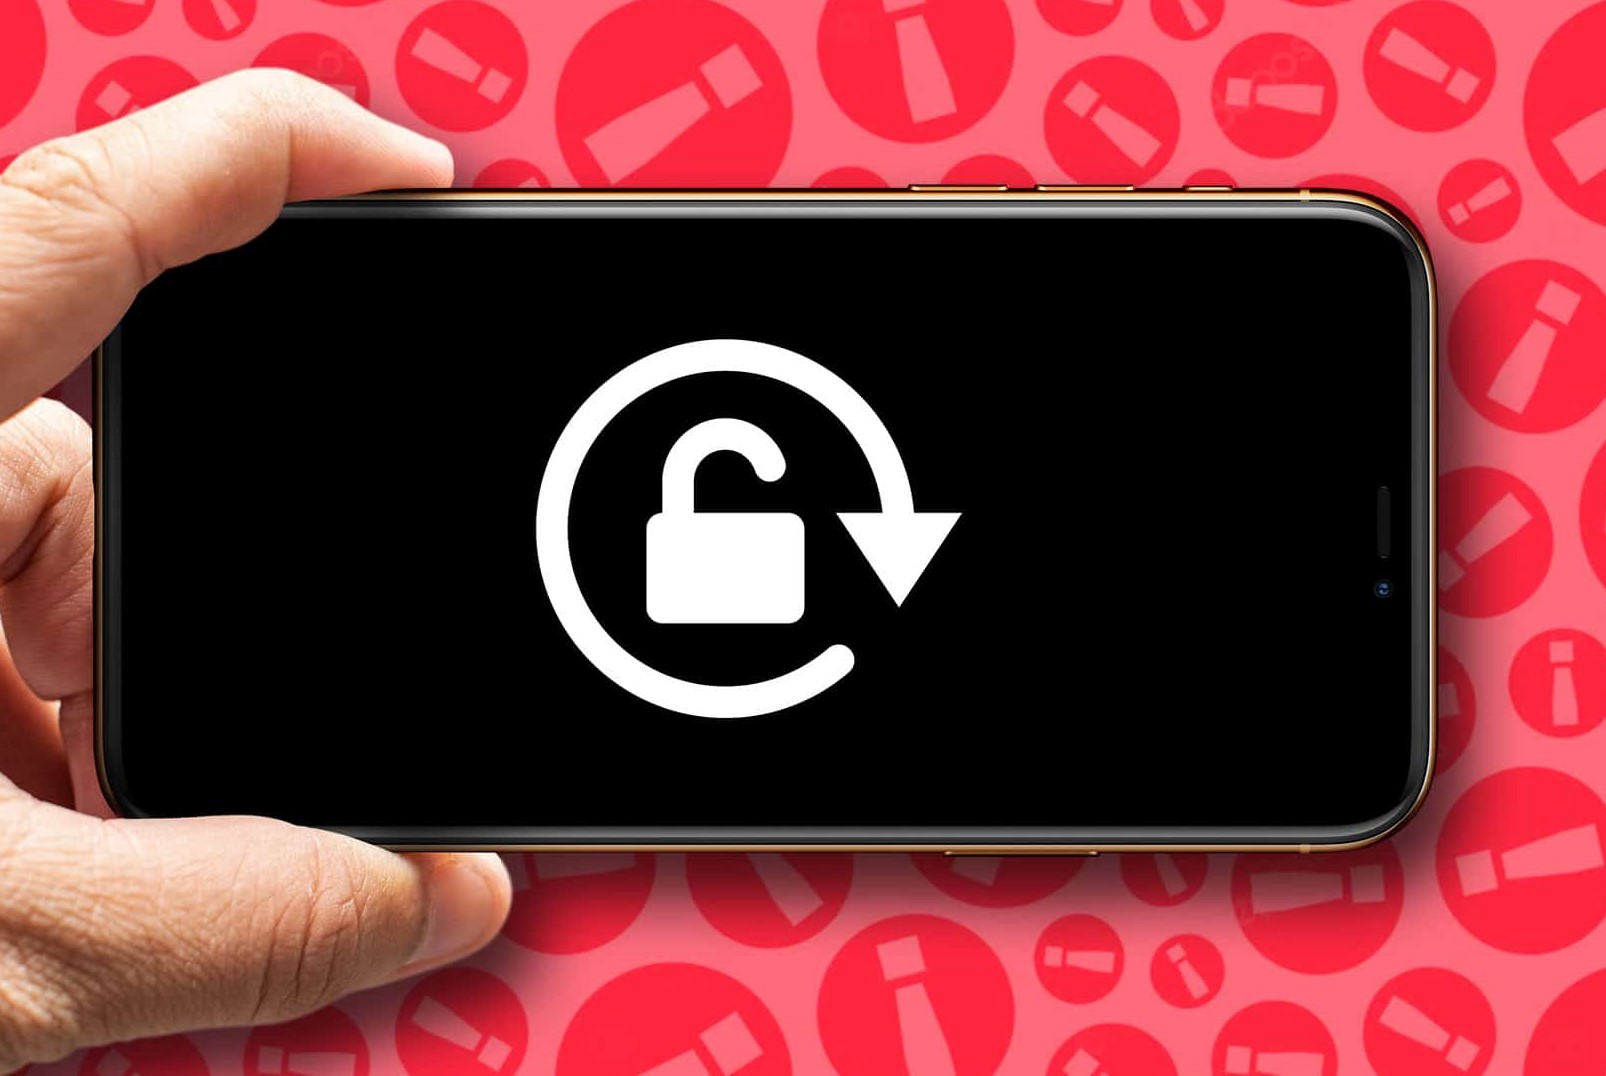
One way to quickly toggle auto-rotate on or off is by using the Control Center. Simply swipe down from the top-right corner of your iPhone X or later, or swipe up from the bottom of the screen for iPhone 8 or earlier models, to access the Control Center. Look for the lock-shaped icon with a circular arrow inside. Tapping on this icon will enable or disable auto-rotate, depending on its current state.
If you prefer a more permanent solution, you can access the screen orientation settings through the iPhone’s Settings app. Open the Settings app, then scroll down and tap on “Display & Brightness.” Look for the “Auto-Lock” section, and tap on “Rotate” to enable or disable auto-rotate.
For those who may have difficulty accessing the Settings app, there is an alternative method. Go to the Control Center again, and tap on the “Accessibility Shortcuts” button, represented by a figure inside a wheelchair icon. From the menu that appears, select “Accessibility Options.” Look for the “Orientation Lock” option and tap on it to enable or disable auto-rotate.
In addition to the built-in settings, there are also third-party apps available in the App Store that can assist with locking the screen orientation. These apps offer more customization options and may be worth exploring if you require additional control over your screen orientation.
If you have tried different methods and are still experiencing issues with the screen rotation, you can try using the Compass app as a workaround. Open the Compass app on your iPhone and swipe left to access the level tool. This will allow you to manually adjust your screen orientation.
Lastly, if none of the above solutions have resolved your screen rotation issue, you can consider resetting your iPhone settings to their default values. Keep in mind that this will erase all customized settings, so be sure to back up any important data before proceeding.
Lock/Unlock Screen Orientation
There may be instances when you want to lock your iPhone’s screen orientation to prevent it from automatically rotating. This can be particularly useful when reading or watching videos, as it ensures that the screen stays in the desired orientation regardless of how you hold the device. Fortunately, there are a few methods you can use to lock or unlock the screen orientation on your iPhone.
The easiest way to lock or unlock the screen orientation is through the Control Center. To access the Control Center, swipe down from the top-right corner of your iPhone X or later, or swipe up from the bottom of the screen for iPhone 8 or earlier models. Look for the lock-shaped icon with a padlock inside. Tapping on this icon will lock or unlock the screen orientation, depending on its current state.
If you prefer to use the Settings app, you can also lock or unlock the screen orientation from there. Open the Settings app, then tap on “Display & Brightness.” Within this section, you’ll find the “Auto-Lock” settings. By tapping on “Rotate,” you can lock or unlock the screen orientation.
For those with accessibility needs, there is a dedicated feature to lock the screen orientation. In the Control Center, tap on the “Accessibility Shortcuts” icon (represented by a figure inside a wheelchair icon). Select “Accessibility Options” from the menu that appears. Within the accessibility options, you’ll find an “Orientation Lock” toggle. Simply tap on it to lock or unlock the screen orientation.
Additionally, some third-party apps offer the functionality to lock the screen orientation. These apps provide more customization options and may be useful for specific scenarios where precise control over screen rotation is needed. Explore the App Store to find such apps and choose the one that best suits your requirements.
If you accidentally lock the screen orientation and want to unlock it, simply follow the same steps mentioned earlier to access the Control Center, Settings app, or accessibility options, depending on your preferred method. By toggling the lock icon or selecting the appropriate settings, you can easily unlock the screen orientation on your iPhone.
By being able to lock or unlock the screen orientation on your iPhone, you have greater flexibility and control over how you interact with your device. Whether you prefer to lock the orientation for specific tasks or enable it for a more dynamic experience, these methods allow you to customize your iPhone’s screen orientation to suit your needs.
Control Center Method
The Control Center on your iPhone provides a convenient and quick way to access various settings, including screen orientation. By using the Control Center method, you can easily toggle the auto-rotate feature on or off with just a few taps.
To access the Control Center, swipe down from the top-right corner of your iPhone X or later models. For iPhone 8 or earlier models, swipe up from the bottom of the screen. The Control Center houses several icons and shortcuts, which can be customized based on your preferences.
Once you’ve accessed the Control Center, look for the lock-shaped icon with a circular arrow inside. This icon represents the screen orientation lock feature. Tapping on this icon will enable or disable the auto-rotate functionality, depending on its current state.
If the lock icon is highlighted in white or has a slash across it, it means that the screen orientation has been locked. In this state, the screen will not rotate, regardless of how you tilt your iPhone. This is useful when you want to prevent the screen from constantly changing orientation, especially when reading or watching videos.
On the other hand, if the lock icon is not highlighted or does not have a slash across it, it means that the screen orientation is unlocked. In this state, the screen will rotate automatically based on the position of your iPhone. This allows for a more dynamic viewing experience, especially when using apps that benefit from different orientations, such as games or certain productivity tools.
It’s important to note that the Control Center method only provides a temporary solution to enable or disable screen rotation. Once you exit the Control Center, the screen orientation settings will revert to their default behavior. If you prefer a more permanent solution, you can make changes in the iPhone’s Settings app, as mentioned in the previous sections.
By using the Control Center method, you can easily toggle screen rotation on or off based on your immediate needs. Whether you want to lock the screen orientation for a specific task or enable it for a more dynamic experience, the Control Center provides a user-friendly approach to managing your iPhone’s screen orientation.
Settings Method
If you prefer a more permanent solution to enable or disable screen rotation on your iPhone, you can make adjustments in the Settings app. This method allows you to customize the screen orientation settings according to your preferences and have them persist beyond a single session.
To access the screen orientation settings, open the Settings app on your iPhone. The app icon resembles a gear and can usually be found on the home screen or in the app library.
Once you’re in the Settings app, scroll down and tap on “Display & Brightness”. This section contains various display-related settings that you can customize on your iPhone.
Within the “Display & Brightness” section, look for the “Auto-Lock” settings. This is where you can adjust the screen orientation behavior on your iPhone. Tap on “Rotate” to enable or disable auto-rotate.
If auto-rotate is enabled, your iPhone will automatically adjust the screen orientation based on how you tilt or turn the device. This is the default setting and is suitable for most users who prefer a more dynamic viewing experience.
If you disable auto-rotate, your iPhone’s screen will remain fixed in its current orientation and will not rotate when you tilt or turn the device. This setting is particularly useful when you want to lock the screen orientation, such as when reading or viewing content that you prefer to keep in a specific orientation.
Once you’ve made your desired selection, the changes will take effect immediately. You can exit the Settings app and continue using your iPhone with the chosen screen orientation settings.
It’s worth noting that the Settings method provides a more permanent solution to adjust the screen orientation on your iPhone. However, if you prefer a more convenient and instant way to toggle screen rotation, you can also utilize the Control Center method or explore other options such as the Accessibility method or third-party apps discussed in the previous sections.
By using the Settings method, you have greater control over the screen orientation on your iPhone. Whether you want to enable auto-rotate for a more dynamic experience or disable it to lock the screen orientation, adjusting the settings in the Settings app allows you to tailor your iPhone’s screen behavior to suit your preferences.
Accessibility Method
For individuals with accessibility needs or those who prefer alternative methods to control screen orientation on their iPhones, there is an option available in the Accessibility settings. By utilizing the Accessibility method, you can easily lock or unlock the screen orientation with just a few taps.
To access the Accessibility settings, start by opening the Control Center on your iPhone. To do this, swipe down from the top-right corner of your iPhone X or later models. For iPhone 8 or earlier models, swipe up from the bottom of the screen.
Once you have opened the Control Center, look for the “Accessibility Shortcuts” button. This button is represented by a figure inside a wheelchair icon. Tap on this button to access the Accessibility Options menu.
Within the Accessibility Options menu, you will find an option called “Orientation Lock.” This option allows you to lock or unlock the screen orientation on your iPhone. Simply tap on the “Orientation Lock” option to enable or disable the feature.
When the Orientation Lock is enabled, a small lock icon will appear in the status bar at the top of your iPhone’s screen. This indicates that the screen orientation is locked and will not change regardless of how you hold your device.
On the other hand, if the Orientation Lock is disabled, the lock icon will disappear from the status bar. In this state, your iPhone’s screen will rotate freely based on how you tilt or turn the device.
The Accessibility method provides an alternative and convenient way to lock or unlock the screen orientation on your iPhone. It allows users with specific accessibility needs to control the screen orientation without relying on the traditional Control Center or Settings options.
Additionally, it’s worth mentioning that there are other accessibility features that can further enhance the overall user experience on your iPhone. Exploring the Accessibility settings can help you discover additional customization options and tools to make your device more accessible and personalized.
By using the Accessibility method, you have the flexibility to easily lock or unlock the screen orientation on your iPhone. This feature ensures a consistent and controlled viewing experience, whether you need to keep the screen fixed in a particular orientation for accessibility reasons or allow it to rotate freely for a dynamic usage experience.
Using the Compass App
If you find that your iPhone’s screen rotation isn’t functioning as expected, or if you want to manually adjust the screen orientation, you can utilize the Compass app as a workaround. The Compass app includes a hidden level tool that can be used to manually adjust the screen orientation on your iPhone.
To access this feature, open the Compass app on your iPhone. The app icon resembles a compass needle and is usually found on the home screen or in the app library.
Once you’re in the Compass app, swipe left on the screen to access the hidden level tool. This tool utilizes the iPhone’s built-in gyroscope and accelerometer to detect the device’s orientation.
To manually adjust the screen orientation, simply tilt or position your iPhone until the bubble in the level tool is centered. This will align the screen with the desired orientation.
It’s important to note that using the Compass app to adjust the screen orientation is a temporary solution. As soon as you exit the app or launch a different app, the screen rotation will revert to its default behavior based on the device’s accelerometer.
However, this method can be particularly helpful when you’re using specific apps that do not support auto-rotate or if you’re experiencing issues with the built-in screen rotation feature. By manually adjusting the orientation using the Compass app, you can ensure that the screen is aligned with your preferred viewing angle.
While using the Compass app as a workaround provides a way to manually adjust the screen orientation, it’s worth mentioning that it is not a comprehensive solution for managing screen rotation on your iPhone. For more control over the screen orientation, it’s recommended to explore the previously mentioned methods, such as the Control Center, Settings app, or Accessibility options.
By utilizing the Compass app’s hidden level tool, you can manually adjust the screen orientation on your iPhone. This provides a workaround when auto-rotation is not functioning correctly or when you need precise control over the screen orientation in certain situations or apps.
Third-Party Apps to Lock Screen Orientation
In addition to the built-in methods provided by Apple, there are also third-party apps available in the App Store that can assist in locking the screen orientation on your iPhone. These apps offer more customization options and may be worth exploring if you require additional control over your screen orientation.
To find third-party apps that can lock the screen orientation, open the App Store on your iPhone and search for keywords such as “screen orientation lock” or “screen rotation control.” This will present you with a variety of apps to choose from, each with its own set of features and functionalities.
These apps typically work by providing a toggle switch or an on-screen button that allows you to lock or unlock the screen orientation with a single tap. Some apps may even offer additional customization options, such as specifying certain apps or scenarios where the screen lock should be enabled.
While third-party apps can offer more flexibility and granularity in controlling screen orientation, it’s essential to choose reputable apps with positive user reviews and high ratings. Take the time to read app descriptions, check out user feedback, and ensure the app is compatible with your iPhone model and iOS version.
Note that using third-party apps may introduce some limitations or dependencies. For example, some apps may require accessibility permissions to work correctly, while others may require a subscription or offer in-app purchases for advanced features.
Additionally, be mindful of the app’s impact on your device’s performance and battery life, as some third-party apps may consume more resources than others. It’s recommended to try out a few different apps to find the one that best suits your needs and preferences.
By exploring third-party apps to lock the screen orientation, you can gain access to additional customization options and fine-tuned control over your iPhone’s screen rotation. Whether you need to lock the orientation for specific tasks or require more advanced features, these apps can provide a tailored solution to meet your requirements.
Resetting iPhone Settings to Default
If you’ve exhausted all other methods and are still experiencing issues with your iPhone’s screen rotation or if you want to revert all your settings to their original state, resetting your iPhone’s settings to default can be a solution. However, it’s important to note that this action will erase all customized settings, so it should be done with caution. It’s advisable to back up your device before proceeding.
To reset your iPhone’s settings to default, open the Settings app on your device. The app icon looks like a gear and can usually be found on the home screen or in the app library.
Within the Settings app, scroll down and tap on “General.” This will open the general settings menu, where you will find various options to manage your iPhone’s overall behavior.
Scroll down again and tap on “Reset.” This section contains several reset options for different aspects of your iPhone.
To reset all settings to their default values, tap on “Reset All Settings.” This action will not erase any content or data on your iPhone, but it will remove all personalized settings, including screen rotation preferences.
Please be aware that resetting your iPhone’s settings may result in the loss of Wi-Fi passwords, Bluetooth pairings, and other personalized preferences. You will need to set up and configure your iPhone’s settings from scratch after the reset.
It’s important to note that resetting your iPhone’s settings to default is not a guaranteed solution for every screen rotation issue. If the problem persists even after the reset, further troubleshooting or a visit to an Apple store may be necessary.
Before proceeding with the reset, make sure to create a backup of your iPhone’s data to avoid potential data loss. You can do this through iCloud or by connecting your device to a computer and using iTunes/Finder to create a backup.
By resetting your iPhone’s settings to default, you can start with a clean slate and potentially resolve any screen rotation issues you may be experiencing. However, remember to consider this option as a last resort and only if other troubleshooting methods have been unsuccessful.