
Step 1: Open Snapchat and go to the camera screen
Opening Snapchat is the first step towards adding music to your snaps. Whether you are using an Android or iOS device, locate the Snapchat app on your home screen or app drawer and tap on it to open it. Once you’re in, you will be taken to the camera screen where you can capture photos and videos.
The camera screen is where the magic happens on Snapchat. It is the place where you can unleash your creativity and capture moments to share with your friends and followers. To access the camera screen, simply tap on the camera icon located at the bottom of the app interface.
Once you reach the camera screen, you will notice several options and features available to enhance your snaps. You can swipe left or right to access different lenses, filters, and effects to add a unique touch to your photos and videos. Additionally, you can toggle between the front and rear-facing cameras by tapping on the icon located in the top-right corner of the screen.
Before moving onto the next step, make sure you have a decent amount of battery charge on your phone. Adding music to your snaps may require playing music from your device, and it’s best to have enough battery power to ensure a seamless experience.
Now that you’ve successfully opened Snapchat and reached the camera screen, it’s time to move on to the next step: playing music on your phone.
Step 2: Start playing music on your phone
Adding music to your Snapchat snaps adds a whole new level of fun and creativity. To start playing music on your phone, open your preferred music app or streaming platform and select the song or playlist you want to use.
You have plenty of options to choose from when it comes to music apps. Whether you use Spotify, Apple Music, Pandora, or any other music streaming service, the process to play music is usually straightforward. Simply open the app, search for the song or playlist, and hit the play button.
Keep in mind that copyright regulations vary by country, so make sure you have the necessary rights to use the music in your snaps. It is always recommended to choose music from your personal library or opt for royalty-free tracks to avoid any copyright issues.
Once you’ve started playing the music, ensure that the volume is at an appropriate level. You don’t want the music to overpower your snaps or drown out any other audio elements you may include.
Experiment with different genres and songs that match the vibe or theme of your snap. Whether you’re looking for an upbeat track to complement a lively moment or a mellow tune to enhance a calm atmosphere, the music you choose can significantly impact the overall experience of your snap.
With the music playing on your phone, you’re now ready to move on to the next step: enabling access to the microphone in Snapchat.
Step 3: Enable Allow Access to the Microphone
In order for Snapchat to capture the audio from your phone while the music is playing, you need to grant the app access to your device’s microphone. This step is crucial to ensure that your snaps are synchronized with the music playing in the background.
To enable access to the microphone on an Android device, follow these steps:
- Open the Settings app on your phone.
- Scroll down and select “Apps & Notifications.”
- Choose “Snapchat” from the list of installed apps.
- Tap on “Permissions.”
- Make sure the toggle for “Microphone” is enabled.
For iOS users, the process to enable access to the microphone is slightly different:
- Open the Settings app on your iPhone.
- Scroll down and select “Privacy.”
- Tap on “Microphone.”
- Locate Snapchat from the list of apps and toggle the switch to allow access to the microphone.
Enabling access to the microphone is essential for Snapchat to capture audio while recording your snap. It ensures that the music playing on your phone is effectively recorded and shared with your friends or followers.
Once you’ve enabled access to the microphone, you can move on to the next step: selecting the audio recording icon in Snapchat.
Step 4: Select the audio recording icon in Snapchat
Now that you’ve opened Snapchat, reached the camera screen, and begun playing music on your phone with microphone access granted, it’s time to select the audio recording icon within the app. This step will allow you to seamlessly integrate the music into your snaps.
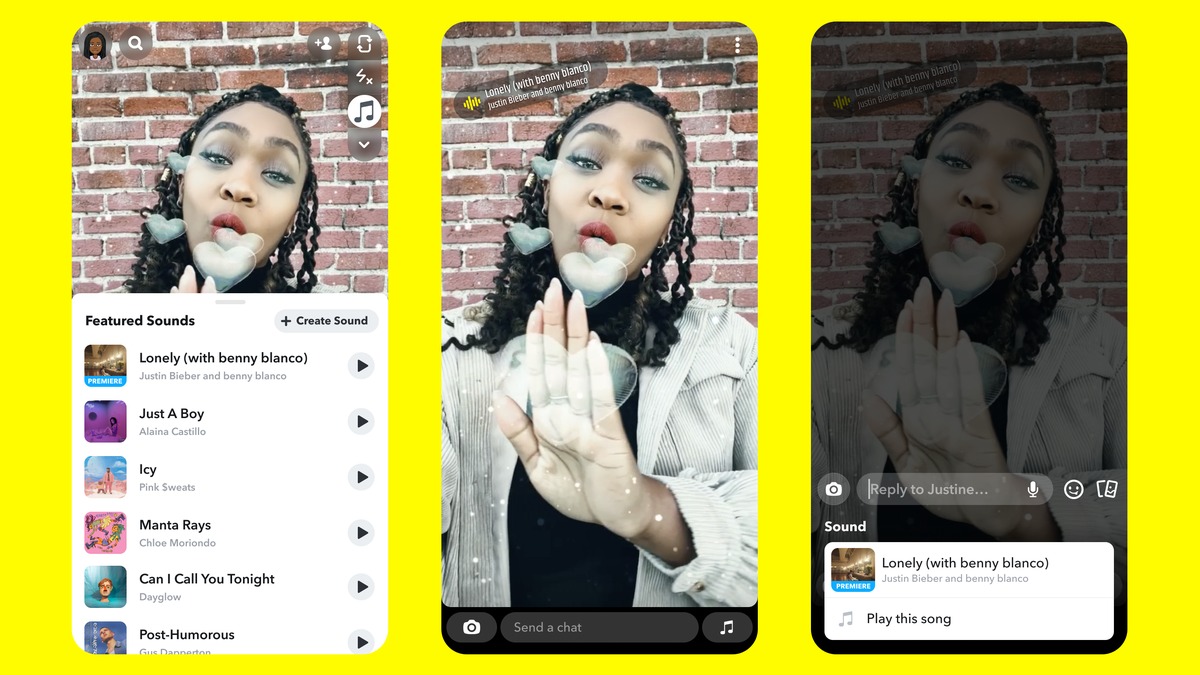
On the camera screen of Snapchat, you will notice a small icon that resembles a music note or sound waves. This is the audio recording icon, and it’s what you need to tap on to start capturing your snap with music.
To select the audio recording icon:
- Locate the audio recording icon on the camera screen. It is typically found on the bottom left corner of the screen.
- Tap on the audio recording icon to activate the music capture feature.
- Once selected, you will see a visualization of the music playing on your phone, signifying that Snapchat is now capturing the audio.
By tapping on the audio recording icon, you initiate the synchronization between the music playing on your phone and the recording of your snap. This allows your friends or followers to experience your snap with the background music intact.
Keep in mind that the audio recording feature may vary slightly depending on the version of Snapchat you are using and the type of device you have. However, the general concept remains the same across all platforms, ensuring that you can easily incorporate music into your snaps.
Once you’ve selected the audio recording icon, you’re ready to move on to the next step: recording your snap while the music plays.
Step 5: Record your Snap while the music plays
With the audio recording feature activated in Snapchat and the music playing on your phone, you’re now ready to capture your snap while the music plays in the background. This step allows you to create engaging and dynamic snaps that amplify the mood and atmosphere.
To record your snap while the music plays:
- Ensure that the music is playing on your phone at the desired volume level.
- Hold down the circular capture button on the camera screen to start recording your snap.
- As you record, move the camera around or position it to capture the scene you want to share.
- Let the music play in the background as you narrate, dance, or showcase anything you want to include in your snap.
- Be creative and experiment with different angles, filters, and effects to enhance the visual appeal of your snap.
- Keep an eye on the duration of your snap, as Snapchat has a maximum limit of 60 seconds for regular snaps.
During the recording process, make sure to stay mindful of the music volume relative to any other audio elements you may include, such as your voice or ambient sounds. Balancing these audio components will ensure that the music doesn’t overpower or distract from the overall snap experience.
Remember, the goal is to create snaps that captivate your audience and leave a lasting impression. By recording your snap while the music plays, you can add an extra layer of excitement and emotion to your content.
Once you have finished recording your snap, you can proceed to the next step: editing your snap with filters or text if desired.
Step 6: Edit your Snap, add filters or text if desired
After recording your snap with the music playing in the background, it’s time to unleash your creativity and personalize your snap by adding filters, text, or other enhancements. This step allows you to make your snap visually appealing and unique to your style.
When you finish recording your snap, you will be taken to the editing screen, where you can make various adjustments and additions. Here are some editing options you can explore:
- Apply filters: Swipe left or right on the screen to cycle through the different filters available. Filters can alter the colors, lighting, or overall look of your snap to match the mood or desired aesthetic.
- Add text: Tap on the “T” icon to insert text onto your snap. You can choose different fonts, sizes, and colors to customize the text. Consider adding captions, captions, or lyrics that complement the music playing in the background.
- Include stickers or emojis: Tap on the smiley face icon to access a wide range of stickers, emojis, and other graphics. These visuals can add a touch of whimsy or convey specific emotions or messages in your snap.
- Draw or doodle: Utilize the drawing tools to get creative and add your personal touch to the snap. Whether it’s sketching, highlighting, or doodling, drawing on your snap can enhance its visual appeal and make it stand out.
- Adjust snap duration: If your snap exceeds the maximum duration allowed, you can trim it down by tapping on the timer icon and adjusting the duration to fit within the time limit.
Feel free to experiment with different combinations of filters, text styles, stickers, and drawings. The editing options in Snapchat are designed to provide a wide range of creative possibilities, allowing you to add that extra flair to your snap.
Once you’ve edited your snap to your satisfaction, you can move on to the final step: sending your snap to specific recipients or adding it to your story.
Step 7: Send your Snap or add it to your story
Now that you’ve recorded your snap, added music, and personalized it with filters, text, and other enhancements, it’s time to share your creation with others. In this final step, you have the option to send your snap directly to specific recipients or add it to your Snapchat story for all your friends and followers to see.
To send your snap to specific recipients:
- Tap on the blue send button located at the bottom-right corner of the screen.
- Choose the friends or groups you want to send the snap to by selecting their names from your contacts list.
- Review your selection and tap on the send button again to share the snap with your chosen recipients.
If you prefer to add your snap to your story:
- Instead of selecting specific recipients, tap on the “My Story” option, usually located at the top of the friends list, before sending.
- Once added to your story, your snap will be visible to all your Snapchat friends for a 24-hour period.
Sharing your snap with others allows you to express yourself and connect with your friends and followers. Whether you opt for private messages or adding it to your story, the choice is yours, and both options have their advantages.
Keep in mind that adding music to your snap can make it more engaging and memorable. The combination of visuals, audio, and creative elements can leave a lasting impression on your audience.
Now that you’ve completed the seven steps, it’s time to start snapping with music and unleash your creativity. Have fun, experiment, and enjoy the process of creating unique and entertaining snaps with music playing from your phone!