
What is Caller ID?
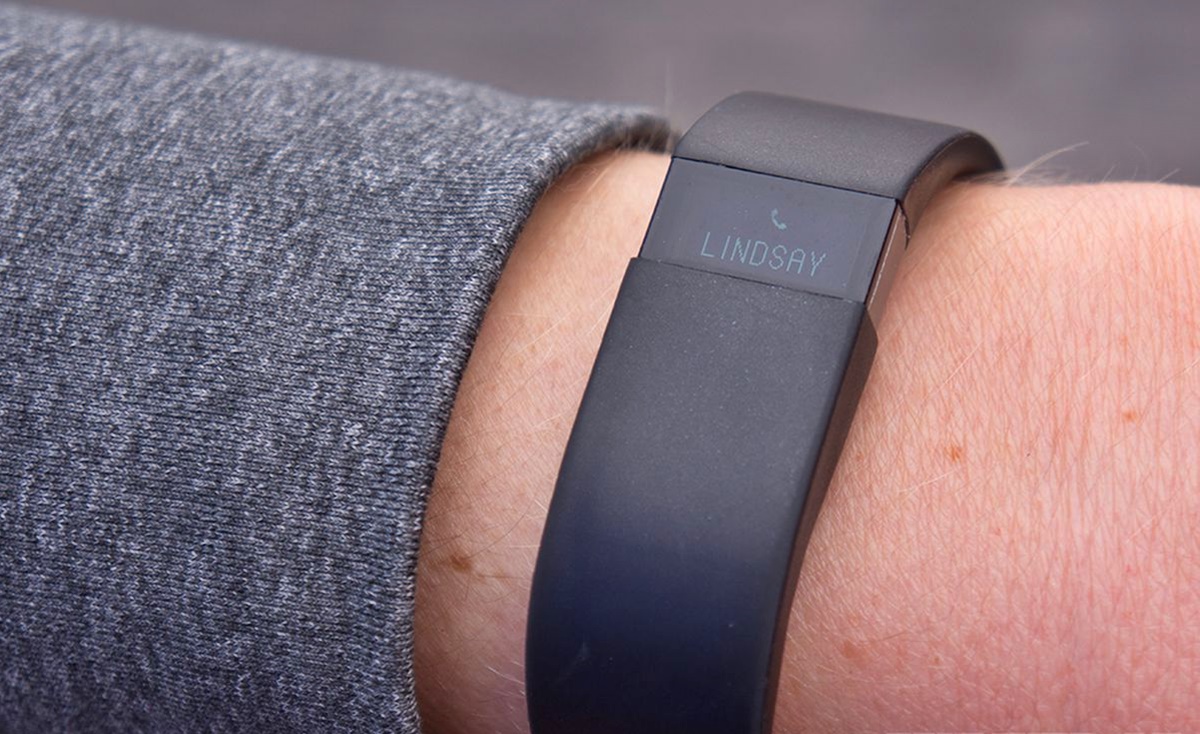
Caller ID is a useful feature that allows you to identify who is calling you before answering the call. It displays the incoming caller’s phone number or name on your Fitbit Charge HR, providing you with important information at a glance. This feature can be particularly helpful when you are engaged in physical activities or unable to access your phone immediately.
With Caller ID functionality, you no longer have to interrupt your workout or daily routine to check your phone for incoming calls. Instead, you can conveniently view the caller’s information on your Fitbit Charge HR’s screen and decide if you want to answer or ignore the call.
The Caller ID feature on Fitbit Charge HR works in conjunction with your smartphone, utilizing Bluetooth technology to receive call notifications. It enhances the overall user experience by ensuring you stay connected without the need to constantly reach for your phone. Whether you are on the go, in a meeting, or simply prefer the convenience of having caller information readily available, Caller ID on Fitbit Charge HR is a valuable tool.
By enabling Caller ID on your Fitbit Charge HR, you can easily screen calls and prioritize your communication based on the caller’s identity. This feature not only enhances the functionality of your fitness tracker but also helps you manage your daily commitments more efficiently.
How does Caller ID work on Fitbit Charge HR?
Caller ID on Fitbit Charge HR operates by connecting your Fitbit device to your smartphone using Bluetooth technology. When you receive an incoming call on your smartphone, the Fitbit app sends a notification to your Fitbit Charge HR, displaying the caller’s information on its screen.
To utilize the Caller ID feature, you need to ensure that your Fitbit app is up to date and that you have enabled the Caller ID option in the settings. Once these steps are complete, your Fitbit Charge HR will seamlessly receive call notifications, making it easy for you to identify the caller without needing to use your phone.
Caller ID on Fitbit Charge HR can display either the caller’s phone number or the name associated with the incoming call, depending on the information available in your smartphone’s contacts. This allows you to quickly recognize whether the call is from an important contact, a family member, or a telemarketer, helping you decide how to prioritize your response.
The Caller ID feature on Fitbit Charge HR works in conjunction with your smartphone’s existing caller identification system. It accesses the phone’s incoming call data and relays it to your Fitbit device, allowing you to stay connected even when your phone is out of reach or stored away.
It’s important to note that Caller ID functionality may vary depending on your smartphone’s compatibility with Fitbit devices. Some older or less common smartphone models may not support this feature, so it’s recommended to check the Fitbit website or consult the product’s user manual for specific compatibility information.
Overall, Caller ID on Fitbit Charge HR provides a convenient way to manage your calls and stay connected while using your fitness tracker. By seamlessly integrating with your smartphone, it ensures you never miss an important call and enables you to make informed decisions about whether to answer or ignore an incoming call, all without needing to access your phone directly.
Step 1: Update the Fitbit App
To enable the Caller ID feature on your Fitbit Charge HR, the first step is to ensure that you have the latest version of the Fitbit app installed on your smartphone. Regularly updating the app ensures you have access to the latest features, bug fixes, and improvements that Fitbit releases.
Updating the Fitbit app is simple. Follow these steps:
- Open the app store on your smartphone (such as the Apple App Store or Google Play Store).
- Search for “Fitbit” in the app store’s search bar.
- If an update is available, you will see an “Update” button next to the Fitbit app. Tap on it to begin the update process.
- Wait for the update to complete. This may take a few minutes, depending on your internet speed.
- Once the update is finished, you are ready to move on to the next step.
Updating the Fitbit app ensures that your Fitbit Charge HR and your smartphone are properly synced and compatible. It also ensures that any new features or improvements, including Caller ID, are available for you to use.
If you have automatic app updates enabled on your smartphone, the Fitbit app will update automatically whenever a new version is released. However, it’s always a good idea to manually check for updates regularly to ensure you have the most up-to-date version of the Fitbit app installed.
Now that you have updated the Fitbit app, you are ready to proceed to the next step and enable the Caller ID feature on your Fitbit Charge HR.
Step 2: Enable Caller ID on your Fitbit Charge HR
After updating the Fitbit app on your smartphone, the next step is to enable the Caller ID feature on your Fitbit Charge HR. Follow these simple steps to get started:
- Open the Fitbit app on your smartphone.
- Tap on the “Account” icon located at the bottom right corner of the screen.
- Scroll down and select your Fitbit device from the list of connected devices.
- In the device settings, you will find an option for “Caller ID.” Tap on it to access the Caller ID settings.
- Toggle the switch next to “Caller ID” to turn it on.
- Depending on your smartphone’s permissions, you may be prompted to grant access to your notifications. Follow the on-screen instructions to allow the Fitbit app to access your incoming call notifications.
- Once you have enabled Caller ID, you may have the option to customize how the caller information is displayed on your Fitbit Charge HR’s screen. You can choose to show either the caller’s phone number or the caller’s name, depending on your preference.
- After making the desired selections, tap the “Save” or “Done” button to save the changes.
Enabling Caller ID on your Fitbit Charge HR ensures that you receive call notifications directly on your device. You no longer have to constantly check your phone or interrupt your activities to see who is calling. The Caller ID feature enhances the convenience and functionality of your Fitbit Charge HR.
Remember to keep your Fitbit device and smartphone nearby, as they need to be within Bluetooth range to stay connected and receive notifications. With Caller ID enabled, you are ready to receive incoming call notifications on your Fitbit Charge HR’s screen.
Step 3: Notifications Settings
Once you have enabled Caller ID on your Fitbit Charge HR, it’s important to customize your notification settings to ensure you receive call notifications on your device. Follow these steps to configure your notifications:
- Open the Fitbit app on your smartphone.
- Tap on the “Account” icon located at the bottom right corner of the screen.
- Select your Fitbit device from the list of connected devices.
- In the device settings, tap on “Notifications.”
- Ensure that the “Call Notifications” option is turned on.
- You may also have the option to customize other notification settings, such as text messages, calendar alerts, or app notifications. Adjust these settings according to your preferences.
- Some smartphones may require additional permissions to allow call notifications. If prompted, follow the on-screen instructions to grant the necessary permissions.
- Tap the “Save” or “Done” button to save your changes.
Configuring your notifications settings ensures that your Fitbit Charge HR is in sync with your smartphone and will receive incoming call notifications. By customizing these settings, you can prioritize the types of notifications you want to receive on your device.
Keep in mind that managing your notifications effectively can help optimize your Fitbit experience and reduce unnecessary distractions. It allows you to stay connected while minimizing interruptions during workouts, meetings, or other activities.
Now that you have set up the notifications, you can move on to the next step and start managing call notifications on your Fitbit Charge HR.
Step 4: Managing Call Notifications
Once you have enabled Caller ID and configured your notifications settings on your Fitbit Charge HR, it’s time to learn how to manage call notifications on your device. Here’s how you can do it:
- When you receive an incoming call, your Fitbit Charge HR will display the caller’s information on its screen. You can glance at your device to see who is calling without needing to access your phone.
- If you want to answer the call, reach for your phone and answer it as you normally would.
- If you prefer to decline the call, simply ignore it and the call will be redirected to your voicemail or go unanswered, depending on your phone’s settings.
- If your Fitbit Charge HR is not within Bluetooth range of your phone, the call notification will not appear on your device. In such cases, you can rely on your phone’s built-in caller ID functionality to identify the caller.
Managing call notifications on your Fitbit Charge HR ensures that you never miss an important call while keeping the convenience of having caller information at your fingertips. Whether you are working out, in a meeting, or in a situation where checking your phone is inconvenient, this feature helps you stay connected without interrupting your activities.
Remember to keep your Fitbit device and smartphone nearby to maintain a reliable Bluetooth connection. This ensures that call notifications are promptly sent to your Fitbit Charge HR, allowing you to manage calls efficiently.
With these simple steps, you can effectively manage call notifications and utilize the Caller ID feature on your Fitbit Charge HR.
Step 5: Troubleshooting Caller ID Issues
If you encounter any issues with the Caller ID feature on your Fitbit Charge HR, there are a few troubleshooting steps you can follow to resolve them:
- Make sure that the Fitbit app on your smartphone is up to date. Check the app store for any available updates and install them if necessary.
- Ensure that your Fitbit Charge HR and smartphone are within Bluetooth range. If the devices are too far apart, the call notifications may not be received on your Fitbit device.
- Restart both your Fitbit Charge HR and smartphone. This can help refresh the Bluetooth connection and potentially resolve any temporary issues.
- Check your smartphone’s notification settings. Make sure that call notifications are enabled for the Fitbit app. You can usually find these settings in your phone’s system settings or the app’s specific notification settings.
- Verify that the Caller ID option is enabled in your Fitbit app’s device settings. If it is disabled, toggle it on and save the changes.
- Ensure that the Fitbit app has the necessary permissions to access your incoming call notifications. Check your smartphone’s app permissions settings and grant any required permissions if prompted.
- If the issue persists, try unpairing and re-pairing your Fitbit Charge HR with your smartphone. This can help establish a fresh connection and resolve any underlying compatibility issues.
- If none of the above steps resolve your Caller ID issues, consult the official Fitbit support website or contact their customer support for further assistance.
By following these troubleshooting steps, you can address common issues related to Caller ID on your Fitbit Charge HR. Remember to always keep your Fitbit app and firmware up to date to ensure the best possible performance and functionality.
With proper troubleshooting, you can enjoy the benefits of Caller ID and stay connected with ease using your Fitbit Charge HR.