
Backing Up Your Old Phone
When transitioning to a new Android phone, it’s crucial to back up your old device to ensure a seamless transfer of data. By following these steps, you can safeguard your valuable information and access it on your new phone:
1. Google Backup: Take advantage of Google’s built-in backup feature by accessing the Backup & Reset section in your phone’s Settings. Enable the option to back up your data, including apps, contacts, calendar events, and Wi-Fi passwords.
2. Cloud Services: Utilize cloud storage services like Google Drive, Dropbox, or OneDrive to securely store your photos, videos, documents, and other important files. Ensure that your files are synced and up to date before resetting or switching to your new phone.
3. External Storage: If your old phone supports expandable storage, copy important files and media onto a microSD card. This will allow you to easily transfer them to your new device later on.
4. Transfer Apps and Settings: If you’re switching between Android devices, the Google Play Store offers a convenient feature called “Backing up to Google Drive.” This allows you to restore your apps and settings on the new device while preserving your preferences.
5. Third-Party Backup Apps: Consider using third-party backup apps like Helium or Titanium Backup for more advanced backup options. These apps can save app data, system settings, and more, ensuring a comprehensive backup of your old device.
By taking the time to back up your old phone, you’ll avoid losing any valuable data during the transition. Remember, prevention is better than regret, so make sure you have a solid backup plan in place.
Transferring Data to Your New Phone
Once you’ve backed up your old phone, it’s time to transfer your data to your new Android device. Follow these steps for a smooth and hassle-free transfer:
1. Google Account Sync: Start by signing in to your new phone using the same Google account you used on your old phone. This will prompt your new device to sync your contacts, calendars, and emails automatically.
2. Restore from Google Backup: During the initial setup of your new phone, you’ll be given the option to restore from a previous backup. Select this option and choose the backup you created earlier. This will restore your apps, app data, and device settings from your old phone.
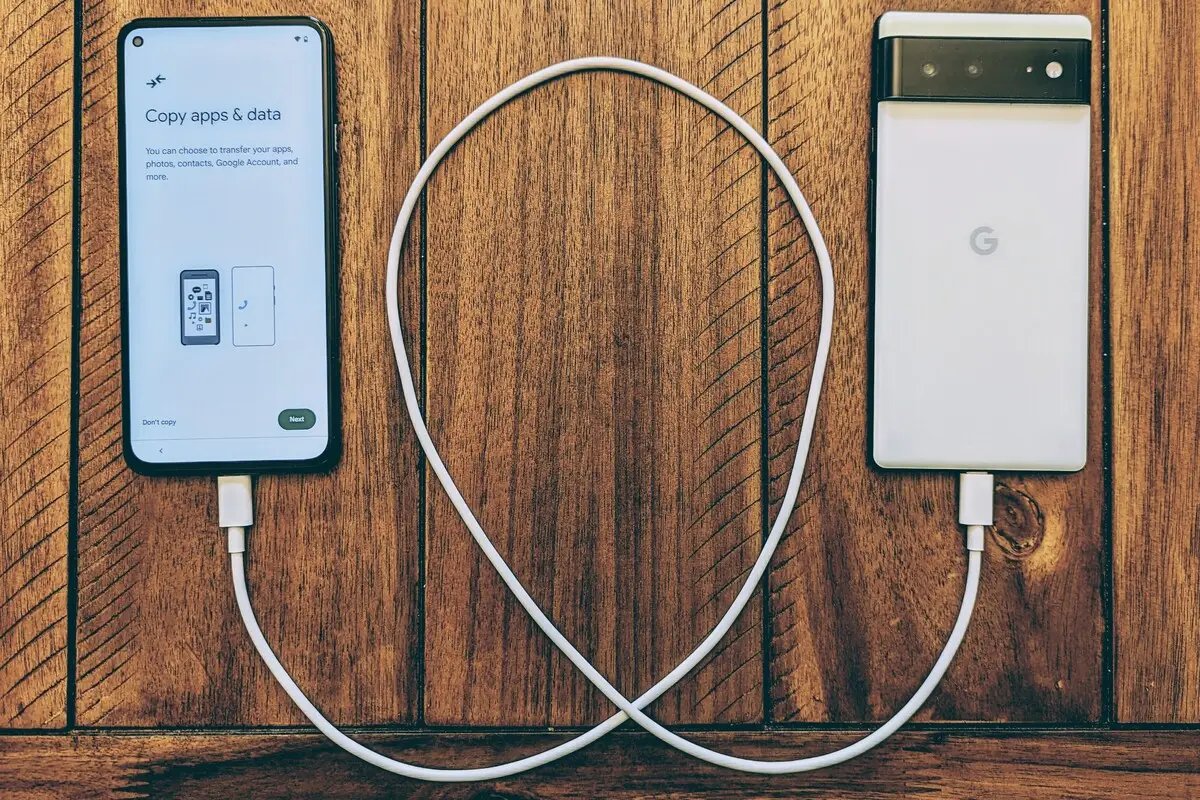
3. Transfer via USB Cable: If you have a USB cable, you can connect your old and new phones using an OTG (On-The-Go) adapter. This will allow you to transfer files, photos, videos, and documents directly from one device to the other.
4. Transfer via Bluetooth: If your old phone supports Bluetooth, you can pair it with your new phone and then transfer files wirelessly. Keep in mind that Bluetooth transfers might take longer and may not work for larger files.
5. Transfer via Smart Switch: If you’re switching from an older Android phone to a new Samsung phone, you can use the Samsung Smart Switch app. This app enables you to transfer data directly from your old device to your new Samsung phone, including contacts, photos, videos, and even apps.
6. Transfer from Cloud Storage: If you stored your files in cloud storage services, log in to your accounts on your new phone and download the files you need. This includes photos, videos, documents, and other important data you want to access on your new device.
By following these data transfer methods, you can seamlessly move your files and information from your old phone to your new Android device. Remember to double-check that everything has been successfully transferred before turning off or factory resetting your old phone.
Setting up Google Account and Services
When you get a new Android phone, one of the first steps is to set up your Google account and enable essential services. Here’s a step-by-step guide to getting started:
1. Sign in with your Google Account: During the initial setup or in the Settings menu, tap on “Add Account” and select “Google.” Enter your email address and password to sign in to your existing Google account. If you don’t have one, tap on “Create Account” to set up a new one.
2. Manage Account Settings: Once you’re signed in, navigate to your Google Account settings to customize your preferences. Here, you can manage your personal information, privacy settings, security options, and connected devices.
3. Enable Syncing: Make sure to enable the syncing of your Google account to ensure that your contacts, calendar events, bookmarks, and other important data automatically sync across all your devices.
4. Explore Google Services: Take the time to explore and enable various Google services based on your preferences. This includes Google Drive for cloud storage, Google Photos for backing up and organizing your photos, Google Play for downloading apps, and Google Maps for navigation.
5. Set Up Google Assistant: If your new phone has Google Assistant built-in, go through the setup process to personalize your Assistant experience. You can choose voice preferences, customize settings, and ask Google Assistant to perform various tasks and assist you throughout the day.
6. Add Payment Methods: To make purchases on Google Play or within apps, you’ll need to add your preferred payment method. Navigate to the Google Play Store, tap on “Account,” and select “Payment Methods” to add or manage your payment options.
By setting up your Google account and enabling essential services, you’ll have access to a wide range of features and functionalities that enhance your Android experience. Remember to review your account settings periodically to ensure they align with your preferences and privacy requirements.
Restoring Apps and Settings
After setting up your Google account and services on your new Android phone, it’s time to restore your apps and settings from your previous device. Here’s how you can do it:
1. Google Play Store Backup: If you enabled the “Back up to Google Drive” option on your previous device, you can restore your apps and settings effortlessly. Open the Google Play Store, go to the menu, tap on “My apps & games,” and select the “Library” tab. From there, you can view and reinstall the apps you had on your old phone.
2. App Data and Settings: Some apps offer their own backup and restore options. For example, popular apps like WhatsApp, Facebook, and Twitter have built-in backup features that let you transfer your app data and settings between devices. Explore the settings within these apps to initiate the backup and restore process.
3. Manual Reinstallation: For apps that don’t offer automatic backup or restore features, you’ll need to manually reinstall them from the Google Play Store. Go to the Play Store, search for the app, and tap on “Install” to download and install it on your new device. Remember to log in with your account information for apps that require an account to access your data.
4. Customize App Preferences: After reinstalling your apps, take some time to customize their preferences according to your preferences. Explore the settings within each app to personalize the app’s behavior, notifications, and other features to suit your needs.
5. System Settings: Additionally, go through the system settings on your new phone and set them up according to your preferences. This includes options like display settings, notification preferences, sound settings, and more. Customize these settings to make your new device feel familiar and comfortable.
By restoring your apps and settings, you can seamlessly transition to your new Android phone with all your preferred apps and personalized configurations intact. Take advantage of backup features and manual reinstallation to ensure a smooth transfer of your digital ecosystem.
Customizing Your Android Settings
One of the great advantages of using an Android device is the ability to customize its settings according to your preferences. Take advantage of the following tips to personalize your Android phone to suit your needs:
1. Display Settings: Go to the Display settings on your Android phone to adjust the brightness, font size, and screen timeout. You can also choose between light and dark mode, as well as enable features like Night Light to reduce eye strain in low light conditions.
2. Notification Preferences: Customize how and when you receive notifications by going to the notification settings. You can choose which apps send you notifications, set priority levels, and even customize notification sounds for each app.
3. Sound Settings: Access the sound settings to adjust volume levels for different types of notifications, calls, and media. You can also customize ringtones, notification sounds, and vibration patterns to personalize your Android phone’s auditory experience.
4. App Permissions: Review and manage app permissions in the settings to control what information each app has access to. You can enable or disable permissions such as camera, microphone, location, contacts, and more, depending on your privacy preferences.
5. Gesture Navigation: Take advantage of gesture navigation if your device supports it. Enable gestures to navigate your Android phone with swipes instead of traditional buttons. This can give you more screen real estate and streamline your overall user experience.
6. Home Screen Layout: Personalize your home screen layout by arranging app icons, widgets, and shortcuts to your liking. You can also choose different wallpapers and themes to give your Android phone a unique look and feel.
7. Keyboard Settings: Access the keyboard settings to customize the behavior and appearance of your device’s keyboard. You can enable features such as autocorrect, gesture typing, and personalized suggestions to enhance your typing experience.
By customizing your Android settings, you can tailor your device to align with your preferences and make it more efficient and enjoyable to use. Explore the various settings options available on your phone to truly personalize your Android experience.
Transferring Media Files to Your New Phone
When setting up a new Android phone, it’s essential to transfer your media files, such as photos, videos, music, and documents, from your old device to the new one. Here are several methods you can use to transfer your media files:
1. USB Cable: Connect your old phone to your new phone using a USB cable. Once connected, your new phone should recognize the old phone as a storage device. Open the file manager on your new phone and navigate to the old phone’s storage. Locate the media files you want to transfer, and then copy them to your new phone’s storage or SD card.
2. MicroSD Card or External Storage: If your old and new phones both support expandable storage, you can copy your media files to a microSD card from your old phone. Insert the microSD card into your new phone and use the file manager to access and move the files to your new phone’s internal storage.
3. Cloud Storage: Another convenient option is to upload your media files to a cloud storage service such as Google Drive, Dropbox, or OneDrive. Install the corresponding app on your old phone, upload the files to the cloud, and then install the app on your new phone. Sign in to your account and download the files to your new device.
4. Wi-Fi Transfer Apps: There are various apps available on the Google Play Store that allow you to transfer files wirelessly between devices on the same Wi-Fi network. Install a Wi-Fi transfer app on both your old and new phones, follow the in-app instructions, and transfer your media files effortlessly.
5. Google Photos Backup: If you use Google Photos to store and backup your photos and videos, installing the app on your new phone will automatically sync your media files. Sign in to your Google account, and your photos and videos will be available on your new device.
6. Music Streaming Services: If you use music streaming services like Spotify, Apple Music, or Google Play Music, you can download the app on your new phone and sign in to your account. Your playlists, songs, and preferences will sync, allowing you to access your music library on your new device.
By utilizing these methods, you can easily transfer your media files to your new Android phone, ensuring that you have access to your favorite photos, videos, music, and documents without any hassle.
Syncing Contacts, Calendars, and Emails
Syncing your contacts, calendars, and emails is crucial when setting up your new Android phone. By following these steps, you can ensure that your important personal and work-related information is transferred seamlessly:
1. Google Account Sync: When setting up your new phone, sign in with the same Google account you used on your old device. This will automatically sync your contacts, calendars, and emails associated with that account. To verify the sync settings, go to the “Accounts” section in your phone’s settings and ensure that “Sync Contacts,” “Sync Calendar,” and “Sync Email” options are enabled.
2. Import and Export Contacts: If you have contacts saved locally on your old phone or in a different account, such as SIM card or another email provider, you can export them as a vCard or CSV file and import them into your Google Contacts. This can be done by going to the Contacts app on your old phone, choosing the export option, and then importing the file on your new device.
3. Email Account Setup: Install the email app of your choice (Gmail, Outlook, etc.) on your new phone and sign in with your email account credentials. The app will automatically sync your emails, folders, and settings. Ensure that the sync frequency and notification options are set according to your preferences.
4. Google Calendar Sync: If you use Google Calendar, sign in to your Google account on your new phone’s Calendar app. Your events should automatically sync and appear on your new device. Adjust the calendar settings to customize the view and notifications as needed.
5. Third-Party Calendar and Email Apps: If you use third-party calendar or email apps, install them on your new phone and sign in with your account credentials. These apps often have their own sync options, so make sure to enable them to sync your events and emails to your new device.
6. Verify Syncing: To ensure that everything is synced correctly, test the syncing by adding a new contact, creating a new calendar event, or sending a test email. Check if these updates are reflected across all your devices, including your old phone, new phone, and any other devices connected to your Google account.
By syncing your contacts, calendars, and emails, you can have all your important information readily available on your new Android phone. This ensures that you stay connected and organized, without missing any essential appointments, messages, or contacts.
Setting Up Fingerprint or Face Unlock
Most modern Android phones offer convenient and secure biometric authentication methods like fingerprint or face unlock. Follow these steps to set up and use these features on your new device:
1. Fingerprint Sensor Setup:
- Go to the Settings menu on your Android phone and navigate to the Security or Biometrics section.
- Look for the option to set up fingerprint unlock, and follow the on-screen instructions.
- Place your finger on the fingerprint sensor multiple times to register your fingerprint. Make sure to cover different angles and parts of your finger for better recognition.
- Once the setup is complete, you can use your registered fingerprint to unlock your device, authorize transactions, and access secure apps.
2. Face Unlock Setup:
- On your Android phone, go to the Settings menu and find the Security or Biometrics section.
- Look for the option to set up face unlock, and follow the on-screen instructions.
- Position your face within the provided frame on the screen and allow the device to capture your facial features.
- After completing the setup, you can use your face to unlock your phone, authenticate app purchases, and more.
- Note that some devices might have an additional security measure to prevent unauthorized access, such as requiring a PIN or pattern to be used in combination with face unlock.
3. Security Considerations:
- Make sure to use a strong, unique PIN or pattern as a backup method in case the biometric unlock fails or is unavailable.
- Keep your fingerprints or face data secure, as they are stored locally on your device and should not be shared with others.
- Regularly clean the fingerprint sensor or camera lens used for face unlock to ensure accurate recognition.
- Remember that biometric unlock methods can be less secure than PIN or pattern unlock if someone gains access to your physical fingerprint or a high-quality image of your face.
By setting up fingerprint or face unlock on your new Android phone, you can enjoy a convenient and secure way to access your device and protect your personal information.
Installing Necessary Security Apps
Protecting your new Android phone from potential security threats is vital. To ensure the safety of your device and data, consider installing the following necessary security apps:
1. Antivirus and Anti-Malware Apps:
- Antivirus apps like Avast, Norton, or Bitdefender can scan your device for malware, viruses, and other malicious software. Install one of these trusted apps to keep your phone secure.
- Regularly update the antivirus app and run scans to detect any potential threats.
2. Find My Device app:
- Google’s Find My Device app allows you to locate, ring, lock, or erase your Android phone remotely. Install this app and enable the necessary permissions to have peace of mind if your phone gets lost or stolen.
3. Secure Messaging and Encryption Apps:
- Utilize secure messaging apps like Signal or WhatsApp to protect your communication by enabling end-to-end encryption for your messages and phone calls.
- Consider using apps like ProtonMail or Tutanota for encrypted email communication, providing an extra layer of privacy.
4. Virtual Private Network (VPN):
- A VPN app, such as NordVPN or ExpressVPN, encrypts your internet connection, enhancing your online privacy and security, especially when connecting to public Wi-Fi networks.
- Use a reputable VPN service to protect your internet activities and safeguard personal information from potential unauthorized access.
5. App Lock:
- Consider using an app lock or security app like AppLock or Norton App Lock to add an extra layer of security to specific apps or sensitive data on your device. This prevents unauthorized access to your apps and information.
Remember that while security apps provide an additional layer of protection, it is equally important to practice good digital hygiene. Regularly update your operating system and apps, be cautious of suspicious links or downloads, and only install apps from trusted sources such as the Google Play Store.
By installing these necessary security apps and following best practices, you can significantly reduce the risk of security breaches on your Android phone.
Optimizing Battery Life for Your New Phone
In order to get the most out of your new Android phone’s battery life, you can follow these optimization tips to ensure longer usage and minimize unnecessary drain:
1. Adjust Screen Brightness:
- Reduce the screen brightness or enable adaptive brightness to automatically adjust the brightness based on ambient light conditions. This can significantly help conserve battery power.
2. Manage Connectivity Options:
- Turn off Wi-Fi, Bluetooth, and NFC when not in use, as these features consume battery power when enabled.
- Enable Airplane mode in areas with weak or no cellular signals to prevent your phone from continuously searching for a network.
3. Control Background Activity:
- Monitor and manage apps that run in the background and consume battery power unnecessarily. Restrict background data and disable automatic syncing for apps that you don’t need to constantly receive updates from.
- Use the Power Saving mode or Battery Optimization feature available in the settings to limit background activity and save battery life.
4. Manage App Notifications:
- Review and customize app notification settings to prevent needless screen wake-ups and vibrations, which can drain battery life. Disable notifications for apps that are not essential.
5. Optimize Location Services:
- Use location services sparingly and enable it only when necessary. Choose the battery-saving or balanced mode in the location settings instead of high-accuracy mode, as it consumes more power.
6. Enable Battery Saver Mode:
- Activate the battery saver mode when your battery level is low or when you know you won’t have access to a charger for an extended period. This mode limits background activity, reduces screen brightness, and optimizes other settings to conserve battery power.
7. Manage App Uninstall and Updates:
- Regularly review and uninstall apps that you no longer use, as they may still run processes in the background and consume battery power.
- Keep your apps and operating system updated to benefit from battery optimization improvements provided by developers.
By implementing these battery optimization practices, you can extend the usage time of your new Android phone and avoid frequent recharging throughout the day.