
Why Check Your Phone Memory
Our smartphones have become an indispensable part of our daily lives, serving as our communication hub, entertainment center, and productivity tool all in one. However, as we rely more and more on our phones, the amount of data they accumulate increases rapidly. From photos and videos to apps and messages, our phone memory can quickly fill up, leading to decreased performance and storage issues. This is why it’s crucial to regularly check your phone memory to ensure that it’s optimized for smooth operation and to free up space for new content and apps.
By checking your phone memory, you can:
- Improve Performance: A cluttered memory can slow down your phone’s performance, causing lagging and freezing. By clearing unnecessary data, you can enhance the speed and responsiveness of your device.
- Free Up Space: Running out of storage space can prevent you from downloading new apps, capturing precious moments, or saving important files. Checking your phone memory allows you to identify and remove redundant data, making room for new content.
- Extend Battery Life: A full memory can strain your phone’s battery, leading to quicker drainage. By optimizing your phone’s storage, you can potentially extend its battery life and enjoy longer usage between charges.
- Prevent Data Loss: Insufficient memory can lead to data loss, especially if your device runs out of space while saving important files or capturing memories. Regularly checking your phone memory can help safeguard your valuable data.
With these benefits in mind, it’s clear that checking your phone memory is essential for maintaining the optimal functionality and usability of your device.
Step 1: Open Settings
To begin the process of checking your phone’s memory, you’ll need to open the Settings app. This can typically be found on your home screen or in the app drawer. The Settings app is where you can access and customize various features and configurations of your phone, including its storage and memory settings.
Here’s how to open the Settings app on different platforms:
- Android: On most Android devices, you can access the Settings app by tapping the gear-shaped icon in the app drawer or by swiping down from the top of the screen and tapping the gear icon in the quick settings panel.
- iOS (iPhone): On an iPhone, the Settings app is represented by a gray gear icon and is usually located on the home screen. Simply tap on the Settings icon to open the app.
Once you’ve successfully opened the Settings app, you’re ready to proceed to the next step in the process of checking your phone memory.
Step 2: Select Storage
After opening the Settings app on your smartphone, the next step in the process of checking your phone memory is to navigate to the “Storage” or “Storage & Backup” section. This section houses valuable information about your device’s storage usage, including the amount of space occupied by various types of data such as apps, photos, videos, and system files.
Here’s how to find the storage settings on different platforms:
- Android: In the Settings app, scroll down and look for the “Storage” or “Storage & Backup” option. The location of this option may vary depending on the device model and the version of the Android operating system. Once you’ve located it, tap on the “Storage” option to access detailed information about your device’s memory usage.
- iOS (iPhone): In the Settings app on an iPhone, you can find the storage settings by tapping on “General” and then selecting “iPhone Storage.” This will display a breakdown of your device’s storage usage, allowing you to identify which types of data are consuming the most space.
By selecting the storage option, you’ll gain insight into how your phone’s memory is being utilized, which is crucial for identifying areas where you can optimize and free up space. This brings us one step closer to effectively managing your phone’s memory and ensuring its optimal performance.
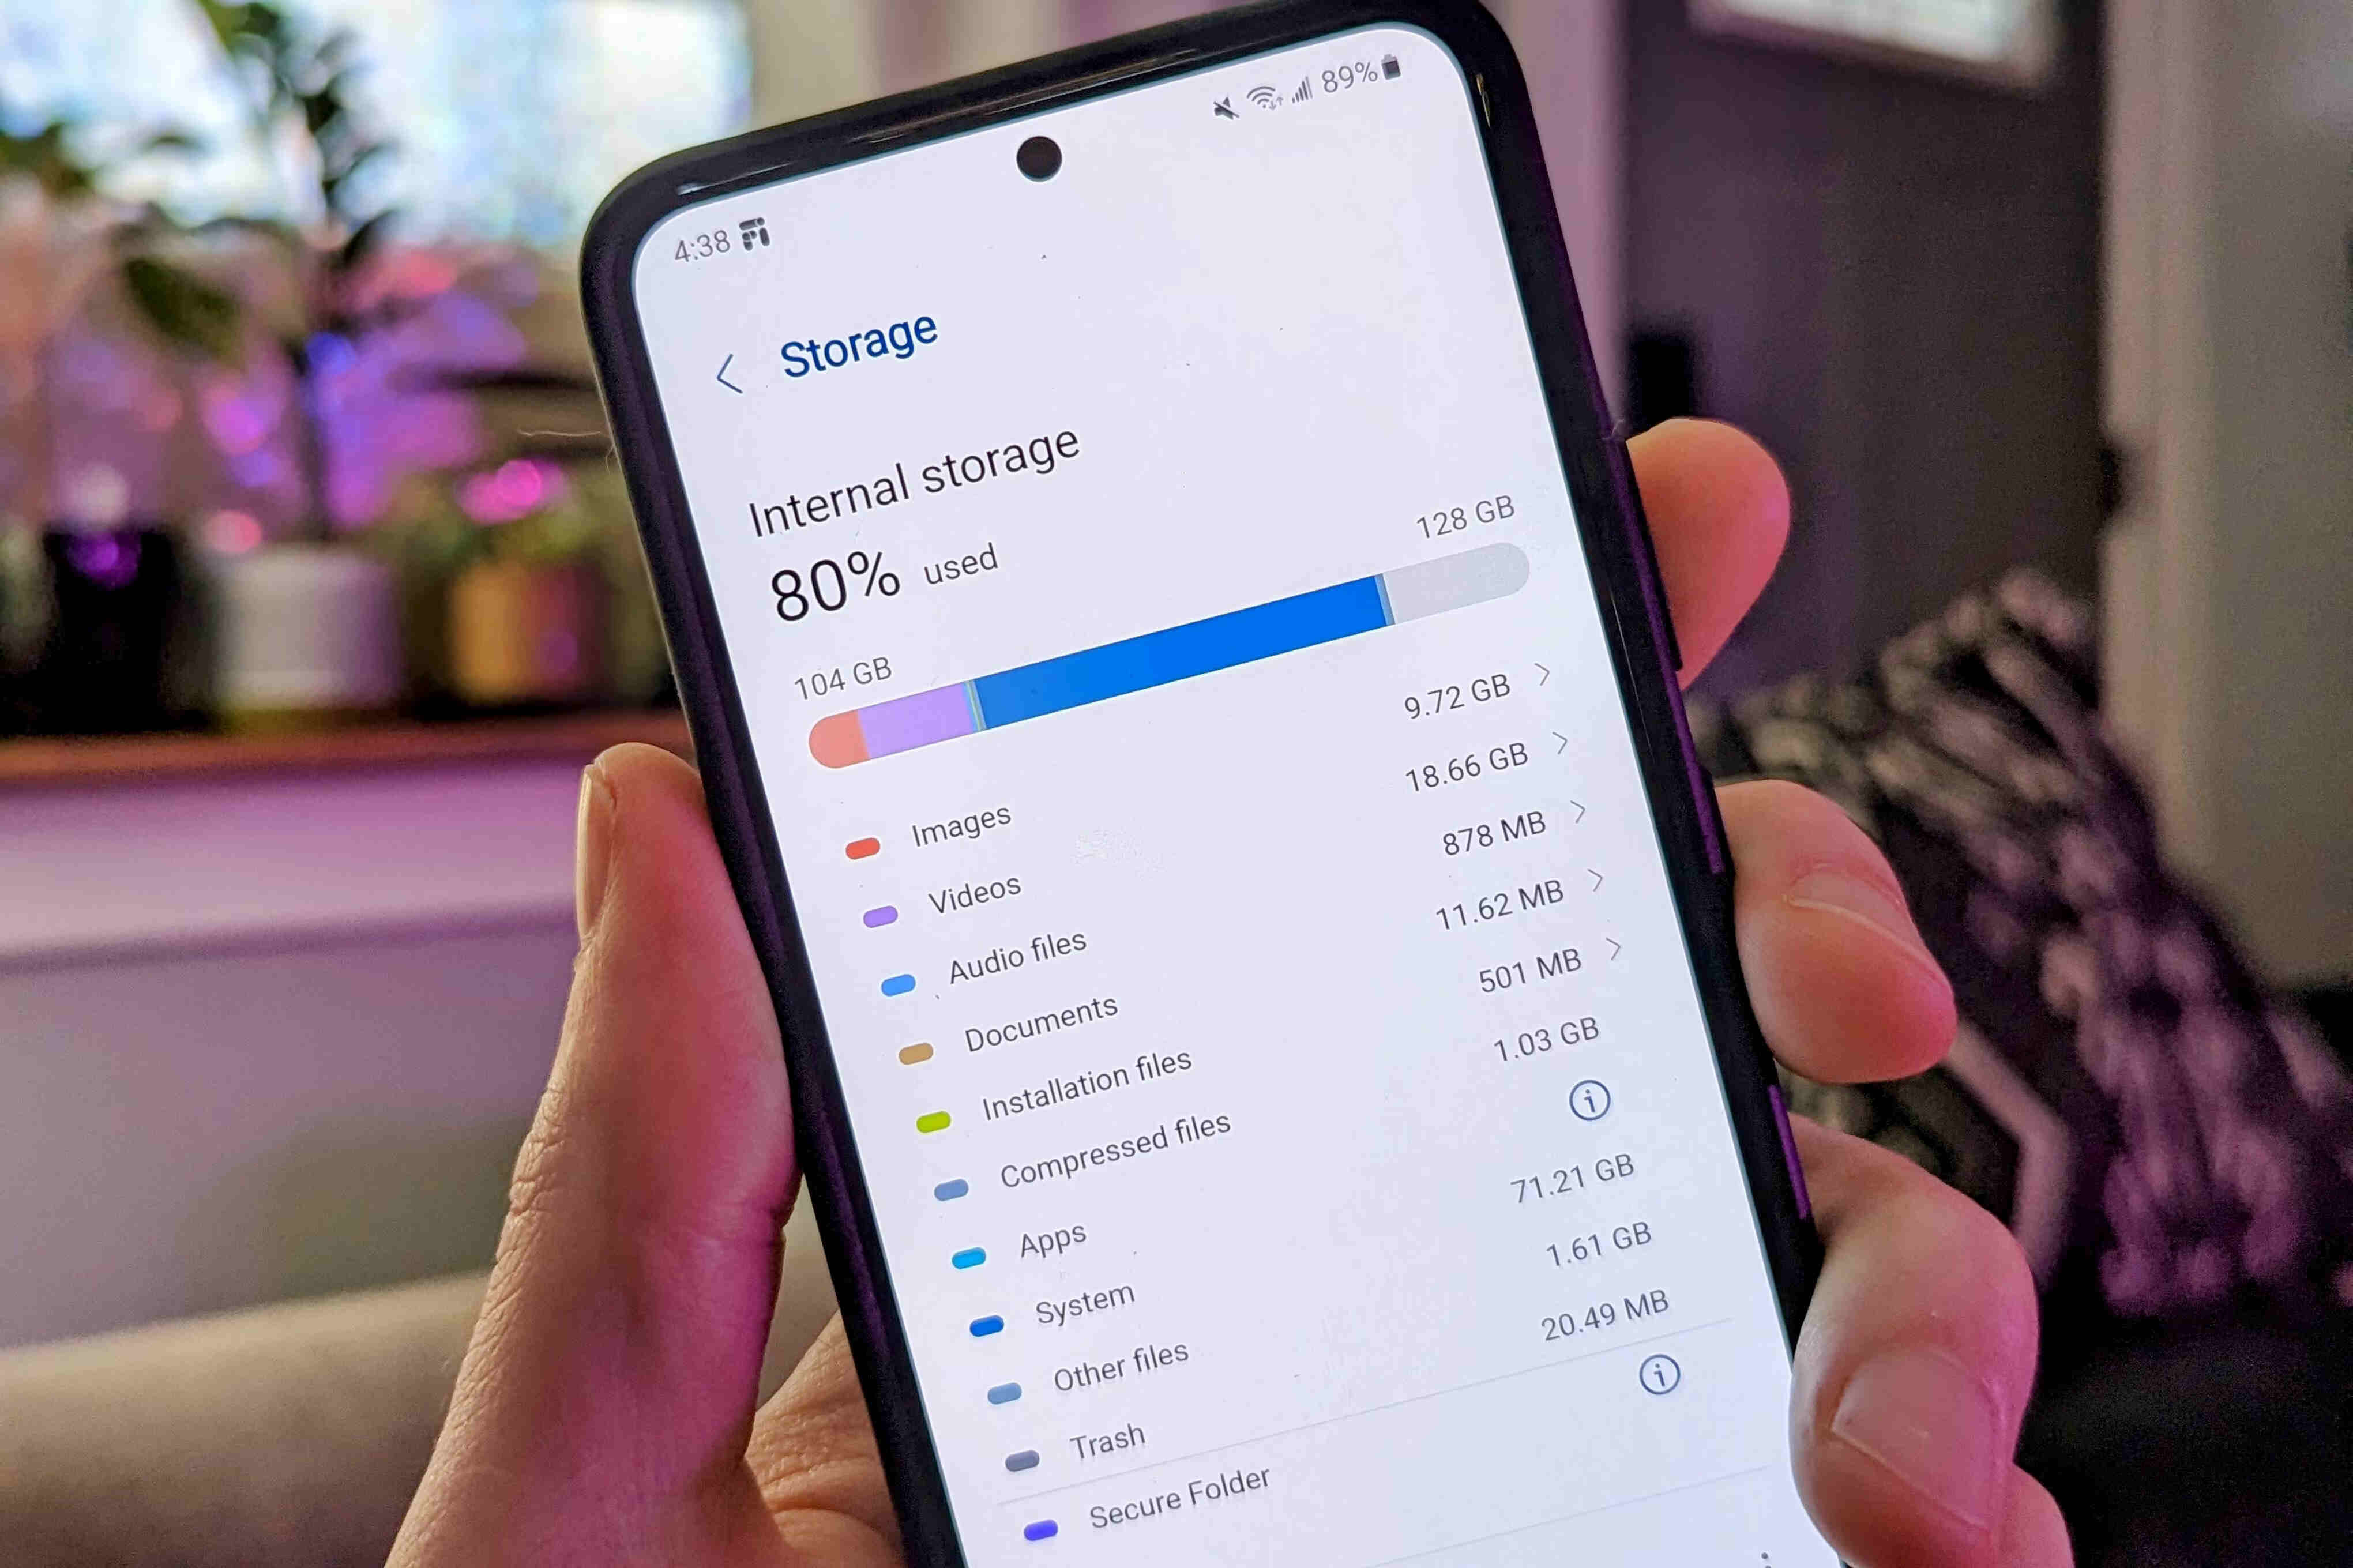
Step 3: Review Memory Usage
Once you’ve accessed the storage settings on your smartphone, it’s time to review the memory usage to gain a comprehensive understanding of how your device’s storage is being utilized. This step is crucial for identifying which types of data are consuming the most space and pinpointing areas where optimization and cleanup are needed.
When reviewing memory usage, you’ll typically encounter the following key information:
- Total Storage: This indicates the overall capacity of your device’s storage, including the space used by both essential system files and user data.
- Used Space: This figure represents the amount of storage space currently occupied by various types of data, such as apps, photos, videos, downloads, and cached files.
- Available Space: The available space reflects the remaining storage capacity on your device, which is essential for accommodating new content and applications.
- Storage Breakdown: This section provides a detailed breakdown of the storage usage by different categories, allowing you to identify which types of data are consuming the most space.
By carefully reviewing the memory usage on your device, you’ll be empowered to make informed decisions about optimizing your phone’s storage. This may involve clearing cache data, uninstalling unused apps, transferring media to cloud storage, and deleting unnecessary files to free up space and enhance the performance of your device.
With a clear understanding of your phone’s memory usage, you’re ready to proceed with the necessary actions to declutter and streamline your device’s storage, ensuring it remains efficient and responsive.
Step 4: Clear Cache
One effective way to optimize your phone’s memory and free up valuable space is by clearing the cache data accumulated by apps and the system. Cache data consists of temporary files and data stored by apps to facilitate quicker access and enhance performance. However, over time, these cached files can accumulate and occupy a significant amount of storage space, potentially impacting your device’s responsiveness and available memory.
Here’s how to clear cache data on different platforms:
- Android: In the Settings app, navigate to “Storage” or “Storage & Backup” and select “Cached Data.” You’ll be prompted to clear the cached data, which can free up a substantial amount of space and help improve your device’s performance.
- iOS (iPhone): On an iPhone, app-specific cache data can be cleared by uninstalling and reinstalling the app. Alternatively, some apps may offer an option within their settings to clear cache data.
Clearing cache data not only frees up space but also has the potential to resolve app-related issues and enhance the overall performance of your device. It’s a simple yet effective way to declutter your phone’s memory and ensure that it operates smoothly.
By regularly clearing cache data, you can maintain an optimized and efficient storage system, allowing your device to function at its best and accommodating new content without unnecessary storage constraints. This proactive approach to managing cache data contributes to the overall health and performance of your smartphone.
Step 5: Uninstall Unused Apps
As we accumulate apps on our smartphones, it’s common for many of them to go unused over time. These unused apps not only occupy valuable storage space but also contribute to cluttering your device’s memory. Uninstalling unused apps is an effective way to free up space, streamline your device, and optimize its performance.
Here’s how to uninstall unused apps on different platforms:
- Android: Open the Settings app, navigate to “Apps” or “Apps & Notifications,” and select the app you want to uninstall. Tap “Uninstall” to remove the app from your device.
- iOS (iPhone): On an iPhone, press and hold the app icon on the home screen until it enters jiggle mode. Then, tap the “X” icon on the app you want to uninstall, and confirm the action when prompted.
By uninstalling unused apps, you can declutter your device’s home screen and app drawer, making it easier to find and access the apps you use regularly. Additionally, this practice can free up storage space, improve device performance, and potentially extend battery life by reducing unnecessary background processes associated with unused apps.
Regularly reviewing and uninstalling unused apps is a proactive approach to managing your phone’s memory and ensuring that it remains optimized for your needs. It’s a simple yet impactful way to maintain a lean and efficient app ecosystem on your device.
Step 6: Move Photos and Videos to Cloud Storage
With the ever-increasing quality and resolution of smartphone cameras, photos and videos can quickly consume a significant amount of storage space on your device. To alleviate this storage burden and ensure that your precious memories are safely preserved, consider moving your photos and videos to cloud storage.
Here’s how to move your media to cloud storage:
- Google Photos (Android and iOS): Install the Google Photos app and sign in with your Google account. You can then choose to back up your photos and videos to Google Photos, which offers free storage for high-quality images and videos. Once backed up, you can safely delete the local copies from your device to free up space.
- iCloud (iOS): On an iPhone, you can use iCloud to back up your photos and videos. Navigate to “Settings” > “[Your Name]” > “iCloud” > “Photos,” and enable iCloud Photos to automatically upload and store your media in the cloud. This allows you to optimize your device’s storage by offloading media to iCloud.
By leveraging cloud storage services, you not only free up space on your device but also gain the added benefits of secure backup and accessibility across multiple devices. Cloud storage offers a convenient and scalable solution for managing your media while optimizing your phone’s memory for other essential content and apps.
Regularly transferring your photos and videos to cloud storage not only declutters your device’s storage but also safeguards your memories against potential data loss. It’s a proactive approach to managing your media while ensuring that your device remains efficient and responsive.
Step 7: Delete Old Messages and Call Logs
Over time, text messages, multimedia messages, and call logs can accumulate and occupy a significant portion of your phone’s memory. Deleting old and unnecessary messages and call logs is an effective way to free up space and streamline your device’s storage, ensuring optimal performance and usability.
Here’s how to delete old messages and call logs on different platforms:
- Android: To delete old messages, open the messaging app, tap and hold the conversation you want to delete, then select the option to delete. For call logs, open the Phone app, navigate to the call history, and delete individual call records or entire call logs as needed.
- iOS (iPhone): On an iPhone, you can delete individual messages by swiping left on the message and tapping “Delete.” To delete entire conversations, open the Messages app, swipe left on the conversation, and tap “Delete.” For call logs, open the Phone app, tap “Recents,” and delete individual call records or entire call logs.
Deleting old messages and call logs not only frees up storage space but also enhances your device’s organization and responsiveness. By decluttering your messaging and call history, you can streamline your communication interface and ensure that your phone’s memory is optimized for essential data and apps.
Regularly managing your messages and call logs is a proactive approach to maintaining a clean and efficient storage system on your device. It allows you to prioritize important conversations and records while decluttering unnecessary data, contributing to a seamless and responsive user experience.