
Unboxing the HomePod Mini
When you first get your hands on the HomePod Mini, the excitement of unboxing is hard to resist. The compact size of this smart speaker makes it ideal for any room in your home. Here’s what you can expect when unboxing your HomePod Mini:
1. Sturdy Packaging: The HomePod Mini comes in a sleek package designed to protect it during shipping. Once you remove the outer sleeve, you’ll find a sturdy box that holds your new device securely.
2. HomePod Mini Design: Inside the box, you’ll discover the exquisite HomePod Mini. This spherical speaker is about the size of a softball and features a seamless mesh fabric exterior that adds a touch of elegance to your space. It’s available in two stylish colors: White and Space Gray.
3. Power Cable: Alongside the HomePod Mini, you’ll find a power cable neatly wrapped. This cable connects to the back of the speaker, providing the necessary power to bring your music and voice control to life.
4. User Manual: Don’t forget to check the bottom of the box, where you’ll find a user manual. This handy guide will walk you through the setup process and provide additional information on how to get the most out of your HomePod Mini.
5. Time to Set Up: With everything unboxed, you’re now ready to set up your HomePod Mini and unleash its powerful capabilities.
Remember to keep the packaging in a safe place in case you need to store or transport your HomePod Mini in the future. Now that your HomePod Mini is unboxed let’s move on to the next step: connecting it to power.
Connecting the HomePod Mini to Power
Before you can start enjoying the impressive audio and voice control features of your HomePod Mini, you need to connect it to power. Follow these simple steps to get your HomePod Mini up and running:
1. Locate an Outlet: Find a suitable location in your home where you can plug in your HomePod Mini. Ensure the outlet is easily accessible and not blocked by furniture or other objects.
2. Connect the Power Cable: Take the power cable that came with your HomePod Mini and insert it into the port located at the back of the speaker. Make sure to push it in firmly to establish a secure connection.
3. Plug into the Power Outlet: Once the power cable is connected to the HomePod Mini, plug the other end into a power outlet. You’ll notice a subtle white LED light on top of the speaker, indicating that it’s successfully connected to power.
4. Powering On: After plugging in your HomePod Mini, it will automatically power on. You’ll hear a pleasant sound indicating that the device is ready to be set up.
5. Positioning the HomePod Mini: Now that your HomePod Mini is powered on, you can position it in a convenient location within your home. Consider placing it on a stable surface, such as a table or shelf, to ensure optimal sound quality and efficient voice control.
By completing these steps, you’ve successfully connected your HomePod Mini to power. Congratulations! Next, we’ll dive into the setup process using your iPhone or iPad.
Setting Up the HomePod Mini with an iPhone or iPad
Setting up your HomePod Mini with your iPhone or iPad is a breeze. Just follow these steps to get started:
1. Ensure Compatibility: Check that your iPhone or iPad is running the latest version of iOS or iPadOS, as the HomePod Mini requires the latest software to function properly.
2. Bring Your Device Close: Place your iPhone or iPad near the HomePod Mini. Make sure they are in close proximity to establish a stable connection during the setup process.
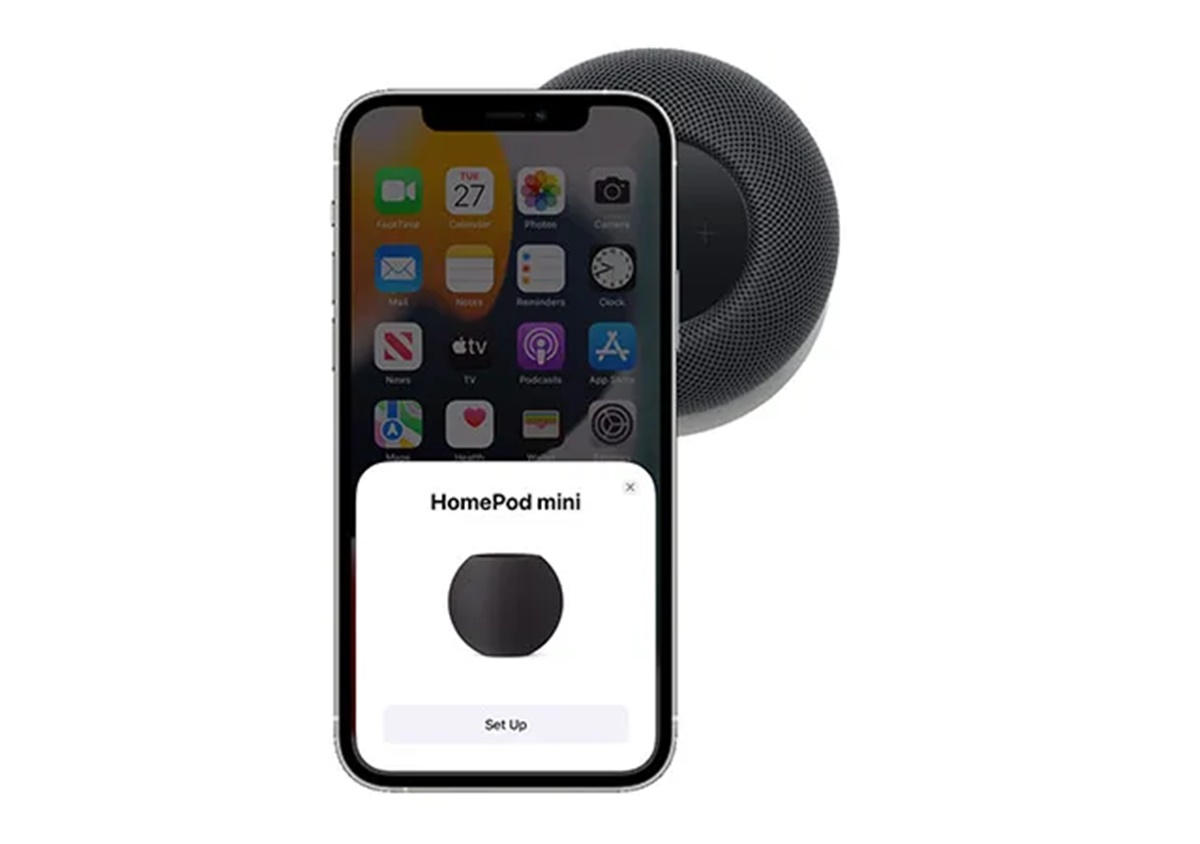
3. Open the Home App: Launch the Home app on your iPhone or iPad. If you don’t already have it installed, you can download it from the App Store.
4. Add a Device: In the Home app, tap the “+” icon in the top-right corner of the screen to add a new device.
5. Set Up a New HomePod: Select “Add Accessory” and then choose “Don’t Have a Code or Can’t Scan?” You’ll see the HomePod Mini listed as an available device.
6. Connect to HomePod Mini: Tap on your HomePod Mini when it appears in the device list. Follow the on-screen prompts to complete the setup process.
7. Choose Room Location: Assign a room location for your HomePod Mini. This helps you easily control specific devices and access personalized features based on the location of your HomePod Mini.
8. Enable Siri: Decide whether you want to enable Siri on your HomePod Mini. Siri allows you to control the speaker with voice commands, playing music, answering questions, and performing a variety of tasks.
9. Customize Settings: Once the setup is complete, you can customize additional settings, such as setting up stereo paired HomePods or enabling “Hey Siri” voice activation.
With these simple steps, you’ll have your HomePod Mini set up and ready to use with your iPhone or iPad. Now you can enjoy the convenience of hands-free control and high-quality audio in your home.
Configuring the HomePod Mini with Home App
Once you’ve set up your HomePod Mini with your iPhone or iPad, it’s time to configure it using the Home app. The Home app allows you to manage and control your HomePod Mini and other smart devices in your home. Follow these steps to configure your HomePod Mini:
1. Launch the Home App: Open the Home app on your iPhone or iPad. You’ll see the HomePod Mini listed under the “Homes” tab.
2. Access HomePod Mini Settings: Tap on the HomePod Mini icon to access its settings and configuration options. Here you can adjust various settings to personalize your HomePod Mini experience.
3. Edit Name and Location: You can change the name of your HomePod Mini to something more recognizable or descriptive. Additionally, you can assign a specific location to your HomePod Mini within your home, such as the living room or bedroom.
4. Control Access: The Home app allows you to control who has access to your HomePod Mini. You can grant or remove permissions for specific users or set up restrictions for certain features.
5. Personalize Siri: Within the Home app, you can customize Siri’s voice and language preferences. You can also manage Siri requests, privacy settings, and enable or disable voice feedback.
6. Create Automation: The Home app lets you create automation routines to enhance your smart home experience. You can set up automated actions, such as having your HomePod Mini play your favorite playlist when you arrive home.
7. Add Accessories: You can add other smart devices to the Home app and control them alongside your HomePod Mini. This allows you to create scenes and automate actions involving multiple devices.
8. Fine-tune Settings: Explore the various settings available within the Home app to further customize your HomePod Mini experience. From sound settings to accessibility features, you can personalize your HomePod Mini to suit your preferences.
By configuring your HomePod Mini with the Home app, you unlock a whole new level of control and customization. Take your time to explore the different settings and options to optimize your smart home experience.
Adjusting HomePod Mini Settings
One of the great features of the HomePod Mini is the ability to adjust its settings to suit your preferences. Whether you want to fine-tune the sound quality or customize the way Siri responds, here are some essential settings to consider:
1. Sound Settings: To enhance your listening experience, you can adjust the sound settings on your HomePod Mini. Open the Home app, go to the HomePod Mini settings, and explore options such as adjusting bass and treble, enabling or disabling automatic sound leveling, and enabling or disabling the “Ambient Sounds” feature.
2. Accessibility Features: The HomePod Mini offers accessibility features to ensure that everyone can enjoy its benefits. In the Home app, you can enable features like VoiceOver, Touch Accommodations, and even use the HomePod Mini as a hearing aid with Live Listen.
3. Siri Voice Feedback: If you prefer less frequent voice feedback from Siri, you can customize those settings. Open the Home app, go to the HomePod Mini settings, and choose “Accessibility.” Here, you can adjust the Siri voice feedback frequency to either “Long” or “Short.”
4. Privacy Settings: To protect your privacy, you have control over how Siri interacts with your HomePod Mini. In the Home app settings, choose “Home Settings” and then “Siri and Search.” From here, you can manage options such as whether Siri can access your Home data or respond when the device is locked.
5. HomePod Software Updates: Ensure that your HomePod Mini is always up to date with the latest features and improvements. In the Home app, go to the HomePod Mini settings, and choose “Software Update.” Enable the “Install Updates Automatically” option to keep your HomePod Mini up to date without manual intervention.
6. Personal Requests: You can customize what types of personal requests Siri can handle on your HomePod Mini. In the Home app settings, choose “Home Settings” and then “Siri and Search.” From here, you can enable or disable options like sending and reading messages, adding reminders, and more.
Remember to explore other settings and features available in the Home app to personalize your HomePod Mini experience. Every individual may have different preferences, so take the time to adjust the settings to suit your needs.
Using Siri on the HomePod Mini
One of the standout features of the HomePod Mini is its integration with Siri, Apple’s voice assistant. By using Siri on your HomePod Mini, you can control your smart home, play music, get information, and much more. Here’s how you can make the most of Siri on your HomePod Mini:
1. Saying “Hey Siri”: Activate Siri by simply saying “Hey Siri” followed by your voice command. The HomePod Mini has an array of far-field microphones that can hear your voice from across the room, making it easy to interact with Siri hands-free.
2. Controlling Smart Home Devices: With Siri, you can control various smart home devices compatible with Apple’s HomeKit framework. Use voice commands to dim the lights, adjust the thermostat, lock the doors, or even control your robotic vacuum cleaner.
3. Playing Music: Siri on the HomePod Mini is a great music companion. Ask Siri to play your favorite songs, albums, or playlists from Apple Music. You can also ask for specific genres, artists, or even request a song from a particular year or decade.
4. Getting Information: Siri is a wealth of knowledge. Ask questions about the weather, news updates, sports scores, and even general knowledge queries. Siri can also set timers, create reminders, and help you with calculations or conversions.
5. Sending Messages and Making Calls: Use Siri on your HomePod Mini to make hands-free calls or send messages to your contacts. Siri can read and reply to incoming messages as well, ensuring you stay connected even when you are busy.
6. Personalized Features: Siri on the HomePod Mini can recognize different voices, allowing each member of your household to have a personalized experience. Siri can access individual calendars, send messages from the right account, and provide tailored recommendations based on individual preferences.
7. Interacting with Third-Party Apps: Siri on the HomePod Mini seamlessly interacts with many third-party apps. Use voice commands to control apps like Uber, Pandora, Spotify, and more. Simply ask Siri to play your favorite podcast or order your regular pizza.
Remember to speak clearly and confidently when interacting with Siri on your HomePod Mini. Experiment with different voice commands to discover everything Siri is capable of. Whether you need assistance, entertainment, or information, Siri is ready to assist you at any time.
Playing Music on the HomePod Mini
With its powerful sound and seamless integration with Apple Music, the HomePod Mini is the perfect companion for playing music in your home. Here’s how to enjoy your favorite tunes on the HomePod Mini:
1. Activate Siri: Begin by saying “Hey Siri” followed by your voice command to activate Siri on the HomePod Mini.
2. Request Specific Songs, Artists, or Albums: Ask Siri to play a specific song, artist, or album. For example, say “Hey Siri, play ‘Shape of You’ by Ed Sheeran” or “Hey Siri, play the latest album by Taylor Swift.”
3. Create Custom Playlists: Use Siri to create and manage personalized playlists. Simply say “Hey Siri, create a new playlist” and give it a name. You can add songs to your playlist by requesting specific songs or asking Siri to add the currently playing song to the playlist.
4. Discover Music: Let Siri be your virtual DJ. Use voice commands to discover new music based on genres, moods, or even specific decades. Say “Hey Siri, play some upbeat pop music” or “Hey Siri, play 90s hits.”
5. Control Playback: Enjoy effortless control over your music playback using voice commands. Ask Siri to pause, resume, skip to the next track, or go back to the previous one. You can also adjust the volume by saying “Hey Siri, turn the volume up/down.”
6. Multi-Room Audio: If you have multiple HomePod Minis or other AirPlay 2-enabled speakers, you can create a multi-room audio setup. Ask Siri to play music in specific rooms or sync your speakers for a seamless audio experience throughout your home.
7. Apple Music Radio: Explore the world of radio with Siri on your HomePod Mini. Request specific radio stations, genres, or discover Apple Music’s curated stations by saying “Hey Siri, play some jazz radio” or “Hey Siri, play Beats 1.”
8. AirPlay from Other Devices: Not only can you play music from your iPhone or iPad, but you can also use AirPlay to stream audio from other devices to the HomePod Mini. Simply select the HomePod Mini as the playback device in the AirPlay options of your device.
Enjoy the immersive sound experience of the HomePod Mini as it fills your home with your favorite music. With Siri at your beck and call, you can effortlessly control your music playback and discover new tunes without lifting a finger.
Managing Multiple HomePod Minis in Different Rooms
If you have more than one HomePod Mini in your home, you can create a multi-room audio setup and control each speaker independently. Here’s how to manage multiple HomePod Minis in different rooms:
1. Assigning HomePods to Rooms: In the Home app, make sure each HomePod Mini is assigned to the correct room. This allows you to control each speaker by its specific location. Open the Home app, tap on a HomePod Mini, go to “Details,” and choose the appropriate room.
2. Creating Speaker Groups: You can create speaker groups to enjoy synchronized audio playback across multiple HomePod Minis. Open the Home app, tap the “+” icon, select “Audio” under the “Create New” section, and follow the prompts to set up your speaker group. Give it a name and select the HomePod Minis you want to include.
3. Controlling Speaker Groups: Once your speaker group is set up, you can control it using Siri or the Home app. For example, you can say “Hey Siri, play music in the living room” to play music on all the HomePod Minis in that specific room or group.
4. Individual Speaker Control: If you prefer to control each HomePod Mini separately, you can do so by specifying the room or the individual speaker’s name. For example, say “Hey Siri, play music in the kitchen” or “Hey Siri, play music on the bedroom HomePod Mini.”
5. Stereo Pairing: If you have two HomePod Minis in the same room, you can create a stereo pair to enjoy a more immersive audio experience. Open the Home app, select one of the HomePod Minis, tap “Details,” and choose “Create Stereo Pair.” Follow the on-screen instructions to complete the setup.
6. AirPlay 2: With AirPlay 2, you can play audio from your iPhone, iPad, or Mac on multiple HomePod Minis simultaneously. Open the audio player on your device, tap the AirPlay icon, and select the HomePod Minis or speaker groups you want to stream to.
7. Accessing Individual Settings: Each HomePod Mini has its own individual settings that can be accessed through the Home app. You can adjust the volume, enable or disable features like Siri, and fine-tune the sound settings for each speaker.
Managing multiple HomePod Minis in different rooms gives you the flexibility to enjoy synchronized audio or control each speaker independently. Whether you want to fill your home with music or create a personalized audio experience in specific areas, the Home app and Siri make it easy to manage and control your HomePod Minis with convenience and precision.
Troubleshooting Tips for the HomePod Mini
While the HomePod Mini is a reliable and user-friendly device, there may be times when you encounter issues or need to troubleshoot. Here are some common troubleshooting tips to help you resolve any problems with your HomePod Mini:
1. Check Power and Connections: Ensure that your HomePod Mini is properly connected to power and that the power cable is securely plugged into a functioning power outlet. If the LED light on your HomePod Mini is not illuminated, try using a different power outlet or cable.
2. Restart Your HomePod Mini: Sometimes a simple restart can resolve minor issues. Unplug your HomePod Mini from power, wait a few seconds, and then plug it back in. Allow it to power up and reconnect to your network.
3. Update Software: Make sure your HomePod Mini is running the latest software version. In the Home app, go to the HomePod Mini settings, select “Software Update,” and enable “Install Updates Automatically” to ensure you have the latest features and bug fixes.
4. Check Network Connectivity: Ensure that your HomePod Mini is connected to a stable Wi-Fi network. Verify that your internet connection is working properly. You can also try restarting your router or moving the HomePod Mini closer to your Wi-Fi router for a stronger signal.
5. Interference and Obstructions: Avoid placing the HomePod Mini near objects that could interfere with the Wi-Fi signal, such as microwaves or cordless phones. Keep the area around your HomePod Mini clear of obstructions to ensure a strong wireless connection.
6. Reset HomePod Mini: If you’re still experiencing issues, you can try resetting your HomePod Mini to its factory settings. Press and hold the top of the HomePod Mini until Siri tells you that it will reset. Follow the voice prompts to complete the reset process.
7. Check Apple Music Subscription: If you’re having trouble playing music from Apple Music, ensure that your subscription is active and that you’re logged in with the correct Apple ID on your HomePod Mini and other devices.
8. Contact Apple Support: If none of the above troubleshooting tips resolve the issue, you may want to reach out to Apple Support for further assistance. They have a dedicated team of experts who can help you troubleshoot specific problems or guide you through more advanced solutions.
By following these troubleshooting tips, you can quickly resolve common issues with your HomePod Mini and get back to enjoying its exceptional functionality and audio quality.