
Enable Automation on iPhone
Modern iPhones come with a powerful feature called Automation that allows users to streamline and simplify various tasks by automating them. With Automation, you can set your iPhone to perform specific actions or tasks automatically based on triggers or conditions you define. This feature can save you time and effort by eliminating the need for manual intervention. Here’s how you can enable Automation on your iPhone:
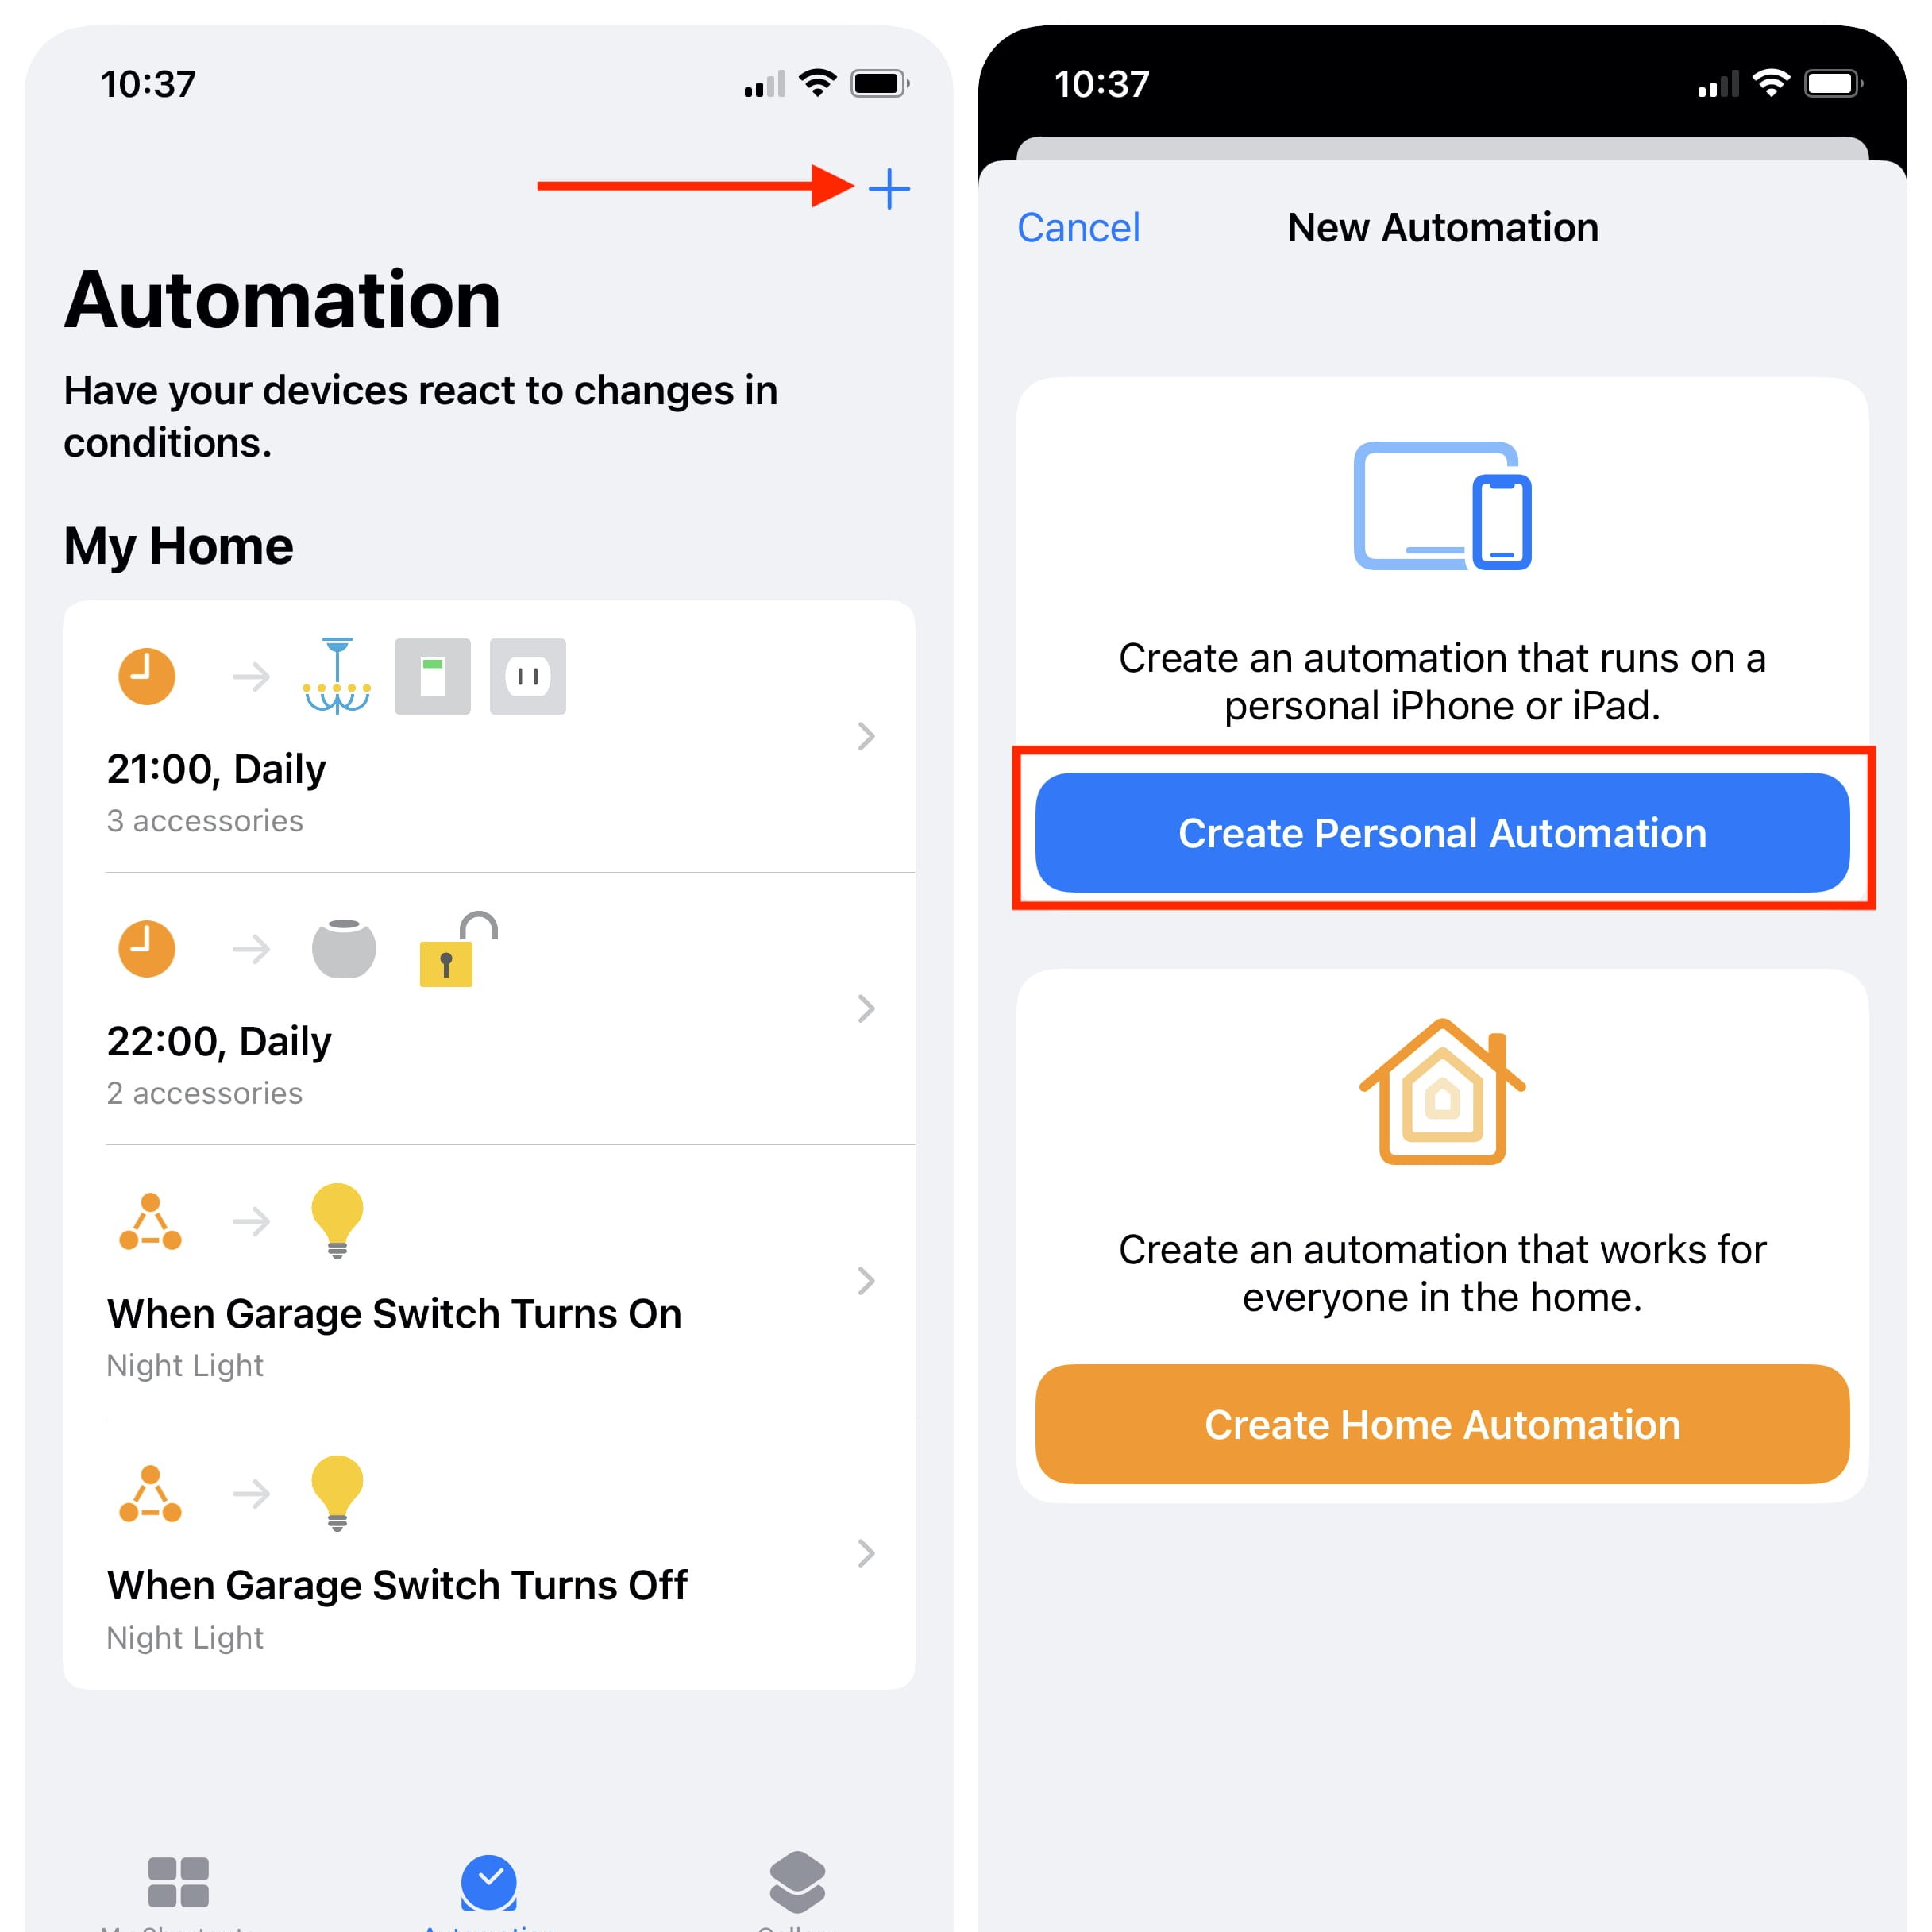
1. Open the “Shortcuts” app: Automation is a part of the Shortcuts app, so launch it on your iPhone. If you don’t have the app already, you can download it for free from the App Store.
2. Tap on “Automation” tab: Once you’re in the Shortcuts app, navigate to the “Automation” tab at the bottom of the screen. This is where you can create and manage your automations.
3. Tap on the “+” icon: To create a new automation, tap on the “+” icon located at the top right corner of the screen. This will open up the automation creation interface.
4. Choose a trigger: In the automation creation interface, you will see a list of available triggers. Triggers are the events or conditions that will activate the automation. You can choose from various options such as “Time of Day,” “When I Arrive,” “When I Connect CarPlay,” and many more. Select the trigger that suits your needs.
5. Configure the trigger: Once you’ve chosen the trigger, you can customize it further by specifying additional details. For example, if you selected “Time of Day,” you can set the specific time range for the trigger to activate.
6. Add actions: After setting up the trigger, you can add actions that will be performed when the trigger is activated. Actions can include tasks like sending a message, toggling settings, opening apps, and much more. You can add multiple actions to create a customized automation.
7. Test and enable the automation: Before finalizing your automation, it’s a good idea to test it out. You can do this by tapping on the “Play” button at the bottom of the screen. Once you’re satisfied with the automation, tap on the “Next” button to proceed. Finally, toggle on the “Enable This Automation” switch to activate the automation.
That’s it! You have successfully enabled automation on your iPhone. The automation will now run automatically whenever the specified trigger condition is met. You can create multiple automations to suit your needs and make your iPhone work smarter for you.
Connect iPhone to Power Source
To ensure your iPhone can trigger automations when plugged into a power source, it’s essential to connect it correctly. Follow these simple steps to connect your iPhone to a power source:
1. Use the original charger: Always use the original charger and cable that came with your iPhone. Using third-party chargers may cause compatibility issues or damage your device.
2. Plug the charger into a power outlet: Find a suitable power outlet in your vicinity and insert the charger’s plug into it. Ensure that the outlet is in good working condition and is properly grounded.
3. Connect the cable to your iPhone: Take the cable and plug the USB end into the charger. Then, gently insert the Lightning end of the cable into the charging port on the bottom of your iPhone. Make sure it goes in smoothly and securely.
4. Verify the charging connection: Look for the battery icon on the top right corner of your iPhone’s screen. It should display a lightning bolt icon, indicating that the device is properly connected and charging.
5. Ensure a stable connection: Avoid placing any unnecessary strain on the cable or charger while the iPhone is charging. Ensure that both ends of the cable are securely connected, and the charger is stable to prevent any accidental disconnection.
6. Use a protective case: If you use a protective case on your iPhone, ensure that it doesn’t interfere with the charging cable’s proper connection. Some cases may have a small flap that needs to be opened to access the charging port.
7. Avoid charging in extreme conditions: To protect your device’s battery health, avoid charging your iPhone in excessively hot or cold environments. Extreme temperatures can affect the performance and longevity of the battery.
Remember to periodically check the charging status of your iPhone when plugged in. It is essential to make sure it is charging properly and that the battery level is increasing. By correctly connecting your iPhone to a power source, you can reliably trigger specific automations whenever your device is plugged in.
Set Automation Triggers
Setting up the right triggers is crucial for ensuring that your automations activate at the desired time or when specific conditions are met. Here’s how you can set automation triggers on your iPhone:
1. Open the “Shortcuts” app: Launch the Shortcuts app on your iPhone to access the automation features.
2. Go to the “Automation” tab: Tap on the “Automation” tab located at the bottom of the screen. This is where you can create and manage your automations.
3. Tap on the “+” icon: To create a new automation, click on the “+” icon found at the top right corner of the screen. This will open the automation creation interface.
4. Choose a trigger type: In the automation creation interface, you will see a list of available trigger types. These trigger types include various events or conditions that can initiate your automation. Select the trigger type that best suits your needs. For example, you can choose “Time of Day” if you want your automation to activate at a specific time.
5. Customize the trigger: Once you’ve selected the trigger type, you can further customize it by adding specific details. For example, if you chose “Time of Day,” you can set the exact time and days of the week when the trigger should activate.
6. Add additional triggers (optional): Depending on your needs, you can add multiple triggers to your automation. This allows you to create more complex and specific conditions for your automation to activate. To add additional triggers, click on the “Add” button and select the trigger type you want to include.
7. Fine-tune trigger settings: After adding the triggers, you may have the option to adjust additional settings for each trigger. These settings can help further customize when and how the automation activates. Take your time to review and fine-tune these settings according to your preferences.
By setting the right triggers, you can ensure that your automations activate at the desired time and under the appropriate conditions. Experiment with different trigger types and combinations to create automations that perfectly fit your needs and make your iPhone work intelligently for you.
Select an Automation
Once you have set up the triggers for your automations, it’s time to select the specific automation that will be executed when those triggers are activated. Follow these steps to choose an automation on your iPhone:
1. Open the “Shortcuts” app: Launch the Shortcuts app on your iPhone to access the automation features.
2. Go to the “Automation” tab: Tap on the “Automation” tab located at the bottom of the screen. This is where you can create and manage your automations.
3. Tap on the “+” icon: To create a new automation, click on the “+” icon found at the top right corner of the screen. This will open the automation creation interface.
4. Choose a trigger: In the automation creation interface, you have already set up the triggers that will activate the automation. Now it’s time to choose the specific automation that will be executed when those triggers are activated.
5. Browse through available automations: In the automation selection screen, you will see a list of available automations organized into different categories. You can browse through these categories or use the search bar to find a specific automation.
6. Select an automation: Once you find the desired automation, tap on it to select it. You will be taken to the automation customization screen where you can further configure and tailor the actions performed by the automation.
7. Customize the automation (optional): Depending on the selected automation, you may have the option to customize and fine-tune the actions performed when it is triggered. You can add or remove actions, adjust settings, and personalize the automation based on your preferences.
By selecting the appropriate automation, you can ensure that the specific tasks or actions you desire will be carried out automatically when the triggers are activated. Take advantage of the wide range of available automations to simplify your daily routine and optimize your iPhone’s functionality to suit your needs.
Customize Automation Actions
Once you have selected an automation, it’s time to customize the actions that will be performed when the automation is triggered. By tailoring the automation actions, you can make your iPhone execute specific tasks or commands according to your preferences. Here’s how you can customize automation actions on your iPhone:
1. Open the “Shortcuts” app: Launch the Shortcuts app on your iPhone to access the automation features.
2. Go to the “Automation” tab: Tap on the “Automation” tab located at the bottom of the screen. This is where you can create and manage your automations.
3. Tap on the automation: In the list of automations, locate the one you want to customize actions for. Tap on it to enter the automation customization screen.
4. Edit actions: On the automation customization screen, you will see the list of actions currently associated with the automation. To customize the actions, tap on individual actions to edit or remove them.
5. Add new actions: To add new actions to the automation, tap on the “+” button located at the bottom of the automation customization screen. This will bring up a list of available actions that you can choose from.
6. Browse and select actions: In the list of available actions, you can browse through different categories or use the search bar to find a specific action. Select the desired action to add it to the automation.
7. Adjust action parameters: After adding an action, you may have the option to adjust its parameters or customize its behavior. This allows you to fine-tune the action according to your specific needs and preferences.
8. Reorder actions (optional): If you want to change the order of actions in the automation, you can simply tap and hold an action, then drag it to the desired position in the list.
By customizing the automation actions, you can create a personalized and tailored experience on your iPhone. Assign actions that align with your routine, preferences, and workflow to automate tasks seamlessly and optimize your device’s functionality.
Test and Fine-tune Automations
After you have customized the actions for your automation, it is important to thoroughly test and fine-tune them to ensure they work as intended. Here are the steps to test and refine your automations on your iPhone:
1. Open the “Shortcuts” app: Launch the Shortcuts app on your iPhone to access the automation features.
2. Go to the “Automation” tab: Tap on the “Automation” tab located at the bottom of the screen. This is where you can create and manage your automations.
3. Select the automation to test: Find the automation you want to test from the list. Tap on it to enter the automation customization screen.
4. Review the actions: Take a moment to review the actions you have set up for the automation. Ensure that they align with your desired outcome and flow logically.
5. Tap on the “Play” button: At the bottom of the automation customization screen, you will see a “Play” button. Tap on it to run the automation and observe the actions being executed.
6. Verify the results: Pay close attention to each action of the automation as it is performed. Check if the actions are executed correctly and if the expected outcome is achieved. Identify any issues or discrepancies that need adjustment.
7. Fine-tune the automation: If you encounter any issues or if the automation does not produce the desired results, go back to the automation customization screen. Edit the actions, parameters, or settings to address any problems and refine the automation accordingly.
8. Repeat the testing process: Once you have made the necessary changes, repeat the testing process to validate the adjustments. Continue to iterate and refine the automation until you are satisfied with the results.
Remember, testing and fine-tuning your automations is crucial to ensure they work reliably and deliver the expected outcome. Through careful observation and adjustment, you can create automations that seamlessly integrate into your workflow, saving you time and effort while enhancing your iPhone experience.
Disable or Delete Automations
If you no longer need certain automations or want to make changes to your existing automation setup, you have the option to disable or delete them. Here’s how you can manage your automations on your iPhone:
1. Open the “Shortcuts” app: Launch the Shortcuts app on your iPhone to access the automation features.
2. Go to the “Automation” tab: Tap on the “Automation” tab located at the bottom of the screen. This is where you can create and manage your automations.
3. Disable an automation: To temporarily turn off an automation without deleting it completely, find the automation you want to disable in the list. Toggle off the switch next to the automation’s name to disable it.
4. Enable a disabled automation: If you want to reactivate a disabled automation, simply find the automation in the list and toggle on the switch to enable it again.
5. Delete an automation: If you no longer need an automation and want to remove it entirely, swipe left on the automation’s name in the list. Tap the “Delete” button that appears to delete the automation.
6. Confirm the deletion: A confirmation prompt will appear after tapping the “Delete” button. Confirm the deletion by tapping “Delete” again to permanently remove the automation from your device.
7. Review and manage other automations: Take some time to review your other automations and make any necessary adjustments or deletion as required. Keep your automation list tidy and organized to ensure you have a clear overview of your active automations.
By disabling or deleting unnecessary automations, you can streamline your automation setup and keep it focused on your current needs. This allows you to maintain a more efficient and effective automation system on your iPhone.