Why Set a Passcode on iPhone and iPod Touch?
Setting a passcode on your iPhone or iPod Touch is an essential security measure that helps protect your personal information and keep your device secure. With the increasing reliance on our mobile devices for various activities, such as online banking, shopping, social media, and email, it has become more important than ever to safeguard our personal data from prying eyes.
By setting a passcode, you prevent unauthorized access to your device, ensuring that only you or someone you trust can unlock it and access its contents. This is especially crucial in case your iPhone or iPod Touch gets lost or stolen, as it acts as a barrier between your sensitive data and potential intruders.
Moreover, a passcode not only provides physical security but also enhances the encryption of your data. Modern iPhones and iPod Touch devices encrypt their data by default, but setting a passcode adds an extra layer of security to this encryption. In the event of someone trying to access your device without authorization, the passcode acts as a safeguard, making it incredibly difficult for them to gain access to your personal information.
Additionally, setting a passcode on your iPhone or iPod Touch allows you to utilize other security features, such as Touch ID or Face ID. These biometric authentication methods use your fingerprint or facial recognition to unlock the device, making it even more convenient while ensuring the highest level of security.
By implementing a passcode, you are taking proactive steps to protect your privacy and maintain control over your personal data. It gives you peace of mind knowing that your device is secure and your information is safeguarded from potential threats.
Step 1: Open Settings
To set a passcode on your iPhone or iPod Touch, you’ll first need to open the Settings app. The Settings app serves as the control center for various device configurations and options.
You can easily access the Settings app by locating the gray icon on your home screen that resembles a gear. Once you find the icon, simply tap on it to open the Settings app.
Alternatively, you can also swipe down from the top-right corner of the screen on devices that support Face ID or swipe up from the bottom of the screen on devices that support Touch ID. This will open the Control Center, where you can find the Settings app shortcut. Tap on the Settings icon to open the app.
Once inside the Settings app, you’ll see a list of options and settings that you can customize to your preference. These options are categorized into different sections, such as General, Display & Brightness, Privacy, and more.
Scroll through the list or use the search bar at the top of the screen to quickly find the specific setting you’re looking for. In this case, we’re setting a passcode, so we’ll need to locate the Passcode settings.
Note that the exact location of the Passcode settings may vary slightly depending on the device model and iOS version you’re using. However, you can typically find it under the “Face ID & Passcode” or “Touch ID & Passcode” section, depending on the biometric authentication method supported by your device.
Now that you’ve successfully opened the Settings app, it’s time to proceed to the next step and set up your passcode.
Step 2: Tap “Face ID & Passcode” or “Touch ID & Passcode”
Once you have entered the Settings app on your iPhone or iPod Touch, the next step is to navigate to the “Face ID & Passcode” or “Touch ID & Passcode” section, depending on the biometric authentication method supported by your device.
This section is where you can manage the settings related to your device’s passcode and biometric authentication features.
To find this section, scroll down the list of options in the Settings app until you locate the “Face ID & Passcode” or “Touch ID & Passcode” label. Tap on it to access the passcode settings.
If your device supports Face ID, the setting will be labeled as “Face ID & Passcode.” Face ID utilizes facial recognition technology to unlock your device, making it even more secure and convenient to access.
If your device supports Touch ID, the label will be “Touch ID & Passcode.” Touch ID uses your fingerprint to unlock the device, offering a quick and secure method to access your device.
Once you tap on the corresponding option, you’ll be prompted to enter your current passcode to proceed. This step is necessary to authenticate your identity and ensure that only authorized individuals can make changes to the passcode settings.
If you haven’t set up a passcode yet, you can skip this step and proceed to set a new passcode directly. However, it is highly recommended to have a passcode enabled for optimal device security.
After entering the current passcode, you are now ready to move on to the next step and either change your passcode or turn on the passcode feature if it’s currently disabled.
Step 3: Enter Your Current Passcode
Once you have accessed the “Face ID & Passcode” or “Touch ID & Passcode” section in the Settings app on your iPhone or iPod Touch, you will be prompted to enter your current passcode.
The current passcode serves as a security measure to ensure that only authorized individuals can make changes to the passcode settings. It is necessary to authenticate your identity and verify that you have the necessary permissions to make modifications.
If you have never set a passcode before, you can skip this step and proceed to set a new passcode directly.
To enter your current passcode, tap on the option that says “Enter Passcode” or a similar label, depending on your device and iOS version.
A numeric keypad will appear on the screen, prompting you to enter your passcode. Type in the digits of your current passcode using the on-screen keypad.
Remember to enter the correct passcode, as an incorrect entry may result in restricted access to your device’s passcode settings.
If you’re unsure about your current passcode or have forgotten it, you may need to use other methods to regain access to your device, such as using your Apple ID or performing a factory reset, which will erase all data on your device.
Once you have entered the correct current passcode, you can proceed to the next step, which involves changing your existing passcode or enabling the passcode feature if it is currently disabled.
Having a passcode on your iPhone or iPod Touch is crucial for securing your personal data and ensuring that only authorized individuals can access your device. It provides an added layer of protection and enhances the privacy and security of your device and its contents.
Step 4: Tap “Change Passcode” or “Turn Passcode On”
After successfully entering your current passcode, the next step is to tap on the option that says “Change Passcode” or “Turn Passcode On” in the “Face ID & Passcode” or “Touch ID & Passcode” section of the Settings app on your iPhone or iPod Touch.
By selecting this option, you can either change your existing passcode or enable the passcode feature if it is currently disabled.
If you have previously set a passcode and wish to change it to a new one, tap on “Change Passcode.” This option allows you to update your current passcode to a new combination of numbers or a custom alphanumeric code.
On the other hand, if the passcode feature is currently disabled on your device and you want to enable it for added security, tap on “Turn Passcode On.” This will activate the passcode feature and prompt you to set a new passcode.
Once you select the appropriate option, you will be directed to a new screen or prompted to enter your passcode again, depending on your device and iOS version.
If you are changing your passcode, you will need to enter your current passcode once again to verify your identity. This step ensures that only authorized individuals can make changes to your passcode.
If you are enabling the passcode feature for the first time, you will be prompted to create a new passcode directly without the need to enter your current passcode again.
In both cases, follow the on-screen instructions to proceed and set a new passcode for your iPhone or iPod Touch.
This new passcode will replace your current passcode or be set as the initial passcode if you are enabling the feature for the first time.
The passcode you choose should be memorable to you but difficult for others to guess. It is recommended to use a combination of numbers, letters, and special characters to create a strong passcode.
Once you have successfully changed your passcode or enabled the passcode feature, you can move on to the next step, which involves entering your new passcode.
Having a solid passcode adds an extra layer of protection to your device and ensures the privacy and security of your personal information.
Step 5: Enter Your New Passcode
After selecting the option to change your passcode or enabling the passcode feature in the Settings app on your iPhone or iPod Touch, the next step is to enter your new passcode.
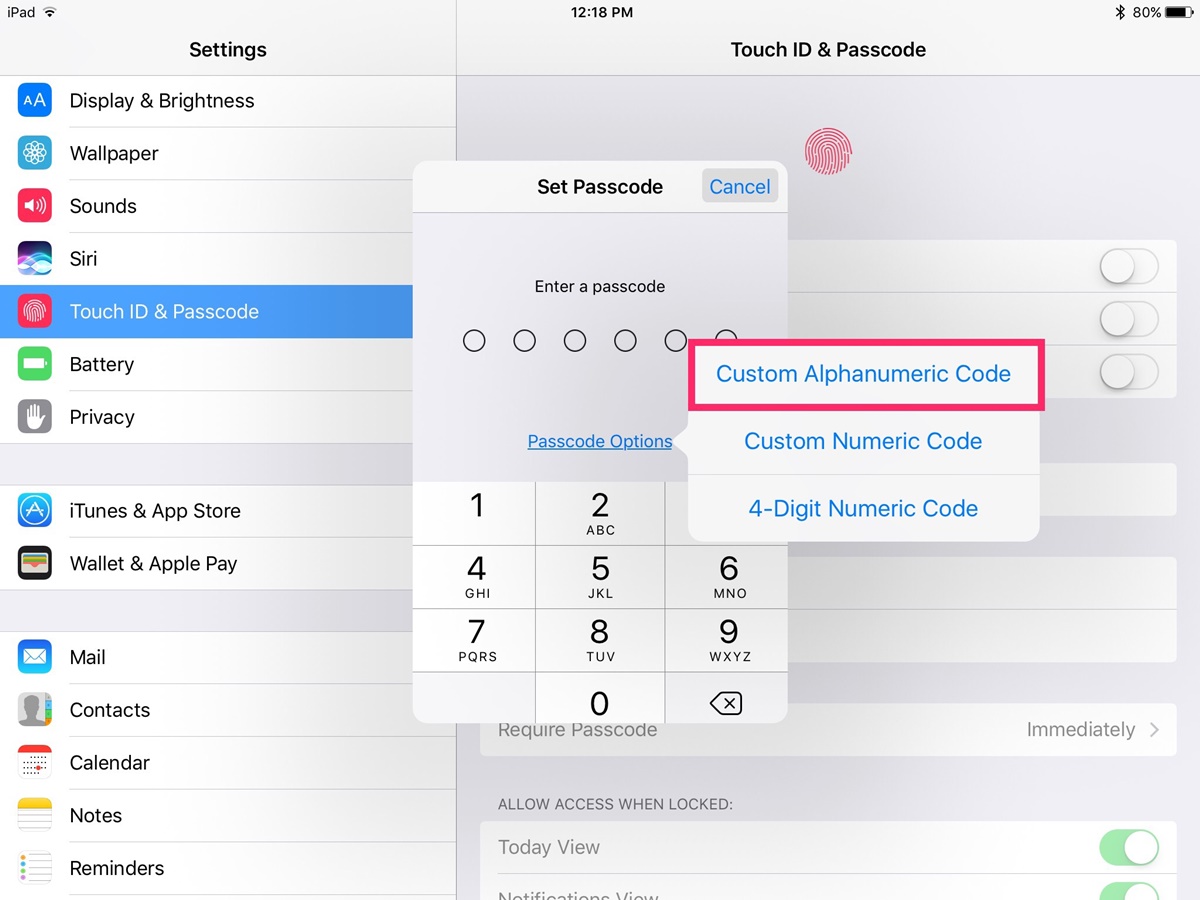
On the passcode screen, you will be prompted to enter a new combination of numbers or a custom alphanumeric code, depending on your device and iOS version.
Follow the instructions on the screen to enter your new passcode. If you are using a numeric passcode, use the on-screen keypad to input your desired combination of numbers.
If you are using a custom alphanumeric passcode, the on-screen keyboard will provide you with both letters and numbers to choose from. To make your passcode stronger, consider using a combination of uppercase and lowercase letters, as well as special characters.
Take your time to carefully enter the new passcode, ensuring that you are comfortable and confident with your selection. Be sure to remember or securely store your passcode in a safe place, as forgetting it may result in restricted access to your device.
By choosing a strong and unique passcode, you enhance the security of your iPhone or iPod Touch and minimize the risk of unauthorized access to your personal data.
Once you have entered your new passcode, you may be prompted to verify it by entering it again. This verification step ensures that you have entered the desired passcode correctly and helps prevent any accidental mistakes.
After successfully verifying your new passcode, your iPhone or iPod Touch will accept the changes and save your new passcode as the active security measure for unlocking your device.
Remember to keep your passcode confidential and not share it with anyone. It is your personal key to accessing your device and protecting your sensitive information.
Now that you have successfully entered your new passcode, you’re ready to move on to the next steps, which involve configuring additional settings and features related to the passcode.
With a strong passcode in place, you can have peace of mind knowing that your device is securely protected and your personal information is kept safe.
Step 6: Re-enter Your New Passcode
After entering your desired new passcode in the previous step, the next step is to re-enter your new passcode for verification.
This additional step is designed to ensure that you have entered your new passcode correctly and matches the one you initially set. It helps prevent any accidental mistakes or typos.
On the passcode screen, you will be prompted to re-enter the same combination of numbers or alphanumeric code that you chose as your new passcode.
Carefully enter your new passcode on the screen, using the same method as before – either the on-screen keypad for numeric passcodes or the on-screen keyboard for custom alphanumeric passcodes.
Take your time to re-enter your new passcode accurately. Pay close attention to each digit or character to ensure a match with your original input.
If there is a mismatch between the initial entry and the verification entry, an error message will appear, indicating that the passcodes do not match. In this case, you will need to start the process again from Step 4 and choose a new passcode.
However, if the passcodes match and are accurately entered, you will receive a confirmation that your new passcode has been successfully set. This means that your device has accepted the new passcode and will use it as the security measure for unlocking your iPhone or iPod Touch.
Remember to securely store or remember your new passcode. It is essential to keep it confidential and avoid sharing it with anyone to maintain the security and privacy of your device and personal data.
Having a strong and unique passcode adds an extra layer of protection to your device, safeguarding your sensitive information from unauthorized access.
Now that you have successfully re-entered your new passcode, you are ready to proceed to the next steps, which involve configuring additional settings and features related to the passcode.
By taking the time to set a strong and secure passcode, you can have peace of mind knowing that your iPhone or iPod Touch is protected and your personal data is safe.
Step 7: Allow or Restrict Features with Passcode
Once you have successfully set a passcode on your iPhone or iPod Touch, you have the option to further customize the level of security and control by allowing or restricting specific features with your passcode.
To access these additional passcode settings, go back to the “Face ID & Passcode” or “Touch ID & Passcode” section in the Settings app on your device.
Here, you will find a list of features that you can manage and control using your passcode. Some of these features include:
- Access to Siri: Choose whether Siri can be accessed when your device is locked or require authentication with your passcode.
- Allow Changes to Passcode settings: Determine whether changes to passcode settings, such as changing the passcode or disabling it, can be made without authentication.
- Viewing Notifications: Decide whether notifications can be viewed on the lock screen, or require authentication to view the content.
- Control Center: Specify whether Control Center can be accessed from the lock screen or require authentication to access it.
- USB Accessories: Enable or disable the ability to connect USB accessories to your device without authentication, providing an additional layer of security in preventing unauthorized access.
Review each option and make adjustments based on your preferences and security needs. By setting specific restrictions with your passcode, you can have better control over the privacy and accessibility of your device.
Keep in mind that enabling stricter restrictions may result in added inconvenience, as it requires authentication with your passcode for certain actions or access. However, it ensures a higher level of security and privacy.
On the other hand, if you prefer a more convenient user experience, you can choose to allow access to certain features without authentication. Just be aware that this may come with a slightly lower level of security.
By customizing these passcode settings, you can tailor the functionality of your iPhone or iPod Touch based on your personal needs and balance security with convenience.
Once you have adjusted the feature settings according to your preferences, you can proceed to the next steps, which involve setting up additional authentication methods, such as Touch ID or Face ID, if they are available on your device.
Remember to periodically review and update your passcode settings to adapt to any changes in your security requirements or preferences.
By taking advantage of the available options, you can enhance the security of your device and protect your personal information.
Step 8: Set Up Touch ID or Face ID (if available)
If your iPhone or iPod Touch supports biometric authentication, such as Touch ID or Face ID, you have the option to set up these convenient and secure features to unlock your device and authorize certain actions.
To set up Touch ID or Face ID, go to the “Face ID & Passcode” or “Touch ID & Passcode” section in the Settings app on your device.
If your device supports Touch ID, you will find the option to “Add a Fingerprint” or “Set Up Touch ID.” Tap on this option to begin the setup process.
If your device supports Face ID, look for the option to “Set Up Face ID” and tap on it to start configuring Face ID.
Follow the instructions displayed on the screen to complete the setup process. This usually involves placing your finger or face in the designated area on the device’s screen or holding it up to your face, allowing the device to capture the necessary data for recognition.
During the setup, you may be prompted to position your finger or face in different angles or positions to ensure accurate recognition. This helps improve the accuracy and reliability of Touch ID or Face ID.
Once the setup is complete, you can use your registered fingerprint or facial features to unlock your device and authorize actions that require authentication, such as making App Store purchases or accessing certain apps and features.
By utilizing Touch ID or Face ID, you can enjoy a seamless and secure way to access your device without the need to enter your passcode every time.
It’s important to note that biometric authentication methods, while convenient, should not replace the need for a passcode. A passcode serves as a backup method to access your device in case biometric authentication fails or if someone else needs to use your device.
If you have multiple fingers or multiple people using the device, you can add additional fingerprints or faces within the Touch ID or Face ID settings. This allows different individuals to authenticate and access the device using their registered biometric data.
Ensure to keep your registered fingerprints or face up to date and remove any outdated or unused biometric data from your device’s settings.
With Touch ID or Face ID set up, you can enjoy the convenience and added security of biometric authentication on your iPhone or iPod Touch.
Now that you have successfully set up Touch ID or Face ID, you can move on to the next steps, which involve tips for choosing a strong passcode to further enhance the security of your device.
Step 9: Tips for Choosing a Strong Passcode
Setting a strong passcode is essential for enhancing the security of your iPhone or iPod Touch. Here are some tips to help you choose a strong and secure passcode:
- Use a combination of numbers, letters, and special characters: Including a mix of uppercase and lowercase letters, numbers, and special characters in your passcode increases its complexity and makes it harder to guess.
- Avoid using obvious or personal information: Avoid using easily guessable information such as your birthdate, phone number, or part of your name as part of your passcode. Choose something unique and unrelated to personal information.
- Avoid sequential or repetitive patterns: Steer clear of passcodes with sequential numbers (e.g., 123456) or repetitive patterns (e.g., 555555). These types of passcodes are easy to guess or predict.
- Make it longer: Lengthier passcodes provide better security. Aim for a minimum of 8 characters, but ideally, choose a passcode with at least 12 characters or more.
- Consider using a passphrase: Instead of a single word or combination of characters, using a passphrase composed of multiple words can increase both security and memorability. Choose words that are unrelated and not easily guessed.
- Change it periodically: Regularly updating your passcode adds an extra layer of security. Consider changing your passcode every few months or sooner if you suspect any security concerns.
- Don’t share your passcode: Keep your passcode confidential and avoid sharing it with anyone, including friends or family members. Remember that your passcode is your personal key to accessing your device and protecting your sensitive information.
It’s essential to strike a balance between selecting a secure passcode and one that you can easily remember. Find a method that works for you to ensure that your passcode is strong, unique, and memorable.
Remember, having a strong passcode is just one layer of protection for your device. It’s essential to also enable additional security features, such as Touch ID or Face ID, and periodically review and update your passcode settings to adapt to changing security requirements.
By following these tips, you can significantly enhance the security of your iPhone or iPod Touch and protect your personal information from unauthorized access.
Now that you have learned about choosing a strong passcode, you can proceed to the final step, which involves exploring additional settings and options related to the passcode on your device.
Step 10: Additional Settings for Passcode
After setting a strong passcode and configuring other security features, there are additional settings you can customize to enhance the security and convenience of your passcode on your iPhone or iPod Touch.
Here are some additional settings you can explore and adjust related to your passcode:
- Erase Data: Enabling the “Erase Data” setting ensures that after ten unsuccessful passcode attempts, all data on your device is permanently erased. This is a powerful security feature to protect your data in case of theft or unauthorized access. However, use this setting with caution, as it cannot be undone.
- Require Passcode Immediately: By enabling this setting, your device will require the passcode to be entered immediately upon waking from sleep mode or when the screen turns off. This ensures that your device remains secure whenever it is not in use.
- Allow Access When Locked: Here, you can customize what actions are allowed when your device is locked. You can choose to enable or disable features such as Siri, Today View, Wallet, Reply with Message, and more. Adjust these settings based on your preference and security requirements.
- Change Passcode: If you ever need to change your current passcode, you can do so by selecting the “Change Passcode” option. This allows you to update your passcode to a new combination of numbers or a custom alphanumeric code.
- Turn Off Passcode: If you no longer wish to use a passcode on your device, you can choose to disable the passcode feature by selecting the “Turn Off Passcode” option. Keep in mind that this significantly reduces the security of your device and makes your personal data more vulnerable.
Exploring and adjusting these additional passcode settings allow you to tailor the security and accessibility of your device based on your needs and preferences.
Remember to periodically review and update these settings as necessary to adapt to any changes in security requirements or preferences.
By taking advantage of these additional settings, you can further enhance the security of your iPhone or iPod Touch and protect your personal information from unauthorized access.
Now that you have learned about the additional settings for the passcode, you have successfully completed all the necessary steps to set up and optimize the passcode on your device. Your iPhone or iPod Touch is now secure and protected, giving you peace of mind while using your device.