
Choosing the Right Video Format
When it comes to sending a video through email, choosing the right video format is essential. Not all video formats are compatible with email clients, and using the wrong format can lead to issues such as broken links or unplayable videos.
One of the most widely supported video formats for email is MP4. It offers a good balance between video quality and file size, ensuring that your video can be easily sent and downloaded by the recipient. Additionally, MP4 is compatible with most devices and operating systems, making it a safe choice for email distribution.
Another format to consider is WebM, which is gaining popularity due to its smaller file size and ability to maintain high video quality. However, it’s important to note that not all email clients support this format, so it’s crucial to check the compatibility before using it for sending videos via email.
On the other hand, formats like AVI, WMV, and MOV may have larger file sizes and lower compatibility with email clients. These formats are better suited for other purposes, such as streaming or offline playback.
It’s also worth mentioning that some email clients and internet service providers have restrictions on the maximum file size of attachments. To ensure that your video can be sent successfully, it’s recommended to compress the video as much as possible without sacrificing too much quality.
Compressing Your Video
Compressing your video files before sending them via email is crucial to ensure fast and efficient delivery, especially if there are file size restrictions. Compressed videos take up less space, making it easier for recipients to download and view the content without delays.
There are several methods you can use to compress your video files. One option is to utilize video editing software that allows you to reduce the file size without compromising too much on video quality. These software programs typically have built-in compression settings or presets that you can choose from.
If you don’t have access to video editing software, there are online video compression tools available. These websites allow you to upload your video and automatically compress it for email-friendly sizes. However, keep in mind that some online tools may reduce the quality of the video more than desired, so it’s important to find a reliable and reputable compression service.
When compressing your video, try adjusting the resolution, bitrate, and codec settings to find the optimal balance between file size and video quality. Lowering the resolution and bitrate can significantly reduce the file size, but be cautious not to make the video too pixelated or blurry.
Trimming unnecessary sections of the video can also help reduce the file size. If there are parts of the video that are not crucial to the content, consider removing them to further decrease the overall size.
Lastly, consider converting your video to a more efficient codec, such as H.264, which offers superior compression without sacrificing visual quality. This codec is widely supported across different devices and platforms, making it an ideal choice for email distribution.
By compressing your video files before sending them via email, you can ensure smooth delivery and a positive viewing experience for your recipients, allowing them to enjoy your content without any issues.
Using an Email Service Provider
When sending videos via email, using an email service provider (ESP) can greatly simplify the process and enhance the deliverability of your content. An ESP offers a range of features and benefits specifically tailored for sending large files like videos.
Firstly, an ESP can handle the technical aspects of delivering your video, ensuring that it meets the requirements of various email clients and internet service providers. ESPs are equipped with the necessary infrastructure to handle large file sizes, reducing the chances of your video being blocked or causing issues with the recipient’s email system.
Furthermore, ESPs often have functionality that allows you to monitor the performance of your video emails. They provide analytics and metrics that help you track key performance indicators such as open rates, click-through rates, and engagement. This data can be invaluable in understanding how your videos are being received and which ones are resonating with your audience.
ESP platforms also usually offer features that enhance the overall presentation of your video content within the email. For example, they may provide customizable video players or templates that allow you to embed your video directly into the email body, enhancing the visual appeal and encouraging recipients to view the video.
Perhaps one of the most significant advantages of using an ESP is that they often have higher file size limits than traditional email clients. This means you can upload and send larger video files without worrying about exceeding attachment file size restrictions. Additionally, ESPs typically have better infrastructure and deliverability rates, ensuring that your video emails reach the intended recipients without being classified as spam.
Before choosing an ESP, consider factors such as pricing, ease of use, customer support, and compatibility with your specific video format and email client. It’s also advisable to check if the ESP has any specific requirements or best practices for sending videos. This will help you select the right ESP that aligns with your needs and maximizes the impact of your video content.
Attaching the Video File
When sending a video through email, one method is to attach the video file directly to the email. This allows the recipient to download and save the video for offline viewing at their convenience. However, it’s important to consider a few factors to ensure the successful delivery of your video file.
First, be mindful of the file size limitations imposed by email clients and internet service providers. Some providers may restrict the maximum attachment size, often ranging from a few megabytes to a few gigabytes. If your video exceeds these limits, the email may fail to send or bounce back. Compressing the video file or using alternative methods for sending larger files is recommended in such cases.
Keep in mind that some email clients and service providers may also have restrictions on the types of files that can be attached. Common video file formats such as MP4, MOV, and AVI are usually accepted, but it’s best to double-check the supported file formats with your recipient’s email provider if you’re unsure.
When attaching the video file, it’s recommended to include relevant information and instructions for the recipient. Add a clear and concise filename to the attachment, giving the recipient an idea of the video’s content. Additionally, include a brief description and any necessary context in the body of the email to give the recipient a preview of what to expect.
For larger video files, consider using a file-sharing service to upload the video and include a download link in the email. This way, the recipient can download the video directly from the file-sharing platform without the need to attach large files to the email itself.
When attaching the video file, pay attention to the total size of the email. Large attachments can contribute to email delivery issues, especially if the recipient’s inbox has limited storage capacity. If possible, inform the recipient in advance about the file size and suggest alternative methods if it exceeds their email client’s limitations.
Attaching the video file directly to the email can be a straightforward method for sending videos, especially for smaller file sizes. However, it’s essential to be mindful of file size limits, supported formats, and the impact on email deliverability to ensure that your video reaches the recipient’s inbox successfully.
Uploading the Video to a Cloud Storage Service
Uploading the video to a cloud storage service is an efficient method for sending large video files via email. Instead of attaching the video directly to the email, you can upload it to a cloud storage platform and share a download link with the recipient. This approach offers several advantages and ensures a smoother delivery process.
One of the main benefits of using a cloud storage service is the ability to bypass attachment size limitations imposed by email clients and service providers. Most cloud storage platforms offer ample storage space, allowing you to upload videos of any size without worrying about file size restrictions.
When uploading the video, ensure that the cloud storage service you choose supports the video file format you are using. Most platforms support a wide range of formats, including MP4, MOV, AVI, and more. However, it’s always a good idea to double-check the compatibility of your chosen format with the cloud storage service’s specifications.
Once the video is uploaded to the cloud storage service, you can generate a secure download link to share with the recipient. This link allows the recipient to access and download the video directly from the cloud storage platform. This approach is particularly useful when sending videos to multiple recipients, as you only need to share the link once instead of attaching the video to each email individually.
Keep in mind that some cloud storage platforms offer additional features that can enhance the video-sharing experience. For example, you may have the option to set permissions and control who has access to the video. You can choose whether to allow anyone with the link to download the video or restrict access to specific individuals.
When sending the email, include clear instructions on how to access the video through the provided download link. Consider providing additional information such as the video’s title, duration, and any necessary context to make it easier for the recipient to understand the content before downloading.
It’s worth noting that cloud storage services generally have a free storage limit, beyond which you may need to upgrade to a paid plan. If you frequently send large videos through email, carefully observe the storage limits and choose a plan that suits your needs.
Uploading the video to a cloud storage service simplifies the process of sending large video files via email. It provides a secure and efficient way to share videos with recipients while bypassing attachment size limitations and ensuring smooth delivery.
Inserting the Video Link in the Email
Instead of directly attaching the video file, another method for sending videos via email is to insert a video link within the email itself. This approach allows recipients to click on the link and be directed to a web page or landing page where the video can be played. Here are some key considerations when inserting a video link in your email.
First, you need to host your video on a platform that supports video playback, such as YouTube, Vimeo, or your own website. Uploading the video to a hosting platform ensures that it can be easily accessed and played without requiring the recipient to download any files.
Once your video is uploaded to the hosting platform, you can generate a shareable link that you can insert into the email. Be sure to use a clear and descriptive text or button for the link to entice recipients to click on it. For example, you can use phrases like “Watch Now” or “Click to Play” to make it more clickable and engaging.
Consider including a thumbnail image of the video in your email, which serves as a visual preview and can entice recipients to click on the link. This thumbnail can be created from a specific frame of the video or a custom image that represents the content. Embedding the thumbnail image in the email is usually straightforward using HTML code.
When inserting the video link, provide relevant context or a brief description of the video. This helps recipients understand what the video is about and why they should take the time to watch it. Giving a teaser or a compelling introduction can capture their interest and encourage them to click on the link.
Before sending the email, test the link to ensure that it is working correctly and leads to the intended video. Also, verify that the video playback settings are configured as desired, such as autoplay or making it full-screen. Testing the link is crucial to avoid any potential issues or broken links once the email is sent.
It’s important to keep in mind that inserting a video link in the email relies on the recipient having an internet connection and access to a compatible device or browser. Be aware that some email clients or security settings may block or disable external links, so it’s worth informing recipients about the video link in the email text to encourage them to enable the links if necessary.
By inserting a video link in your email, you provide recipients with the convenience of viewing the video directly without needing to download or open any attachments. This method also allows for better tracking of video views and engagement metrics through the hosting platform’s analytics.
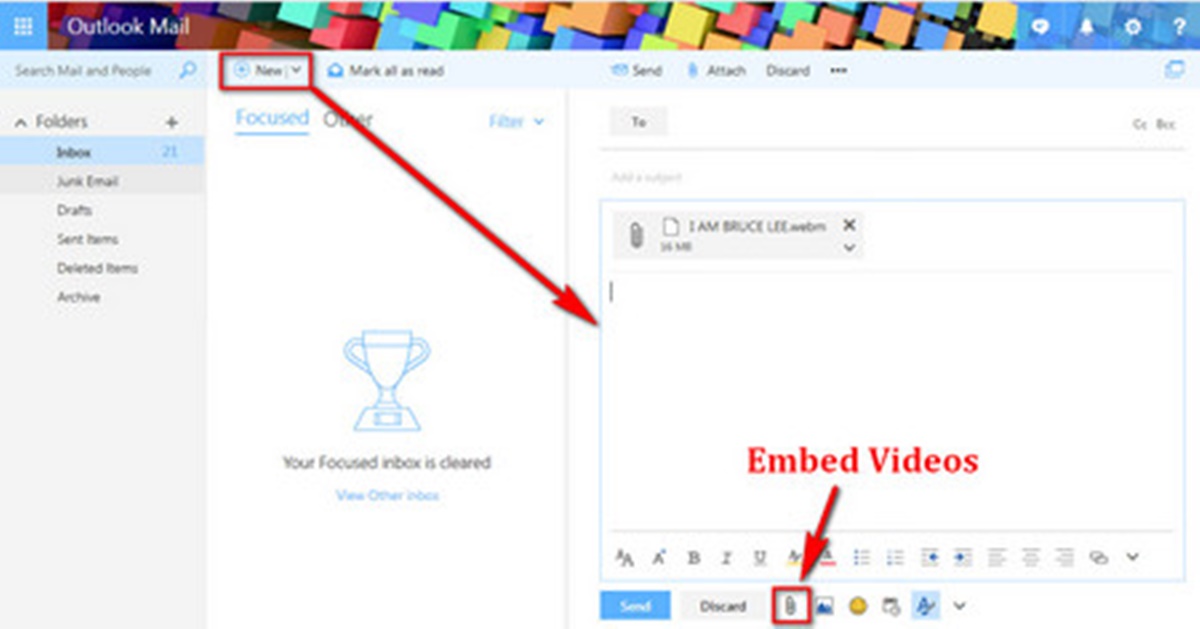
Using Video Embed Codes
When sending a video via email, another effective method is to use video embed codes. This allows you to embed the video directly into the email itself, providing recipients with an immersive viewing experience without having to leave their inbox. Here’s how you can utilize video embed codes to share videos:
1. Choose a suitable video hosting platform: Select a video hosting platform that provides embed code options, such as YouTube, Vimeo, or Wistia. These platforms allow you to upload and manage your videos while providing you with the necessary embed codes to include in your email.
2. Generate the embed code: After uploading your video to the hosting platform, locate the option to embed the video. The hosting platform will provide you with a specific embed code that you can copy and paste into your email.
3. Insert the embed code in your email: Open your email editor and switch to the HTML view. Paste the embed code in the appropriate section of your email’s HTML code. Make sure to place the code within the appropriate HTML tags to ensure proper execution.
4. Customize the video display: Adjust the dimensions and settings of the embedded video as needed. You can specify the width and height of the video player to ensure it fits within the email layout. Additionally, you may have options to configure autoplay, muted playback, or other settings offered by the hosting platform.
5. Preview and test the email: Before sending the email, preview it in different email clients and devices to ensure that the embedded video displays correctly. It’s important to double-check the video’s appearance and functionality to ensure a seamless playback experience for recipients.
One advantage of using video embed codes is that it allows recipients to watch the video directly within the email, eliminating the need to click on external links or navigate to a separate page. This convenience can lead to higher engagement rates and increased viewing time.
However, it’s crucial to keep in mind that not all email clients support embedded videos, and some may display them differently or fail to play them altogether. Therefore, it’s essential to test the email in various email clients and devices to ensure compatibility and fallback options for clients that don’t support embedded videos.
Using video embed codes can provide a rich and interactive experience for recipients, making it easier for them to view your videos without leaving the email. This method is particularly effective when showcasing product demos, tutorials, or promotional videos, as it allows for direct engagement and seamless access to your content.
Adding a Thumbnail Image with Link
When sending a video via email, a visually appealing and clickable thumbnail image can be an effective way to entice recipients to watch the video. By adding a thumbnail image with a link to the video, you create a visually engaging element that encourages recipients to click and view the content. Here’s how you can incorporate a thumbnail image with a link into your email:
1. Select or create a compelling thumbnail image: Choose an eye-catching image that accurately represents the content of your video. It should be visually appealing and capture the viewer’s attention. You can select a frame from the video itself or create a custom image specifically for the thumbnail.
2. Optimize the thumbnail image: Ensure that the thumbnail image is appropriately sized to fit within your email layout. Consider reducing the file size of the image without compromising visual quality to ensure faster loading times and better email performance.
3. Insert the thumbnail image into your email: Open your email editor and add the thumbnail image in the desired location within the email body. Use HTML tags to insert the image, specifying the image source and alt text. The alt text is important for accessibility, ensuring that visually impaired recipients can understand the context of the image.
4. Add the link to the video: Surround the thumbnail image with an HTML anchor tag () and provide the URL of the video as the destination link. This link should lead recipients to a landing page, video hosting platform, or website where they can play the video.
5. Customize the appearance and styling: If desired, you can further enhance the visual appeal of the thumbnail image by adding borders, shadows, or other CSS properties. Ensure that the styling complements the overall design of your email and maintains a cohesive visual experience.
6. Test the email: Before sending the email, preview and test it in different email clients and devices. Make sure that the thumbnail image displays correctly and that clicking on it leads to the intended video. Test the email on various email clients and devices to ensure a consistent experience for all recipients.
By adding a thumbnail image with a link, you provide a visual preview that entices recipients to engage with your video content. This approach is particularly effective for promoting webinars, product demonstrations, or any video that you want to highlight in your email campaign.
Remember, the thumbnail image should accurately depict the video’s content and be visually appealing to capture the recipient’s attention. By combining a compelling thumbnail image with a clickable link, you can increase the chances of recipients watching your video and engaging with your message.
Testing before Sending
Before hitting the “send” button on your email with a video, it’s crucial to thoroughly test it to ensure a seamless and engaging experience for your recipients. Testing before sending allows you to catch any potential issues, optimize the video playback, and ensure compatibility across different email clients and devices. Here are some key aspects to consider when testing your email with a video:
1. Test on multiple email clients and devices: Email clients and devices vary in how they display and render emails. Ensure that you test your email with the embedded or linked video on various popular email clients such as Gmail, Outlook, Apple Mail, and mobile devices like smartphones and tablets. This will give you a comprehensive understanding of how your video appears and performs across different platforms.
2. Verify video playback: Test the video playback in each email client and device to ensure that it plays properly without any issues. Check for any lag, buffering, or audio/video synchronization problems. Adjust the video settings, such as autoplay or fallback options for email clients that don’t support video playback, if necessary.
3. Check the email layout: Ensure that the email’s layout and design remain intact with the video included. Verify that the video thumbnail or embedded video is visually appealing and doesn’t disrupt the overall flow of the email. Test different email widths and screen sizes to ensure a responsive design that adapts to various devices.
4. Test loading times: Pay attention to the loading times of your email with the video. Optimize the video file size and the image assets to minimize loading delays. Make sure the email and video load quickly, as recipients may lose interest or abandon the email if it takes too long to load.
5. Evaluate mobile responsiveness: With a significant number of emails being read on mobile devices, it’s essential to test the mobile responsiveness of your email. Check that the video is mobile-friendly, adjusts to the screen size, and functions as intended on different mobile devices and operating systems.
6. Review email deliverability: Ensure that your email lands in the recipients’ inboxes and is not flagged as spam. Test your email with video across different email providers and spam filters to identify any deliverability issues. Avoid triggering spam filters by optimizing email copy, using reputable sender addresses, and following best practices for email marketing.
7. Proofread and review links: Double-check all the links in your email, including the video link and any accompanying calls-to-action or additional resources. Ensure that the links are accurate and properly direct recipients to the intended destinations, such as the video landing page or the video hosting platform.
By thoroughly testing your email with the video before sending it out, you can identify and resolve any potential issues that may affect the recipient’s experience. This ensures that your video is displayed correctly, plays smoothly, and delivers your message effectively, increasing engagement and maximizing the impact of your email campaign.
Adding a Personalized Message
When sending a video through email, adding a personalized message is a powerful way to connect with your audience and create a more engaging and meaningful experience. A personalized message helps you establish a rapport, build trust, and increase the likelihood of recipients watching and interacting with your video content. Here are some tips for adding a personalized message to your email:
1. Address the recipient by name: Start your email with a personalized greeting that includes the recipient’s name. This small but significant gesture shows that the email is specifically tailored to them, making it more likely to grab their attention and encourage further engagement.
2. Establish a connection: Begin your personalized message by referencing any previous interactions or connections you may have with the recipient. This could be something as simple as mentioning that you met at an event or a mutual connection you both share. Establishing a connection from the start creates a sense of familiarity and relevance.
3. Highlight the relevance of the video: Explain why you are sharing the specific video and how it relates to the recipient’s needs or interests. Personalize the message by referencing specific details that make the video relevant to their situation. This demonstrates that you’ve taken the time to understand their needs and are providing valuable content.
4. Include a brief summary or teaser: Give the recipient a preview of what they can expect from the video. Share a brief summary or teaser that highlights the main points or key takeaways. This generates curiosity and encourages the recipient to watch the video to learn more.
5. Inject a conversational tone: Write your personalized message in a conversational and friendly tone. Use language that feels natural, relaxed, and approachable. Avoid overly formal or robotic language, as it may create a disconnect with the recipient. Aim for a tone that resonates with your audience and reflects your brand personality.
6. Align with their pain points or goals: Show empathy by addressing the recipient’s pain points or aspirations. Discuss how the video can provide solutions, insights, or inspiration related to their specific challenges or goals. This personal touch demonstrates that you understand their needs and are genuinely interested in helping them.
7. Call to action: Encourage the recipient to take action after watching the video. Whether it’s requesting further information, scheduling a call, or engaging with your product or service, provide a clear and compelling call to action that aligns with the content of the video and your overall objectives.
Remember, the goal of adding a personalized message is to create a deeper connection with the recipient and make them feel valued and understood. By customizing your message, you increase the chances of your email being opened, read, and acted upon, ultimately driving greater engagement with your video content.
Dealing with File Size Limits
File size limits can pose a challenge when sending videos via email. Many email clients and internet service providers impose restrictions on the maximum file size of attachments, which can prevent you from directly attaching and sending larger video files. However, there are several strategies you can employ to overcome these limitations:
1. Compress the video: One of the most effective ways to deal with file size limits is to compress the video file. Use video editing software or online compression tools to reduce the file size without significantly sacrificing the video quality. Experiment with different compression settings to strike a balance between file size and visual clarity.
2. Opt for a smaller video format: Consider using video formats that are known for their smaller file sizes. Formats like MP4 and WebM offer good compression efficiency while maintaining decent video quality. Converting your video to a more efficient format can help reduce the overall file size and increase the chances of successful transmission.
3. Utilize video hosting platforms: Instead of attaching the video to the email itself, you can upload the video to a video hosting platform such as YouTube, Vimeo, or Wistia. This allows you to share a link to the video in the email, bypassing attachment file size limits. Recipients can then click on the link to watch the video directly on the hosting platform.
4. Use file-sharing services: If the video file exceeds the attachment size limit, consider utilizing file-sharing services such as Google Drive, Dropbox, or WeTransfer. Upload the video to the file-sharing service and share the download link in your email. This way, the recipient can access and download the video from the file-sharing platform instead of attaching it directly to the email.
5. Split the video into multiple parts: If the video is too large to be sent as a whole, you can consider splitting it into several parts. Divide the video into logical segments and send them as individual attachments or upload them to a hosting platform. Include clear instructions for the recipient on how to piece the video parts together, if necessary.
6. Request alternative delivery methods: If the file size limit cannot be overcome, you can ask the recipient if they prefer an alternative delivery method. This can include providing a link to download the video from an FTP server, sending a physical storage device via mail, or scheduling a video-sharing session using a video conferencing platform.
Take into account that even if you successfully find solutions to work around file size limits, it’s important to consider the recipient’s internet speed and bandwidth capabilities. Sending very large videos can still create challenges for them in terms of download times and storage space on their devices.
By employing these strategies, you can overcome file size limits and ensure that your video content reaches the intended recipients successfully. Be mindful of the recipient’s preferences and limitations when choosing the most appropriate method for delivering your videos via email.
Best Practices for Sending Videos via Email
When sending videos via email, following best practices ensures that your content is delivered effectively and engages your audience. These practices help maximize video playback, optimize email performance, and enhance the overall recipient experience. Here are some key best practices for sending videos via email:
1. Keep file size in check: Compress your video files to an appropriate size that adheres to the file size limits imposed by email clients and internet service providers. By reducing file size, you minimize buffering and loading times, making it easier for recipients to view and enjoy your videos without delays.
2. Choose a compatible format: Opt for widely supported video formats such as MP4 or WebM to ensure compatibility across various email clients and devices. This helps avoid issues with video playback and ensures that your videos can be viewed by the highest number of recipients possible.
3. Customize thumbnails and preview images: Use visually appealing thumbnail images to entice recipients to click and watch the video. Customizing thumbnails helps convey the essence of your video content and increases the likelihood of engagement.
4. Optimize email copy: Craft compelling subject lines and email copy that pique recipients’ interest and prompt them to open the email. Clearly communicate the value and relevance of the video content, and make it clear what action you want recipients to take after viewing.
5. Provide clear instructions: Include explicit instructions on how recipients can access and view the video. Whether it’s an embedded video, a click-to-play link, or a download link, make sure the instructions are easy to follow and understand.
6. Test across various email clients and devices: Test your emails and videos in different email clients and devices to ensure consistent display and functionality. This allows you to identify any issues and make necessary adjustments to optimize the viewing experience for all recipients.
7. Prioritize mobile responsiveness: With a significant portion of emails being viewed on mobile devices, ensure that your emails and videos are mobile-responsive. Optimize the video size and layout so that they adapt to smaller screens and are easily viewable on smartphones and tablets.
8. Check for fallback options: Some email clients may not support embedded videos or advanced video playback features. Consider providing fallback options, such as including a static image and a clickable link to the video landing page, in case recipients cannot view the video directly within the email.
9. Monitor and analyze video performance: Utilize video analytics to track engagement metrics such as views, click-through rates, and average watch time. Gain insights into how your videos are performing and use this data to optimize future video content and email campaigns.
10. Personalize and segment your emails: Personalize your emails by addressing recipients by name and tailoring the message to their specific needs or interests. Segment your email list to ensure that you’re sending relevant video content to the right audience, increasing the chances of engagement and conversion.
By following these best practices, you can effectively deliver videos via email and engage your audience with compelling video content. Remember to continuously monitor performance, experiment with different approaches, and adjust your strategies based on recipient feedback and analytics to maximize the impact of your video email campaigns.