
How to Select a Frame From a Live Photo
Live photos offer a unique way of capturing moments by combining a still image with a short video clip. The result is a dynamic photo that brings your memories to life. But what if you want to choose a specific frame from a live photo to make it your static image? In this guide, we will explore different methods to help you select the perfect frame from a live photo.
Understanding Live Photos
Live photos were introduced by Apple and are supported on most iOS devices. When you take a live photo, your device automatically records a short video clip before and after capturing the still image. This additional footage is hidden but can be accessed later to select a frame.
Importing Live Photos to Your Device
…
…
Saving and Sharing Your Selected Frames
Once you have chosen your desired frame, it’s time to save and share it. Most devices allow you to save the selected frame as a separate image in your photo library. From there, you can easily share it with friends and family through various messaging apps, social media platforms, or simply by sending it as an email attachment.
Remember, live photos are a fun and interactive way to capture and relive precious moments. By following these simple steps, you can easily select the perfect frame from a live photo and create stunning static images that will stand the test of time.
Understanding Live Photos
Live photos have revolutionized the way we capture and experience moments. Introduced by Apple, live photos are a combination of a still image and a short video clip. When you take a live photo, your device captures a few seconds of video before and after the moment you press the shutter, resulting in a dynamic and interactive photo.
Live photos provide a more immersive and engaging way to relive memories. When viewed on a compatible device, such as an iPhone or iPad, you can long-press on the photo to see it come to life as the video clip plays. This adds movement, sound, and emotion to your captured moments, making them feel more realistic and alive.
The video component of a live photo is not immediately visible when you scroll through your camera roll. Instead, the static image is displayed until you interact with it. This is beneficial as it allows you to choose the most appealing frame from the live photo to create still images that represent the moment perfectly.
Live photos can be easily identified by a special symbol, usually in the form of concentric circles or waves, displayed on the thumbnail. This makes it easy to distinguish them from regular photos in your library.
One important thing to note is that live photos take up more storage space than regular photos. This is because it includes both a high-quality still image and a short video. Be mindful of your device’s storage capacity when capturing live photos, especially if you take them frequently.
Live photos have become popular across various social media platforms and messaging apps, allowing you to share your experiences with friends and family in a more dynamic way. Additionally, some platforms let you convert live photos into GIFs, enhancing your ability to share these moments beyond just still images.
Now that we have a better understanding of live photos, let’s explore how you can import them to your device and select the perfect frame to preserve those special moments.
Importing Live Photos to Your Device
Importing live photos to your device is a straightforward process that allows you to access and manage your captured moments efficiently. Here’s how you can import live photos to your device:
1. Using the Photos App:
If you’re using an iOS device, your live photos are automatically saved in the Photos app. To import live photos, follow these steps:
- Open the Photos app on your device.
- Navigate to the album or folder where the live photo is stored.
- Tap on the live photo you want to import to open it.
- Once the live photo is open, you can choose to save the entire clip or select only specific frames.
- To save the entire clip, tap on the “Share” icon and select “Save as Video”.
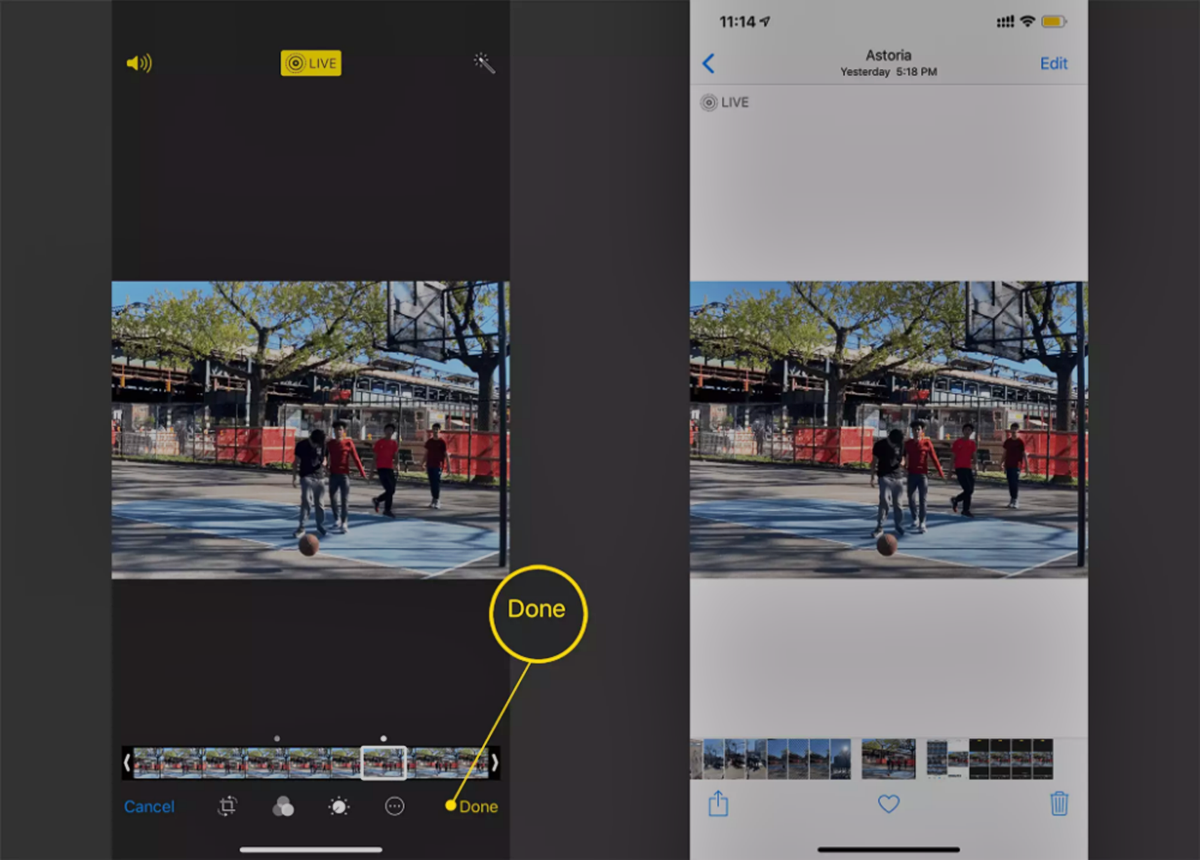
- To select specific frames, tap on the “Edit” button and use the scrubber tool to find the desired frame. Once you have the frame you want, tap on “Done” to save it as a separate image.
2. Using Third-Party Apps:
If you prefer using third-party apps to manage your live photos, there are several options available on both iOS and Android devices. These apps provide additional features and editing capabilities for your live photos. Some popular apps include Google Photos, Snapseed, and VSCO.
When using these apps, you can import your live photos by following the instructions provided within the specific app. Generally, you can either directly import live photos from your device’s camera roll or use the app’s built-in camera to capture new live photos.
Importing live photos to your device ensures that you have easy access to your moments whenever you want to view, edit, or share them. It’s an essential step in the process of selecting the perfect frame from a live photo.
The Benefits of Live Photo Frames
Live photos offer more than just motion and sound – they also provide the opportunity to select and preserve a perfect frame from the captured moment. Let’s take a closer look at the benefits of live photo frames:
1. Curating Your Memories:
Live photo frames allow you to curate and showcase your memories in a visually appealing and meaningful way. By choosing the ideal frame, you can highlight the essence of the moment and ensure that the emotions and details are captured exactly as you want them to be.
2. Immortalizing Precious Moments:
Live photo frames allow you to freeze a magical moment in time. Whether it’s a birthday party, a stunning landscape, or a candid shot of loved ones, selecting the right frame allows you to immortalize these special moments and cherish them for years to come.
3. Creating Stunning Visuals:
The ability to select a frame from a live photo provides an opportunity to create visually striking images. You can choose frames with unique poses, captivating expressions, or dynamic movements to create captivating visuals that stand out on your digital platforms or in printed form.
4. Enhancing Personal Creativity:
Selecting a live photo frame allows you to unleash your personal creativity. You can experiment with different frames and angles to create engaging compositions or explore your editing skills to enhance the colors, contrast, or lighting in the selected frame.
5. Versatile Sharing Options:
With the chosen frame from a live photo, you have a static image that is versatile for sharing. You can easily share it across various platforms, such as social media, emails, or messaging apps, giving your friends and family a beautiful snapshot of the moment without the need for them to view the entire live photo.
By harnessing the power of live photo frames, you can elevate your photography experience and capture moments with greater precision and creativity. The benefits go beyond mere visuals, allowing you to savor the emotions, stories, and details associated with each frame, truly bringing your memories to life.
Selecting Frames Using Your Device’s Built-in Tools
Your device’s built-in tools offer convenient options to help you select frames from live photos. Whether you’re using an iPhone, iPad, or an Android device, here are some common methods to choose the desired frame:
1. Photos App on iOS:
If you’re using an iOS device, the Photos app provides simple yet powerful tools to select frames from your live photos:
- Open the Photos app and locate the live photo you want to work with.
- Tap on the live photo to view it in full screen.
- Below the photo, you’ll see a row of thumbnails representing each frame of the live photo.
- Swipe left or right to scroll through the frames and find the one you want to select.
- Once you’ve found the perfect frame, tap on the “Make Key Photo” or “Select” option to set it as the main representation for the live photo.
2. Google Photos on Android:
If you’re using an Android device, the Google Photos app offers similar functionality for selecting frames from live photos:
- Open the Google Photos app and locate the live photo you want to work with.
- Tap on the live photo to open it in full screen.
- Swipe up from the bottom to reveal additional options.
- Tap on the “Edit” button (represented by a pencil icon) to start editing the live photo.
- Scroll through the frames at the bottom and select the desired frame by tapping on it.
- Save the changes by tapping on the “Save” or “Done” button, depending on your specific device and app version.
These are just examples of how you can select frames using the built-in tools on iOS and Android devices. Depending on the model and operating system version, the exact steps and interface may vary slightly.
Take the time to explore the various options and features available in your device’s built-in photo apps. Experiment with different frames to find the one that best captures the essence of the moment and reflects your artistic vision.
Once you’ve selected the perfect frame, you can further enhance and adjust it using editing tools provided by these apps or export it to other editing apps for additional enhancements.
Now that you know how to select frames using your device’s built-in tools, let’s explore how third-party apps can expand your options even further.
Using Third-Party Apps to Choose Live Photo Frames
While your device’s built-in tools provide convenient options to select frames from live photos, using third-party apps can offer even more flexibility and creative possibilities. Here’s how you can use third-party apps to choose live photo frames:
1. Google Photos:
Google Photos is a popular app available for both iOS and Android devices. It offers a range of features for managing and enhancing your live photos. To select frames using Google Photos:
- Open the Google Photos app and find the live photo you want to work with.
- Tap on the live photo to open it in full screen.
- Tap on the “Edit” button (represented by a pencil icon).
- Scroll through the frames at the bottom and select the desired frame by tapping on it.
- Save the changes by tapping on the “Save” button.
2. Snapseed:
Snapseed is a powerful photo editing app available on iOS and Android that lets you fine-tune your live photo frames. Here’s how you can use Snapseed to choose frames:
- Import the live photo into Snapseed by tapping on the “Open” or “Import” option within the app.
- Tap on the “Tools” icon and select “View Edits”.
- Swipe left or right to browse through the frames.
- Tap on the frame you want to select.
- Tap on the “Save” button to save the selected frame as a separate image.
3. VSCO:
VSCO is another popular app for photo editing and curation, available for iOS and Android. It offers creative tools to enhance your live photo frames. Here’s how you can use VSCO to choose frames:
- Import the live photo into VSCO by tapping on the “+” icon and selecting the live photo from your device’s library.
- Tap on the live photo to open it in the editing interface.
- Swipe left or right to browse through the frames.
- Tap on the frame you want to select.
- Save the selected frame by tapping on the “Save” icon.
Using third-party apps expands your options for selecting frames from live photos. These apps often offer advanced editing features, such as adjusting exposure, saturation, or applying filters, allowing you to further refine the chosen frame.
Remember to explore different third-party apps available on your device’s respective app stores to discover additional options and features that suit your creative vision and editing preferences.
Now that you’re familiar with using third-party apps to choose live photo frames, let’s explore some tips for selecting the perfect frame.
Tips for Choosing the Perfect Frame
When it comes to selecting the perfect frame from a live photo, there are a few tips and considerations that can help you make the right choice. Here are some suggestions to guide you:
1. Pay Attention to Composition:
Look for frames that have a balanced and visually appealing composition. Consider the rule of thirds, leading lines, and other compositional techniques to create an eye-catching image.
2. Capture Emotion and Expression:
Choose frames that capture the emotions and expressions that are important to you. Look for genuine smiles, intense gazes, or captivating moments that evoke a specific feeling.
3. Focus on Clarity and Detail:
Ensure that the selected frame is sharp and clear. Look for frames where the subject is in focus and the details are well-defined. This will enhance the overall quality of the static image.
4. Look for Unique Perspectives:
Explore frames that offer a unique perspective or angle. Experiment with different viewpoints to add visual interest and create a fresh and captivating image.
5. Consider Lighting and Colors:
Evaluate frames that have appealing lighting conditions and vibrant colors. Look for frames with good exposure, balanced lighting, and colors that enhance the mood or subject of the photo.
6. Take Your Time:
Don’t rush the process of selecting a frame. Take your time to review each frame, zoom in if needed, and evaluate the details. Pay attention to small nuances that could significantly impact the final image.
7. Trust Your Instincts:
Ultimately, trust your instincts and choose the frame that resonates with you on a personal level. Listen to your intuition and select the frame that best captures the essence of the moment as you remember it.
8. Experiment with Editing:
After choosing a frame, don’t hesitate to explore editing options to further enhance the image. Adjust the brightness, contrast, saturation, or apply filters to create the desired look and feel.
By considering these tips, you can make an informed decision when selecting a frame from your live photo. Remember, the perfect frame is subjective and depends on your personal preferences and the story you want to tell with your image.
Now that you’re armed with these tips, it’s time to dive into how you can adjust and enhance the frames you’ve selected.
Adjusting and Enhancing Selected Frames
Once you have selected the perfect frame from your live photo, you may want to further enhance and refine it to achieve the desired look and feel. Here are some techniques and tools you can use to adjust and enhance your selected frames:
1. Crop and Straighten:
Consider cropping the frame to remove any unwanted elements or to improve the composition. Straighten the image if necessary to align horizons or other elements.
2. Adjust Exposure and Contrast:
Use the exposure and contrast adjustments to fine-tune the lighting and overall tonal range. Increase or decrease exposure to brighten or darken the image, and adjust contrast to enhance the difference between light and dark areas.
3. Enhance Colors:
Experiment with color adjustments to make the colors more vibrant or to achieve a specific mood. Adjust the saturation, vibrance, or individual color channels to get the desired tonal balance.
4. Sharpen and Reduce Noise:
Apply sharpening techniques to enhance the details and clarity of the frame. Additionally, if there is any visible noise in the image, reduce it using noise reduction filters or tools.
5. Apply Filters and Effects:
Explore different filters and effects to add an artistic touch to your selected frame. Experiment with black and white conversions, vintage styles, or creative filters to create a unique and engaging image.
6. Fine-tune White Balance:
Adjust the white balance to ensure the colors appear natural and accurate. Use the temperature and tint adjustments to correct any color casts and achieve the desired color temperature.
7. Add Creative Enhancements:
Consider adding creative enhancements such as vignettes, gradients, or lens flares to add atmosphere, depth, or visual interest to the frame. Be cautious not to overdo it and keep the enhancements subtle and complementary.
8. Save and Preserve the Original:
Remember to save your edited frame as a separate image, preserving the original live photo frame. This allows you to revert back to the original frame or make further adjustments if needed.
Experiment with these adjustments and enhancements to find the perfect look for your selected frame. Use your creativity and personal style to transform the image into a polished and visually stunning representation of your captured moment.
Once you are satisfied with the adjustments, it’s time to save and share your selected and enhanced frame with others.
Saving and Sharing Your Selected Frames
After you have chosen the perfect frame from your live photo and made any necessary adjustments or enhancements, it’s time to save and share your selected frames. Here’s how you can do it:
1. Save to Device:
Most devices allow you to save the selected frame as a separate image in your photo library. Simply tap on the “Save” or “Export” option, and the frame will be saved as a static image on your device.
2. Share on Social Media:
Share your selected frame directly on social media platforms like Facebook, Instagram, Twitter, or any other platform of your choice. Each platform provides a share button within their app, allowing you to easily post your frame and share it with your friends and followers.
3. Send as an Email or Message Attachment:
If you prefer a more private way of sharing, you can send the selected frame as an email attachment or message attachment. Simply compose a new email or message, choose the frame as an attachment, and send it to the recipients you wish to share it with.
4. Print and Display:
If you prefer a physical representation of your selected frame, you can print it and display it in your home or office. Consider printing it as a high-quality photo print or even as a framed artwork to showcase your captured moment.
5. Create Digital Albums:
Organize your selected frames into digital albums or collections on your device, allowing you to easily browse and revisit them whenever you want. This is a great way to curate your favorite moments and keep them organized.
6. Share with Cloud Storage:
Use cloud storage services such as Google Drive, Dropbox, or iCloud to store and share your selected frames. You can upload the frames to your cloud storage and share the access link with others, allowing them to view and download the frames as needed.
7. Share with Collaborative Platforms:
If you’re working collaboratively on a project or sharing frames with a team, consider using collaborative platforms like Google Photos, Adobe Creative Cloud, or other similar platforms. These platforms allow you to share your selected frames in a collaborative space where others can view and interact with them.
Remember to respect copyrights and permissions when sharing your selected frames with others. Ensure that you have the necessary rights or consent before sharing any frames that include recognizable individuals or copyrighted material.
With these options, you can save, share, and display your selected frames from live photos, allowing you to cherish and showcase your captured moments in various ways.