
Benefits of Seeing Someone’s Location on an iPhone
With the advancement of technology, smartphones have become an integral part of our lives. iPhones, in particular, provide a range of features that enable us to stay connected with our loved ones. One such useful feature is the ability to see someone’s location. While this may raise concerns about privacy, there are several benefits to using this feature, especially in certain situations. Let’s explore some of the advantages of being able to see someone’s location on an iPhone.
1. Safety and Security: Knowing the whereabouts of your family members or close friends can provide a sense of comfort and security. In case of emergencies, such as accidents, natural disasters, or even a lost child, being able to track their location quickly can be incredibly valuable.
2. Peace of Mind: If you have elderly parents or relatives living alone, knowing their location can bring peace of mind. It allows you to keep an eye on their safety and well-being, ensuring they are not in any compromising situations.
3. Coordination and Meeting Up: Planning meetups or coordinating with friends and family becomes much easier when you can see their real-time location. It eliminates the need for constant calls or messages to check on each other’s whereabouts, saving time and reducing the likelihood of miscommunication.
4. Traveling Together: When exploring new places or going on vacations, tracking someone’s location can be particularly useful. It helps ensure that everyone stays together, especially in crowded areas or unfamiliar destinations. It also eliminates the stress and frustration of getting separated.
5. Parental Control: For parents, the ability to track their child’s location provides an added layer of protection. It allows parents to ensure that their children are where they’re supposed to be, such as school or extracurricular activities, and gives them peace of mind.
6. Lost or Stolen iPhone: iPhone users know how frustrating it can be to lose their device or have it stolen. By tracking the location of your iPhone, you might be able to retrieve it or at least have a general idea of where it might be, making it easier to report to the authorities.
While there are numerous benefits to being able to see someone’s location on an iPhone, it is essential to use this feature responsibly and with the consent of the individuals involved. It is crucial to respect privacy boundaries and ensure that the tracking feature is used for valid and legitimate reasons only.
How to Use Find My iPhone
Find My iPhone is a powerful built-in feature on iPhones that helps you locate your device if it goes missing. Additionally, it can also be used to see someone’s location, but only if they have enabled location sharing with you. Here’s a step-by-step guide on how to use Find My iPhone effectively:
1. Enable Find My iPhone: To start using this feature, ensure that Find My iPhone is enabled on your device. Go to “Settings” and tap on your Apple ID at the top of the screen. Then, select “Find My” and turn on the “Find My iPhone” toggle switch.
2. Sign in to iCloud: Make sure you’re signed in to the iCloud account associated with the iPhone you want to locate. Open the Find My app or go to iCloud.com and sign in using your Apple ID and password.
3. Locate Your iPhone: From the Find My app or the iCloud website, select the “Devices” tab and choose your iPhone from the list. The app will display its current location on a map, along with options to play a sound, mark it as lost, or erase its data if necessary.
4. Share Location: If you want to see someone else’s location on your iPhone, they need to enable location sharing with you. Ask the person to go to “Settings,” tap on their Apple ID, and select “Find My.” Then, they can turn on the “Share My Location” toggle switch and choose your contact to share their location with you.
5. View Shared Locations: To see someone’s shared location, open the Find My app on your iPhone and tap on the “People” tab at the bottom. You should find the person’s name listed under “Share My Location.” Tap on their name to view their current location along with other options like directions and estimated arrival time.
6. Use Notifications: To stay updated about someone’s location changes, go to the Find My app, tap on the person’s name under “People,” and enable “Notify Me.” You will receive notifications whenever the person arrives or leaves a specific location.
Remember, it’s important to respect privacy and only use Find My iPhone for legitimate purposes. Obtain consent from the person you’re tracking and ensure that you’re using this feature responsibly and within legal boundaries.
How to Share Your Location with Someone
Sharing your location with someone on your iPhone can be helpful in various situations, such as meeting up with friends or letting family members know where you are. Here are the steps to share your location with someone:
1. Open Settings: Go to the “Settings” app on your iPhone’s home screen.
2. Tap on your Apple ID: Scroll down and tap on your Apple ID at the top of the screen to access the settings related to your account.
3. Go to “Find My”: Under your Apple ID, you’ll find the “Find My” option. Tap on it to access the settings related to location sharing.
4. Enable “Share My Location”: In the Find My settings, enable the toggle switch next to “Share My Location.” This will allow you to share your location with others.
5. Choose a Contact: Tap on the “Add” button to select a contact from your list or enter the contact’s name manually. You can choose multiple contacts to share your location with.
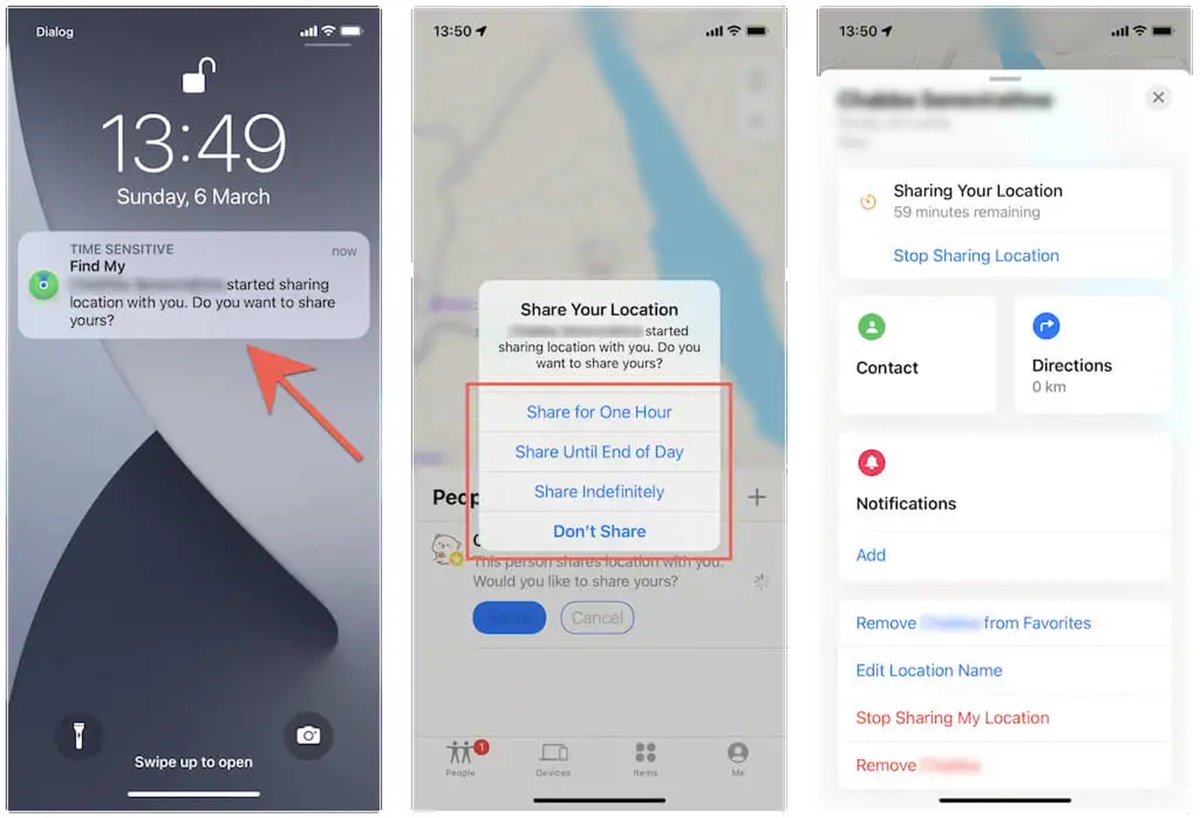
6. Share Indefinitely or for a Limited Time: Decide whether you want to share your location with the selected contact(s) indefinitely or for a limited time. If you choose a limited time, set the duration you want the location sharing to be active.
7. Customize Notifications: You can also choose whether to receive notifications when the contact(s) arrive or leave a specific location.
8. Confirm Location Sharing: Tap on “Send” or “Done” to confirm and share your location with the selected contact(s).
9. Coordinate Through Messages: Once you’ve shared your location, you can easily coordinate with the contact(s) through the Messages app. Open the conversation with the contact and tap on the “i” button in the top right corner. From there, tap on “Details” and select “Share My Location” to view each other’s locations on a map.
Remember, it’s essential to share your location responsibly and only with trusted individuals. It’s always a good idea to reevaluate and revoke location sharing permissions if needed, ensuring your own privacy and security.
How to Request Someone’s Location
There may be instances where you need to know someone’s location, like when meeting up with a friend or checking on the whereabouts of a family member. Fortunately, on an iPhone, you can easily request someone’s location if they have enabled location sharing with you. Here’s a step-by-step guide on how to do it:
1. Open the Messages app: Launch the Messages app on your iPhone, where you have an existing conversation with the person you want to request the location from.
2. Open the conversation: Tap on the conversation with the specific person to open it.
3. Tap on the “i” button: In the top right corner of the conversation screen, you’ll find an “i” button. Tap on it to access the details of the conversation.
4. Select “Info”: From the conversation details screen, tap on “Info” or “Details” (depending on your iOS version) to view more information about the conversation and the person.
5. Request location: Once you’re in the conversation details, scroll down until you find the “Location” section. Tap on the “Request Location” button to send a request for their current location.
6. Wait for a response: After sending the location request, you’ll need to wait for the person to approve or deny your request. Once they respond, you’ll be able to view their location on a map.
7. View the location: Once the person approves your location request, their current location will appear on a map in the conversation details. You can tap on the map to open it in the Maps app for a more detailed view.
8. Coordinate and meet up: With access to the person’s location, you can now coordinate and plan to meet up more efficiently. You can use the location information to guide yourself or provide directions to the desired meeting point.
Remember, it’s important to use location requests responsibly and with the consent of the person you’re requesting it from. Respect privacy boundaries and only request someone’s location for legitimate and valid reasons.
How to See Someone’s Location through iMessage
iMessage, the default messaging app on iPhones, offers a convenient way to see someone’s location without needing any additional apps or features. If the person you want to track has shared their location with you through iMessage, you can easily view it. Here’s how:
1. Open iMessage: Launch the iMessage app on your iPhone. Make sure you have an existing conversation with the person whose location you want to see.
2. Open the conversation: Tap on the conversation with the specific person to open it.
3. Tap on the “i” button: In the top right corner of the conversation screen, you’ll find an “i” button. Tap on it to access the details of the conversation.
4. View Location: In the conversation details screen, scroll down until you find the “Location” section. If the person has shared their location with you, their current location will be displayed on the map in this section.
5. Zoom and Navigate: To explore the location more precisely, you can zoom in or out on the map by pinching your fingers together or apart. You can also swipe and pan the map to view different areas or landmarks.
6. Get Directions: If you need to navigate to the person’s location, tap on the location pin on the map. It will open in the Maps app, where you can access turn-by-turn directions to reach your desired destination.
7. Coordinate and Communicate: With access to the person’s location, you can now coordinate more effectively. Use this information to plan meetups, provide directions, or simply have a better understanding of their whereabouts while chatting with them in iMessage.
Remember, seeing someone’s location through iMessage is only possible if they have explicitly shared their location with you. Respecting privacy and obtaining consent before tracking someone’s location is crucial.
How to Track Someone’s Location with Find My Friends
Find My Friends is an app developed by Apple that allows you to track the real-time location of your friends and family members who have granted you access to their location. With Find My Friends, you can stay connected and keep tabs on their whereabouts. Here’s how to track someone’s location with Find My Friends:
1. Install Find My Friends: If you haven’t already, download and install the Find My Friends app from the App Store. It’s available for free and compatible with iPhones running iOS 9 or later versions.
2. Launch the App: Once installed, open the Find My Friends app on your iPhone. You’ll need to sign in with your Apple ID or create a new account if you don’t have one.
3. Send Invitation: To track someone’s location, you’ll need to send them an invitation to share their location with you. Tap on the “Add Friends” button and select a contact from your list or enter their Apple ID or phone number manually. Then, tap “Send” to send the invitation.
4. Accept the Invitation: The person you invited will receive a notification and an invitation to share their location with you. They need to accept the invitation in order for you to track their location. Once they accept, their name will appear under “Friends” in the Find My Friends app.
5. Track Location: To see the person’s location in real-time, open the Find My Friends app and select their name from the “Friends” list. The app will display their current location on a map, along with additional details like their current address and how long ago the location was updated.
6. Set Up Geofence Notifications (Optional): If you want to receive notifications when the person arrives or leaves a specific location, you can set up geofence notifications. Tap on the person’s name in the Find My Friends app, select “Notify Me,” and choose whether you want to be notified when they arrive or leave a particular location.
7. Customize Sharing Duration (Optional): By default, the person’s location is shared indefinitely. However, if you only need to track them for a certain period, you can customize the sharing duration. Tap on their name, select “More,” and choose either a specific time duration or “Until I Decide to Stop Sharing.”
Remember, it’s important to use Find My Friends responsibly and with the consent of the person you want to track. It’s essential to respect privacy boundaries and obtain permission before tracking someone’s location.
How to Track Someone’s Location with Family Sharing
Family Sharing is a feature on iPhones that allows family members to share various aspects of their digital lives, including their location. If you’re part of a Family Sharing group and have permissions enabled, you can easily track the location of your family members. Here’s how to track someone’s location with Family Sharing:
1. Set Up Family Sharing: To begin, ensure that Family Sharing is set up on your iPhone. Go to “Settings” and tap on your Apple ID at the top of the screen. Choose “Set Up Family Sharing” and follow the on-screen instructions to establish a family group.
2. Enable Location Sharing: Once Family Sharing is set up, make sure that location sharing is enabled for your family members. Go to “Settings,” tap on your Apple ID, and select “Family Sharing.” From there, choose “Location Sharing” and ensure that everyone you want to track has it enabled.
3. View Locations: To track someone’s location, open the Find My app on your iPhone. Tap on the “People” tab at the bottom, and you’ll see a list of the family members who have enabled location sharing. Tap on a family member’s name to view their current location on the map.
4. Set Up Notifications: If you want to receive notifications when family members arrive or depart from specific locations, you can set up geofence notifications. Tap on a family member’s name in the Find My app, select “Notify Me,” and choose whether you want to be notified when they arrive or leave a particular location.
5. Share Location with Family Members (Optional): If you want your family members to track your location as well, you can share your location with them. Go to “Settings,” tap on your Apple ID, select “Family Sharing,” and choose “Location Sharing.” Then, enable the toggle switch next to each family member with whom you want to share your location.
6. Customize Location Sharing (Optional): Family Sharing allows for flexibility in location sharing. You can customize the sharing settings for each family member, such as having location sharing for specific family members or enabling it for all family members. You can adjust these settings in the Family Sharing section of your Apple ID settings.
Remember, tracking someone’s location within a Family Sharing group should be done with their consent and for legitimate reasons. Respect privacy boundaries and gain approval from family members before utilizing this feature.
How to Monitor Someone’s Location with a Tracking App
If you’re looking to monitor someone’s location beyond the built-in features of an iPhone, there are various tracking apps available that offer more comprehensive location tracking capabilities. These apps can be particularly useful for parents keeping an eye on their children or employers monitoring their employees’ whereabouts. Here’s how to monitor someone’s location with a tracking app:
1. Research and Choose a Tracking App: Start by researching and selecting a tracking app that suits your needs. There are several reputable options available, such as Life360, mSpy, and FamiSafe. Look for features like real-time location tracking, geofencing, and notifications.
2. Install the App: Once you’ve chosen a tracking app, download and install it on both your iPhone and the device you want to monitor. Follow the instructions provided by the app to complete the installation process.
3. Set Up an Account: After installing the app, create an account using a valid email address and password. Some apps may require additional information during the setup process.
4. Grant Permissions: Allow the app to access the necessary permissions on both your iPhone and the monitored device. These permissions may include location access, notifications, and other relevant features required for accurate tracking.
5. Pair and Sync Devices: Depending on the tracking app you choose, you may be required to pair and sync the devices for accurate location tracking. Follow the instructions provided by the app to complete this process.
6. Access Location Information: Once the app is installed and devices are synced, you can access the location information of the monitored device from your iPhone. Open the tracking app and navigate to the location tracking section to view real-time updates.
7. Set Geofences and Notifications: Many tracking apps allow you to set up geofences, virtual boundaries around specific locations. Configure geofences according to your preferences, and enable notifications to receive alerts when the person enters or leaves these predetermined areas.
8. Monitor Location History: Some tracking apps provide a location history feature, allowing you to view past location data. This can be useful for tracking patterns or reviewing historical location information.
Remember, it’s crucial to use tracking apps responsibly and within legal boundaries. Obtain consent from the person you’re monitoring and respect privacy limitations. Ensure that you are complying with applicable laws and regulations in your region.
How to Disable Location Sharing on an iPhone
While location sharing can be a useful feature, there may be situations where you want to disable it on your iPhone for privacy or personal reasons. Disabling location sharing ensures that your whereabouts are not being tracked or shared with others. Here’s how to disable location sharing on an iPhone:
1. Open Settings: Go to the “Settings” app on your iPhone’s home screen.
2. Tap on Privacy: Scroll down and tap on “Privacy” to access the privacy settings on your device.
3. Select Location Services: From the privacy settings, choose “Location Services” to view and manage location settings for different apps.
4. Disable Location Services: At the top of the Location Services screen, you’ll find a toggle switch. Tap on it to disable location services for all apps on your iPhone. This will completely turn off location sharing for your device.
5. Customize Location Settings for Specific Apps (Optional): If you want to maintain some level of location functionality for certain apps while disabling it for others, you can customize the location settings. Scroll down to view the list of apps that have requested access to your location. Tap on an app to choose the desired location access, such as “Never,” “While Using the App,” or “Always.”
6. Disable Share My Location (Optional): If you want to specifically disable the sharing of your location with individuals in your contacts, you can disable the “Share My Location” feature. From the Location Services screen, scroll to the bottom and tap on “Share My Location.” Toggle off the switch to stop sharing your location with others.
7. Manage Frequent Locations (Optional): Additionally, you can manage your iPhone’s collection of frequent locations. These are locations that your iPhone learns based on your usage patterns. To manage frequent locations, scroll to the bottom of the Location Services screen and tap on “System Services.” From there, tap on “Frequent Locations” and disable the feature or clear the history of frequent locations.
By following these steps, you can easily disable location sharing on your iPhone. Keep in mind that disabling location services may affect the functionality of certain apps and services that rely on location data. Consider the implications before disabling location sharing and enable it again if required for specific purposes.
Tips for Ethical Use of Location Tracking Features
Location tracking features on iPhones provide convenience and enhanced safety, but it’s important to use them ethically and responsibly. Respecting privacy and consent is crucial when utilizing these features. Here are some tips for the ethical use of location tracking features on your iPhone:
1. Obtain Consent: Before tracking someone’s location, make sure you have obtained their consent. Respect their privacy and avoid tracking others without their explicit permission. It’s essential to build trust and maintain healthy relationships by respecting boundaries.
2. Communicate Openly: Clearly communicate the purpose and intention behind tracking someone’s location. Be transparent about why you want to track their whereabouts and ensure that they understand and agree to it. Open communication helps build understanding and fosters trust.
3. Limit Tracking to Legitimate Reasons: Use location tracking features for legitimate purposes only. Avoid using them for intrusive or unwarranted surveillance. Tracking someone’s location should be restricted to situations such as safety, emergencies, or with the consent of the person being tracked.
4. Respect Privacy Boundaries: Respect the privacy boundaries of individuals when tracking their location. Avoid constantly monitoring their every move and give them space. It’s important to strike a balance between ensuring safety and respecting personal autonomy.
5. Use Features Within Legal Boundaries: Ensure that you are using location tracking features within the legal boundaries of your jurisdiction. Familiarize yourself with the laws and regulations governing privacy and tracking in your region. Understanding the legal framework helps ensure ethical use.
6. Disclose Tracking to Family Members: If you are using family tracking features, inform your family members that you have enabled location sharing. Allow them to express any concerns they may have and address those concerns openly. Transparency promotes trust and understanding.
7. Periodically Reevaluate Tracking: Regularly reassess the need for location tracking. Is it still necessary? Are there any changes in circumstances or agreements? Keeping an open line of communication helps ensure that all parties involved remain comfortable with the arrangement.
8. Educate Yourself and Others: Stay informed about the features and capabilities of location tracking on your iPhone. Educate yourself and others about the importance of ethical use, consent, and privacy. Encourage respectful and responsible use of location tracking technology.
By following these tips, you can ensure the ethical and responsible use of location tracking features on your iPhone. Prioritize consent, respect privacy boundaries, and maintain open communication to foster trust and the responsible use of these features.