Finding the Windows Snipping Tool
Taking screenshots on an HP laptop is a useful way to capture and share information. One of the easiest ways to do this is by using the built-in Windows Snipping Tool. This handy tool allows you to capture screenshots of your entire screen, a specific window, or a selected area. Here’s how you can find and use the Windows Snipping Tool on your HP laptop.
To begin, click on the “Start” button located at the bottom left corner of your screen. In the search bar, type “Snipping Tool” and press “Enter.” The Snipping Tool application should appear in the search results. Click on it to launch the tool.
Alternatively, you can also access the Snipping Tool by navigating to the “Windows Accessories” folder in the “Start” menu. Look for the folder named “Windows Accessories” and click on it. Inside, you’ll find the Snipping Tool icon.
Once the Snipping Tool is open, you’ll see a small window with several options. By default, the tool is set to capture a rectangular snip, but you can change this by clicking on the “Mode” button. Here, you’ll find options to capture a free-form snip, a window snip, or a full-screen snip.
If you want to quickly capture the entire screen, simply click on the “New” button and then click on your screen. The Snipping Tool will capture the image, and you can edit or save it as desired.
If you only want to capture a specific window, click on the “New” button and then select the window you want to capture. The Snipping Tool will automatically capture the selected window, allowing you to save or edit the screenshot.
If you prefer to capture a specific area of the screen, click on the “New” button and then drag your cursor to select the desired area. Release the cursor, and the Snipping Tool will capture the selected area for you to save or edit.
To save your screenshot, click on the “Save” button in the Snipping Tool window. You can choose a file name and location to save the screenshot. Additionally, you can use the “Copy” button to copy the screenshot to your clipboard and paste it into another application.
The Windows Snipping Tool offers a simple and convenient way to capture screenshots on your HP laptop. Whether you need to share information or save something for later reference, the Snipping Tool has got you covered. Take advantage of this built-in tool to streamline your screenshotting process and enhance your productivity.
Using the PrtScn (Print Screen) Button
If you’re looking for a quick and straightforward way to take a screenshot on your HP laptop, the PrtScn (Print Screen) button is your go-to option. This button allows you to capture the entire screen and save it as an image file. Here’s how you can use the PrtScn button to take a screenshot on your HP laptop.
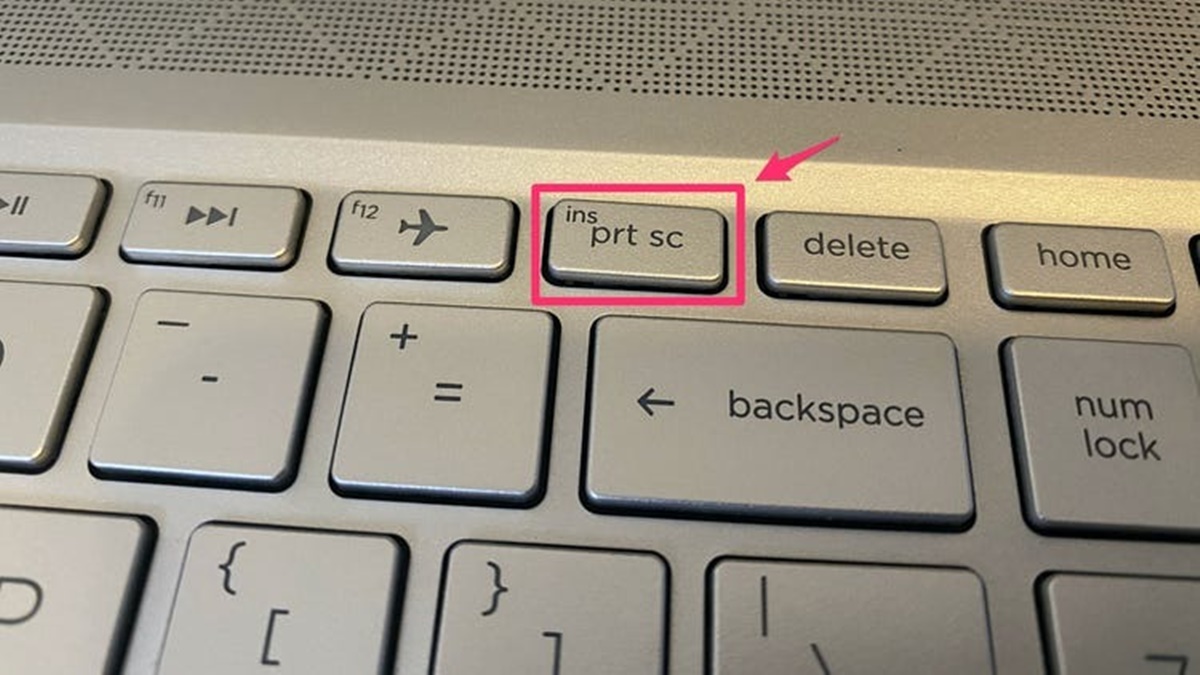
To start, locate the PrtScn button on your keyboard. It is usually located in the top row, either by itself or labeled as “PrtScn” or “Print Screen.” On some laptops, you might need to use the “Fn” key in conjunction with the PrtScn button.
To capture the entire screen, simply press the PrtScn button. The screen will flash briefly, indicating that the screenshot has been captured. The screenshot is now saved to your clipboard, ready to be pasted into an image editing software or document.
If you want to capture only the active window, press the “Alt” key together with the PrtScn button. This combination will take a screenshot of the currently active window and save it to your clipboard.
After capturing the screenshot, you can open an image editing software like Paint or Photoshop and paste the image by pressing “Ctrl” + “V” or selecting “Paste” from the editing software’s menu. From there, you can crop, edit, and save the screenshot as desired.
If you prefer to save the screenshot directly without any further edits, you can use the “Windows Key” + “PrtScn” combination. Pressing these keys simultaneously will instantly capture the screen and automatically save it as an image file in the “Pictures” folder on your HP laptop.
By using the PrtScn button, taking screenshots on your HP laptop becomes a breeze. Whether you need to capture an important document, save an error message, or share information with others, this simple method allows you to quickly and conveniently capture the screen and save it as an image file.
Remember, the specific functionality of the PrtScn button may vary depending on the laptop model and operating system. If the above methods don’t work on your HP laptop, refer to the manufacturer’s documentation or search online for the specific instructions for your laptop model.
Capturing the Entire Screen
When you want to capture the entire screen on your HP laptop, there are a few different methods you can use depending on your preference and the tools available. Here are some ways to capture the entire screen on your HP laptop.
1. Using the PrtScn (Print Screen) button:
The simplest and most common method is to use the PrtScn button on your keyboard. Pressing this button captures a screenshot of the entire screen and saves it to your clipboard. You can then paste the screenshot into an image editing software or document to save or edit it further.
2. Using the Windows Snipping Tool:
If you prefer more control over your screenshots, you can use the Windows Snipping Tool. This built-in tool allows you to capture screenshots of different shapes and sizes. To capture the entire screen, open the Snipping Tool, click on “New,” and select the “Full-screen Snip” option. The tool will capture the entire screen, and you can then save or edit the screenshot as needed.
3. Using the Windows Game Bar:
If you’re using Windows 10, you can utilize the Windows Game Bar to capture the screen. To activate the Game Bar, press the “Windows Key” + “G” on your keyboard. Once the Game Bar appears, click on the camera icon to capture a screenshot of the entire screen. The screenshot will be saved to your designated “Captures” folder.
4. Using third-party screenshot tools:
There are many third-party screenshot tools available that offer additional features and flexibility. Programs like Snagit, Greenshot, or Lightshot allow you to capture the entire screen with just a few clicks. These tools may also offer advanced editing and sharing options for your screenshots.
Whether you choose to use the PrtScn button, the Windows Snipping Tool, the Game Bar, or third-party screenshot tools, capturing the entire screen on your HP laptop is a straightforward process. By using these methods, you can easily capture important information, create presentations, or share your screen with others.
Remember to check your laptop’s user manual or the manufacturer’s website for specific instructions or additional features related to taking screenshots.
Capturing a Specific Window
If you want to capture a specific window on your HP laptop, there are several methods you can use. Whether you need to save an error message, capture a specific application window, or share information with others, capturing a specific window is a useful feature. Here are some ways to do it.
1. Using the Alt + PrtScn (Print Screen) button:
One of the easiest ways to capture a specific window is by using the Alt + PrtScn button combination. First, make sure the window you want to capture is in focus. Then, press the Alt key while simultaneously pressing the PrtScn button. This action captures the active window and saves it to your clipboard. You can then paste the captured window into an image editing software or document.
2. Using the Windows Snipping Tool:
If you prefer more control over your screenshots, you can use the Windows Snipping Tool. Open the Snipping Tool and click on “New.” Instead of selecting the “Full-screen Snip” option, choose “Window Snip.” The Snipping Tool will then allow you to capture a specific window by clicking on it. Once captured, you can save or edit the window screenshot as needed.
3. Using the Windows Game Bar:
If you’re using Windows 10, you can also utilize the Windows Game Bar to capture a specific window. Press the “Windows Key” + “G” on your keyboard to open the Game Bar. From there, click on the camera icon to capture the currently active window. The captured image will be saved in your designated “Captures” folder.
4. Using third-party screenshot tools:
There are many third-party screenshot tools available that offer a range of features. Programs like Snagit, Greenshot, or Lightshot allow you to capture specific windows with ease. These tools often provide additional editing and sharing options for your captured window screenshots.
By using the Alt + PrtScn button combination, the Windows Snipping Tool, the Game Bar, or third-party screenshot tools, capturing a specific window on your HP laptop becomes a simple task. Experiment with these methods to find the one that works best for your needs and workflow.
Always refer to your laptop’s user manual or the manufacturer’s website for specific instructions or additional features related to taking screenshots on your HP laptop.
Capturing a Part of the Screen with the Snipping Tool
When you need to capture a specific part of the screen on your HP laptop, the Snipping Tool can be a valuable tool. With the Snipping Tool, you can select and capture a specific area of the screen, allowing you to focus on the important details. Here’s how you can capture a part of the screen using the Snipping Tool on your HP laptop.
1. Open the Snipping Tool:
To begin, click on the “Start” button located at the bottom left corner of your screen. In the search bar, type “Snipping Tool” and press “Enter.” The Snipping Tool application should appear in the search results. Click on it to launch the tool.
2. Select the snip type:
Once the Snipping Tool is open, you’ll see a small window with several options. By default, the tool is set to capture a rectangular snip. If you prefer a different shape, such as a free-form snip or a window snip, click on the “Mode” button to choose the desired snip type.
3. Capture the desired part of the screen:
To capture a specific part of the screen, click on the “New” button in the Snipping Tool window. The screen will fade, and your cursor will turn into a crosshair. Click and drag the crosshair to select the area you want to capture. Release the cursor to complete the snip.
4. Save or share the snip:
Once you have captured the desired area, the Snipping Tool will open a new window with the snipped image. You can use basic editing tools like highlights, pens, or erasers to annotate or emphasize certain parts of the snip. To save the snip, click on the “Save” button and choose a file name and location. Alternatively, you can click on the “Copy” button to copy the snip to your clipboard for pasting into another application or document. You can also click on the “Share” button to directly share the snip via email or other methods, depending on your configuration.
By using the Snipping Tool, you have the flexibility to capture and save specific parts of the screen on your HP laptop. Whether you need to capture an image, highlight important text, or save a portion of a webpage, the Snipping Tool is a useful and versatile tool at your disposal.
Remember to explore the various snip types and editing tools available in the Snipping Tool to make your screenshots more informative and visually appealing.
Saving and Sharing the Screenshot
After capturing a screenshot on your HP laptop, the next step is to save and share it with others. Saving and sharing screenshots allows you to store important information, collaborate with colleagues, or communicate ideas effectively. Here’s how you can save and share screenshots taken on your HP laptop.
1. Saving the screenshot:
Once you have captured a screenshot, whether using the Snipping Tool, PrtScn button, or any other method, you need to save it to your desired location on your HP laptop. If you are using the Snipping Tool, click on the “Save” button in the Snipping Tool window after capturing the screenshot. Choose a file name and location where you want to save the screenshot. For screenshots taken with the PrtScn button, paste the captured image into an image editing software like Paint or Photoshop and save it from there.
2. Choosing the right file format:
When saving the screenshot, consider the file format that best suits your needs. The most common formats for screenshots are JPEG and PNG. JPEG files are compressed and suitable for images with many colors, while PNG files maintain better quality for screenshots with more detailed graphics or text. Choose the format that provides the desired balance between file size and image quality.
3. Organizing screenshots:
As you take more screenshots, it’s essential to keep them organized for easy access. Create dedicated folders or subfolders on your HP laptop to categorize and store your screenshots systematically. You can create folders based on topics, projects, or dates to help you locate the screenshots quickly when needed.
4. Sharing the screenshot:
When it comes to sharing screenshots, there are various methods you can use:
- Email: Attach the saved screenshot file to an email and send it to the intended recipient. This method is useful when sharing screenshots with colleagues, clients, or friends.
- Messaging apps: Share the screenshot through messaging apps like WhatsApp, Slack, or Microsoft Teams. These platforms often allow you to attach and send images within the messaging interface.
- Cloud storage: Save your screenshot in a cloud storage service like Google Drive, OneDrive, or Dropbox. After saving, you can generate a link and share it with others. This method is convenient for collaborating on screenshots or sharing them with multiple people.
- Social media: You can also share screenshots on social media platforms like Facebook, Twitter, or Instagram. This is useful when sharing screenshots publicly or seeking feedback from a wider audience.
By saving and sharing your screenshots effectively, you can maximize their value and utility. Remember to consider the appropriate file format, organize your screenshots for easy access, and choose the right sharing method based on your specific needs.
Whether you are capturing important information, collaborating with others, or communicating ideas, proper saving and sharing of screenshots help streamline your workflow and enhance productivity.
Using the Snip & Sketch App
The Snip & Sketch app is a built-in screenshot tool available on Windows 10. It offers an easy and efficient way to capture, annotate, and share screenshots on your HP laptop. If you prefer a dedicated app for your screenshot needs, the Snip & Sketch app is a versatile option. Here’s how you can use the Snip & Sketch app to capture and work with screenshots on your HP laptop.
1. Opening the Snip & Sketch app:
You can access the Snip & Sketch app in several ways. One method is to click on the “Start” button located at the bottom left corner of your screen and search for “Snip & Sketch.” Select the app from the search results to open it. Another way is to use the keyboard shortcut “Windows Key” + “Shift” + “S” simultaneously. This combination brings up the Snip & Sketch app interface directly.
2. Capturing a screenshot:
Once the Snip & Sketch app is open, you have several options to capture a screenshot:
- Full-screen capture: Click on the “New” button in the Snip & Sketch app, then select the “Fullscreen Snip” option. The app will capture the entire screen.
- Window capture: Choose the “New” button, then select the “Window Snip” option. Click on the desired window, and Snip & Sketch will capture only that window.
- Free-form capture: Select the “New” button, then choose the “Freeform Snip” option. Click and drag your cursor to capture any irregular shape or region on the screen.
- Rectangular capture: Click on the “New” button and select the “Rectangular Snip” option. Click and drag to capture a specific rectangular area of the screen.
- Snip delayed capture: Click on the “New” button, then choose the “Snip & Sketch” option. This option provides a delayed capture, allowing you to set up your screen before the screenshot is taken.
3. Working with the captured screenshot:
After capturing a screenshot, Snip & Sketch opens a dedicated editing window where you can annotate, crop, highlight, or draw on the captured image. The app provides tools such as a pen, highlighter, eraser, and ruler to enhance your screenshots. Use these tools to add arrows, text, or shapes to emphasize specific areas of the screenshot.
4. Saving and sharing the screenshot:
Once you have edited the screenshot to your satisfaction, you can save it by clicking on the disk icon in the Snip & Sketch window. Choose a file name and location to save the screenshot on your HP laptop. If you want to share the screenshot instantly, use the share icon to send it through various apps or platforms, such as email, social media, or messaging apps.
The Snip & Sketch app provides a user-friendly interface and powerful editing tools to capture and edit screenshots on your HP laptop. Whether you need to capture a specific window, region, or the entire screen, Snip & Sketch offers a range of options to suit your needs.
Experiment with the Snip & Sketch app’s various capture and editing features to enhance your screenshots and streamline your workflow. It’s a valuable tool for personal use, collaboration, or sharing information with others.
Customizing Snip & Sketch Settings
The Snip & Sketch app comes with several customization options that allow you to tailor it to your preferences and improve your screenshot-taking experience on your HP laptop. By customizing the settings, you can optimize the app to fit your workflow and capture screenshots more efficiently. Here’s how you can customize the Snip & Sketch settings.
1. Opening the Snip & Sketch settings:
To access the Snip & Sketch settings, first, open the Snip & Sketch app. Click on the three dots (…) located at the top-right corner of the app window. From the dropdown menu, select “Settings.”
2. Changing the capture mode:
In the settings, you can adjust the default capture mode for Snip & Sketch. By default, the app is set to capture a rectangular snip. However, if you frequently need to capture a specific window or the entire screen, you can change the setting to your preferred capture mode.
3. Setting delay options:
Snip & Sketch offers a delay feature that allows you to set a countdown timer before capturing a screenshot. This can be useful when you need to capture a specific screen layout or wait for a certain event to occur. In the settings, you can customize the delay duration to suit your needs.
4. Enabling or disabling ink effects:
Ink effects allow you to draw or annotate with digital ink on your screenshots. If you find these effects distracting or unnecessary, you can disable them in the settings. On the other hand, if you enjoy using ink effects to highlight or mark up your screenshots, ensure this feature is enabled.
5. Choosing the default save location:
Snip & Sketch allows you to specify the default location where your captured screenshots are saved. In the settings, you can choose a different folder or create a new one to keep your screenshots organized. Setting a default save location can save you time and ensure your screenshots are stored in a convenient location.
6. Adjusting notification options:
Snip & Sketch can provide notifications when a screenshot is captured, allowing you to quickly access and edit the screenshot. In the settings, you can enable or disable these notifications based on your preference and workflow.
7. Exploring other options:
Aside from the aforementioned settings, there may be additional preferences you can explore based on the version of Windows 10 you’re using. Take the time to navigate through the settings menu and familiarize yourself with the available options to customize Snip & Sketch to your liking.
By customizing the Snip & Sketch settings, you can optimize the app to align with your specific screenshot-taking needs. Experiment with different settings to enhance your workflow and make capturing and editing screenshots on your HP laptop even more efficient.
Remember to regularly revisit the settings to adjust them as your needs change or to explore any new features or updates that may become available.
Using Keyboard Shortcuts for Screenshotting
If you frequently need to capture screenshots on your HP laptop, using keyboard shortcuts can save you time and streamline the process. Windows provides several keyboard shortcuts that allow you to quickly and easily capture screenshots without needing to open any additional applications. Here are some keyboard shortcuts you can use for screenshotting on your HP laptop.
1. PrtScn (Print Screen) key:
The PrtScn key is a commonly used keyboard shortcut for capturing the entire screen. Pressing the PrtScn key captures a screenshot of the entire screen and saves it to your clipboard. To save the screenshot as an image file, open an image editing software like Paint or Photoshop, and paste the screenshot by pressing “Ctrl” + “V.” From there, you can save and edit the screenshot as desired.
2. Alt + PrtScn key:
If you want to capture only the active window instead of the entire screen, you can use the Alt + PrtScn (Print Screen) key combination. Pressing these keys simultaneously captures a screenshot of the currently active window and saves it to your clipboard. Like the PrtScn key, you can paste the screenshot into an image editing software to save and edit it further.
3. Windows Key + Shift + S:
This keyboard shortcut is specific to Windows 10 and opens the Snip & Sketch app’s snipping bar directly. After pressing the Windows Key + Shift + S, your screen will be dimmed, and the snipping bar will appear. You can choose to capture a rectangular area, a free-form region, the entire screen, or a specific window. Once captured, the screenshot is copied to your clipboard, allowing you to paste it into an image editing software or document.
4. Windows Key + PrtScn key:
On some HP laptops and Windows 10 devices, you can use the Windows Key + PrtScn key combination to quickly capture the entire screen and save it as an image file. The captured screenshot is automatically saved in the “Pictures” folder under a subfolder called “Screenshots.” This shortcut offers a straightforward way to take screenshots without needing to access any additional applications.
By utilizing these keyboard shortcuts, you can capture screenshots effortlessly and without interrupting your workflow. They provide convenient alternatives to using dedicated screenshot tools or applications and are especially useful when you need to capture screenshots quickly or on the go.
Remember to paste your screenshots into an image editing software or document to save and edit them after using these keyboard shortcuts.
Troubleshooting Common Screenshot Issues
While capturing screenshots on your HP laptop is generally a straightforward process, you may encounter occasional issues or challenges. Understanding common screenshot problems and knowing how to troubleshoot them can help ensure a smooth screenshotting experience. Here are some common screenshot issues and their troubleshooting steps:
1. Blank or black screenshots:
If your screenshots are turning out blank or black, check the following:
- Ensure that the screen or window you want to capture is in focus.
- Verify that your screen brightness is at an adequate level.
- Restart the computer, as this can resolve temporary display issues.
- Update your graphics drivers to the latest version.
2. Incorrect or distorted colors in the screenshot:
If your screenshots have incorrect or distorted colors, try these troubleshooting steps:
- Adjust your display settings to ensure accurate color representation.
- Check if color calibration is required for your monitor.
- Update your graphics drivers to the most recent version.
- Consider using a different screenshot tool or method to capture the screenshot.
3. Screenshot not capturing the entire screen or window:
If your screenshot is not capturing the entire screen or window as expected, try the following solutions:
- Double-check the selected capture area and ensure it encompasses the desired screen or window.
- Make sure that the screen resolution is set correctly for a full-capture.
- If using a third-party screenshot tool, adjust the settings or options to capture the entire screen or window.
- Restart the computer to refresh the display settings.
4. Unresponsive or malfunctioning screenshot tools:
If your screenshot tool is unresponsive or dysfunctional, troubleshoot it using these steps:
- Close and reopen the screenshot tool.
- Update the screenshot tool to the latest version.
- If the issue persists, uninstall and reinstall the screenshot tool.
- Check for conflicts with other applications or security software.
5. Wrong file format or low-quality screenshots:
If your screenshots are being saved in the wrong file format or are of low quality, consider the following solutions:
- Adjust the default settings of the screenshot tool to your preferred file format (e.g., JPEG or PNG).
- Increase the screenshot quality or resolution in the tool’s settings.
- If using the PrtScn button, paste the screenshot into an image editing software and save it in the desired format and quality.
If you continue to experience issues with taking screenshots on your HP laptop, consult the manufacturer’s documentation or support resources for further assistance. Troubleshooting steps may vary depending on the specific laptop model, operating system, and screenshot tool being used.
Remember to regularly update your laptop’s software, including the operating system and any screenshot tools, to ensure optimal performance and compatibility when capturing screenshots.