Using the Print Screen Key
One of the simplest and most commonly used methods to take a screenshot on a Lenovo laptop is by using the Print Screen key. This key is typically located in the top row of the keyboard, often labeled as “PrtScn” or “Print Scr”. Here’s how you can use it:
- Make sure the screen you want to capture is displayed on your Lenovo laptop.
- Press the Print Screen key (usually abbreviated as “PrtScn”) or “Fn + Print Screen” keys simultaneously.
- The screen image will be captured and saved to your computer’s clipboard.
- To access the captured screenshot, open an image editing software like Paint or Photoshop.
- Press “Ctrl + V” or right-click and select “Paste” to paste the screenshot from the clipboard onto your editing software.
- You can now save the screenshot as an image file by choosing the “Save” or “Save As” option in the editing software. Give it a name and select a location to save it.
Using the Print Screen key allows you to capture the entire visible screen. However, keep in mind that it may not capture certain elements like pop-up windows or animated images. If you want to capture a specific window or a custom area, there are other methods you can use, which will be discussed further in this article.
Taking a Screenshot of the Entire Screen
If you want to capture the entire screen on your Lenovo laptop, including all visible elements and windows, there are a few methods you can use:
- Press the Print Screen key (usually labeled as “PrtScn” or “Print Scr”) or “Fn + Print Screen” keys together to capture the entire screen. The screenshot will be saved to your clipboard.
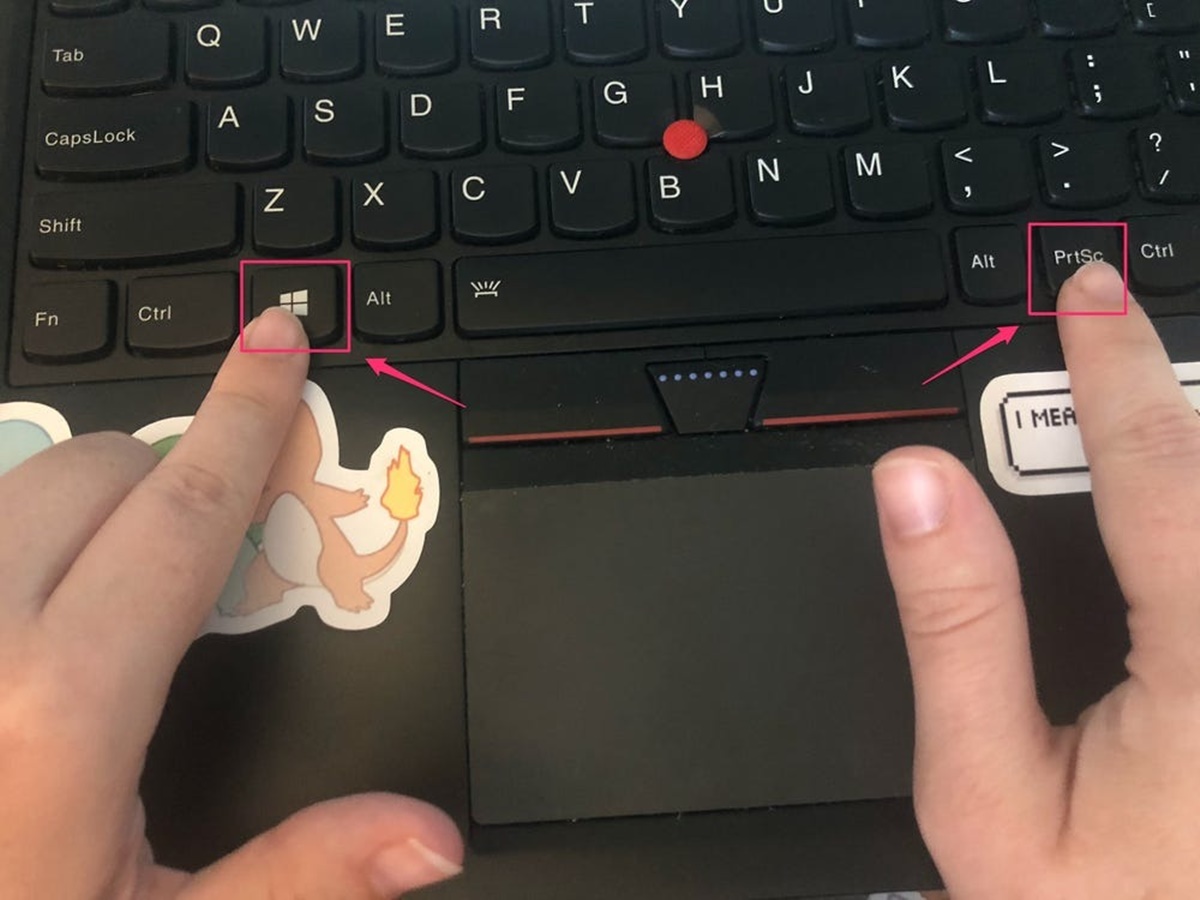
- If your Lenovo laptop has the PrtScn key combined with another key, such as “Win + Print Screen” or “Alt + PrtScn”, you can use that combination instead to capture the entire screen. This method may also automatically save the screenshot in a predefined location, such as the “Pictures” folder.
- In some Lenovo laptops, you may also have a dedicated “Screenshot” key on the keyboard. Pressing this key will capture the entire screen and save it directly to your computer’s storage.
Once you have captured the screenshot of the entire screen, you can open an image editing software like Paint or Photoshop and paste the screenshot by pressing “Ctrl + V” or right-clicking and selecting “Paste.” From there, you can make any necessary edits or save the screenshot as an image file.
Keep in mind that taking a screenshot of the entire screen may capture sensitive information, such as open applications or personal data. Make sure to review the captured screenshot before sharing or saving it to ensure there is no confidential or private information present.
Capturing a Specific Window
If you want to take a screenshot of a specific window on your Lenovo laptop, instead of the entire screen, there are a few methods you can use:
- Ensure that the window you want to capture is active and in focus on your Lenovo laptop.
- Press the Alt key along with the Print Screen key (usually labeled as “PrtScn” or “Print Scr”) simultaneously. This will capture a screenshot of the active window and save it to your clipboard.
- If your Lenovo laptop has the PrtScn key combined with another key, such as “Win + Alt + Print Screen” or “Alt + Fn + Print Screen”, you can use that combination to capture the specific window.
- Open an image editing software, such as Paint or Photoshop, and paste the screenshot by pressing “Ctrl + V” or right-clicking and selecting “Paste.”
- Make any necessary edits or cropping to the screenshot and save it as an image file.
By capturing a specific window, you can avoid capturing unnecessary elements that may be present on your screen. This is especially useful when you want to share a specific document, application, or webpage with others.
Note that certain applications or windows may have restrictions that prevent you from capturing screenshots. In such cases, you may need to seek alternative methods or check the application’s settings for any specific screenshot restrictions.
Saving a Screenshot to the Clipboard
When taking screenshots on your Lenovo laptop, you have the option to save them directly to the clipboard. This allows you to quickly paste the screenshot into any application or document without the need to save it as a separate image file. Here’s how you can save a screenshot to the clipboard:
- Capture the desired screen or window using one of the methods mentioned earlier, such as the Print Screen key or a specific window combination.
- Once the screenshot is captured, it is automatically saved to the clipboard, replacing any previous contents stored there.
- Open the application or document where you want to paste the screenshot, such as an email, a Word document, or an image editing software.
- Press “Ctrl + V” or right-click and select “Paste” to paste the screenshot from the clipboard into the desired location.
- You can now edit, resize, or adjust the screenshot as needed within the application or document.
Saving a screenshot to the clipboard can be a convenient option when you want to quickly share or insert the screenshot into another application or document. However, be aware that the clipboard has limited storage capacity, and capturing multiple screenshots may overwrite previous contents. Therefore, it’s advisable to paste and save the captured screenshot in a file or application of your choice as soon as possible to avoid losing any important information.
If you want to save the screenshot as a separate image file, you can do so by pasting it into an image editing software, such as Paint or Photoshop, and then saving it using the appropriate file format and location.
Taking a Screenshot of a Custom Area
Sometimes you may only need to capture a specific portion of your Lenovo laptop’s screen instead of the entire screen or a window. In such cases, taking a screenshot of a custom area allows you to capture exactly what you need. Here’s how you can capture a screenshot of a custom area:
- Select the area on your screen that you want to capture. This can be done by either clicking and dragging the mouse cursor to create a selection box or specifying the dimensions of the custom area.
- Once you have selected the desired area, use one of the following methods:
- Press the Print Screen key (usually labeled as “PrtScn” or “Print Scr”) or “Fn + Print Screen” keys to capture the custom area. The screenshot will be saved to your clipboard.
- If your Lenovo laptop has a specific key combination for capturing a custom area, use that combination instead.
- Paste the screenshot into an image editing software, such as Paint or Photoshop, by pressing “Ctrl + V” or right-clicking and selecting “Paste.”
- You can now edit, crop, or resize the screenshot as needed before saving it as an image file.
By taking a screenshot of a custom area, you have control over what part of the screen you capture, letting you focus on specific details or eliminate any unnecessary elements. This method is particularly useful when you want to highlight a specific portion of a webpage, document, or application.
Keep in mind that some applications or programs may have restrictions on taking screenshots. If you are unable to capture a custom area using the methods mentioned above, you may need to explore alternative options or check the application’s settings for any specific screenshot restrictions.
Using the Windows Snipping Tool
If you prefer a built-in tool specifically designed for capturing and saving screenshots, you can use the Windows Snipping Tool on your Lenovo laptop. The Snipping Tool provides additional features to capture screenshots in different modes and make annotations. Here’s how you can use it:
- Click on the Start menu and search for “Snipping Tool”. Click on the Snipping Tool app to open it.
- Once the Snipping Tool is open, click on the “New” button to start capturing a screenshot.
- From the drop-down menu, choose the desired snipping mode:
- Free-form Snip: Allows you to draw a free-form shape around the area you want to capture.
- Rectangular Snip: Enables you to capture a specific rectangular area by dragging your cursor.
- Window Snip: Captures the entire window of an open application when you click on it.
- Full-screen Snip: Captures the entire screen of your Lenovo laptop.
- After selecting the appropriate snipping mode, click and drag your cursor to capture the desired screenshot.
- The captured screenshot will appear in the Snipping Tool editing window, where you can add annotations, highlights, or drawings if desired.
- Click on the “File” menu and select “Save As” to save the screenshot as an image file in your desired location.
The Windows Snipping Tool offers more flexibility and options compared to the basic Print Screen method. It allows you to capture specific areas or entire windows, and provides additional tools for annotation and markup. This can be useful when you need to provide visual instructions or highlight specific elements in your screenshots.
Note that the Windows Snipping Tool may vary depending on your version of Windows. If you are using a newer version, you may have access to the Snip & Sketch tool, which offers even more advanced screenshot capturing and editing capabilities.
Capturing a Screenshot with Lenovo Vantage
If you own a Lenovo laptop, you might have the Lenovo Vantage software installed. Lenovo Vantage offers a range of tools and features, including the ability to capture screenshots. Here’s how you can capture a screenshot using Lenovo Vantage:
- Open the Lenovo Vantage software on your laptop. If you don’t have it installed, you can download it from the Lenovo website or the Microsoft Store.
- In the Lenovo Vantage application, navigate to the “Hardware Settings” or “My Device Settings” section.
- Look for a section or tab related to “Display” or “Screen”; the exact location and naming may vary depending on your laptop model and software version.
- Within the display settings, you should find an option to capture screenshots. It might be labeled as “Screen Snip,” “Screen Capture,” or something similar.
- Click on the corresponding option, and a screenshot of the entire screen or a selected area will be captured.
- The captured screenshot will either be automatically saved to a default location or prompt you to choose a save location.
Using Lenovo Vantage to capture screenshots can be beneficial if you prefer a dedicated and streamlined tool provided by Lenovo. It offers a convenient way to capture and save screenshots without the need for third-party software or additional key combinations.
Make sure to explore the Lenovo Vantage software further, as it may also provide additional features such as system diagnostics, driver updates, and more, to help manage and optimize your Lenovo laptop.
Saving a Screenshot as an Image File
After capturing a screenshot on your Lenovo laptop, you have the option to save it as an image file. Saving the screenshot as an image file allows you to easily share or store it for later use. Here’s how you can save a screenshot as an image file:
- After capturing the screenshot using one of the methods mentioned earlier, open an image editing software like Paint or Photoshop.
- Choose the “New” option in the image editing software to create a new canvas that matches the dimensions of the captured screenshot.
- Paste the screenshot into the blank canvas by pressing “Ctrl + V” or right-clicking and selecting “Paste.”
- Once the screenshot appears in the image editing software, you can make any necessary edits, such as cropping unwanted areas or adding annotations.
- When you’re satisfied with the screenshot, click on the “File” menu and choose the “Save As” or “Save” option.
- Select a file format for your screenshot, such as JPEG, PNG, or GIF, depending on your preferences and requirements.
- Choose a location on your Lenovo laptop where you want to save the screenshot and give it a descriptive file name.
- Click on the “Save” button to save the screenshot as an image file.
By saving the screenshot as an image file, you can easily share it through email, social media, or other platforms. You can also store the screenshot for future reference or include it in presentations, documents, or blog posts.
Remember to choose an appropriate file format for your screenshot. JPEG is a common format that offers good quality and relatively small file sizes. PNG is another popular format that preserves higher quality, but it may result in larger file sizes. Consider your needs and the intended use of the screenshot when selecting the file format.
Editing and Annotating Screenshots
Once you have captured a screenshot on your Lenovo laptop, you may want to edit or annotate it before sharing or saving it. Editing and annotating screenshots can help highlight important information, add explanatory text, or draw attention to specific areas. Here are some methods to edit and annotate screenshots:
- Open an image editing software like Paint, Photoshop, or third-party applications specifically designed for editing screenshots.
- Paste the captured screenshot into the editing software by pressing “Ctrl + V” or right-clicking and selecting “Paste.”
- Use the available tools and features in the editing software to make edits or annotations:
- Draw or highlight important parts with shapes or freehand drawing tools.
- Add text boxes or speech bubbles to provide explanations or context.
- Blur or pixelate sensitive information that you want to hide.
- Crop or resize the screenshot to focus on specific areas.
- Adjust brightness, contrast, or colors to enhance the screenshot if necessary.
- Save the edited screenshot as an image file by clicking on the “File” menu and choosing the “Save As” or “Save” option.
- Select a suitable file format for the edited screenshot, such as JPEG or PNG, depending on your requirements.
- Choose a location on your Lenovo laptop to save the edited screenshot and give it an appropriate file name.
- Click on the “Save” button to save the edited screenshot with your annotations.
Editing and annotating screenshots can greatly enhance their visual impact and communicate your message more effectively. Whether you need to add arrows, highlight specific areas, or provide textual explanations, these tools provide the flexibility to customize and personalize your screenshots.
Remember to strike a balance between providing clear annotations and not overwhelming the screenshot with excessive elements. Maintain clarity and simplicity so that your edited screenshot remains easy to understand and visually appealing.
Troubleshooting Common Screenshot Issues
While capturing screenshots on your Lenovo laptop is generally straightforward, there may be some common issues that you encounter. Here are a few troubleshooting tips to help you resolve these issues:
- Blank or black screenshots: If your screenshots appear blank or black, ensure that the screen or window you want to capture is in focus and visible. Additionally, check for any conflicting software or graphics settings that may be preventing proper screenshot capture.
- Partial or incomplete screenshots: If your screenshots capture only a portion of the screen or a distorted image, try using different methods, such as the Print Screen key, specific window capture, or Lenovo Vantage, to see if the issue persists. Additionally, make sure your screen resolution is set correctly and there are no scaling issues.
- Screenshot not saving or disappearing: If your screenshots are not saving or disappearing, check the default image save location in your settings. Ensure that the folder or directory is accessible and has sufficient storage space. Additionally, avoid capturing screenshots directly to the clipboard without saving them promptly, as clipboard contents may be replaced with subsequent captures.
- Failed screenshot shortcuts: If the key combinations or shortcuts for capturing screenshots do not work, ensure that you are using the correct combination specific to your Lenovo laptop model. Some laptops may require the Fn key to be pressed along with the Print Screen key. Updating the keyboard drivers or using alternative methods like the Snipping Tool or Lenovo Vantage can also help overcome shortcut issues.
- Restricted screenshots in applications: Certain applications or programs may restrict the use of screenshots. If you are unable to capture screenshots within a specific application, check the program settings or consult the documentation for any screenshot limitations or permissions. In such cases, you may need to rely on third-party software or alternative methods like using a separate camera to capture the screen.
If you continue to experience issues with capturing screenshots on your Lenovo laptop, consider checking the manufacturer’s support website or seeking assistance from their customer support channels. They can provide specific guidance based on your laptop model and software configuration to resolve any persistent issues you may be facing.