
Overview
Screen recording on an iPad can be incredibly useful in various situations. Whether you want to capture gameplay footage, create tutorial videos, or demonstrate a process, being able to record your iPad’s screen can make it much easier to share information with others.
In this article, we will explore three different methods you can use to screen record on your iPad: using the built-in screen recording feature, using a third-party screen recording app, and using a Mac computer and QuickTime Player.
The built-in screen recording feature on your iPad allows you to easily capture your screen without the need for any additional apps. This method is ideal for quickly recording short clips or capturing specific moments on your device. We will walk you through the steps to enable and use this feature.
If you are looking for more advanced screen recording options, you may consider using a third-party screen recording app. These apps often offer additional features like editing tools, customizable settings, and live streaming options. We will provide recommendations for some popular screen recording apps that you can try.
For those who have access to a Mac computer, you can also use QuickTime Player to screen record your iPad. This method allows for more flexibility and control over your recordings, as you can easily edit and save them on your computer. We will guide you through the process of setting up your iPad with QuickTime Player using a USB cable.
Regardless of which method you choose, we will also cover some essential tips for successful screen recording on your iPad. These tips will help you optimize your recording settings, manage storage effectively, and ensure smooth and high-quality recordings.
Once you have successfully captured your screen recording, we will briefly touch on editing and sharing options. Editing your recordings can help you polish the final product, add annotations, or trim out any unnecessary parts. We will provide some recommendations for editing tools and discuss various ways to share your screen recordings with others.
Method 1: Using the Built-in Screen Recording Feature
The easiest and most straightforward way to screen record on your iPad is by utilizing the built-in screen recording feature. This feature allows you to capture your screen activity without the need for any additional apps or tools.
To enable the screen recording feature, follow these simple steps:
- Open the “Settings” app on your iPad.
- Scroll down and tap on “Control Center”.
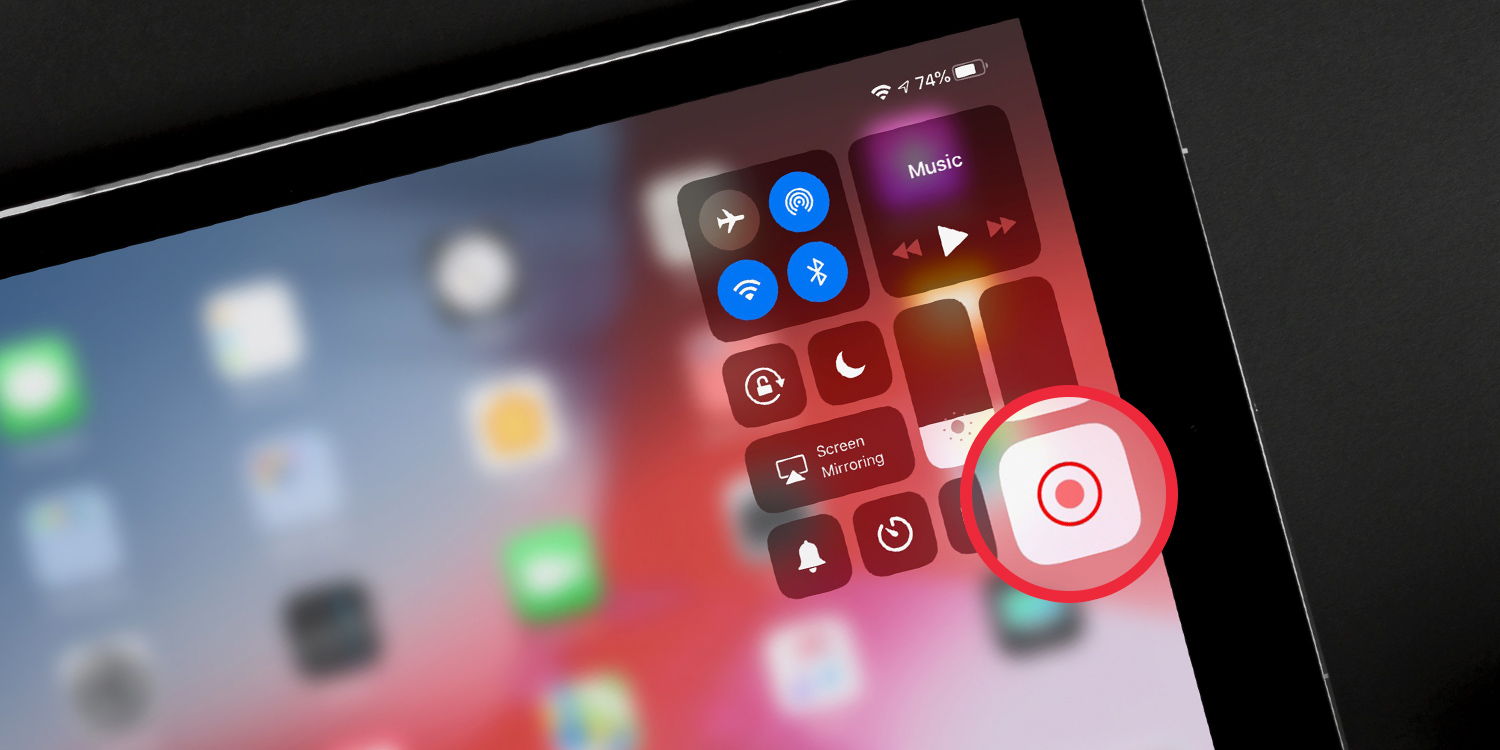
- Under “More Controls”, find “Screen Recording” and tap the green plus button next to it to add it to your Control Center.
- Close the “Settings” app and swipe down from the top-right corner (or up from the bottom, depending on your iPad model) to access the Control Center.
- Tap on the “Screen Recording” icon, which looks like a solid circle inside a circle.
- A three-second countdown will appear, indicating that the recording is about to start. You can press the red button again to cancel the recording during this countdown.
Once the screen recording is active, your iPad will capture everything that happens on the screen, including any touches or gestures you make. To stop the recording, simply tap the red status bar at the top of the screen and select “Stop”. The recording will be automatically saved to your Photos app.
It’s worth noting that screen recording doesn’t capture any audio by default. However, you can enable external audio sources, such as your iPad’s microphone, during the recording by long-pressing on the screen recording icon in the Control Center and selecting the desired audio input.
The built-in screen recording feature is perfect for quick and simple recordings, but it does have its limitations. For longer recordings, you may encounter storage issues, as the files can take up a significant amount of space. Additionally, the built-in feature lacks advanced editing and customization options. If you require more control over your recordings or additional features, you may want to explore third-party screen recording apps, as we will discuss in the next method.
Method 2: Using a Third-Party Screen Recording App
If you’re looking for more advanced screen recording options and additional features, utilizing a third-party screen recording app is a great alternative. These apps provide a range of functionalities, including editing tools, customizable settings, and even live streaming options.
Here are the steps to follow:
- Go to the App Store on your iPad and search for a reputable screen recording app. Some popular options include “Display Recorder”, “AirShou”, and “GoRecord”.
- Select the app that suits your needs and download it onto your device.
- Open the screen recording app and follow any setup instructions or permissions required.
- Once the app is ready to use, you can typically start a recording by tapping a dedicated record button within the app.
- During the recording, you can usually access various options like adjusting resolution, frame rate, and audio settings.
- When you have finished recording, look for the save or stop button within the app to finalize the recording.
Third-party screen recording apps offer more flexibility and control over your recordings, allowing you to tailor them to your specific needs. Many apps also provide editing features that enable you to trim, add annotations, or merge multiple recordings together.
Furthermore, some apps offer the option to live stream your screen recording directly to platforms like YouTube or Twitch, making it ideal for gamers or content creators who want to share their gameplay or tutorials in real-time.
While third-party apps provide enhanced features, keep in mind that they may come with a cost or offer in-app purchases for additional functionalities. Additionally, ensure you choose a reputable and trusted app to protect your privacy and ensure the security of your recordings.
Experiment with different screen recording apps to find the one that best suits your needs and preferences. Reading user reviews and checking app ratings can also give you valuable insights into the usability and reliability of each app.
Now that you are familiar with using a third-party screen recording app on your iPad, let’s explore another method utilizing a Mac computer and QuickTime Player for screen recording, as outlined in the next section.
Method 3: Using a Mac Computer and QuickTime Player
If you have access to a Mac computer, you can use the built-in QuickTime Player to screen record your iPad. This method offers more flexibility and control over your recordings, as well as the ability to easily edit and save them on your computer.
Follow these steps to screen record your iPad using QuickTime Player:
- Connect your iPad to your Mac computer using a USB cable.
- On your Mac, open QuickTime Player from the Applications folder or search for it using Spotlight.
- In the QuickTime Player menu, click on “File” and then select “New Movie Recording”.
- A new window will appear with a video preview. To select your iPad as the recording source, click on the small arrow next to the red record button and choose your iPad from the dropdown menu.
- Click the red record button to start the screen recording.
- Perform the actions on your iPad that you want to capture in the recording.
- When you’re done with the recording, click the stop button in the QuickTime Player menu bar.
- Save the recording by going to “File” and selecting “Save”. Choose a location on your computer to save the file.
QuickTime Player allows you to screen record your iPad while also providing the ability to record audio using your computer’s microphone or an external audio source connected to your Mac.
Once the recording is complete, you can easily edit it in QuickTime Player or other video editing software available on your Mac. This method is particularly useful if you want to create professional-looking screen recordings with precise editing capabilities.
Remember to disconnect your iPad from your Mac after completing the recording process.
Now that you are familiar with the three methods for screen recording on your iPad, it’s important to understand how to adjust the screen recording settings to optimize your recordings, as we will discuss in the next section.
Adjusting the Screen Recording Settings
Adjusting the screen recording settings on your iPad is essential to ensure that you capture high-quality recordings and optimize your storage space. Depending on the method you choose, there may be different settings available to customize your screen recordings.
If you are using the built-in screen recording feature on your iPad, you can access the settings by going to “Settings” and selecting “Control Center”. From there, tap on “Customize Controls” and find “Screen Recording”. Here, you can adjust the settings for screen recording, including audio sources and microphone access.
When using a third-party screen recording app, the settings may vary depending on the app you are using. Typically, you will find options to configure the recording quality, frame rate, audio settings, and other specific features provided by the app. Take the time to explore these settings and adjust them according to your preferences and recording needs.
For screen recording using QuickTime Player on a Mac, you can adjust settings within the application itself. Click on “File”, go to “New Movie Recording”, then click the small arrow next to the record button. From there, you can select the desired recording quality, adjust the microphone input, and customize other settings based on your requirements.
When adjusting the settings, keep in mind the trade-off between video quality and file size. Higher quality recordings may result in larger file sizes, which could affect storage and sharing capabilities.
It’s also worth considering where you will be sharing or using the recorded footage. If you plan to upload the recordings to a video sharing platform, make sure to check the recommended settings or guidelines provided by the platform for optimal compatibility and performance.
Experimenting with different settings and recording scenarios is a great way to find the right balance between video quality and storage efficiency. Take the time to record test clips and assess the results to ensure your screen recordings meet your desired standards.
Now that you are familiar with adjusting the screen recording settings, let’s explore some tips to help you achieve successful screen recording sessions on your iPad.
Tips for Successful Screen Recording on iPad
To ensure successful screen recording sessions on your iPad, consider the following tips and best practices:
- Plan your recording: Before you start recording, have a clear idea of what you want to capture and any specific steps or actions you need to demonstrate. This will help you avoid unnecessary pauses or mistakes during the recording.
- Clean up your iPad: Close any unnecessary apps or background processes to free up system resources and ensure smooth recording performance.
- Optimize storage: Screen recordings can quickly consume storage space on your iPad. Delete any unwanted files or apps and regularly transfer recordings to your computer or cloud storage to free up space.
- Check battery levels: Screen recording can drain your iPad’s battery quickly. Make sure your device is adequately charged or connect it to a power source to avoid interruptions during longer recording sessions.
- Use a stable surface: Place your iPad on a stable surface or use a stand to minimize camera shake and keep your recording steady.
- Record in landscape mode: Unless you specifically need to capture content in portrait mode, record in landscape orientation to provide a better viewing experience for your audience.
- Test audio levels: If your screen recording includes audio, check the volume levels to ensure it is clear and audible. Avoid recording in noisy environments to improve the overall quality.
- Utilize gestures and highlighting: During the recording, use gestures and highlighting features to draw attention to specific areas of interest or emphasize certain actions.
- Practice and review: Record test clips and review them to identify any areas for improvement. This will help you refine your recording techniques and enhance the quality of your final recordings.
By following these tips, you can increase the effectiveness and professionalism of your screen recordings on your iPad. Whether you’re creating instructional videos, showcasing your gaming skills, or sharing presentations, implementing these practices will elevate the quality and impact of your recordings.
Now that you’ve successfully recorded your screen, let’s briefly touch on editing and sharing options to enhance your recordings and share them with others.
Editing and Sharing your Screen Recording
After you have completed your screen recording on your iPad, you may want to make some edits or additions before sharing it with others. Editing your screen recording can help you refine the content, remove any unwanted sections, add annotations, or enhance the overall presentation. There are several options you can explore for editing your screen recordings:
1. Video Editing Apps: There are various video editing apps available on the App Store that offer comprehensive editing features. Some popular options include iMovie, Adobe Premiere Rush, and LumaFusion. These apps provide options to trim the footage, add text and graphics, apply filters, and even include transitions and music.
2. Computer-Based Video Editing Software: If you prefer to edit your screen recording on a larger screen and have access to a computer, you can transfer the recording to your computer using iCloud or transfer the file via USB. Software like Adobe Premiere Pro, Final Cut Pro, or iMovie for Mac offer powerful editing capabilities for more advanced editing needs.
3. Built-in Editing Features: Depending on the method you used to record the screen, you may have access to basic editing features within the recording app itself. These features might include trimming the footage, merging clips, or adding text overlays.
Once you have finished editing your screen recording, you can choose from a variety of options to share it with others:
1. Directly from your iPad: You can share the edited recording directly from your iPad using the built-in sharing options. Tap on the share icon and choose the platform or app you want to share the recording on, such as Messages, Mail, or social media platforms.
2. Cloud Storage: Upload the recording to a cloud storage service like iCloud Drive, Google Drive, or Dropbox, and share the link with others. This method allows you to conveniently share larger files without worrying about email attachment limits.
3. Video Sharing Platforms: Upload your edited recording to popular video sharing platforms like YouTube or Vimeo. This allows you to reach a wider audience and also provides the option to customize privacy settings, embed the video on websites, and gather viewer analytics.
4. Collaboration and Presentation Tools: If you are working in a collaborative or professional setting, you may want to share your screen recording through platforms like Microsoft Teams, Google Meet, or Zoom. These tools offer features to share your screen with others during virtual meetings or presentations.
Consider the purpose of your screen recording and your intended audience when deciding on the editing and sharing options that best suit your needs. Remember to respect any copyright or privacy guidelines when sharing your recordings.
With your screen recording edited and shared, you have successfully showcased your iPad screen to others and effectively communicated your message. Harness the power of screen recording to engage and educate your audience, whether it’s for work, education, or entertainment purposes.