
Why Resetting Your GoPro to Factory Settings Can Be Helpful
Resetting your GoPro to factory settings is an important maintenance step that can help resolve issues and improve the overall performance of your camera. Whether you’re experiencing software glitches, camera freezing, or simply want to start fresh, a factory reset can often provide a solution.
Here are a few reasons why resetting your GoPro to factory settings can be helpful:
- Resolve software issues: Over time, your GoPro’s software may encounter bugs or become outdated. Resetting the camera to its factory settings can help resolve any software-related issues and ensure that you have the latest firmware installed.
- Improve performance: If you notice that your GoPro is running slow or not performing optimally, a factory reset can help improve its overall speed and responsiveness. It clears out any unnecessary files or settings that may be slowing down the camera.
- Fix freezing or crashing: If your GoPro frequently freezes or crashes during use, a factory reset can often fix these issues. It clears any temporary files or settings that may be causing the camera to become unresponsive.
- Remove unwanted settings: Over time, you may have customized various settings on your GoPro to suit specific shooting situations. However, if you no longer need or remember these settings, a factory reset can quickly remove them and bring your camera back to its default configuration.
- Clean up storage: If you have accumulated a lot of media files on your GoPro’s storage and want to start with a clean slate, a factory reset can delete all the footage and free up valuable space on your camera’s memory card.
Remember, before performing a factory reset on your GoPro, make sure to back up any important files or settings that you want to keep. Once the reset is complete, you’ll have a fresh start with your camera and can begin capturing amazing footage once again.
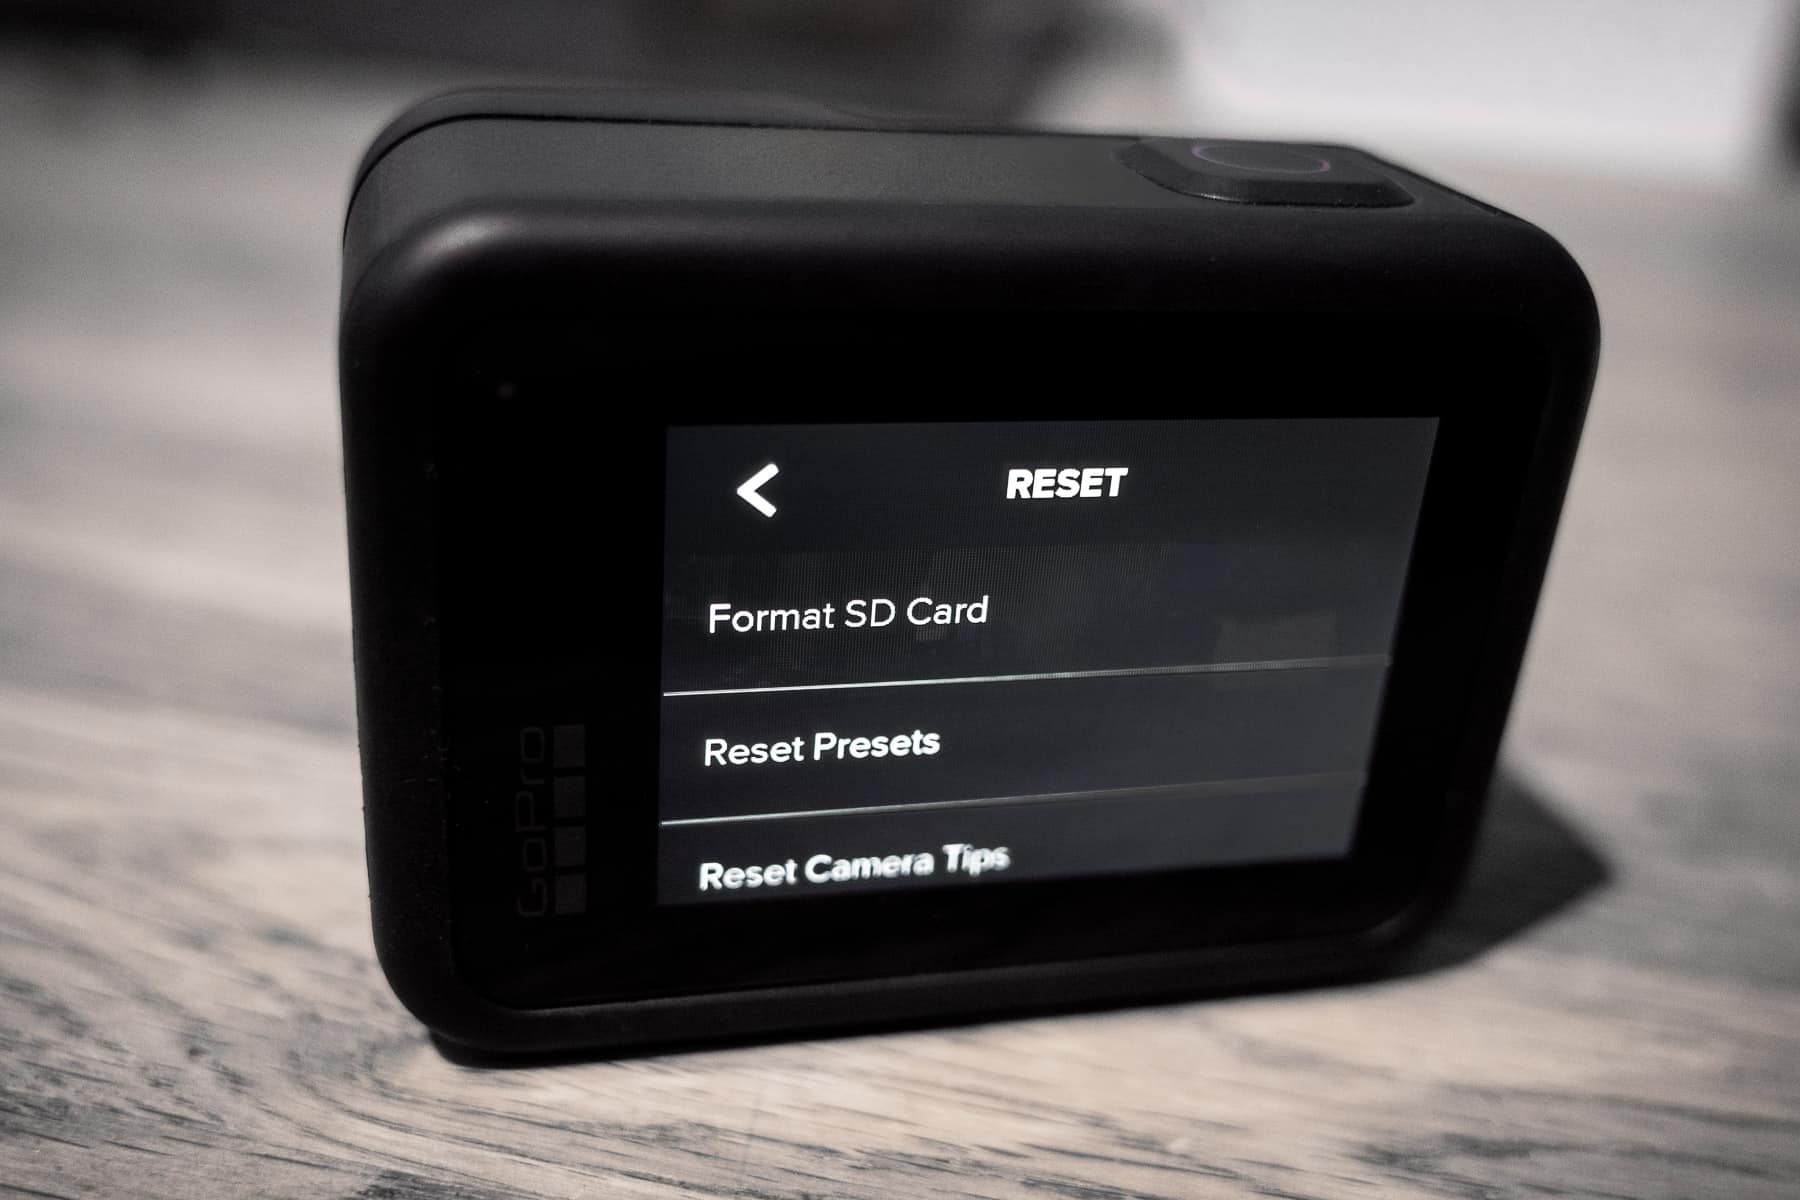
How to Reset Your GoPro HERO9 Black to Factory Settings
If you’re experiencing issues with your GoPro HERO9 Black or simply want to start fresh, performing a factory reset can help resolve any software-related problems. Here’s a step-by-step guide on how to reset your GoPro HERO9 Black to its factory settings:
- Ensure that your GoPro HERO9 Black is turned off.
- Remove the battery from the camera.
- Wait for about 10 seconds and reinsert the battery.
- Press and hold down the Mode button on the side of the camera for about 8 seconds.
- Release the Mode button when you see the “RESET” option on the screen.
- Use the Shutter button to navigate to the “RESET” option and press the Mode button to select it.
- A confirmation message will appear on the screen. Use the Shutter button to navigate to “YES” and press the Mode button to confirm.
- Your GoPro HERO9 Black will now begin the reset process. Once it’s complete, the camera will restart and return to its factory default settings.
It’s important to note that performing a factory reset will delete all media files, settings, and preferences stored on your GoPro HERO9 Black. Therefore, make sure to back up any important files before proceeding.
After the reset is complete, you can set up your GoPro HERO9 Black again from scratch. You’ll need to configure your preferred settings, update the firmware if necessary, and personalize the camera according to your shooting preferences.
By following these steps, you can easily reset your GoPro HERO9 Black to its factory settings, ensuring a clean and fresh start for your camera.
How to Reset Your GoPro HERO8 Black to Factory Settings
If you’re experiencing software issues or simply want to start fresh with your GoPro HERO8 Black, performing a factory reset can help resolve these problems. Here’s a step-by-step guide on how to reset your GoPro HERO8 Black to its factory settings:
- Make sure your GoPro HERO8 Black is powered off.
- Remove the battery from the camera.
- Wait for around 10 seconds before reinserting the battery.
- Press and hold down the Mode button on the side of the camera for about 8 seconds.
- Release the Mode button when you see the “RESET” option appear on the screen.
- Using the Shutter button, navigate to the “RESET” option and press the Mode button to select it.
- A confirmation message will appear on the screen. Navigate to “YES” using the Shutter button and press the Mode button to confirm.
- Your GoPro HERO8 Black will now begin the reset process. Once completed, the camera will restart and return to its factory default settings.
It’s important to note that performing a factory reset will delete all media files, settings, and preferences stored on your GoPro HERO8 Black. As a precautionary measure, ensure that you have backed up any important files before proceeding with the reset.
After the reset, you’ll need to set up your GoPro HERO8 Black again from scratch. This includes configuring your preferred settings, updating the firmware if necessary, and personalizing the camera according to your shooting preferences.
By following these steps, you can easily reset your GoPro HERO8 Black to its factory settings, providing a clean slate for your camera and potentially resolving any software-related issues you may be experiencing.
How to Reset Your GoPro HERO7 Black to Factory Settings
If you’re encountering performance issues or want to start fresh with your GoPro HERO7 Black, performing a factory reset can help resolve these concerns. Follow the step-by-step guide below to reset your GoPro HERO7 Black to its factory settings:
- Ensure that your GoPro HERO7 Black is turned off.
- Open the side door of the camera to access the SD card slot and battery compartment.
- Remove the battery from the camera.
- Locate the Mode button on the side of the camera.
- Press and hold down the Mode button.
- While holding the Mode button, insert the battery back into the camera.
- Continue holding the Mode button for about 10 seconds until the camera powers on and displays “RESET” on the front screen.
- Release the Mode button.
- Using the front Mode button, navigate to the “RESET” option and press the Shutter button to select it.
- A confirmation message will appear on the screen. Navigate to “YES” using the front Mode button and press the Shutter button to confirm the reset.
- Your GoPro HERO7 Black will now begin the reset process. Once completed, the camera will restart and return to its factory default settings.
Keep in mind that performing a factory reset erases all media files, settings, and preferences on your GoPro HERO7 Black. Ensure that you have backed up any important files before proceeding with the reset to prevent data loss.
After the reset, you’ll need to set up your GoPro HERO7 Black again. This includes configuring your preferred settings, updating the firmware if necessary, and personalizing the camera to suit your shooting preferences.
By following these steps, you can easily reset your GoPro HERO7 Black to its factory settings, resolving any performance issues and starting anew with your camera.
How to Reset Your GoPro HERO6 Black to Factory Settings
If you’re experiencing issues with your GoPro HERO6 Black or want to start fresh, performing a factory reset can help resolve these problems. Follow the steps below to reset your GoPro HERO6 Black to its factory settings:
- Make sure your GoPro HERO6 Black is turned off.
- Open the side door of the camera to access the SD card slot and USB-C port.
- Locate the Mode button on the side of the camera.
- Press and hold down the Mode button.
- While holding the Mode button, press the Power/Mode button on the front of the camera.
- Continue holding both buttons for about 8 seconds until the camera powers on and shows the GoPro logo on the front screen.
- Release both buttons.
- Using the front Power/Mode button, navigate to the “RESET” option by repeatedly pressing the button until you reach it.
- Press the Shutter button on the top of the camera to select the “RESET” option.
- A confirmation message will appear on the front screen. Use the front Power/Mode button to navigate to “YES” and press the Shutter button to confirm the reset.
- Your GoPro HERO6 Black will now begin the reset process. Once completed, the camera will restart and return to its factory default settings.
It’s essential to note that performing a factory reset will erase all media files, settings, and preferences on your GoPro HERO6 Black. Be sure to back up any important files before proceeding to avoid permanent data loss.
After the reset, you’ll need to set up your GoPro HERO6 Black again. This involves configuring your preferred settings, updating the firmware if necessary, and personalizing the camera to suit your shooting preferences.
By following these steps, you can easily reset your GoPro HERO6 Black to its factory settings, resolving any issues you may be facing and starting anew with your camera.
How to Reset Your GoPro HERO5 Black to Factory Settings
If you’re experiencing glitches or want to restore your GoPro HERO5 Black to its original settings, performing a factory reset can help. Follow these steps to reset your GoPro HERO5 Black to its factory settings:
- Ensure that your GoPro HERO5 Black is turned off.
- Open the side door of the camera to access the SD card slot and USB port.
- Remove the battery from the camera.
- Locate the Mode button on the side of the camera.
- Press and hold down the Mode button.
- While holding the Mode button, insert the battery back into the camera.
- Continue holding the Mode button for about 10 seconds until the camera powers on and shows the GoPro logo on the front screen.
- Release the Mode button.
- Using the front Power/Mode button, navigate to the “RESET” option by repeatedly pressing the button until you reach it.
- Press the Shutter button on the top of the camera to select the “RESET” option.
- A confirmation message will appear on the front screen. Use the front Power/Mode button to navigate to “YES” and press the Shutter button to confirm the reset.
- Your GoPro HERO5 Black will now begin the reset process. Once completed, the camera will restart and return to its factory default settings.
It’s important to keep in mind that performing a factory reset will erase all media files, settings, and preferences on your GoPro HERO5 Black. Make sure to back up any important files before proceeding to avoid permanent data loss.
Once the reset is complete, you’ll need to set up your GoPro HERO5 Black again. This involves configuring your preferred settings, updating the firmware if necessary, and personalizing the camera to suit your shooting preferences.
By following these steps, you can easily reset your GoPro HERO5 Black to its factory settings, resolving any issues you may be encountering and giving your camera a fresh start.
How to Reset Your GoPro HERO4 Black to Factory Settings
If you’re experiencing software issues or want to restore your GoPro HERO4 Black to its original settings, performing a factory reset can help. Here’s how you can reset your GoPro HERO4 Black to its factory settings:
- Turn off your GoPro HERO4 Black by pressing the Power button on the front until the camera powers down.
- Open the side door of the camera to access the microSD card slot and USB port.
- Remove the microSD card from the camera.
- Locate the Mode button on the side of the camera.
- Press and hold down the Mode button.
- While holding the Mode button, insert the microSD card back into the camera.
- Continue holding the Mode button for about 10 seconds until the camera powers on and displays “RESET” on the front screen.
- Release the Mode button.
- Using the front Power button, navigate to the “RESET” option by repeatedly pressing the button until you reach it.
- Press the Shutter button on the top of the camera to select the “RESET” option.
- A confirmation message will appear on the front screen. Use the front Power button to navigate to “YES” and press the Shutter button to confirm the reset.
- Your GoPro HERO4 Black will now begin the reset process. Once completed, the camera will restart and return to its factory default settings.
It’s important to note that performing a factory reset will delete all media files, settings, and preferences on your GoPro HERO4 Black. To avoid losing important data, make sure to back up any files before proceeding.
After the reset, you’ll need to set up your GoPro HERO4 Black again. This involves configuring your preferred settings, updating the firmware if necessary, and personalizing the camera to suit your shooting preferences.
By following these steps, you can easily reset your GoPro HERO4 Black to its factory settings, resolving any software-related issues and starting fresh with your camera.
How to Reset Your GoPro HERO3+ Black to Factory Settings
If you’re encountering software problems or simply want to restore your GoPro HERO3+ Black to its original settings, performing a factory reset can be helpful. Here’s a step-by-step guide on how to reset your GoPro HERO3+ Black to its factory settings:
- Turn off your GoPro HERO3+ Black by pressing the Power button on the front until the camera powers down.
- Open the side door of the camera to access the microSD card slot and USB port.
- Remove the microSD card from the camera.
- Locate the Mode button on the front of the camera.
- Press and hold down the Mode button.
- While holding the Mode button, insert the microSD card back into the camera.
- Continue holding the Mode button for about 10 seconds until the camera powers on and displays “RESET” on the front screen.
- Release the Mode button.
- Using the front Power button, navigate to the “RESET” option by repeatedly pressing the button until you reach it.
- Press the Shutter button on the top of the camera to select the “RESET” option.
- A confirmation message will appear on the front screen. Use the front Power button to navigate to “YES” and press the Shutter button to confirm the reset.
- Your GoPro HERO3+ Black will now begin the reset process. Once completed, the camera will restart and return to its factory default settings.
It’s important to note that performing a factory reset will delete all media files, settings, and preferences on your GoPro HERO3+ Black. Make sure to back up any important files before proceeding to avoid permanent data loss.
After the reset, you’ll need to set up your GoPro HERO3+ Black again. This includes configuring your preferred settings, updating the firmware if necessary, and personalizing the camera to suit your shooting preferences.
By following these steps, you can easily reset your GoPro HERO3+ Black to its factory settings, resolving any software-related issues and giving your camera a fresh start.
How to Reset Your GoPro HERO3 Black to Factory Settings
If you’re experiencing software glitches or want to restore your GoPro HERO3 Black to its original settings, performing a factory reset can be a solution. Follow the steps below to reset your GoPro HERO3 Black to its factory settings:
- Turn off your GoPro HERO3 Black by pressing the Power button on the front until the camera powers down.
- Open the side door of the camera to access the microSD card slot and USB port.
- Remove the microSD card from the camera.
- Locate the Mode button on the front of the camera.
- Press and hold down the Mode button.
- While holding the Mode button, insert the microSD card back into the camera.
- Continue holding the Mode button for about 10 seconds until the camera powers on and displays “RESET” on the front screen.
- Release the Mode button.
- Using the front Power button, navigate to the “RESET” option by repeatedly pressing the button until you reach it.
- Press the Shutter button on the top of the camera to select the “RESET” option.
- A confirmation message will appear on the front screen. Use the front Power button to navigate to “YES” and press the Shutter button to confirm the reset.
- Your GoPro HERO3 Black will now begin the reset process. Once completed, the camera will restart and return to its factory default settings.
Keep in mind that performing a factory reset on your GoPro HERO3 Black will erase all media files, settings, and preferences. It’s crucial to back up any important files before proceeding to avoid permanent data loss.
After the reset, you’ll need to set up your GoPro HERO3 Black again. This includes configuring your preferred settings, updating the firmware if necessary, and personalizing the camera to suit your shooting preferences.
By following these steps, you can easily reset your GoPro HERO3 Black to its factory settings, resolving any software-related issues and giving your camera a fresh start.
How to Reset Your GoPro HERO Session to Factory Settings
Performing a factory reset on your GoPro HERO Session can be a helpful troubleshooting step or a way to restore the camera to its original settings. Follow these steps to reset your GoPro HERO Session to its factory settings:
- Power off your GoPro HERO Session by pressing and holding the Mode button on the front until the camera turns off.
- Open the side door of the camera to access the microSD card slot and USB port.
- Remove the microSD card from the camera.
- Locate the small Reset button on the side of the camera next to the microSD card slot.
- Using a small object like a paperclip, press and hold the Reset button for about 8 seconds.
- Release the Reset button when the camera powers on and displays “RESET” in red on the front screen.
- You will see a confirmation message on the front screen. Press the Shutter button on the top of the camera to select “YES” and begin the reset process.
- Your GoPro HERO Session will now reset to its factory default settings. This may take a few moments.
- After the reset, the camera will automatically power off and then power back on.
Note that performing a factory reset will erase all media files, settings, and preferences on your GoPro HERO Session. It’s important to back up any important files before proceeding to avoid permanent data loss.
After the reset, you’ll need to set up your GoPro HERO Session again. This includes configuring your preferred settings, updating the firmware if necessary, and personalizing the camera to suit your shooting preferences.
By following these steps, you can easily reset your GoPro HERO Session to its factory settings, resolving any issues you may be experiencing and restoring the camera to its original state.
How to Reset Your GoPro HERO+ LCD to Factory Settings
If you’re encountering software glitches or want to restore your GoPro HERO+ LCD to its original settings, performing a factory reset can be a helpful solution. Follow the step-by-step guide below to reset your GoPro HERO+ LCD to its factory settings:
- Make sure your GoPro HERO+ LCD is turned off.
- Open the side door of the camera to access the microSD card slot and USB port.
- Remove the microSD card from the camera.
- Locate the small Reset button on the bottom of the HERO+ LCD, near the microSD card slot.
- Using a small object like a paperclip, press and hold the Reset button for about 8 seconds.
- Release the Reset button when the camera powers on and displays “RESET” on the front screen.
- A confirmation message will appear on the front screen. Press the Shutter button on the top of the camera to select “YES” and begin the reset process.
- Your GoPro HERO+ LCD will now reset to its factory default settings. This may take a few moments.
- After the reset is complete, the camera will automatically power off and then power back on.
Note that performing a factory reset will erase all media files, settings, and preferences on your GoPro HERO+ LCD. Be sure to back up any important files before proceeding to avoid permanent data loss.
After the reset, you’ll need to set up your GoPro HERO+ LCD again. This includes configuring your preferred settings, updating the firmware if necessary, and personalizing the camera to suit your shooting preferences.
By following these steps, you can easily reset your GoPro HERO+ LCD to its factory settings, resolving any software-related issues and bringing your camera back to its original state.
How to Reset Your GoPro HERO+ to Factory Settings
If you’re experiencing software issues or want to restore your GoPro HERO+ to its original settings, performing a factory reset can be a helpful solution. Follow the step-by-step guide below to reset your GoPro HERO+ to its factory settings:
- Ensure that your GoPro HERO+ is turned off.
- Open the side door of the camera to access the microSD card slot and USB port.
- Remove the microSD card from the camera.
- Locate the small Reset button on the bottom of the HERO+ camera, near the microSD card slot.
- Using a pin or a paperclip, press and hold the Reset button for about 8 seconds.
- Release the Reset button when the camera powers on and displays “RESET” on the front screen.
- Using the Mode button on the front of the camera, navigate to the “RESET” option by pressing the button repeatedly.
- Press the Shutter button on the top of the camera to select the “RESET” option.
- A confirmation message will appear on the front screen. Navigate to “YES” using the Mode button and press the Shutter button to confirm the reset.
- Your GoPro HERO+ will now begin the reset process. This may take a few moments.
- After the reset is complete, the camera will automatically power off and then power back on.
It’s important to note that performing a factory reset will erase all media files, settings, and preferences on your GoPro HERO+. Be sure to back up any important files before proceeding to avoid permanent data loss.
After the reset, you’ll need to set up your GoPro HERO+ again. This includes configuring your preferred settings, updating the firmware if necessary, and personalizing the camera to suit your shooting preferences.
By following these steps, you can easily reset your GoPro HERO+ to its factory settings, resolving any software-related issues and restoring the camera to its original state.
How to Reset Your GoPro HERO (2018) to Factory Settings
If you’re experiencing software glitches or want to restore your GoPro HERO (2018) to its original settings, performing a factory reset can be a helpful solution. Here’s how you can reset your GoPro HERO (2018) to its factory settings:
- Make sure your GoPro HERO (2018) is powered off.
- Open the side door of the camera to access the microSD card slot and USB port.
- Remove the microSD card from the camera.
- Locate the small Reset button on the bottom of the camera, near the microSD card slot.
- Using a small object like a paperclip, press and hold the Reset button for about 8 seconds.
- Release the Reset button when the camera powers on and displays “RESET” on the front screen.
- Using the front Power button, navigate to the “RESET” option by repeatedly pressing the button until you reach it.
- Press the Shutter button on the top of the camera to select the “RESET” option.
- A confirmation message will appear on the front screen. Use the front Power button to navigate to “YES” and press the Shutter button to confirm the reset.
- Your GoPro HERO (2018) will now begin the reset process. This may take a few moments.
- After the reset is complete, the camera will automatically power off and then power back on.
Please note that performing a factory reset will erase all media files, settings, and preferences on your GoPro HERO (2018). Be sure to back up any important files before proceeding to avoid permanent data loss.
Once the reset is complete, you’ll need to set up your GoPro HERO (2018) again. This includes configuring your preferred settings, updating the firmware if necessary, and personalizing the camera to suit your shooting preferences.
By following these steps, you can easily reset your GoPro HERO (2018) to its factory settings, resolving any software-related issues and restoring your camera to its original state.
How to Reset Your GoPro MAX to Factory Settings
If you’re encountering software issues or want to restore your GoPro MAX to its original settings, performing a factory reset can be a helpful solution. Follow the steps below to reset your GoPro MAX to its factory settings:
- Ensure that your GoPro MAX is powered off.
- Open the side door of the camera to access the microSD card slot and USB-C port.
- Remove the battery from the camera.
- Wait for about 10 seconds before reinserting the battery.
- Press and hold down the Power/Mode button on the side of the camera for about 8 seconds.
- Release the Power/Mode button when you see the GoPro logo appear on the screen.
- Using the Power/Mode button, navigate to “Preferences” and press the Shutter button to select it.
- Scroll down to the “Reset” option and press the Shutter button to select it.
- Confirm the reset by selecting “Reset” again on the confirmation screen.
- Your GoPro MAX will now begin the reset process. Once completed, the camera will restart and return to its factory default settings.
Note that performing a factory reset will delete all media files, settings, and preferences on your GoPro MAX. Be sure to back up any important files before proceeding to avoid permanent data loss.
After the reset is complete, you’ll need to set up your GoPro MAX again. This includes configuring your preferred settings, updating the firmware if necessary, and personalizing the camera to suit your shooting preferences.
By following these steps, you can easily reset your GoPro MAX to its factory settings, resolving any software-related issues and restoring your camera to its original state.
How to Reset Your GoPro Fusion to Factory Settings
If you’re experiencing software glitches or want to restore your GoPro Fusion to its original settings, performing a factory reset can be a helpful solution. Follow the steps below to reset your GoPro Fusion to its factory settings:
- Ensure that your GoPro Fusion is turned off.
- Open the side door of the camera to access the microSD card slot and USB-C port.
- Remove the battery from the camera.
- Wait for about 10 seconds before reinserting the battery.
- Press and hold down the Power/Mode button on the side of the camera for about 8 seconds.
- Release the Power/Mode button when you see the GoPro logo appear on the screen.
- Using the Power/Mode button, navigate to “Preferences” and press the Shutter button to select it.
- Scroll down to the “Reset” option and press the Shutter button to select it.
- Select “Factory Reset” and press the Shutter button to confirm.
- A confirmation message will appear on the screen. Use the Power/Mode button to navigate to “Yes” and press the Shutter button to confirm the reset.
- Your GoPro Fusion will now begin the reset process. This may take a few moments.
- After the reset is complete, the camera will restart and return to its factory default settings.
Keep in mind that performing a factory reset will erase all media files, settings, and preferences on your GoPro Fusion. Make sure to back up any important files before proceeding to avoid permanent data loss.
After the reset, you’ll need to set up your GoPro Fusion again. This includes configuring your preferred settings, updating the firmware if necessary, and personalizing the camera to suit your shooting preferences.
By following these steps, you can easily reset your GoPro Fusion to its factory settings, resolving any software-related issues and restoring your camera to its original state.
Tips and Precautions for Resetting Your GoPro to Factory Settings
Resetting your GoPro camera to factory settings can be a useful troubleshooting step or a way to start fresh. However, it’s important to keep certain tips and precautions in mind to ensure a smooth and successful reset. Here are some tips to consider:
- Backup your media: Before performing a factory reset, make sure to back up any important media files stored on your GoPro camera. This will prevent permanent data loss.
- Charge your battery: Ensure that your camera’s battery is fully charged or connect your camera to a power source during the reset process. This will help prevent any disruptions due to low battery power.
- Remove accessories and connections: Take off any external accessories or connections from your GoPro camera before performing a factory reset. This includes microSD cards, batteries, mounts, and any other attachments.
- Follow the correct reset procedure: Each GoPro model may have a slightly different process for resetting to factory settings. Refer to the user manual or the official GoPro website for specific instructions for your model.
- Verify your decision: Double-check that you truly want to reset your GoPro to factory settings. This action cannot be undone, and it will erase all media files, settings, and preferences on your camera.
- Update firmware: After performing a factory reset, check if any firmware updates are available for your GoPro camera. Updating the firmware can improve performance and add new features.
- Personalize your settings: Once the reset is complete, take the time to reconfigure the settings on your GoPro camera according to your preferences. This includes video resolution, frame rate, exposure settings, and more.
- Reach out for support: If you encounter any issues during or after the reset process, don’t hesitate to reach out to GoPro customer support for assistance. They can provide guidance and help troubleshoot any problems you may encounter.
By following these tips and taking necessary precautions, you can successfully reset your GoPro camera to factory settings without any major complications. It’s always beneficial to be well-prepared and ensure you have a backup of your important files before proceeding.