
Step 1: Update Your GoPro Firmware
Your GoPro camera is a powerful piece of technology, and to ensure optimal performance, it’s essential to keep its firmware up to date. Firmware updates often include new features, bug fixes, and improvements to the camera’s overall functionality. Here’s how you can easily update your GoPro firmware:
1. Connect your GoPro camera to your computer using the USB cable that came with it.
2. Open the GoPro website (www.gopro.com) and navigate to the Support section.
3. Look for the Firmware Updates page and find the latest firmware version available for your specific GoPro model.
4. Download the firmware update file to your computer.
5. Once the file is downloaded, locate it on your computer and extract the contents if necessary.
6. Open the extracted folder and look for the firmware update file with the .bin extension.
7. Copy the .bin file to the root folder of your GoPro’s SD card. Ensure that there are no other files or folders on the SD card’s root.
8. Safely eject your GoPro camera from your computer and power it on.
9. Navigate to the settings menu on your GoPro by pressing the mode button repeatedly until you reach the cogwheel icon.
10. Scroll down to the option that says “Firmware Update” and select it.
11. Follow the on-screen prompts to start the firmware update process. Your GoPro camera will turn off and on several times during the update.
12. Once the update is complete, your GoPro camera will automatically restart with the latest firmware installed.
Updating your GoPro firmware regularly is crucial to ensure the best performance and compatibility with new features. It’s recommended to check for firmware updates every few months or whenever a new version is released by GoPro.
Step 2: Download and Install the GoPro App on Your iPhone
The GoPro app is a powerful tool that allows you to control your GoPro camera directly from your iPhone. It also enables you to preview and download photos and videos, edit them, and share them with just a few taps. Follow these steps to download and install the GoPro app on your iPhone:
1. Open the App Store on your iPhone by tapping on the App Store icon.
2. Tap on the search bar at the bottom of the screen and type “GoPro” into the search field.
3. From the list of search results, look for the official GoPro app and tap on it.
4. On the app’s page, tap the “Get” or “Install” button to begin the download and installation process.
5. If prompted, enter your Apple ID or use Touch ID/Face ID to authenticate the download.
6. Wait for the app to download and install on your iPhone. The installation process may take a few minutes depending on your internet speed.
7. Once the installation is complete, locate the GoPro app on your iPhone’s home screen and tap on it to launch the app.
8. On the initial setup screen, you’ll be prompted to sign in or create a GoPro account. If you already have an account, enter your credentials. Otherwise, follow the on-screen instructions to create a new account. Having a GoPro account allows you to access additional features and cloud storage.
9. After signing in, the app will guide you through a brief tutorial on how to use its features and connect to your GoPro camera.
10. Once the tutorial is completed, you’ll be able to connect your iPhone to your GoPro camera and start capturing and controlling your footage right from your device.
Downloading and installing the GoPro app on your iPhone is a simple and straightforward process. Once installed, you’ll have access to a wide range of features to enhance your GoPro experience.
Step 3: Enable Wi-Fi on Your GoPro
In order to connect your GoPro camera to your iPhone, you need to enable the Wi-Fi feature on your GoPro. Here’s how you can do it:
1. Power on your GoPro camera by pressing the power button on the front or top of the camera.
2. Navigate to the settings menu by pressing the mode button repeatedly until you reach the cogwheel icon.
3. Scroll down to the Wi-Fi settings option and select it.
4. In the Wi-Fi menu, you’ll see different options like “Wi-Fi Off,” “GoPro App,” and “Wi-Fi RC.” Select the option that says “GoPro App” to enable Wi-Fi specifically for connecting to your iPhone.
5. After selecting “GoPro App,” your GoPro camera will start broadcasting a Wi-Fi signal.
6. Take note of or remember the name (SSID) and password for your GoPro’s Wi-Fi network. You’ll need this information to connect to the camera from your iPhone.
With Wi-Fi enabled on your GoPro, your camera creates a network that allows communication with your iPhone through the GoPro app. Keep in mind that enabling Wi-Fi on your camera can impact its battery life, so it’s a good idea to disable Wi-Fi when not in use to conserve power.
Once you’ve enabled Wi-Fi on your GoPro camera, you’re ready to move on to the next step and connect your iPhone to the camera’s Wi-Fi network.
Step 4: Connect Your iPhone to the GoPro’s Wi-Fi Network
In order to control your GoPro camera from your iPhone, you need to connect your iPhone to the Wi-Fi network created by your GoPro. Here’s how you can do it:
1. Open the Settings app on your iPhone by tapping on the Settings icon on your home screen.
2. Scroll down and tap on Wi-Fi.
3. In the list of available Wi-Fi networks, look for the network name (SSID) of your GoPro camera. It should be displayed on the back of your camera or in the Wi-Fi settings menu on your GoPro.
4. Tap on the GoPro Wi-Fi network to connect to it. You may be prompted to enter the password for the Wi-Fi network. Enter the password that you noted down or remembered from the previous step.
5. Once your iPhone is connected to the GoPro’s Wi-Fi network, you’ll see a checkmark next to the network name in the Wi-Fi settings menu.
6. Exit the Settings app and return to your iPhone’s home screen.
Now that your iPhone is connected to the Wi-Fi network of your GoPro camera, you’re ready to launch the GoPro app and start controlling your camera from your iPhone. Keep in mind that when connected to the GoPro’s Wi-Fi network, your iPhone will not have access to the internet, so you won’t be able to browse the web or use other internet-dependent apps.
If for some reason you’re unable to connect your iPhone to the GoPro’s Wi-Fi network, make sure that you’ve enabled Wi-Fi on your GoPro and entered the correct password. Additionally, ensure that you’re within range of the Wi-Fi network and that there are no obstructions or interference that may affect the connection.
Once your iPhone is connected to the GoPro’s Wi-Fi network, you’re ready to move on to the next step and launch the GoPro app on your iPhone.
Step 5: Launch the GoPro App on Your iPhone
With your iPhone connected to the Wi-Fi network created by your GoPro camera, it’s time to launch the GoPro app and get ready to control your camera right from your device. Follow these steps to launch the GoPro app on your iPhone:
1. Locate the GoPro app on your iPhone’s home screen. The app icon features the iconic GoPro logo.
2. Tap on the GoPro app icon to launch the app.
3. The GoPro app will open up, and you’ll be presented with the login screen.
4. Enter your GoPro account credentials and tap on the “Log In” button. If you don’t have a GoPro account, you can create one by tapping on the “Sign Up” option and following the on-screen instructions.
5. After logging in, the GoPro app may prompt you to allow access to certain features like the camera roll or location services. Grant the necessary permissions for the app to function properly.
6. Once the initial setup and permissions are complete, the GoPro app’s main dashboard will appear on your screen.
Now that the GoPro app is launched on your iPhone, you have complete control over your GoPro camera’s settings, modes, and features. Use the intuitive interface to navigate through the app and take advantage of the wide range of options available to capture your extraordinary moments.
From the GoPro app, you can preview and frame your shots, adjust camera settings like resolution and frame rate, switch between different capturing modes, start and stop recording, and even access advanced features like time-lapse or night mode.
Take some time to familiarize yourself with the GoPro app’s interface and explore its various capabilities. By doing so, you’ll be ready to capture stunning footage and control your GoPro camera seamlessly from your iPhone.
Step 6: Pair Your GoPro with the GoPro App
Now that you have launched the GoPro app on your iPhone, it’s time to pair your GoPro camera with the app. Pairing allows your iPhone to establish a wireless connection with your GoPro, enabling you to control the camera directly from the app. Follow these steps to pair your GoPro with the GoPro app:
1. On the GoPro app’s main dashboard, tap on the camera icon located at the bottom left corner of the screen. This will take you to the Camera menu.
2. On the Camera menu, tap on the “+” button or the “Add Camera” option.
3. The GoPro app will search for available GoPro cameras that are within range and powered on. Wait for the app to detect your GoPro camera.
4. Once your GoPro camera is detected, tap on its name to select it.
5. You may be prompted to enter the Wi-Fi network password for your GoPro camera. If prompted, enter the password that you noted down or remembered from earlier steps.
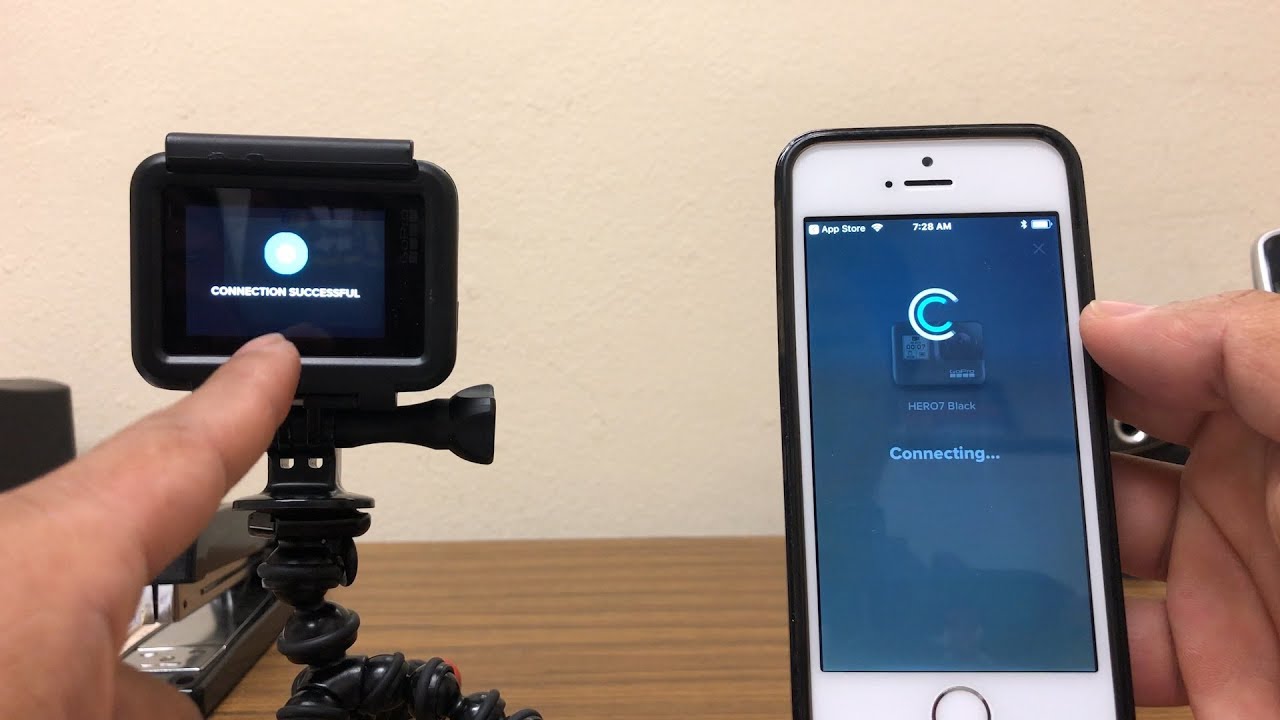
6. Once the password is entered, the GoPro app will establish a connection with your GoPro camera.
7. The app will display a confirmation message when the pairing process is successful. You will also see the live preview from your GoPro camera on your iPhone screen.
Now that your GoPro camera is paired with the GoPro app, you have full control over its settings, modes, and features directly from your iPhone. You can use the app’s interface to change shooting modes, adjust camera settings, start and stop recording, and access advanced features like time-lapse or burst mode.
Additionally, the live preview feature allows you to frame your shots and preview footage in real-time, providing you with greater control over your GoPro camera’s capturing capabilities.
If for some reason the pairing process is unsuccessful, make sure that your GoPro camera is powered on, its Wi-Fi network is enabled, and your iPhone is connected to the GoPro’s Wi-Fi network. Restarting both devices and repeating the pairing process usually resolves any connectivity issues.
With your GoPro camera successfully paired with the GoPro app, you’re now ready to take full advantage of the app’s features and capture amazing footage directly from your iPhone.
Step 7: Control Your GoPro from Your iPhone
With your GoPro camera successfully paired with the GoPro app on your iPhone, you now have the ability to control all aspects of your camera’s functionality right from your device. Here’s how you can control your GoPro camera using your iPhone:
1. On the GoPro app’s main dashboard, you’ll see a range of options and settings you can control. These include the shooting modes, resolution, frame rate, and more. Tap on the respective settings to make adjustments to your preferences.
2. To start recording, tap on the red circle icon. The app will send a signal to your GoPro camera to begin recording. To stop recording, tap the same red circle icon again.
3. The GoPro app’s interface also provides access to additional advanced features, such as time-lapse, night mode, burst mode, and more. Explore these features and try them out to unleash your creativity and capture unique footage.
4. The app also provides a live preview of what your GoPro camera is capturing. Use this feature to help frame your shots and ensure you’re capturing the perfect angle and perspective.
5. In addition to controlling the camera settings and capturing footage, the GoPro app allows you to download and view your photos and videos directly on your iPhone. You can access the Media Library within the app and browse through your captured content.
6. To download your media from the GoPro camera to your iPhone, simply select the desired media files and tap on the download button. The app will transfer the selected files to your device’s camera roll.
The GoPro app provides a seamless and intuitive interface for controlling your GoPro camera from your iPhone. You can experiment with various shooting modes, adjust settings on the fly, and instantly view and download your captured footage.
Remember to keep your iPhone within range of your GoPro camera to maintain a stable connection. If your camera is mounted in a location where the Wi-Fi signal may be weak, you can use the GoPro Smart Remote or other compatible accessories for extended remote control.
By leveraging the powerful capabilities of the GoPro app, you can unlock the full potential of your GoPro camera and capture stunning footage with ease and convenience.
Step 8: Transfer Photos and Videos from Your GoPro to Your iPhone
The GoPro app not only allows you to control your GoPro camera from your iPhone but also simplifies the process of transferring your photos and videos directly to your device. Here’s how you can transfer your media from your GoPro to your iPhone using the GoPro app:
1. Open the GoPro app on your iPhone and ensure that your GoPro camera is turned on and connected to your iPhone via Wi-Fi.
2. From the app’s main screen, tap on the Media Library tab located at the bottom of the screen. This will take you to your GoPro camera’s media library.
3. Browse through your media files in the app and select the photos and videos that you want to transfer to your iPhone.
4. Once you’ve selected the desired media files, tap on the download button. The app will start transferring the selected files to your iPhone’s camera roll.
5. Depending on the file size and the number of files being transferred, the process may take a few moments. You’ll see a progress bar indicating the status of the transfer.
6. Once the transfer is complete, you’ll find the photos and videos in your iPhone’s camera roll, ready to view, edit, and share.
Transferring your media files from your GoPro to your iPhone using the GoPro app provides a convenient way to access and utilize your captured content. Whether you want to quickly share your adventures on social media or edit your footage using other applications, having your media readily available on your iPhone simplifies the workflow.
It’s worth noting that the transfer process works best when both your GoPro camera and iPhone have a strong and stable Wi-Fi connection. If you experience any issues with the transfer, try moving closer to your GoPro camera or ensuring that there are no obstructions affecting the Wi-Fi signal.
With the GoPro app, you can effortlessly transfer your photos and videos from your GoPro camera to your iPhone, allowing you to conveniently access and share your epic moments with the world.
Step 9: Share Your GoPro Content from Your iPhone
Once you have captured and transferred your GoPro content to your iPhone, you can easily share your epic moments with friends, family, and the world. The GoPro app offers seamless integration with popular social media platforms and other sharing options. Here’s how you can share your GoPro content from your iPhone:
1. Open the GoPro app on your iPhone and navigate to the Media Library tab.
2. Locate the photo or video that you want to share and tap on it to open it in full view.
3. Tap on the share button, which is usually represented by an arrow pointing upward or an icon that indicates sharing.
4. A list of available sharing options will appear. You can choose to share your content directly to popular social media platforms such as Instagram, Facebook, Twitter, or YouTube.
5. Select the desired platform or sharing option from the list. Depending on the platform, you may be prompted to log in to your account or select additional settings before posting.
6. Customize your post by adding captions, hashtags, location tags, or any other relevant information to enhance your GoPro content’s visibility and engagement.
7. Once you have customized your post, tap on the share button to complete the sharing process. The GoPro app will then upload and post your content to the selected platform.
In addition to sharing directly to social media platforms, the GoPro app offers other sharing options, such as sharing via email, messaging apps, or saving the content to your device for later sharing using other methods.
Remember to respect the privacy of others and obtain any necessary permissions when sharing your GoPro content, especially if it includes photos or videos of individuals other than yourself.
The GoPro app provides a seamless sharing experience, allowing you to effortlessly share your incredible adventures and experiences captured with your GoPro camera. So go ahead, share your adrenaline-pumping moments, breathtaking landscapes, or heartwarming memories with the world!
Troubleshooting Tips
While connecting your GoPro camera to your iPhone using the GoPro app is generally a smooth process, you may occasionally encounter some issues. Here are some troubleshooting tips to help you resolve common problems:
1. Ensure that both your GoPro camera and iPhone have sufficient battery power. Low battery levels can cause connectivity issues. Charge your devices if needed.
2. Make sure that you have the latest firmware installed on your GoPro camera. Check for firmware updates regularly and install them to ensure optimal performance and compatibility with the GoPro app.
3. Verify that your GoPro camera’s Wi-Fi network is enabled and broadcasting. If the Wi-Fi network is not visible, try restarting your GoPro camera or toggling the Wi-Fi setting off and then on again.
4. Double-check that your iPhone is connected to the correct GoPro Wi-Fi network. If you’re having trouble connecting, try forgetting the GoPro network on your iPhone and reconnecting from scratch.
5. Ensure that your iPhone is within range of your GoPro camera’s Wi-Fi signal. If you’re too far away, move closer to the camera for a stronger connection.
6. Restart both your GoPro camera and iPhone. Rebooting can often resolve minor software glitches or connectivity issues.
7. If you’re still unable to establish a connection, reset the Wi-Fi settings on your GoPro camera by going to the settings menu, selecting “Reset,” and choosing the “Reset Wi-Fi” option. Follow the on-screen prompts to complete the reset process, and then attempt to reconnect with your iPhone.
8. Ensure that both your GoPro app and iPhone are updated to the latest versions available. Software updates often include bug fixes and improved compatibility.
9. If you encounter persistent issues, try uninstalling and reinstalling the GoPro app on your iPhone. This can resolve any app-related issues that may be causing connectivity problems.
10. If all else fails, consult the official GoPro support website or reach out to their customer support for further assistance. They have a wealth of troubleshooting resources and experts who can provide specific guidance tailored to your situation.
By following these troubleshooting tips, you can overcome common connectivity issues and ensure a seamless connection between your GoPro camera and iPhone, allowing you to fully enjoy the features and capabilities offered by the GoPro app.