
Back up Your Data
Before you begin the process of reinstalling Mac OS, it is crucial to back up all of your important data. This ensures that in the event of any unforeseen issues during the reinstallation, your files will remain safe and easily accessible.
There are several methods to back up your data on a Mac. One convenient option is to use the Time Machine feature, which automatically creates incremental backups of your entire system. Simply connect an external hard drive and configure Time Machine to start backing up your files.
If you prefer a more manual approach, you can manually copy your important files to an external storage device or cloud storage service. This includes documents, photos, videos, music, and any other personal data or files you want to preserve. Be sure to organize and categorize your files beforehand to simplify the restoration process.
Another valuable step is to create a list of all the applications installed on your Mac. This will make it easier to reinstall them later after the OS reinstallation. Take note of any specialized settings or preferences, as these may need to be configured again.
Remember to also make note of any customizations you have made to your system, such as personalized keyboard shortcuts, desktop backgrounds, or system preferences. By having a record of these settings, you can recreate the same customized experience after reinstalling Mac OS.
Once you have successfully backed up your data and made note of your important applications and system customizations, you are ready to proceed with the next steps in reinstalling Mac OS.
Create a Bootable Installer
To reinstall Mac OS, you will need a bootable installer. This allows you to start the installation process without having to download the operating system over the internet. Here’s how you can create a bootable installer:
- Connect a USB flash drive with at least 12GB of storage to your Mac.
- Open the App Store on your Mac and search for the version of Mac OS you want to reinstall. Once you find it, click on the “Download” button.
- After the download is complete, the Mac OS installer will automatically open. Close it without proceeding with the installation.
- Open the Terminal application on your Mac. You can find it by searching for “Terminal” in Spotlight or navigating to Applications > Utilities > Terminal.
- In the Terminal window, type the following command:
sudo /Applications/Install\ macOS\ [version].app/Contents/Resources/createinstallmedia --volume /Volumes/MyVolume - Replace “[version]” with the name of the version of Mac OS you downloaded. Replace “MyVolume” with the name of your USB flash drive, which will be erased and turned into a bootable installer.
- Press Enter and enter your administrator password when prompted. The Terminal will display the progress of the creation process.
- Once the process is complete, you will have a bootable installer on your USB flash drive.
Creating a bootable installer ensures that you have a reliable source to reinstall Mac OS, even if you don’t have an internet connection or encounter any issues with your network during the reinstallation process. It gives you the ability to perform a clean installation and start fresh with a new copy of Mac OS.
With a bootable installer ready, you’re now prepared to move on to the next steps of reinstalling Mac OS.
Restart Your Mac and Access Recovery Mode
Once you have created a bootable installer, the next step in the process of reinstalling Mac OS is to restart your Mac and access Recovery Mode. This mode provides essential tools and utilities to perform various maintenance tasks, including installing a fresh copy of Mac OS.
Here’s how you can access Recovery Mode:
- Save any ongoing work and close all open applications on your Mac.
- Click on the Apple menu icon in the top-left corner of the screen and select “Restart.”
- While your Mac is restarting, hold down the “Command” (⌘) and “R” keys simultaneously until you see the Apple logo or a spinning globe.
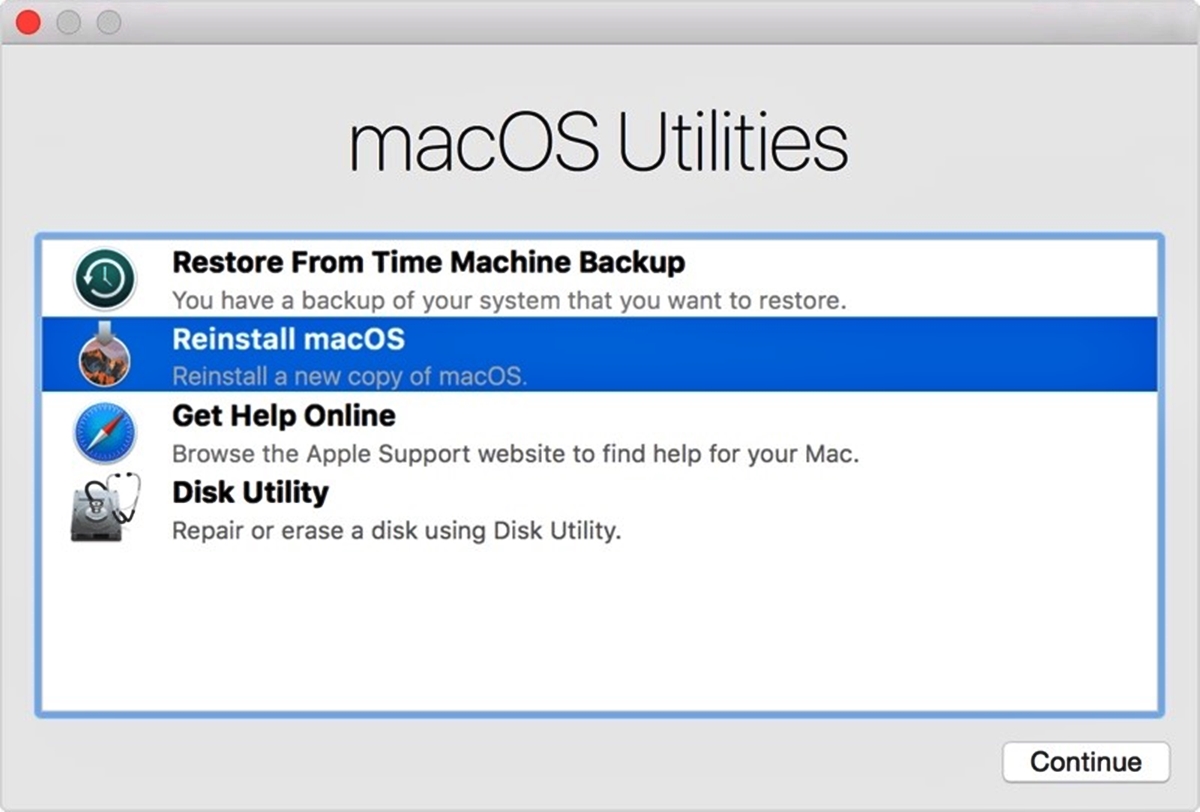
- Release the keys once the macOS Utilities window appears.
In the macOS Utilities window, you will find different options for managing your Mac, including reinstalling macOS, restoring from a Time Machine backup, and accessing Disk Utility for disk management tasks.
To proceed with reinstalling Mac OS, select “Reinstall macOS” and click “Continue.” This will guide you through the installation process and prompt you to choose the destination drive for the OS installation.
Before proceeding, it is essential to ensure that you are connected to a stable internet connection. This will ensure that the latest version of Mac OS is downloaded and installed during the reinstallation process.
Once you have successfully accessed Recovery Mode and selected the option to reinstall macOS, you can proceed to the next steps to complete the reinstallation process.
Erase Your Startup Disk
Before reinstalling Mac OS, it is necessary to erase your startup disk. This ensures that any existing data and settings are completely removed, preparing the disk for a fresh installation. Here’s how you can erase your startup disk:
- Ensure that you have backed up all important data from your startup disk as it will be permanently deleted during the erasing process.
- Restart your Mac and access Recovery Mode by holding down the “Command” (⌘) and “R” keys simultaneously until the macOS Utilities window appears.
- In the macOS Utilities window, select “Disk Utility” and click “Continue.”
- In the Disk Utility window, select your startup disk from the sidebar.
- Click on the “Erase” button from the toolbar at the top of the window.
- In the erase dialog box, provide a name for your disk and select the desired format. For most users, the recommended format is “APFS” (Apple File System).
- Click on the “Erase” button to initiate the erasing process. This may take some time depending on the size of your disk.
- Once the erasing process is complete, close Disk Utility, and you will be returned to the macOS Utilities window.
By erasing your startup disk, you are ensuring a clean slate for the reinstallation of Mac OS. It removes all previous data and settings, which helps in achieving a fresh and optimized system performance after the OS installation.
Now that your startup disk is successfully erased, you can proceed to the next steps in the reinstallation process.
Install Mac OS
Now that you have prepared your Mac and erased the startup disk, it’s time to install Mac OS. This step will install a fresh copy of the operating system on your Mac, providing you with a clean and updated system. Follow these steps to install Mac OS:
- Make sure your Mac is still in Recovery Mode. If not, restart your computer while holding down the “Command” (⌘) and “R” keys until the macOS Utilities window appears.
- In the macOS Utilities window, select “Reinstall macOS” and click “Continue.”
- Follow the on-screen instructions to choose the destination disk where you want to install Mac OS. Select your startup disk and click “Install.”
- The installation process will begin, and you will see an estimated time remaining. This may vary depending on the speed of your Mac and the version of macOS you are installing.
- During the installation, your Mac may restart and display a progress bar. Do not interrupt the process and let it complete.
- After the installation is finished, your Mac will restart again and guide you through the initial setup process.
- Follow the on-screen instructions to set up your Mac. This includes selecting your country, creating a user account, and configuring various settings.
- Once you have completed the setup, you will be greeted with a fresh installation of Mac OS.
Installing Mac OS ensures that you have the latest version of the operating system with all the latest features, improvements, and security updates. It also provides a clean environment to work with, free from any previous system issues or clutter.
Now that you have successfully installed Mac OS, you can proceed to the next steps to restore your data and configure your system.
Set Up Your Mac and Restore Data
After installing Mac OS, it’s time to set up your Mac and restore your backed-up data. This step will help you personalize your system and bring back your important files and settings. Follow these steps to set up your Mac and restore your data:
- Complete the initial setup process by following the on-screen instructions. This includes selecting your language, signing in with your Apple ID, and setting up various preferences such as Siri and iCloud.
- Once you have finished the initial setup, if you used Time Machine to back up your data, connect the external storage device containing your Time Machine backup to your Mac.
- A “Migration Assistant” window may appear, asking if you want to transfer information from another Mac, a Time Machine backup, or another disk. Select the option to transfer from your Time Machine backup.
- Follow the prompts to select the backup source and choose the specific data you want to restore. This can include documents, photos, applications, and system settings.
- Allow the restore process to complete. This may take some time depending on the size of your backup and the amount of data being restored.
- Once the restore process is finished, your Mac will reboot, and you will have your data and settings restored.
During the setup process, you may also choose to manually transfer your data from the external storage device or cloud service you used for backing up your data. Simply copy the files back to their respective locations on your Mac.
Setting up your Mac and restoring your data ensures that you have all your important files and settings back in place. It helps you resume your workflow seamlessly and continue working with your preferred applications and configurations.
Now that you have successfully set up your Mac and restored your data, you can proceed to the next steps to update and configure your system.
Update and Configure Your System
After setting up your Mac and restoring your data, it’s important to update and configure your system to ensure optimal performance and security. Follow these steps to update and configure your Mac:
- Open the App Store on your Mac and navigate to the “Updates” tab. Check for any available updates and install them. This ensures that you have the latest security patches, bug fixes, and performance improvements.
- Go to “System Preferences” from the Apple menu and review the various settings to customize your Mac according to your preferences. This includes adjusting display settings, setting up notifications, configuring energy-saving options, and more.
- Install any necessary software or drivers for peripherals such as printers, scanners, or external devices. Visit the manufacturer’s website to download the latest versions compatible with your Mac OS.
- Explore the Mac App Store for additional applications that you may need for your work or personal use. Install the desired applications and set them up according to your preferences.
- Configure your Mac’s security settings to ensure the safety of your data. Enable FileVault to encrypt your startup disk, enable Firewall to protect against unauthorized network access, and consider using a trusted antivirus software to safeguard against malware.
- Set up Time Machine to automatically back up your data regularly. This provides an additional layer of protection against data loss and allows for easy restoration in case of emergencies.
- Customize your desktop, including choosing a background image, arranging icons, and configuring the dock. Personalize your Mac to make it feel like your own.
Updating and configuring your system is important to keep your Mac running smoothly and efficiently. It ensures that you have the latest features, improvements, and security enhancements. By customizing the settings to your liking, you can enhance your productivity and enjoy a seamless user experience.
Now that you have updated and configured your system, your Mac is ready for use. Remember to regularly check for software updates and review your settings to keep your Mac up to date and optimally configured.
Troubleshooting Tips
While reinstalling Mac OS can resolve many issues, occasional hiccups may still occur. Here are some troubleshooting tips to help you navigate common problems during or after the reinstallation process:
- If the reinstallation process stalls or appears to be frozen, give it some time. The installation may take longer than expected, especially if you have a slow internet connection or if you are installing a large macOS update.
- If your Mac gets stuck on a specific step during the installation process, try restarting your Mac and entering Recovery Mode again. Then, attempt the installation once more.
- If your Mac restarts repeatedly or encounters a boot loop after the installation, try resetting the NVRAM (Non-Volatile Random Access Memory). To do this, restart your Mac and hold down the “Command” (⌘), “Option,” “P,” and “R” keys simultaneously until you hear the startup sound twice.
- If you experience network issues during the installation, ensure that you have a stable and reliable internet connection. Consider using a wired connection or connecting to a different network, if possible.
- If you encounter problems with specific applications or drivers after the reinstallation, check whether the latest software updates and drivers are available. Visit the manufacturer’s website or the App Store to download and install updates specific to your hardware or software.
- If you encounter any data discrepancies or missing files after restoring your data, double-check your backups to ensure that all important files were included. If necessary, use additional data recovery tools or services to retrieve any missing data.
- If you continue to experience significant issues or if the reinstallation process fails repeatedly, consider contacting Apple Support or visiting an authorized service center for further assistance.
Remember to exercise caution and follow troubleshooting instructions carefully. Always back up your important data before attempting any troubleshooting steps to avoid any potential data loss.
Troubleshooting common issues during and after the reinstallation process helps ensure a successful and smooth experience. By being proactive and learning from these troubleshooting tips, you can overcome obstacles and enjoy the benefits of a fresh installation of Mac OS.