
Why Recover Gold from Electronics?
Gold is a highly valuable and sought-after precious metal that has been used for centuries in jewelry and various industries. What many people don’t realize is that small amounts of gold can be found in old electronics, such as computers, cell phones, and circuit boards. Recovering gold from electronic waste not only helps in recycling valuable resources but also reduces the environmental impact of electronic disposal.
Electronics contain gold-plated components, connectors, and circuits that are rich in this precious metal. By recovering gold from electronics, you can turn your old and unused electronic devices into a source of profit. Instead of letting them gather dust in your drawers or adding to the growing e-waste problem, you can extract the gold they contain and sell it to refiners or collectors.
With the increasing demand for electronics and rapid technological advancements, there is a significant amount of electronic waste generated worldwide. According to the United Nations, approximately 50 million metric tons of electronic waste are produced each year. Only a small percentage of this waste is recycled, which means that a substantial amount of gold and other valuable metals are being lost.
Moreover, mining gold from the earth has detrimental effects on the environment, including deforestation, habitat destruction, and water pollution. By recovering gold from electronics, we can minimize the need for new mining activities and reduce the carbon footprint associated with gold production.
Recovering gold from electronics is not only financially beneficial but also promotes sustainable practices. It encourages the reuse of valuable resources and helps reduce the reliance on unsustainable mining practices. Additionally, it contributes to the circular economy, where electronic waste is recycled and reintegrated into the production cycle.
So, if you have old electronic devices lying around, instead of throwing them away, consider recovering the gold they contain. It’s a win-win situation – you get to earn money from something you no longer need, and the environment benefits from reduced electronic waste and resource conservation.
Safety Precautions
Recovering gold from electronics can be a rewarding endeavor, but it is essential to prioritize safety throughout the process. Here are some safety precautions to keep in mind when working with electronic waste:
- Protective Gear: Wear appropriate protective gear, including gloves, safety goggles, and a face mask, to shield yourself from potential hazards such as chemical splashes or airborne particles.
- Ventilation: Ensure that you work in a well-ventilated area or use a fume hood to prevent the build-up of potentially harmful vapors or gases.
- Work Area: Set up your work area on a sturdy, stable surface, away from flammable materials. Keep a fire extinguisher nearby as a precaution.
- Chemical Handling: Handle chemicals, such as vinegar or other solvents, with care, following the instructions on the labels. Avoid inhaling fumes and accidental ingestion. Dispose of chemicals properly according to local regulations.
- Electricity: Always disconnect any power source and ensure that electronic devices are turned off before disassembling them to avoid electrical shocks.
- Sharp Objects: Handle tools and sharp objects carefully to prevent injuries. Use appropriate tools for disassembling electronic devices and avoid using excessive force.
- Fire Safety: Be cautious when working with heat sources, such as burners or open flames, during the gold recovery process. Keep a fire blanket or extinguisher nearby in case of emergencies.
- Eye Protection: Use safety goggles to protect your eyes from debris or particles that may be released during the disassembly process.
- Storage and Disposal: Store recovered gold and any other valuable materials in a secure location. Dispose of electronic waste responsibly by finding a certified e-waste recycling facility.
While these safety precautions are important, it is also advisable to educate yourself on the specific risks associated with the gold recovery process and seek guidance from experts or professionals if needed. Prioritizing safety will help ensure a smooth and secure gold recovery experience.
What You’ll Need
Before you begin the process of recovering gold from electronics, gather the necessary tools and materials. Here’s a list of what you’ll need:
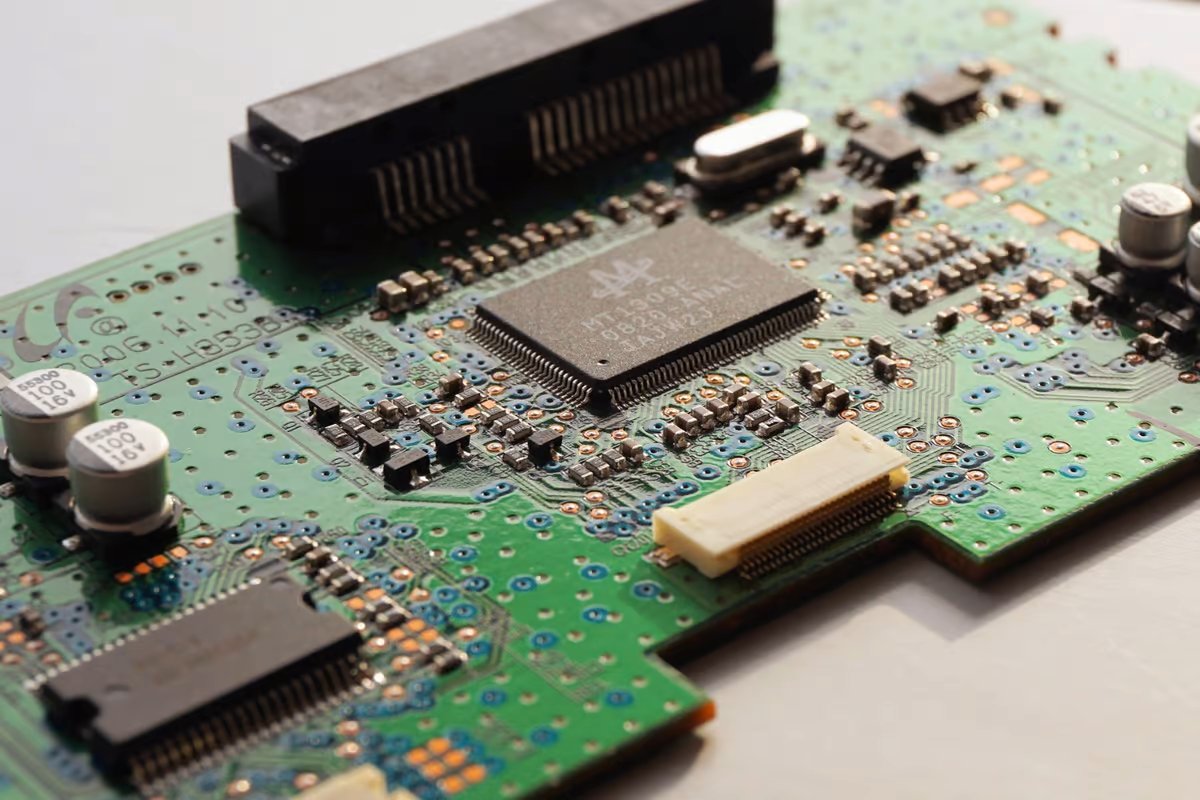
- Old Electronics: Gather old electronic devices such as computers, smartphones, circuit boards, and any other devices that may contain gold-plated components.
- Protective Gear: Wear gloves, safety goggles, and a face mask to protect yourself from potential hazards, such as chemicals or sharp objects.
- Tools: Have a set of basic tools ready, including screwdrivers, pliers, wire cutters, and a soldering iron, to help you disassemble the electronic devices.
- Container: Prepare a plastic or glass container to hold the electronic components and solutions during the gold recovery process. Make sure it is large enough to accommodate the items you’ll be working with.
- Chemicals: You’ll need vinegar (preferably white vinegar) as the main solvent for dissolving the gold. Make sure to have enough vinegar to cover the electronic components.
- Strainer or Filter: Obtain a fine-mesh strainer or filter that you can use to separate the dissolved gold from the solution.
- Heat Source: Depending on the gold recovery method you choose, you may require a heat source, such as a hot plate or a small burner, to facilitate certain steps in the process.
- Water Source: Ensure you have access to a water source for rinsing and washing the recovered gold.
- Drying Tools: Prepare a clean cloth or paper towels for drying the gold after washing.
- Storage Container: Get a small, airtight container to store the final recovered gold safely.
Having these tools and materials ready will help you proceed smoothly through the gold recovery process. Remember to handle all equipment and chemicals with care, and follow safety guidelines throughout the entire process.
Step 1: Preparation
Before you begin recovering gold from electronics, it’s important to prepare yourself and your workspace. By following these preparation steps, you’ll ensure a smooth and efficient gold recovery process:
- Organize Your Workspace: Clear a designated area where you can work comfortably and have enough room to spread out the electronic devices. Make sure you have good lighting and access to necessary tools and materials.
- Gather Safety Gear: Put on your protective gear, including gloves, safety goggles, and a face mask. These will protect you from potential hazards during the disassembly and chemical processes.
- Read Instructions or Guides: Familiarize yourself with the specific guidelines and steps for recovering gold from electronics. Research reliable sources and consult experts to ensure you understand the process thoroughly.
- Prepare Work Surfaces: Lay down a clean, non-conductive work surface, such as a rubber mat or cardboard, to protect the electronic devices and prevent static electricity buildup.
- Disconnect Power: Ensure all electronic devices are completely powered off and disconnected from any power sources. Unplug chargers, remove batteries, and disconnect cables to eliminate any risk of electrical shock or short circuits.
- Secure Proper Disposal Method: Identify a certified e-waste recycling facility where you can dispose of any non-recoverable electronic parts responsibly. Separate these parts from the ones you’ll be recovering gold from.
- Prepare Storage Containers: Set up separate containers or trays to sort and store the various electronic components you’ll encounter during the disassembly process. This will help you keep track of different parts and make it easier to extract gold later on.
- Double-Check Safety Measures: Take a moment to review safety precautions and ensure you have everything in place. This includes having a fire extinguisher nearby and an emergency exit strategy if needed.
By taking the time to properly prepare before starting the gold recovery process, you’ll minimize risks and maximize efficiency. Once you’ve completed these preparation steps, you’re ready to move on to disassembling the electronic devices and extracting the valuable gold components.
Step 2: Disassemble the Electronics
Once you’ve completed the preparation process, it’s time to disassemble the electronic devices to access the gold-plated components. Follow these steps to effectively disassemble the electronics:
- Gather the Necessary Tools: Ensure you have the appropriate tools, such as screwdrivers, pliers, wire cutters, and a soldering iron, to assist you in disassembling the electronic devices. Use the tools that match the type and size of screws or connectors.
- Identify and Remove External Components: Begin by removing any detachable components, such as batteries, memory cards, or SIM cards. Set these aside for separate recycling or disposal.
- Remove the Case or Housing: Depending on the device, you may need to unscrew or unclip the case to access the internal components. Be mindful of any hidden screws or tabs that may secure the housing.
- Detach Internal Components: Carefully remove the circuit boards, connectors, and other internal components from the device. Pay close attention to connectors and cables, as they may require gentle prying or unscrewing.
- Sort and Organize Components: As you remove each component, sort and organize them based on their type and potential gold content. Separate those with visible gold plating or gold-filled pins from other non-valuable parts.
- Note Specifics for Each Device: Different devices may have unique disassembly requirements. Refer to online guides or manuals to ensure you follow the correct procedures for each device you’re working with.
- Handle Fragile Components with Care: Some components, such as delicate integrated circuits or glass screens, require gentle handling to avoid damage. Use caution to protect both yourself and the components during the disassembly process.
- Set Aside Non-Recoverable Parts: Separate any non-recoverable parts, such as plastics, cables, or non-gold-plated connectors, for proper recycling or disposal. These parts can be brought to an e-waste recycling facility.
Remember to work methodically, keeping track of the disassembled parts and ensuring your work area remains organized. Take your time to avoid damaging valuable components or accidentally discarding gold-plated elements. Once you’ve successfully disassembled the electronics, you’re ready to move on to the next step: sorting and identifying gold-containing components.
Step 3: Sort and Identify Components
Now that you have disassembled the electronics, it’s time to sort and identify the components that may contain gold. This step is crucial in determining which parts you will focus on for gold recovery. Follow these steps to effectively sort and identify the components:
- Organize Components: Lay out all the disassembled components in front of you. Create separate piles or containers for different types of components, such as circuit boards, connectors, and other parts.
- Look for Gold-Plated Surfaces: Examine the components closely for any signs of gold plating. Gold-plated pins, fingers, or edges are common indicators of gold content. Focus your attention on these parts, as they will yield the most significant amount of gold.
- Identify Different Types of Components: Gain familiarity with the various types of components and their potential gold content. For example, circuit boards often have gold traces and gold-plated IC chips, while connectors and switches may have gold-plated pins.
- Research Component Composition: If you’re unsure about the potential gold content of a specific component, conduct research to identify which parts are likely to contain gold. Online resources, forums, and guides can provide valuable information on common gold-bearing components in electronics.
- Use Magnification if Necessary: In some cases, gold plating may be difficult to detect with the naked eye. Utilize a magnifying glass or jeweler’s loupe to inspect components more closely. This will help you identify smaller gold-plated elements that are key for gold recovery.
- Separate Non-Gold Components: As you identify gold-plated components, set them aside in a separate container. Discard or recycle non-gold components that do not hold any value for gold recovery.
- Note Quantity and Quality: Make a mental or written note of the quantity and quality of the gold-plated components you’ve sorted. This will assist you in estimating the potential value of your gold recovery efforts.
Sorting and identifying components is essential for maximizing your gold recovery yield. By focusing on gold-plated surfaces and understanding the composition of different components, you can prioritize your efforts and move on to the next step: preparing for the gold recovery process.
Step 4: Gold Recovery Preparation
After sorting and identifying the gold-containing components, the next step is to prepare for the gold recovery process. This step involves gathering the necessary materials and ensuring you have a suitable workspace. Follow these guidelines to properly prepare for gold recovery:
- Clean and Clear Workspace: Clear your workspace of any clutter and ensure you have ample room to work. Clean the area thoroughly to prevent contamination of the gold recovery process.
- Review the Gold Recovery Method: Determine the gold recovery method you will employ based on the components you have and your level of expertise. Research the specific steps and requirements for the method you choose.
- Gather Required Materials: Collect all the materials necessary for the gold recovery process. This may include vinegar (preferably white vinegar), a container for the vinegar solution, a fine-mesh strainer or filter, and a heat source if the chosen method requires one.
- Calculation of Chemical Ratios: If your chosen method involves chemical reactions, calculate the appropriate ratios for mixing chemicals. Follow established guidelines and suggested proportions to ensure safe and effective gold recovery.
- Ensure Proper Ventilation: If working with chemicals or heat sources, make sure your workspace is well-ventilated. Open windows or use a fume hood to ensure that any fumes or gases are properly ventilated to prevent the accumulation of harmful substances.
- Take Precautions for Heat Sources: If your gold recovery method involves heat, set up a safe and appropriate heat source, such as a hot plate or a small burner. Ensure that it is stable and positioned away from flammable materials.
- Have Safety Gear at Hand: Put on your safety gear, including gloves, safety goggles, and a face mask, to protect yourself throughout the gold recovery process. Keep a first aid kit nearby in case of any accidents or injuries.
- Plan for Solution Disposal: Take into consideration the proper disposal of the vinegar solution or any other chemicals you’ll be using. Research local regulations and ensure you have a safe and responsible method for disposing of waste solutions.
By adequately preparing for the gold recovery process, you’ll minimize potential risks and ensure a more efficient and successful recovery of the precious metal. Once you have gathered all the required materials and taken the necessary precautions, you’re ready to proceed with the gold recovery steps specific to your chosen method.
Step 5: Dissolve Gold with Vinegar
Once you have prepared for the gold recovery process, it’s time to dissolve the gold from the gold-plated components using vinegar. Vinegar, specifically white vinegar, is an effective and accessible solvent for dissociating the gold from the components. Follow these steps to dissolve the gold using vinegar:
- Prepare the Vinegar Solution: Fill a container with enough vinegar to fully immerse the gold-plated components. Ensure that the container is made of non-reactive material, such as glass or plastic, to avoid any unwanted chemical reactions.
- Immerse the Gold-Plated Components: Carefully place the gold-plated components into the vinegar solution, ensuring they are fully submerged. Allow them to soak for a sufficient amount of time, typically several hours or overnight.
- Stir or Agitate the Solution: Periodically stir or agitate the solution to enhance the dissolution process. This promotes a stronger reaction between the gold and the vinegar, aiding in the separation of the gold from the components.
- Observe the Dissolution Process: Monitor the solution and components to observe the gold dissolving. Over time, you may notice the gold plating gradually breaking down and dispersing into the vinegar solution.
- Extend Soaking Time if Necessary: If the gold-plated components are highly resistant to dissolution, you may need to extend the soaking time. Patience is key during this step, as the vinegar gradually breaks down the gold plating.
- Separate Components from Solution: Once the gold plating has dissolved, remove the components from the vinegar solution. You can use a pair of tongs or a non-reactive utensil to handle the items.
- Strain or Filter the Solution: Pour the vinegar solution through a fine-mesh strainer or filter to separate any remaining gold particles or solid debris from the liquid. This step helps in isolating the dissolved gold from the solution.
It’s important to note that the vinegar solution mainly dissolves the gold from the components, leaving behind other non-valuable materials. The dissolved gold will be recovered and further processed in the following steps. Remember to handle the vinegar solution with care and dispose of it responsibly following local regulations.
Once you have successfully dissolved the gold using vinegar, you can proceed to the next step: separating the gold from the solution and precipitating it for recovery.
Step 6: Separate Gold from Solution
After dissolving the gold from the gold-plated components using vinegar, the next step is to separate the gold from the solution. This involves separating the dissolved gold particles from the vinegar solution to concentrate and prepare for further processing. Follow these steps to effectively separate the gold from the solution:
- Allow Settling Time: After straining or filtering the vinegar solution, allow it to sit undisturbed for a period of time. This will enable any solid particles to settle at the bottom of the container.
- Decant the Solution: Carefully pour off the excess vinegar solution, leaving the settled particles undisturbed at the bottom. Pour slowly and steadily to avoid agitating the settlement.
- Use a Fine-Mesh Filter: To further remove any remaining solid particles, pour the solution through a fine-mesh filter or a coffee filter. This will help capture any small gold particles that may still be suspended in the liquid.
- Collect the Filtered Solution: Collect the filtered solution in a clean container that is suitable for further processing. Ensure the container is non-reactive and large enough to hold the solution without any overflow.
- Retain any Settled Gold Residue: If you notice any gold sediment at the bottom of the original container, carefully transfer it to a separate container or collect it for later recovery.
- Repeat Filtration if Necessary: If the filtered solution still contains suspended particles or impurities, repeat the filtration process using a fresh filter or a more fine-mesh material to achieve a cleaner solution.
- Set Aside the Filtered Solution: Once you have obtained a clear and filtered solution, set it aside for the next step in the gold recovery process. The separated gold particles are now concentrated and ready for further precipitation.
It’s important to handle the filtered solution with care to avoid any spills or contamination. The separated gold particles in the solution are key for the next step: precipitating the gold for final recovery. Securely store the filtered solution and proceed to the following step when you are ready.
Step 7: Precipitate the Gold
After successfully separating the gold from the solution, the next step is to precipitate the gold. Precipitation involves chemically converting the dissolved gold particles into a solid form. Follow these steps to effectively precipitate the gold:
- Choose a Precipitant: Select a suitable chemical precipitant to convert the dissolved gold ions into solid gold particles. Commonly used precipitants include sodium metabisulfite or a similar reducing agent.
- Create a Precipitant Solution: Dissolve the chosen precipitant in water to create a concentrated solution. The concentration and quantity of the precipitant may vary depending on the amount of gold and the specific instructions of the chosen method.
- Add Precipitant Solution to the Gold Solution: Gradually add the precipitant solution into the filtered gold solution, stirring gently. The addition of the precipitant will cause a chemical reaction that promotes the precipitation of the gold particles.
- Observe the Precipitation Process: As you add the precipitant solution, watch for any color changes or the formation of a cloudy or powdery substance. This indicates the conversion of the dissolved gold into solid gold particles.
- Stir and Allow Settling Time: After adding the precipitant, stir the solution gently to ensure thorough mixing. Then, let the solution sit undisturbed for a sufficient amount of time to allow the gold particles to settle at the bottom.
- Decant the Supernatant: Carefully pour off the clear liquid, known as the supernatant, from the settled gold particles. Pour slowly and steadily to avoid disturbing the settled gold, which should remain at the bottom of the container.
- Recover the Precipitated Gold: Use a fine-mesh filter or a filter paper to collect and capture the precipitated gold particles. Rinse them with water to remove any remaining impurities or residual chemicals.
- Allow the Gold to Dry: Set the recovered gold particles on a clean, non-reactive surface and allow them to air dry completely. Avoid heating or using excessive force to speed up the drying process, as this may damage the gold particles.
Once the precipitated gold is dry, you have successfully transformed the dissolved gold into solid particles. Congratulations! The next step is to wash and dry the gold, preparing it for storage or further refining.
Step 8: Wash and Dry the Gold
After precipitating the gold particles, the final step in the gold recovery process is to wash and dry the gold. This step ensures the removal of any remaining impurities or chemicals, leaving you with clean and pure gold. Follow these steps to effectively wash and dry the gold:
- Prepare a Cleaning Solution: Create a mild cleaning solution by mixing warm water with a small amount of dish soap or a specialized gold cleaning solution. Avoid using harsh chemicals or abrasives that could damage the gold.
- Submerge the Gold into the Cleaning Solution: Place the gold particles or gold-containing material into the cleaning solution. Gently agitate the solution to ensure all surfaces of the gold are thoroughly cleaned.
- Rinse the Gold with Water: Remove the gold from the cleaning solution and rinse it with clean water. This step helps remove any soap residue or remaining cleaning solution from the gold.
- Inspect and Repeat if Necessary: Check the gold for any remaining impurities or discoloration. If needed, repeat the washing and rinsing process until the gold is visibly clean and free from any contaminants.
- Dry the Gold: Place the washed gold particles onto a clean cloth or paper towel and gently pat them dry. Avoid using excessive force or heat, as this may damage or deform the gold.
- Air Dry the Gold: Allow the gold to air dry completely in a well-ventilated area. Make sure it is placed away from direct sunlight or heat sources that could potentially cause damage.
- Inspect and Store the Gold: Once the gold is thoroughly dry, inspect it to ensure its cleanliness and purity. Store the gold in a secure container or airtight packaging to protect it from environmental factors.
- Consider Further Refining: If you intend to refine the gold for higher purity or sell it to a bullion dealer, you may need to consult with a professional refiner who specializes in precious metal refining.
By thoroughly washing and drying the gold, you have completed the gold recovery process. The clean and pure gold particles are now ready for storage, further refining, or future use in jewelry or other applications. Ensure you handle and store the gold with care to maintain its quality and value.