
Setting up a Minecraft Multiplayer Server
One of the most exciting aspects of playing Minecraft is the ability to explore and build in a shared world with friends. Setting up a Minecraft multiplayer server allows you to invite others to join you in your adventures and create a collaborative gaming experience. Here, we will guide you through the steps to set up your own Minecraft multiplayer server.
Before diving into the process, it’s important to note that setting up a server requires a solid internet connection and a computer that can handle the server’s demands. Additionally, the server installation process may vary depending on your operating system. Let’s get started!
1. Downloading the Minecraft Server Software
The first step is to download the Minecraft server software from the official Minecraft website. Make sure to choose the version that is compatible with your operating system.
2. Creating a Dedicated Server Folder
Next, create a dedicated folder on your computer to store your Minecraft server files. Choose a location that is easily accessible and remember to keep your server files organized within this folder.
3. Running the Minecraft Server
Locate the downloaded server software file and run it. This action will generate the necessary server files in your dedicated server folder. Once the files are generated, you can customize the server settings to your preferences.
4. Configuring Server Settings
Open the server configuration file using a text editor and adjust the settings accordingly. You can specify the maximum number of players allowed, set game rules, and customize other options as needed. Save the changes before moving on.
5. Opening ports and Enabling Port Forwarding
To allow other players to connect to your server, you need to open the necessary ports on your router. This step, known as port forwarding, may vary depending on your router brand and model. Consult your router’s manual or manufacturer’s website to learn how to enable port forwarding for Minecraft.
6. Inviting Friends to Join
With your Minecraft server up and running, you can now invite your friends to join in on the multiplayer fun. Share your server IP address with them, which can be found in the server.properties file within your server folder.
7. Managing Player Roles and Permissions
As the server owner, you have the ability to manage player roles and permissions. Utilize Minecraft server plugins or built-in commands to assign different privileges to players, ensuring a fair and enjoyable gaming experience.
Setting up a Minecraft multiplayer server opens up endless possibilities for collaboration and creativity. With the right server hosting and configuration, you and your friends can embark on exciting adventures together, building, exploring, and battling mobs in the vast world of Minecraft.
Remember to always keep your server files and plugins updated to ensure compatibility and security. Enjoy your multiplayer gaming experience!
Choosing the Right Server Hosting Provider
When it comes to setting up a Minecraft multiplayer server, choosing the right server hosting provider is crucial. A reliable and efficient hosting provider ensures that your server runs smoothly and provides a seamless multiplayer experience for you and your friends. Here are some factors to consider when selecting a server hosting provider.
1. Performance and Reliability
The performance and reliability of the hosting provider’s servers are essential for a lag-free gaming experience. Look for providers that offer powerful hardware and robust infrastructure to handle the demands of hosting a Minecraft server. Check for uptime guarantees and customer reviews to ensure that the provider is dependable and can deliver a consistent gaming experience.
2. Scalability
If you plan on growing your Minecraft server community or hosting multiple game servers, scalability becomes an important consideration. Choose a hosting provider that offers flexible plans and the ability to upgrade your resources as your server expands. This ensures that your server can handle an increasing number of players without sacrificing performance.
3. Server Locations
Consider the physical location of the server hosting provider’s data centers. The closer the server is to your player base, the lower the latency and better the overall connection quality. Look for providers with data centers located in regions that have a good internet infrastructure to minimize lag and ensure a smooth gaming experience.
4. Customer Support
Having reliable and responsive customer support is crucial, especially when encountering technical issues with your Minecraft server. Look for hosting providers that offer 24/7 support through various channels, such as live chat, email, or phone. Prompt and knowledgeable customer support can help resolve any problems quickly, allowing you to get back to enjoying your multiplayer sessions.
5. Price and Value for Money
Consider your budget and compare the pricing plans of different hosting providers. While price is an important factor, it’s essential to evaluate the value for money. Look for providers that offer reasonable pricing while providing the necessary features and performance for your Minecraft server.
6. Control Panel and Customization Options
A user-friendly control panel allows you to easily manage and customize your Minecraft server settings. Look for hosting providers that offer intuitive control panels, such as Multicraft or Pterodactyl, which provide convenient options for adjusting server configurations, adding plugins, and monitoring server performance.
7. Reputation and Reviews
Do some research and read reviews from other Minecraft server owners to gauge the reputation of hosting providers. Pay attention to feedback regarding server performance, customer support, and overall satisfaction. This can give you valuable insights into the reliability and quality of the hosting provider.
By considering these factors, you can choose the right server hosting provider for your Minecraft multiplayer server. A reliable and efficient hosting provider ensures a smooth and enjoyable gaming experience, allowing you and your friends to embark on exciting adventures in the Minecraft world.
Installing and Configuring the Minecraft Server
Once you have chosen a server hosting provider and downloaded the Minecraft server software, the next step is to install and configure the server. Follow these steps to get your Minecraft server up and running:
1. Uploading Server Files
Access your server hosting provider’s control panel or FTP client and upload the Minecraft server files to your server’s directory. This is typically done by dragging and dropping the server files into the designated folder.
2. Running the Server for the First Time
Once the server files are uploaded, navigate to the folder on your server where the files are stored. Locate the Minecraft server file (typically named “server.jar”) and run it. This will start the server and generate additional files needed to configure the server.
3. Customizing Server Settings
After running the server for the first time, several configuration files will be generated. Open the “server.properties” file using a text editor to customize various server settings. You can modify parameters such as the server name, game mode, difficulty level, and more.
4. Adjusting Resource Allocation
Depending on your server hosting plan, you may need to adjust the allocated resources for your Minecraft server. Some hosting providers offer easy-to-use control panels where you can adjust parameters such as memory (RAM) allocation, CPU usage, and disk space. Consider the number of players you expect to have on your server and adjust the resources accordingly.
5. Adding Plugins and Mods
If you want to enhance your Minecraft server with additional features and gameplay mechanics, you can install plugins and mods. Most plugins and mods have installation instructions included with them. Follow the specific instructions provided to add the desired plugins or mods to your server.
6. Allowing Player Connections
To allow players to connect to your Minecraft server, you may need to enable online mode in the “server.properties” file. This ensures that players must have a legitimate Minecraft account to join your server, helping to prevent unauthorized access.
7. Restarting the Server
Once you have made all the necessary configurations, save the “server.properties” file and restart the Minecraft server. This is typically done by stopping the server and running the server file again. Any changes you made will take effect after the server restarts.
By following these steps, you can successfully install and configure your Minecraft server. Remember to regularly update your server files and keep an eye on the server logs to identify and resolve any issues that may arise. With your server up and running, you and your friends can dive into the exciting world of Minecraft multiplayer and embark on countless adventures together.
Port Forwarding for Multiplayer
If you want to host a Minecraft multiplayer server, you’ll need to configure port forwarding on your router to allow other players to connect to your server. Port forwarding is the process of instructing your router to direct incoming traffic on a specific port to a designated IP address, in this case, your Minecraft server. Here’s how you can set up port forwarding for multiplayer:
1. Find Your Internal IP Address
The first step is to find the internal IP address of the device running your Minecraft server. This IP address is unique to your local network and is assigned to your server computer or device. You can find this IP address by opening the command prompt or terminal and typing “ipconfig” (for Windows) or “ifconfig” (for macOS and Linux).
2. Access Your Router’s Settings
Open your web browser and enter your router’s default gateway IP address in the address bar. This IP address is typically 192.168.0.1 or 192.168.1.1. Consult your router’s manual or manufacturer’s website if you are unsure about the default IP address.
3. Login to Your Router
Enter the username and password to access your router’s settings. If you haven’t changed them, refer to your router’s documentation for the default login credentials. Once logged in, navigate to the port forwarding settings section.
4. Create a Port Forwarding Rule
In the port forwarding settings section, you’ll need to create a new port forwarding rule specific to your Minecraft server. Provide a name for the rule (e.g., “Minecraft Server”), specify the internal IP address of your server, and enter the port numbers used by Minecraft, which are 25565 by default.
5. Enable the Port Forwarding Rule
After creating the port forwarding rule, save your changes and enable the rule. This ensures that incoming traffic on the specified port is directed to your Minecraft server’s IP address.
6. Test the Port Forwarding
To ensure that the port forwarding is set up correctly, you can use online port forwarding testing tools or ask a friend to attempt to connect to your Minecraft server using your public IP address. If the connection is successful, then the port forwarding is working properly.
Keep in mind that port forwarding settings may vary depending on your router’s make and model. Consult your router’s manual or contact your router manufacturer’s support for specific instructions if you encounter any difficulties.
By following these steps and configuring port forwarding on your router, you can enable other players to connect to your Minecraft multiplayer server. Take note of your public IP address, as it will be needed by players who want to join your server. Enjoy playing Minecraft together with your friends in the exciting multiplayer world you’ve created!
Connecting to a Minecraft Multiplayer Server
Now that you have set up and configured your Minecraft multiplayer server, it’s time to connect and join the fun with your friends! Here’s a step-by-step guide on how to connect to a Minecraft multiplayer server:
1. Obtain the Server IP Address
The first thing you’ll need is the server’s IP address. The server IP address is a unique identifier that allows you to connect to a specific Minecraft server. You can get the server IP address from the server host or from the server owner if you’re connecting to a private server.
2. Launch Minecraft
Launch the Minecraft Java Edition on your computer. Once the Minecraft launcher is open, click on the “Multiplayer” button located on the main menu.
3. Add a New Server
In the multiplayer menu, click on the “Add Server” button. This will open a dialog box where you can enter the server details.
4. Enter Server Details
In the dialog box, enter a name for the server in the “Server Name” field. This can be any name you choose for easy identification. Next, enter the server IP address you obtained in step 1 into the “Server Address” field. If desired, you can also add a server description.
5. Save and Connect
Once you’ve entered the server details, click the “Done” button to save the settings. You will be redirected back to the multiplayer menu, where you should now see the server name listed with a green status indicator. Click on the server name to connect to the multiplayer server.
6. Wait for Connection
After clicking on the server name, Minecraft will attempt to connect you to the multiplayer server. This process may take a few moments, and you might see a “Logging in” or “Connecting to server” message. Be patient while the connection is established.
7. Start Playing
Once the connection is successful, you will be inside the Minecraft server, ready to embark on adventures with your friends. Explore the server’s world, build structures, mine resources, and interact with other players in this shared Minecraft experience.
If at any point you encounter issues connecting to a server, double-check the server IP address, ensure you have a stable internet connection, and verify that the server is online and active. Additionally, make sure you are using the correct version of Minecraft for the server you’re trying to connect to.
Now that you know how to connect to a Minecraft multiplayer server, gather your friends, share the server IP address, and start enjoying the collaborative and exciting gameplay of Minecraft together. Have a great time building, crafting, and exploring with your fellow players!
Inviting Friends to Join Your Minecraft Multiplayer Server
Playing Minecraft with friends is even more enjoyable when they can join you on your multiplayer server. Here are some methods you can use to invite your friends to join your Minecraft server:
1. Share the Server IP Address
The simplest and most common way to invite friends to your Minecraft server is by sharing the server’s IP address. The server IP address acts as the unique identifier for your server and enables others to connect to it. Simply provide your friends with the IP address, and they can enter it into their Minecraft client to join your server.
2. Use a Dynamic DNS Service
If your home internet connection has a dynamic IP address that changes periodically, using a dynamic DNS (Domain Name System) service can simplify the process of inviting friends. Dynamic DNS services assign a domain name to your changing IP address. You can share the domain name instead of the IP address, and it will always point to your current IP address, making it easier for your friends to connect to your server.
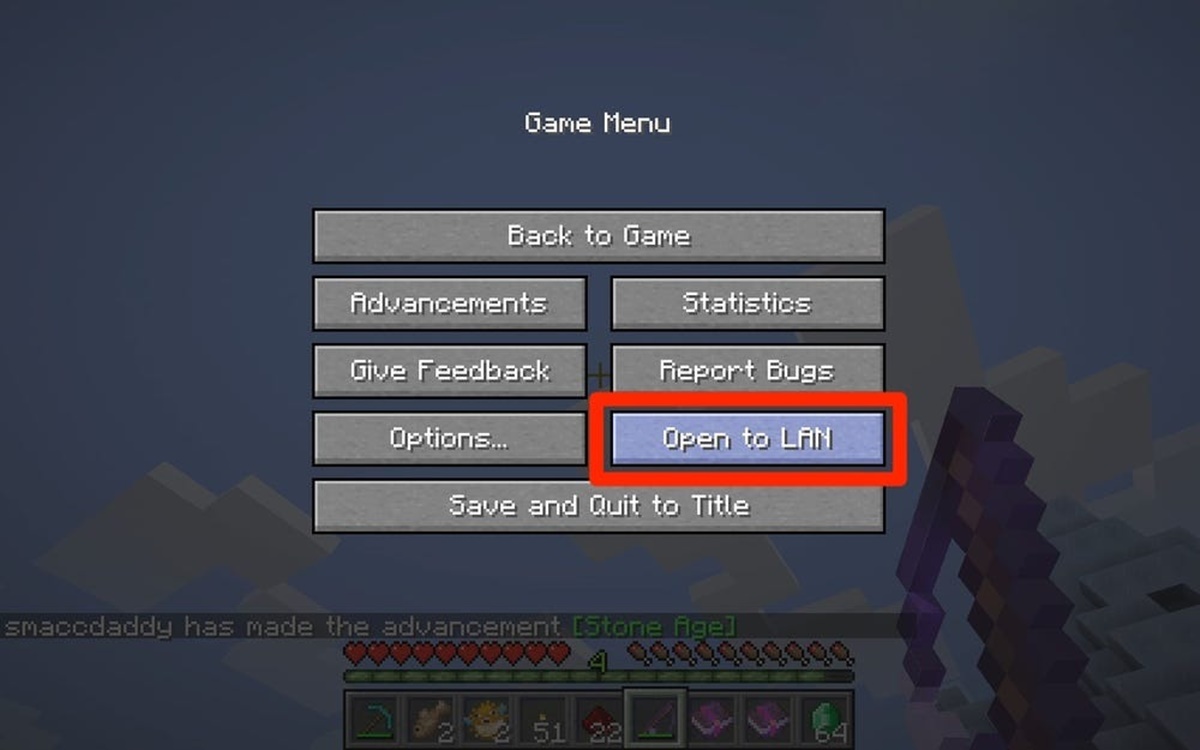
3. Local Area Network (LAN) Connection
If you and your friends are on the same local network, you can connect to your Minecraft server using a LAN connection. To do this, ensure that your friends are connected to the same Wi-Fi network as you. In Minecraft, go to the multiplayer menu and have your friends select the LAN server option. Your server should appear on their list of available servers, allowing them to join without needing the server’s IP address or any additional setup.
4. In-Game Invite Features
Some server hosting platforms and Minecraft mods offer in-game invitation features that allow you to invite friends to join your server directly from within the game. These features often have user-friendly interfaces where you can enter your friends’ usernames or send them direct invitations. Check if your server hosting provider or the plugins you are using offer such features, as they can simplify the process of inviting friends to your server.
5. Social Media or Messaging Apps
If you and your friends are connected on social media platforms or messaging apps, you can alternatively share the server details through these channels. Send a message or create a group chat where you provide the server IP address, domain name, or any relevant information for them to join your Minecraft server. This method works well for small groups of friends who are familiar with each other’s online presence.
Remember to communicate any specific rules or guidelines you have for your server, such as gameplay modes, plugins, or server settings. And always be conscious of your server’s capacity and maintain a positive and inclusive environment for everyone.
With these methods, you can easily invite your friends to join your Minecraft multiplayer server. Collaborate, build, explore, and embark on exciting adventures together in the vast and creative world of Minecraft!
Managing Player Roles and Permissions
As the owner or administrator of a Minecraft multiplayer server, you have the ability to manage player roles and permissions. This allows you to control what players can do within the server, ensuring a fair and enjoyable gaming experience for everyone. Here are some ways to effectively manage player roles and permissions:
1. Understand Default Minecraft Roles
Minecraft has three default player roles: operator (OP), member, and visitor. Operators have the highest level of authority and can perform administrative actions like changing server settings and executing commands. Members are regular players who can interact with the environment and other players but do not have administrative privileges. Visitors are players who are only granted limited access to explore the server without being able to make changes.
2. Use Permissions Plugins
Consider using a permissions plugin, such as PermissionsEx or LuckPerms, to have more control over player roles and permissions. These plugins allow you to create custom roles with specific permissions. You can assign permissions to roles and then assign roles to players, giving you granular control over what each player can do on the server.
3. Define Player Roles and Responsibilities
Before assigning roles and permissions, define the responsibilities and privileges that each role should have. For example, you may have roles like builder, moderator, and administrator. Builders can focus on construction and design, moderators can enforce server rules and handle disputes, and administrators have full control over settings and player management.
4. Assign Roles Based on Trust and Experience
When assigning player roles, consider the trustworthiness and experience of the players. Promoting players to higher roles should be based on their commitment, reliability, and knowledge of the server rules. It’s important to ensure that individuals in authoritative roles can be trusted with their elevated permissions.
5. Communicate Role Expectations
Clearly communicate the expectations and responsibilities of each role to the players. This can be done through server rules, guidelines, or a dedicated website or forum. Let players know what privileges and limitations come with each role and what behavior is expected from them. Openly address any questions or concerns players may have about their roles.
6. Regularly Review and Adjust Roles
As your server evolves and the player base changes, it’s essential to periodically review and adjust player roles and permissions. Evaluate whether certain roles need to be added or removed and whether the permissions assigned align with the server’s goals and gameplay style. Regularly communicating with players and seeking feedback can help inform these decisions.
7. Foster a Positive Community
Building a positive and inclusive community is key to a successful Minecraft server. Encourage collaboration, respect, and teamwork among players. Establish guidelines for behavior and address any conflicts or issues promptly and fairly. By creating a welcoming environment, players will be more likely to respect and appreciate the roles and permissions assigned to them.
By effectively managing player roles and permissions, you can create a balanced and enjoyable experience for everyone on your Minecraft multiplayer server. Ensure clear communication, trustworthiness, and a positive community to foster a thriving gaming environment. Have fun exploring and creating with your players!
Creating and Joining Minecraft Multiplayer Game Modes
Minecraft offers various game modes that cater to different playstyles and preferences. Whether you want to engage in survival challenges, collaborate on creative constructions, or engage in intense player-versus-player combat, there is a game mode for you. Here’s a guide on creating and joining Minecraft multiplayer game modes:
1. Survival Mode
In Survival mode, players must gather resources, build shelters, and survive against various challenges, including hostile mobs and hunger. To create a Survival multiplayer game, start a new world or select an existing Survival world. Then, open the game to LAN (Local Area Network) to allow your friends to join. They can join by connecting to your local network or using the server’s IP address.
2. Creative Mode
Creative mode offers unlimited resources, allowing players to let their imaginations run wild and build without restrictions. To create a Creative multiplayer game, follow the same process as Survival mode, but select Creative mode when starting the world. Other players can then join by connecting to your LAN network or the server’s IP address.
3. Adventure Mode
Adventure mode is designed to create custom experiences within Minecraft. In this mode, players can explore custom maps and stories created by the Minecraft community. To join an Adventure multiplayer game, first, find an adventure map or server that supports this game mode. The server owner or map creator will provide instructions on how to join their specific adventure.
4. Spectator Mode
Spectator mode allows players to fly through blocks and observe the world without interacting with it. This mode is useful for hosting events, game tournaments, or exploring complex redstone contraptions. To join a Spectator multiplayer game, you will need to be invited by the server owner, who will grant you spectator permissions upon joining.
5. Minigame Servers
Minecraft offers a wide range of servers dedicated to hosting various mini-games, such as parkour, PvP battles, racing, and more. To join a Minigame server, you need the server IP address. Look for popular minigame servers that offer multiple game modes and an active player base. Joining these servers will allow you to participate in a variety of exciting multiplayer games.
6. Modded and Custom Game Modes
Minecraft’s versatility extends to modding, which allows for the creation of custom game modes and experiences. Modded servers offer unique gameplay features, mechanics, and even entirely new dimensions. To join a modded server or custom game mode, you will need the specific mod or resource pack required by the server. Look for servers that align with your desired gameplay style and follow their instructions for joining.
Remember to respect the rules and guidelines of the game mode and server you are joining. Take time to familiarize yourself with the specific mechanics and objectives of each game mode to fully enjoy the experience.
By creating or joining different Minecraft multiplayer game modes, you can explore diverse experiences, challenge yourself, and have hours of fun with friends. Choose the mode that suits your preferences, connect with others, and embark on exciting adventures in the vast and dynamic world of Minecraft!
Communicating with Other Players in Minecraft Multiplayer
One of the key aspects of Minecraft multiplayer is the ability to communicate and collaborate with other players. Whether you want to coordinate building projects, strategize in battles, or simply chat and make new friends, effective communication enhances the multiplayer experience. Here are some ways to communicate with other players in Minecraft multiplayer:
1. In-Game Chat
The most common method of communication in Minecraft multiplayer is through the in-game chat feature. To chat, simply press the “T” key (or the “/” key on some platforms) to open the chat window. Type your message and press enter to send it to all players on the server. Everyone will be able to see your messages and respond accordingly.
2. Private Messaging
Minecraft also offers a private messaging feature, allowing you to communicate directly with specific players. To send a private message, type “/msg [playername] [message]” in the chat window, replacing “[playername]” with the name of the player you want to message. Only you and the recipient will see the message, ensuring a more private conversation.
3. Voice Chat
Besides text chat, you can use voice chat to communicate with other players. Some Minecraft servers or mods may offer voice chat capabilities, allowing you to talk with your friends using microphones or headsets. Alternatively, you can use external voice chat applications, such as Discord or Teamspeak, to communicate while playing Minecraft. Make sure to coordinate with your friends to determine which voice chat method to use.
4. Server Forums or Websites
Many Minecraft servers have dedicated forums or websites where players can communicate outside of the game. These platforms often provide different sections for general discussions, suggestions, events, and more. Check if your server has a forum or website and join the discussions to interact with other players, share ideas, or ask for help.
5. Signs and Books
In Minecraft, you can also use signs and books to communicate with other players. Place signs in key locations to leave messages or instructions for others to read. For longer messages or stories, write them in books and share them with other players. This method is particularly useful for leaving messages in creative building projects or adventure maps.
6. Collaborative Building Projects
If you want to communicate and work together on building projects, it can be helpful to establish a system of agreed-upon signals or color-coded building plans. This ensures that everyone understands the intentions and progress of the project without relying solely on chat or voice communication.
7. Respectful and Positive Communication
Lastly, remember the importance of maintaining respectful and positive communication with other players. Treat your fellow players with kindness, avoid offensive language, and listen to others’ opinions. Engage in constructive discussions and be open to collaboration. By fostering a welcoming and inclusive atmosphere, you will create an enjoyable multiplayer experience for everyone involved.
Effectively communicating with other players in Minecraft multiplayer enhances teamwork, coordination, and social interactions. Choose the communication methods that suit your playstyle, collaborate with others, and forge lasting friendships in the vibrant Minecraft community.
Troubleshooting Common Issues
While Minecraft multiplayer can provide hours of fun and collaboration, it’s not uncommon to encounter certain issues along the way. Here are some common problems that players may face in Minecraft multiplayer and ways to troubleshoot them:
1. Connection Issues
If you are unable to connect to a multiplayer server or are experiencing frequent disconnections, check your internet connection. Make sure you have a stable internet connection and that no network issues are affecting your connectivity. Restarting your router or resetting your internet connection may help resolve connection problems.
2. Incorrect Server Address
If you can’t connect to a multiplayer server, double-check the server address you are entering. Ensure that you have the correct IP address or domain name, as even a small typo can prevent you from joining the server. Make sure to enter the address correctly, including any special characters or numbers.
3. Outdated Minecraft Version
If you are unable to join a server, check your Minecraft version. Servers often run specific Minecraft versions, and trying to connect with an incompatible version can result in failure. Make sure your Minecraft client is updated to the same version as the server you are trying to join.
4. Firewall or Antivirus Blocks
Firewalls and antivirus software are designed to protect your computer, but they may sometimes interfere with Minecraft multiplayer. Check your firewall settings to ensure that Minecraft is given permission to connect to the internet. Similarly, configure your antivirus software to exempt Minecraft from any restrictions or scans that might hinder its multiplayer functionality.
5. Server Lag
If you are experiencing lag while playing on a multiplayer server, there are a few possible solutions. First, check your computer’s performance and ensure that it meets the requirements to run Minecraft smoothly. Close any unnecessary programs running in the background to free up system resources. Additionally, consider choosing servers closer to your location to minimize latency issues.
6. Plugin or Mod Compatibility
If you encounter issues on a modded or plugin-based server, ensure that your mods or plugins are compatible with the server version. Some mods or plugins may also conflict with one another, causing crashes or gameplay issues. Make sure you have the correct versions installed and check for any conflicting mods or plugins. Removing or updating them may resolve these issues.
7. Server-Side Maintenance or Downtime
If a specific server is consistently inaccessible, it may be undergoing maintenance or experiencing downtime. Check the server’s website or community forums for any announcements or updates regarding its availability. Sometimes, patiently waiting for the server to come back online is the best solution.
If you continue to experience issues, reach out for support from the server’s administrator or consult Minecraft community forums for further assistance. Remember to provide as much detail as possible about the problem, such as error messages and steps to reproduce the issue.
Troubleshooting common issues in Minecraft multiplayer can be challenging, but with patience and a systematic approach, many problems can be resolved. Don’t hesitate to seek help when needed, as the Minecraft community is often eager to assist fellow players in overcoming technical difficulties. Happy gaming!