
System Requirements for Playing Ark Survival on HTC Vive
If you’re ready to embark on a thrilling virtual reality adventure in the prehistoric world of Ark Survival on your HTC Vive, it’s important to ensure that your system meets the necessary requirements. Playing Ark Survival on the HTC Vive requires a powerful computer setup to fully immerse yourself in the game. Here are the minimum and recommended system requirements:
Minimum System Requirements:
- Processor: Intel Core i5-4590 or AMD FX 8350
- Memory: 8GB RAM
- Graphics: NVIDIA GeForce GTX 970 or AMD Radeon R9 290
- DirectX: Version 11
- Storage: 60GB available space
- Additional Notes: HTC Vive VR headset and SteamVR required
Recommended System Requirements:
- Processor: Intel Core i7-4770K or AMD Ryzen 5 1500X
- Memory: 16GB RAM
- Graphics: NVIDIA GeForce GTX 1070 or AMD Radeon RX 480
- DirectX: Version 11
- Storage: 60GB available space
- Additional Notes: HTC Vive VR headset and SteamVR required
It’s important to note that these are the minimum and recommended requirements for a smooth and enjoyable gaming experience. If your system falls below the minimum specifications, you may encounter performance issues or even struggle to run the game. To fully enjoy the immersive world of Ark Survival on HTC Vive, it’s recommended to meet or exceed the recommended system requirements.
Make sure to update your graphics card drivers and ensure that your HTC Vive and SteamVR are up to date. These updates can greatly improve performance and compatibility, allowing you to maximize your gaming experience. With a compatible system, you’ll be ready to dive into the prehistoric world of Ark Survival and embark on thrilling adventures with dinosaurs and otherworldly creatures.
Setting Up Your HTC Vive for Ark Survival
Before diving into the epic world of Ark Survival on your HTC Vive, it’s crucial to properly set up your virtual reality headset for the best gaming experience. Here’s a step-by-step guide to get your HTC Vive ready for Ark Survival:
- Connect the HTC Vive to your PC: Begin by connecting your HTC Vive headset to your PC. Ensure that all the necessary cables, including the power cord and HDMI cable, are securely plugged in.
- Install SteamVR: To play Ark Survival on your HTC Vive, you’ll need to have SteamVR installed on your computer. Visit the official Steam website and download the Steam client if you haven’t already. Launch Steam and go to the Library tab to find and install the SteamVR application.
- Set up the HTC Vive base stations: The HTC Vive requires base stations to track your movements in virtual reality. Place the base stations in opposite corners of your play area, at least 6.5 feet high, and ensure they have a clear line of sight to each other. Connect the base stations to a power source and make sure they are powered on.
- Perform room setup: Launch SteamVR and follow the on-screen instructions to set up your room. This process involves defining your play area by tracing the boundaries with your controllers and adjusting the headset placement. It’s important to carefully follow the instructions to ensure accurate tracking and a safe gaming environment.
- Calibrate the controllers: Once the room setup is complete, you’ll need to calibrate your HTC Vive controllers. Hold the controllers in front of your headset and follow the calibration prompts in SteamVR. This step is crucial for accurate tracking and optimal gameplay.
- Adjust the headset: Put on your HTC Vive headset and make sure it fits comfortably on your head. Adjust the straps and the position of the headset to ensure a clear and immersive view. Tighten the straps enough to keep the headset secure but not too tight to cause discomfort.
- Launch Ark Survival: With your HTC Vive properly set up and SteamVR running, launch Ark Survival from your Steam Library. Make sure the game is set to run in virtual reality mode, and you’ll be ready to enter the stunning world of dinosaurs and survival.
By following these steps, you can successfully set up your HTC Vive for a thrilling Ark Survival experience. Enjoy the immersive virtual reality world and prepare to face the challenges that await you in this prehistoric adventure.
Downloading and Installing Ark Survival on HTC Vive
To embark on your virtual reality journey in the prehistoric world of Ark Survival on your HTC Vive, you’ll first need to download and install the game. Follow these steps to get Ark Survival up and running on your HTC Vive:
- Open Steam: Launch the Steam client on your computer. If you don’t have Steam installed, visit the official Steam website to download and install it.
- Search for Ark Survival: In the Steam client, use the search bar at the top-right corner to search for “Ark Survival.” Click on the game from the search results to access its store page.
- Purchase the game: If you haven’t already purchased Ark Survival, click on the “Add to Cart” or “Buy” button to proceed with the purchase. Follow the on-screen instructions to complete the transaction.
- Install the game: After purchasing Ark Survival, the game will be added to your Steam Library. Navigate to your Steam Library by clicking on “Library” at the top of the Steam client. Locate Ark Survival in your library, right-click on it, and select “Install” from the drop-down menu.
- Choose installation location: During the installation process, you’ll be prompted to choose the installation location for Ark Survival. Select your preferred drive and click on “Next” to continue.
- Wait for the installation: Steam will now begin downloading and installing Ark Survival on your computer. The time this process takes will vary depending on your internet speed and the size of the game. Be patient and ensure you have sufficient disk space available.
- Install SteamVR: While the game is being installed, ensure that SteamVR is also installed on your computer. If you haven’t already installed it, follow the instructions provided in the “Setting Up Your HTC Vive for Ark Survival” section above.
- Launch Ark Survival: Once the installation is complete, go back to your Steam Library and locate Ark Survival. Click on the “Play” button to launch the game.
With Ark Survival successfully downloaded and installed on your HTC Vive, you’re now ready to embark on a thrilling adventure in the prehistoric world. Strap on your VR headset, grab your controllers, and get ready to survive, tame dinosaurs, and explore the vast open world of Ark Survival.
Navigating the Main Menu in Ark Survival
Once you’ve launched Ark Survival on your HTC Vive, you’ll find yourself in the main menu, which serves as the gateway to the prehistoric world. Navigating the main menu is essential to access various game modes, customize settings, and explore options. Here’s a guide on how to navigate the main menu in Ark Survival:
- Navigation Controls: To navigate the main menu, you can use the HTC Vive controllers. The trigger button allows you to select and interact with menu options, while the touchpad or joystick can be used to navigate through different menu sections and scroll through options.
- Main Menu Sections: The main menu is divided into several sections, each offering different options. These sections include “Single Player,” “Multiplayer,” “Options,” “Mods,” and “Credits.” To access a specific section, point your controller at it and press the trigger button.
- Single Player: In this section, you can start a new single-player game, continue a saved game, or customize game settings for single-player mode. Select the desired option by pointing at it and pressing the trigger button.
- Multiplayer: The multiplayer section allows you to join or host multiplayer sessions in the Ark Survival world. Here, you can search for and connect to servers, create private sessions with your friends, or manage your server settings.
- Options: The options section allows you to customize various game settings to suit your preferences. You can adjust graphics settings, audio options, control configurations, and more. Explore the different tabs within the options section to fine-tune your Ark Survival experience.
- Mods: If you’re interested in enhancing your gameplay with mods created by the Ark Survival community, you can browse and install mods through the mods section. This section provides access to a wide variety of user-generated content that can add new features, creatures, and gameplay mechanics to the game.
- Credits: The credits section provides recognition to the developers and contributors of Ark Survival. You can explore this section to learn more about the individuals and teams involved in creating this immersive and captivating virtual reality experience.
- Exiting the Main Menu: To exit the main menu and enter the game world, navigate to the “Single Player” or “Multiplayer” section and select the desired game mode or session. This will launch the game and transport you to the vast and dangerous world of Ark Survival.
By familiarizing yourself with the navigation controls and menu sections in Ark Survival, you can easily navigate through the main menu and access the features and options that suit your gameplay preferences. Take your time to explore the different sections, customize settings, and prepare yourself for the thrilling adventures that await you in the prehistoric world.
Configuring Graphics and Controls in Ark Survival
Configuring the graphics and controls in Ark Survival on your HTC Vive is crucial for optimizing your gaming experience and ensuring smooth gameplay. By adjusting these settings, you can enhance visual quality, customize controls to your preference, and tailor the game to meet the capabilities of your system. Here’s a guide on how to configure graphics and controls in Ark Survival:
- Graphics Settings: To adjust the graphics settings, navigate to the “Options” section in the main menu and select the “Graphics” tab. Here, you’ll find various options to customize the visual quality of Ark Survival. These options may include resolution, texture quality, view distance, shadows, anti-aliasing, and more. Experiment with different settings to find a balance between visual fidelity and smooth performance based on the capabilities of your computer.
- Controls Settings: In the “Options” section, select the “Controls” tab to access the control configuration options. Here, you can remap controls, adjust sensitivity settings, and customize various aspects of the controls to your preference. Tailor the controls based on your comfort and play style, ensuring that the controls feel natural and responsive for an immersive experience.
- VR-Specific Settings: Ark Survival offers specific options for virtual reality gameplay. In the “Options” section, search for VR-specific settings or look for a dedicated VR tab. Here, you may find options to enable VR head-bobbing, adjust VR comfort settings, or fine-tune VR-specific graphical options. It’s recommended to experiment with these settings to find the configuration that provides the most comfortable and immersive VR experience.
- Save and Apply Changes: After customizing the graphics and controls settings, make sure to save and apply the changes before exiting the options menu. This ensures that your configurations are applied and ready for your next gameplay session.
- Additional Tips: If you’re experiencing performance issues or want to further optimize your graphics settings, you can try adjusting options like shadows, view distance, or other resource-intensive settings. Lowering these settings can help improve frame rates and overall performance.
- Experiment and Fine-tune: Every player’s system and preference can vary, so don’t be afraid to experiment with different settings to find what works best for you. Take the time to fine-tune and adjust the graphics and controls settings until you achieve the optimal balance of visual quality and performance.
By properly configuring the graphics and controls in Ark Survival on your HTC Vive, you can enhance your gaming experience, ensure smooth gameplay, and create a personalized setup that suits your preferences and hardware capabilities. Take advantage of these options to fully immerse yourself in the awe-inspiring world of Ark Survival.
Understanding the Game Interface in Ark Survival
As you embark on your adventure in the captivating world of Ark Survival on your HTC Vive, it’s essential to familiarize yourself with the game interface. The game interface provides vital information and tools that will aid you in surviving and thriving in this prehistoric environment. Here’s a breakdown of the key elements and functions of the game interface in Ark Survival:
- Health, Stamina, and Food: Located at the bottom left corner of the screen, these bars display your character’s current health, stamina, and food levels. Keep an eye on these bars and ensure they don’t deplete fully, as low levels can weaken your character and make survival more challenging.
- Hotbar: Positioned at the bottom center of the screen, the hotbar displays the items you have equipped and readily available for use. Assign items to slots on the hotbar for quick access. To use a hotbar item, press the corresponding number key on your keyboard or use the assigned VR controller buttons.
- Status Indicators: Along the top right corner of the screen, various icons and indicators provide information about your character’s current status. These indicators may include your character’s level, current experience points, water level, oxygen level (when underwater), and more.
- Inventory: Accessible by pressing a dedicated key or through the game’s menu, the inventory screen allows you to manage and organize your collected items. Here, you can view, equip, drop, or transfer items between your inventory and storage containers, such as chests.
- Crafting Menu: By opening the crafting menu, you can view and craft various items and structures. The crafting menu displays the recipes available to you based on your current level and the materials you have gathered. Experiment with different recipes to create useful tools, weapons, and essential items for survival.
- Map and GPS: As you explore the vast world of Ark Survival, you can access a map to help you navigate through different regions and locate important landmarks. In addition, advanced players may acquire a GPS device that provides real-time location tracking and coordinates, further aiding in exploration and navigation.
- Chat Interface: If playing on multiplayer servers, the chat interface allows you to communicate with other players. Use this interface to ask for assistance, coordinate activities, or engage in social interactions with fellow survivors.
- Tutorials and Hints: Ark Survival provides useful tutorials and hints throughout the game to guide and educate you on various gameplay mechanics, crafting recipes, and survival strategies. Pay attention to these prompts as they can provide valuable tips and insights that enhance your gameplay experience.
Understanding the game interface in Ark Survival is essential for effectively managing your character’s health, resources, and inventory. By mastering these elements, you’ll be better equipped to navigate the challenging environments, tame dinosaurs, gather resources, and survive the multitude of dangers lurking in this prehistoric world.
Basic Controls in Ark Survival on HTC Vive
Mastering the basic controls in Ark Survival is essential for navigating the prehistoric world and surviving encounters with dinosaurs and other creatures. With your HTC Vive controller in hand, familiarize yourself with the following controls to ensure a seamless gaming experience:
- Movement: Use the touchpad or joystick on your HTC Vive controller to move around. Pushing forward will make your character move forward, while pulling back will make them move backward. Tilting the joystick or touchpad left or right will allow you to strafe in the respective directions.
- Jump: Press the designated jump button on your HTC Vive controller to make your character jump. Jumping can be useful for traversing obstacles or evading danger.
- Crouch: To crouch and reach lower objects or hide from predators, press the crouch button on your HTC Vive controller. This can help you move stealthily and avoid attracting unwanted attention.
- Interaction: To interact with objects, creatures, or other players, point your HTC Vive controller at the desired target and press the interaction button. This will allow you to execute actions such as opening doors, accessing inventory, or initiating communication.
- Attacking: To defend yourself or attack enemies, use the attack button on your HTC Vive controller. Swing or thrust your controller to execute attacks with weapons or fists, depending on what you have equipped.
- Gathering Resources: To gather resources such as wood, stone, or berries, approach the desired resource and use the designated gather button. This action will gather the resources and add them to your inventory for later use.
- Inventory Navigation: Access your inventory by using the designated button. Navigate through your inventory by using the joystick or touchpad on your HTC Vive controller. Select an item to equip it, drop it, or transfer it to a storage container.
- Using Hotbar Items: The hotbar on the bottom of your screen displays equipped items. To use an item from the hotbar, press the corresponding number button on your HTC Vive controller. This allows quick access to important items such as weapons, food, tools, or medical supplies.
- Mounting and Riding Dinosaurs: In Ark Survival, you can tame and ride dinosaurs. Approach a tamed dinosaur and use the designated mount button to climb aboard and control the creature. Each dinosaur may have specific abilities and controls, so be sure to familiarize yourself with each dinosaur’s unique mechanics.
- Menu Navigation: Navigate through the in-game menus by using the touchpad or joystick to highlight options and the interaction button to select them. This will allow you to access settings, manage your tribe (if playing multiplayer), and perform other actions in the game.
By becoming proficient in these basic controls, you’ll be able to efficiently explore the immersive world of Ark Survival on your HTC Vive. Practice using the controls in different scenarios and adapt your strategies based on the challenges you encounter. Soon, you’ll be on your way to mastering the game and embarking on unforgettable adventures!
How to Survive in the Ark World
Surviving in the harsh and dangerous world of Ark Survival is no easy feat, but with the right strategies and knowledge, you can increase your chances of survival. Here are some essential tips to help you thrive in the Ark world:
- Gather Resources: From the moment you spawn in the Ark world, start gathering essential resources like wood, stone, and thatch. These resources are crucial for crafting tools, weapons, shelters, and other items necessary for survival.
- Construct a Shelter: Building a shelter is paramount for protecting yourself from the elements and hostile creatures. Start with simple structures like thatch or wood shelters and gradually upgrade to stronger materials like stone or metal.
- Hunt and Gather Food: Find and hunt animals for meat and gather fruits, vegetables, and other edible plants to sustain yourself. Cook meat on a campfire or use a cooking pot to ensure it’s safe to consume.
- Manage Health, Hunger, and Thirst: Monitor your character’s health, hunger, and thirst levels at all times. Keep them replenished by eating cooked food, drinking water, and using medical supplies when necessary.
- Level up and Allocate Engram Points: As you gain experience, you’ll earn levels and engram points. Use these points to learn new crafting recipes, allowing you to unlock advanced tools, weapons, and structures.
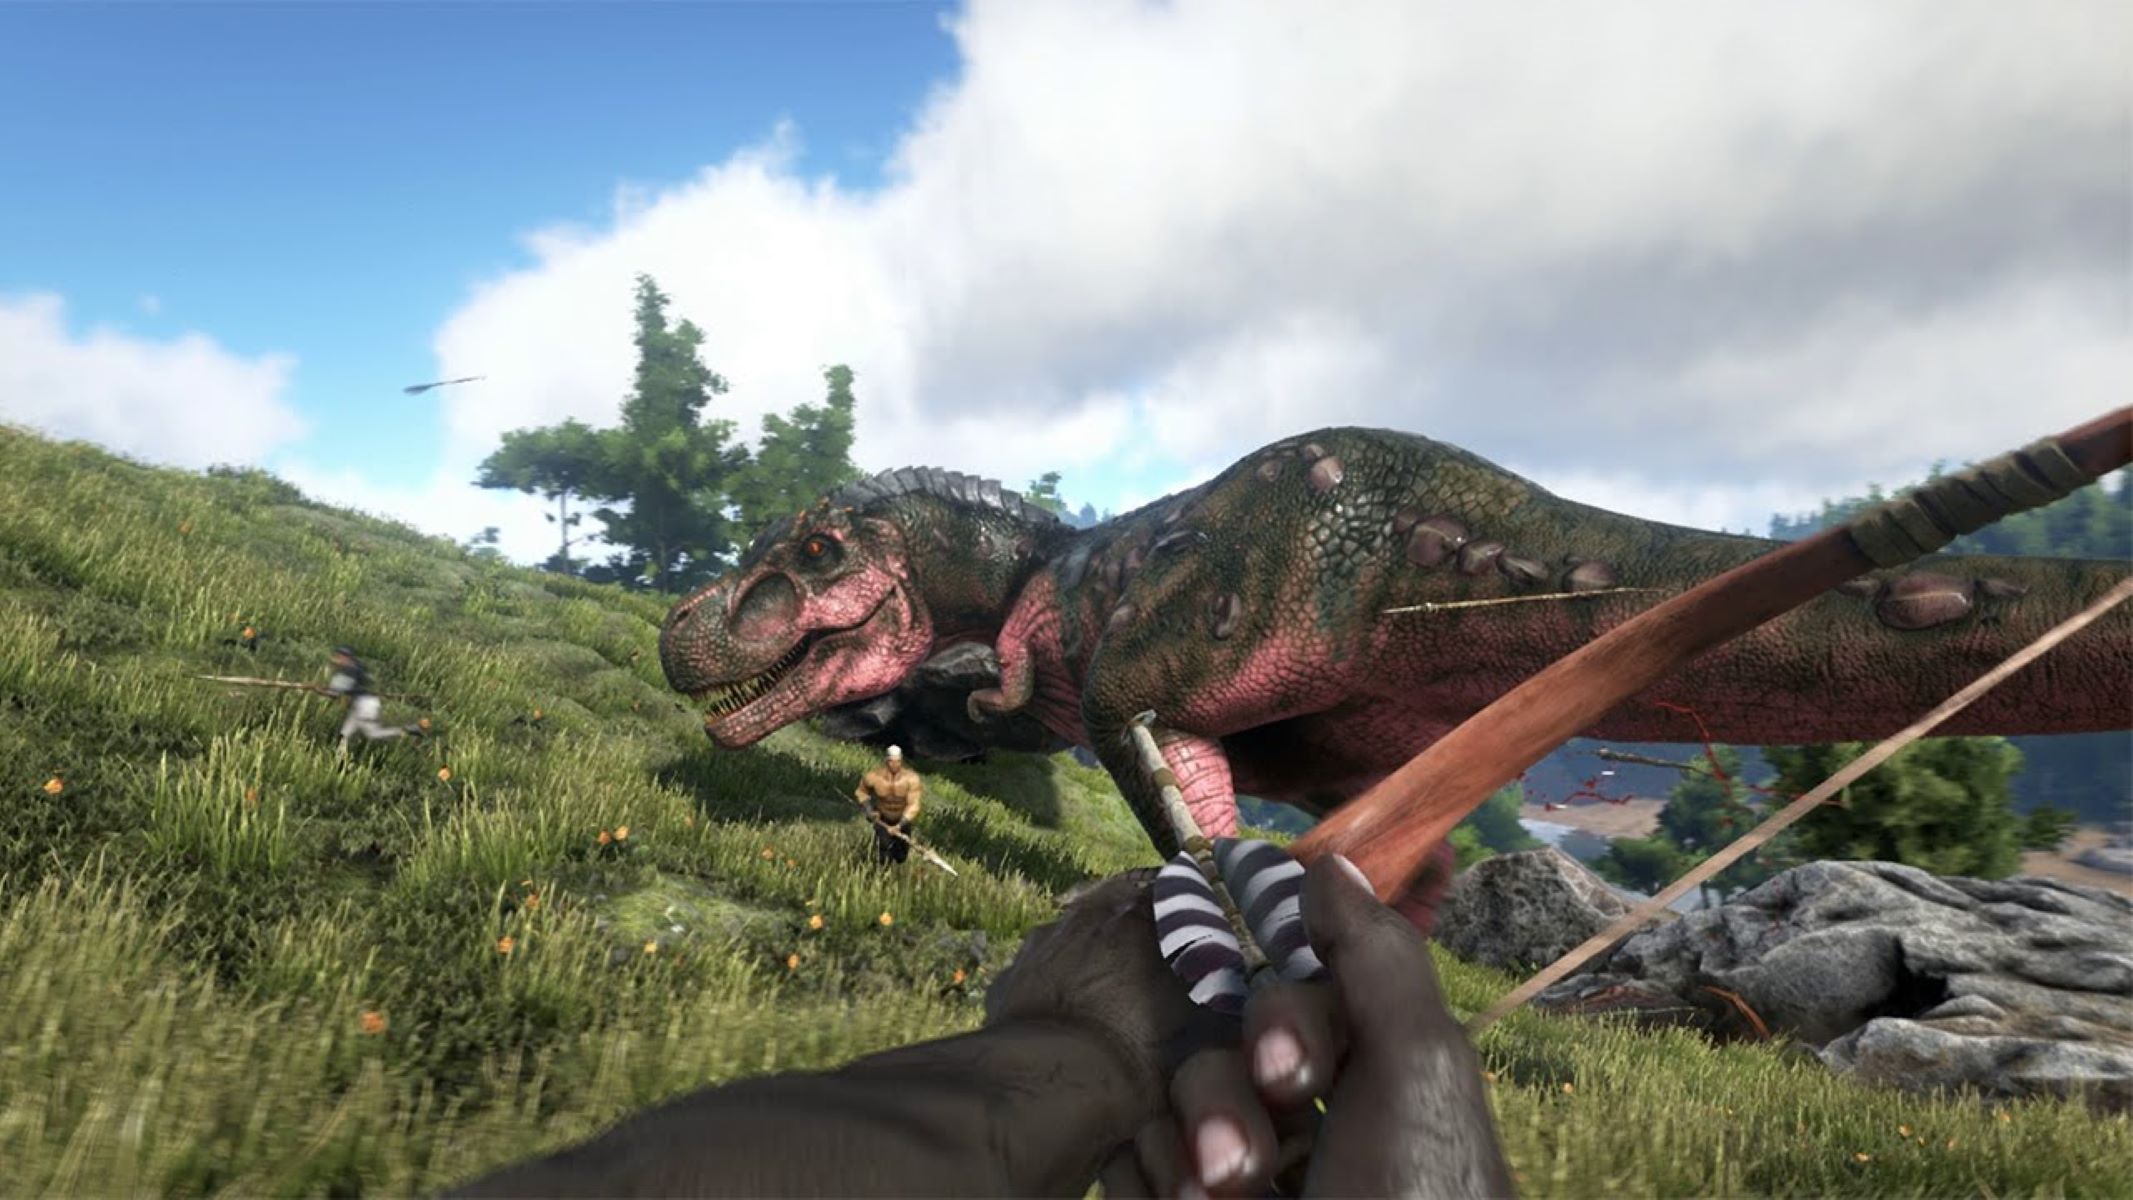
- Tame and Ride Dinosaurs: Taming dinosaurs can provide valuable companions, resources, and protection. Use bolas and tranquilizer arrows to immobilize and tame dinosaurs. Once tamed, you can ride them, use them for gathering resources, or engage in battles.
- Join a Tribe: Consider joining or forming a tribe with other players. Tribes offer safety in numbers, cooperative gameplay, and the ability to share resources, knowledge, and protection. Working together can greatly enhance your chances of survival.
- Explore Carefully: The Ark world is vast and filled with dangers. Explore cautiously, especially in unfamiliar territories. Watch out for aggressive dinosaurs, dangerous environmental conditions, and other hostile players.
- Craft Tools and Weapons: Utilize your gathered resources to craft essential tools and weapons. These items will aid in gathering resources, defending yourself against threats, and advancing in the game.
- Stay Prepared: Always carry essential supplies like food, water, medical kits, and tools. Be prepared for unexpected encounters or emergencies, ensuring you have the necessary items to handle various situations.
- Learn from Tutorials and Online Guides: Take advantage of in-game tutorials, as well as online guides and community resources, to deepen your understanding of gameplay mechanics, taming methods, base building techniques, and survival strategies.
Surviving in the Ark world requires resourcefulness, adaptability, and careful decision-making. Stay vigilant, be prepared for challenges, and continually improve your skills and knowledge to overcome the trials of this unforgiving prehistoric land.
Gathering Resources in Ark Survival
Gathering resources is a fundamental aspect of survival in the prehistoric world of Ark Survival. Resources are essential for crafting tools, weapons, shelters, and other items that are vital for your survival and progression in the game. Here’s a guide to help you gather resources effectively:
- Wood: Wood is a versatile resource used in crafting various structures, tools, and weapons. To gather wood, look for trees and use a hatchet or pickaxe to harvest it. Aim your tool at the tree and swing to gather wood from it.
- Stone: Stone is a crucial resource for crafting more advanced structures, tools, and weapons. You can find stones scattered on the ground or mine them from rocks using a pickaxe. Look for rocky outcrops or boulders to gather stone.
- Fiber: Fiber is obtained from various plant sources and is used in crafting items like thatch structures, cloth armor, and ropes. To gather fiber, look for bushes or plants and use your hands or a tool to harvest them.
- Thatch: Thatch is a lightweight resource used in crafting temporary structures and basic items. To gather thatch, look for plants with grass-like leaves and use your hands or a tool to harvest them.
- Flint: Flint is a valuable resource used in crafting tools, weapons, and certain structures. It can be obtained by harvesting rocks with a pickaxe or by breaking open small boulders scattered throughout the environment.
- Metal: Metal is a precious resource used in crafting advanced tools, weapons, and structures. It can be gathered by harvesting metal-rich rocks or mining metal nodes with a metal pickaxe. Metal deposits can often be found in caves or near mountainous areas.
- Hide: Hide is obtained by harvesting the carcasses of animals you have hunted. Use a tool like a hatchet to gather hide from slain creatures. Hide is used for crafting armor, tools, and other items.
- Pelts and Fur: Pelts and fur are obtained by harvesting certain animals with a suitable tool. These resources are used in crafting warm clothing and specialized items.
- Berries and Seeds: Berries and seeds can be gathered from various plants and bushes. They provide sustenance and can also be used in taming certain creatures. Look for bushes with berries or plants with seed pods to harvest them.
- Organic Polymer: Organic polymer is a rare resource often obtained from killing certain creatures like Kairuku or Dire Polar Bears. It is essential for crafting advanced items.
Explore the Ark world and keep an eye out for resource-rich areas. It’s important to tailor your resource gathering strategy based on your needs. Remember to be cautious, as gathering resources also puts you at risk of encountering aggressive dinosaurs or other players. Always consider your surroundings and take necessary precautions to ensure your safety while gathering resources.
Building Structures and Bases in Ark Survival
Building structures and bases in Ark Survival is not only essential for your survival but also allows you to establish a secure foothold in the prehistoric world. A well-designed base provides protection from hostile creatures and other players, storage for resources, and a place to conduct research and crafting. Here’s a guide to building structures and bases in Ark Survival:
- Choose the Right Location: Select a suitable location for your base, keeping in mind proximity to resources, the presence of water sources, and natural defenses like cliffs or water bodies. Consider both practicality and defense when choosing your base’s location.
- Start with Foundations: Begin constructing your base by placing foundation pieces. Foundations serve as the base for all other structures and provide stability and structural integrity to your base. Ensure a level foundation to avoid stability issues later.
- Add Walls and Ceilings: Utilize walls and ceilings to enclose and secure your base. Walls provide protection from outside threats, while ceilings create a roof overhead. Be sure to reinforce weak points with additional walls or defensive structures.
- Construct Doors and Gates: Install doors and gates to control access to your base. They serve as entry points for authorized individuals and safeguard your resources and belongings. Reinforce them with locks or security measures to prevent unauthorized access.
- Create Storage Space: Build storage containers like chests or vaults within your base to store resources, equipment, and other valuables. Organize your items in designated storage units to easily find and manage your inventory.
- Establish Crafting Stations: Set up crafting stations such as forges, smithies, or fabricators to facilitate item production and research. These stations enable you to craft advanced tools, weapons, armor, and other essential items for survival and progression.
- Consider Defensive Structures: Enhance the security of your base by incorporating defensive structures like spikes, walls with turrets, or pet pens. These structures deter intruders and provide an additional layer of protection to your base.
- Utilize Crop Plots: If resources permit, establish crop plots to grow essential crops like vegetables and fruits. These crops provide a steady supply of food and can be used to produce ingredients for cooking.
- Upgrade and Expand: As you progress, upgrade your base’s materials from thatch to wood, stone, and eventually metal. Expand your base as necessary to accommodate additional resources, defensive measures, and future developments.
- Consider Water Structures: If your base is near a body of water, consider constructing water structures like underwater bases or boathouses. These structures provide unique advantages and allow easy access to water resources.
- Decorate and Personalize: Add your personal touch to your base by decorating it with furnishings or aesthetic elements. This not only makes your base feel more like home but can also serve as a point of pride and accomplishment.
Building structures and bases in Ark Survival requires careful planning and consideration. Experiment with different designs and configurations to find what suits your needs and playstyle. Remember to reinforce your structures, stay vigilant, and be prepared to defend your base against attacks. With a well-built base, you can establish a stronghold and thrive in the prehistoric world of Ark Survival.
Taming and Riding Dinosaurs in Ark Survival
Taming and riding dinosaurs is one of the most exciting and unique aspects of Ark Survival. The ability to tame and utilize these prehistoric creatures provides numerous advantages, including enhanced mobility, combat capabilities, and resource gathering. Here’s a guide on how to tame and ride dinosaurs in Ark Survival:
- Identify and Approach Target Dinosaurs: Scout the Ark world for dinosaurs you wish to tame. Approach the target dinosaur cautiously, being mindful of its level and potential threats in the surrounding area.
- Prepare Taming Supplies: Before attempting to tame a dinosaur, gather the necessary supplies. These may include tranquilizer arrows, tranquilizer darts, narcotics, bolas, and suitable food for taming.
- Immobilize the Dinosaur: Use a bola to immobilize smaller dinosaurs or tranquilizer arrows/darts to tranquilize larger ones. Aim for non-lethal parts of the creature’s body to avoid accidentally killing it.
- Monitor Torpor and Feed: Once the dinosaur is immobilized and unconscious, monitor its torpor level (visible in its inventory) to ensure it doesn’t wake up. Feed it appropriate food from its inventory to gradually increase its taming progress.
- Beware of Predators: While taming a dinosaur, be prepared to defend it from predators that may attack. Stay vigilant and eliminate any threats to ensure a successful taming process.
- Use Narcotics and Narcoberries: To keep the dinosaur unconscious during the taming process, regularly administer narcotics or narcoberries to increase its torpor. This will help prevent it from waking up before taming is complete.
- Monitor Taming Effectiveness: Each dinosaur has specific preferences for taming effectiveness. Certain foods and resources yield higher taming efficiency, speeding up the process. Pay attention to the dinosaur’s preferred food and use it to maximize taming effectiveness.
- Protect the Taming Area: Establish a perimeter around the unconscious dinosaur to ensure its safety and prevent other creatures from interfering with the taming process. Utilize defensive structures or enlist the help of tribe members to protect the area.
- Use Taming Calculators: Online taming calculators can help you determine the approximate time and resources required for taming specific dinosaurs based on their level, preferred food, and other factors. Utilize these calculations to plan your taming strategies more effectively.
- Riding and Controlling Dinosaurs: Once a dinosaur is tamed, equip a saddle suitable for that species and use the “Mount” command to ride and control the dinosaur. Each dinosaur has its own unique controls, abilities, and attack patterns, so take time to understand their behaviors and optimize their use.
- Breed and Raise Baby Dinosaurs: With a male and female dinosaur of the same species, you can breed them in appropriate conditions to produce fertilized eggs. Incubate these eggs and raise baby dinosaurs by providing them with proper care, warmth, and food until they mature into valuable companions.
Taming and riding dinosaurs in Ark Survival opens up a world of possibilities and strategic advantages. From transportation to combat support, these magnificent creatures can greatly enhance your survival abilities. Carefully plan, execute, and nurture your taming endeavors to build an impressive dinosaur army and conquer the challenges of the Ark world.
Crafting and Enchanting Items in Ark Survival
Crafting and enchanting items play a crucial role in your survival and progression in the world of Ark Survival. By utilizing the resources you gather, you can craft a wide range of tools, weapons, armor, structures, and other essential items. Additionally, enchanting items can enhance their effectiveness and give you a competitive edge. Here’s a guide on how to craft and enchant items in Ark Survival:
- Gather Resources: Venture into the world to gather essential resources such as wood, stone, fiber, hide, and metal. These resources form the foundation for crafting a multitude of items.
- Access the Crafting Menu: Open the crafting menu by pressing the designated key or accessing it through the game’s menu. The crafting menu displays the available recipes based on your level and the resources you possess.
- Select an Item to Craft: Browse through the crafting menu to find the item you wish to craft. Select it to view the required resources and the crafting cost.
- Allocate Engram Points: Engram Points are earned as you level up in the game. Use these points to unlock new crafting recipes. Allocate them wisely to unlock useful items and structures that suit your gameplay style.
- Gather Crafting Ingredients: Collect the necessary resources and crafting ingredients listed in the recipe. Ensure you have the required materials in your inventory or nearby storage containers.
- Craft the Item: Once you have the required resources, select the desired item in the crafting menu and choose the “Craft” option. The item will be created and added to your inventory or designated storage.
- Enchanting Items: Certain items in Ark Survival can be further enhanced through the process of item enchanting. This involves using resources like element shards or other special materials to imbue the item with additional effects, such as increased damage or durability.
- Access the Enchantment Menu: To enchant an item, access the enchantment menu through a suitable workstation or dedicated device. This menu allows you to select the item you want to enchant and choose the desired enchantment effect.
- Enchant the Item: Once you have selected the desired enchantment effect, confirm the selection and consume the required resources to initiate the enchantment process. The item will be enchanted, gaining the specified bonus effect.
- Experiment and Discover Blueprints: In addition to crafting items from basic recipes, you can also discover and create advanced items through the discovery of blueprints. These blueprints provide more powerful versions of items with improved stats and additional bonuses.
- Repair and Maintain Items: With continued use, items may deteriorate and lose durability. Use the appropriate resources and designated repair stations to repair and maintain your items, ensuring they remain in optimal condition.
- Share Crafting Knowledge: In multiplayer games, share your crafting knowledge with other players in your tribe. This allows for specialization and division of labor, maximizing crafting efficiency and progress.
Mastering the art of crafting and enchanting in Ark Survival is essential for your survival and success. Continually expand your crafting knowledge and experiment with different combinations to create powerful weapons, protective armor, efficient tools, and sturdy structures. With skillful crafting and strategic item enchanting, you’ll be well-prepared to face the challenges of the Ark world.
Exploring the Ark World in Virtual Reality
Exploring the vast and immersive world of Ark Survival in virtual reality is an extraordinary experience. With the power of virtual reality (VR), you can fully immerse yourself in the prehistoric environment, interact with magnificent dinosaurs, and uncover the mysteries that await you. Here’s a guide to exploring the Ark world in virtual reality:
- Put on Your HTC Vive: Ensure your HTC Vive headset is properly set up and adjusted for a comfortable fit. Make sure the controllers are fully charged, and you have ample space to move around in your VR play area.
- Launch Ark Survival in VR Mode: Launch Ark Survival and ensure that it is set to run in virtual reality mode. This will activate the VR features and enable you to dive into the immersive VR world.
- Take in the Scale and Beauty: As you enter the Ark world in VR, take a moment to appreciate the scale and beauty of the environment. The stunning landscapes, lush vegetation, and towering dinosaurs truly come to life in virtual reality.
- Interact with the Environment: In VR, you can physically interact with the Ark world. Reach out with your HTC Vive controllers to touch objects, gather resources, open doors, or activate switches. Use the VR controls to mimic actions like swinging a tool, throwing a bola, or shooting a bow.
- Experience the Thrill of Taming Dinosaurs: Taming and riding dinosaurs takes on a whole new level of excitement in VR. Approach and interact with the dinosaurs using the VR controls, feeling the thrill of being up close and personal with these majestic creatures.
- Utilize VR-Specific Features: Ark Survival in VR offers features specifically designed for the virtual reality experience. Take advantage of VR-specific settings like head-bobbing or immersive control schemes to enhance your immersion and comfort during gameplay.
- Immerse Yourself in Dynamic Environments: VR allows you to fully immerse yourself in the dynamic environments of Ark Survival. Witness the changing weather, day-night cycles, and the interplay of light and shadow, making the experience feel more lifelike and captivating.
- Engage in Multiplayer VR: Joining multiplayer sessions in VR adds an extra layer of social interaction and cooperation. Team up with other players, communicate through voice chat, and embark on thrilling adventures together to conquer the challenges of the Ark world.
- Take Caution in VR Combat: In virtual reality, combat encounters with dinosaurs or hostile players can be intense. Be alert and utilize your VR controls effectively to defend yourself, dodge attacks, and gain an advantage in battle.
- Capture the Beauty with VR Screenshots or Recordings: VR allows you to capture stunning moments and memories from your exploration. Take VR screenshots or record gameplay to relive and share your adventures with friends.
- Seek Unique VR Experiences: Explore special VR-exclusive areas or events within Ark Survival to uncover unique experiences that fully utilize the capabilities of virtual reality.
- Stay Mindful of Your Physical and Virtual Surroundings: While engrossed in the VR world of Ark Survival, always remain aware of your physical surroundings. Ensure you have a clear play area, avoid obstacles, and take breaks when needed to prevent any accidents or discomfort.
Exploring the Ark world in virtual reality offers an unparalleled level of immersion and excitement. Delve into the vibrant landscapes, engage in thrilling encounters, and witness the wonders of ancient creatures in a way that feels incredibly real. Immerse yourself in the captivating VR world of Ark Survival and embark on unforgettable adventures.
Joining Multiplayer Servers in Ark Survival on HTC Vive
One of the most exciting aspects of Ark Survival is the opportunity to join multiplayer servers and embark on cooperative or competitive gameplay with other players. Joining multiplayer servers in Ark Survival on your HTC Vive allows you to explore the prehistoric world alongside fellow survivors. Here’s a guide on how to join multiplayer servers in Ark Survival:
- Launch Ark Survival: Start by launching the Ark Survival game on your HTC Vive. Ensure that you have a stable internet connection to access multiplayer servers.
- Select ‘Multiplayer’ from the Main Menu: In the main menu, select the ‘Multiplayer’ section to access the multiplayer server options. Here, you’ll find various server types, including official servers, unofficial servers, player-hosted servers, and dedicated servers.
- Browse Server List: In the multiplayer server section, you can browse through the available servers to find one that suits your playstyle and preferences. Filter your search based on factors like server type, location, player count, server settings, and available mods.
- Choose a Server: Once you’ve found a server that interests you, select it from the server list. Take note of any server-specific rules or criteria mentioned in the server description.
- Enter Server Details: Based on the server’s requirements, you may need to enter a server password, if applicable. Input the password provided by the server administrator to gain access to their server.
- Join the Server: After entering the necessary server details, confirm your selection to join the multiplayer server. You’ll be transported to the server’s world and can begin exploring and interacting with other players.
- Communicate and Interact: Upon joining the server, use in-game chat or voice communication to interact with other players. Coordinate activities, form tribes, trade resources, or plan collaborative projects to enhance your gameplay experience.
- Respect Server Rules and Guidelines: It’s essential to respect the rules and guidelines set by each server. Follow the server’s code of conduct, guidelines for base building, resource harvesting, PvP (Player versus Player) interactions, and any other specific rules outlined by the server administrator.
- Participate in Server Events and Activities: Many multiplayer servers host events, competitions, or community activities. Engage in these events to challenge your skills, earn rewards, and foster camaraderie within the server community.
- Contribute to the Server Community: As an active member of a multiplayer server, contribute positively to the community. Offer assistance to new players, engage in helpful discussions, and foster a friendly and inclusive environment.
- Create or Host Your Own Server: If desired, you have the option to create or host your own multiplayer server. Depending on your preferences and technical capabilities, you can set up a dedicated server or use the in-game options to create a locally hosted server for you and your friends.
- Enjoy Multiplayer Adventures: Joining multiplayer servers in Ark Survival opens up a world of exciting multiplayer adventures. Engage in cooperative interactions, engage in epic battles, trade resources, form alliances, or engage in friendly competitions with other players. Embrace the multiplayer experience and create memorable moments together.
Joining multiplayer servers in Ark Survival amplifies the thrill and challenges of surviving in the prehistoric world. Interacting with a vibrant community of players adds a dynamic and social aspect to your gameplay experience. Immerse yourself in cooperative or competitive multiplayer adventures and forge alliances or rivalries as you navigate the dangerous landscapes of Ark Survival.
Tips and Strategies for Succeeding in Ark Survival on HTC Vive
Surviving and thriving in the challenging world of Ark Survival on your HTC Vive requires strategic thinking and careful planning. By utilizing these tips and strategies, you can increase your chances of success in this prehistoric adventure:
- Start with the Basics: Focus on gathering essential resources, crafting basic tools, and establishing a simple shelter. These initial steps will provide a solid foundation for your survival.
- Explore Your Surroundings: Venture out to discover the diverse landscapes of the Ark world. Explore different biomes, search for valuable resources, and uncover hidden treasures.
- Learn from the Indigenous Wildlife: Observe the behavior of the local wildlife to understand their habits and vulnerabilities. Use this knowledge to your advantage when hunting or avoiding encounters.
- Tame and Utilize Dinosaurs: Taming dinosaurs expands your capabilities tremendously. Choose the right dinosaurs for various tasks such as resource gathering, combat, or transportation.
- Build a Secure Base: Construct a robust and well-defended base to protect yourself, your resources, and your tamed dinosaurs. Strategic placement, reinforced walls, and defensive structures are key.
- Form Alliances: Join or create a tribe with other players to pool resources, share knowledge, and defend against common threats. Cooperation and teamwork will greatly enhance your chances of survival.
- Manage Resources Wisely: Be mindful of resource management. Avoid waste, prioritize essential items, and store surplus resources for future needs. Efficient resource utilization is crucial for long-term sustainability.
- Plan Ahead: Develop a long-term strategy for progression and development. Set achievable goals, such as unlocking specific engrams or taming certain dinosaurs, to guide your gameplay and track your progress.
- Utilize Crafting Engrams and Blueprints: Learn and unlock useful crafting engrams to access advanced items and structures. Search for blueprints to craft higher quality gear with improved stats and bonuses.
- Balance Exploration and Safety: While exploration is important, ensure you are adequately equipped and prepared before venturing into dangerous territories. Take calculated risks and always be prepared for unexpected encounters.
- Learn from In-Game Tutorials and Community Resources: Take advantage of in-game tutorials and guides, as well as online community resources. They can provide valuable insights and tips for efficient taming, crafting, and survival strategies.
- Keep an Eye on Your Surroundings: Stay vigilant and observe your surroundings carefully. Be aware of aggressive creatures, unpredictable weather conditions, and potential threats from other players.
- Adapt and Evolve: Be open to adapting your strategies based on the changing circumstances. The Ark world is dynamic, and being flexible in your approach will increase your chances of success.
- Take Breaks and Rest: Ark Survival can be immersive and intense, so remember to take breaks and rest. Pacing yourself will help maintain focus and prevent burnout.
By following these tips and strategies, you can navigate the challenging world of Ark Survival on your HTC Vive with more confidence and success. Utilize your resources wisely, strengthen your base, seek allies, and continue to learn and adapt as you strive to become a formidable survivor in this ancient and dangerous world.
Common Issues and Troubleshooting Tips for Ark Survival on HTC Vive
While playing Ark Survival on your HTC Vive, you may encounter some common issues or face technical difficulties. Here are some troubleshooting tips to help you resolve these problems and ensure a smoother gaming experience:
- Performance Issues: If you experience performance issues such as lag or low frame rates, try lowering the graphics settings in the game options menu. Disabling unnecessary graphical features like shadows, post-processing effects, or anti-aliasing can help improve performance.
- VR Tracking Issues: If you notice tracking issues with your HTC Vive controllers or headset, ensure that the base stations are positioned correctly and have an unobstructed line of sight. Remove any reflective surfaces in the play area and make sure the base stations are properly connected and powered on.
- Controller Calibration: If your HTC Vive controllers seem unresponsive or misaligned, try recalibrating them through the SteamVR settings. Go to the SteamVR menu, select “Devices,” then “Controller Settings,” and follow the on-screen instructions for calibration.
- Audio Issues: If you encounter audio problems, check your audio settings in both the game and SteamVR. Ensure that the correct audio output device is selected and that the volume levels are properly configured. Updating your audio drivers may also help resolve audio-related issues.
- VR Comfort Settings: If you experience discomfort or motion sickness while playing in VR, explore the comfort settings within Ark Survival. Enable options like snap turning, FOV filters, or teleportation to minimize the risk of motion sickness.
- Crashes or Freezes: If the game crashes or freezes, make sure your system meets the minimum system requirements for Ark Survival. Update your graphics card drivers to the latest version and verify the integrity of the game files through the Steam client to repair any damaged files.
- Server Connection Issues: If you encounter connection issues when trying to join multiplayer servers, check your internet connection and ensure that the server you’re trying to join is online and accessible. Verify that you have entered the correct server details, including password if required.
- Controls Not Working: If your HTC Vive controllers or keyboard inputs are not recognized, check the control settings in Ark Survival and ensure that the correct input devices are selected. Restarting the game or SteamVR may also help resolve control-related issues.
- Saving and Loading Issues: If you experience problems with saving or loading your game progress, make sure you have sufficient disk space on your system drive. Additionally, try running the game as an administrator or disabling any conflicting third-party software that may interfere with the save/load process.
- Community Support: Should you encounter persistent issues or encounter problems not covered here, consult the online community forums, official support channels, or online guides. The Ark Survival community is often helpful and can provide specific solutions or workarounds for different technical issues.
By troubleshooting these common issues and following the provided tips, you can overcome technical difficulties and enjoy a more seamless experience while playing Ark Survival on your HTC Vive. Remember to keep your system and drivers updated, maintain proper configuration settings, and seek support from the community if needed.
Frequently Asked Questions about Playing Ark Survival on HTC Vive
Here are some frequently asked questions (FAQs) and their answers to provide further clarity and guidance for playing Ark Survival on your HTC Vive:
- Can I play Ark Survival on HTC Vive?
- What are the system requirements for playing Ark Survival on HTC Vive?
- How do I set up my HTC Vive for playing Ark Survival?
- Can I play Ark Survival in multiplayer mode on HTC Vive?
- How do I join a multiplayer server in Ark Survival on HTC Vive?
- How can I improve performance in Ark Survival on HTC Vive?
- Can I use mods while playing Ark Survival on HTC Vive?
- Are there any specific controls for playing Ark Survival on HTC Vive?
Yes, Ark Survival is fully compatible with the HTC Vive virtual reality headset.
The minimum system requirements for playing Ark Survival on HTC Vive include an Intel Core i5-4590 or AMD FX 8350 processor, 8GB of RAM, an NVIDIA GeForce GTX 970 or AMD Radeon R9 290 graphics card, and 60GB of available storage space. However, meeting the recommended system requirements will provide an even better gameplay experience.
To set up your HTC Vive for playing Ark Survival, connect the headset to your PC, install SteamVR, set up the base stations for tracking, perform room setup to define your play area, and calibrate the controllers. Ensure that your HTC Vive and SteamVR are up to date for optimal performance.
Yes, Ark Survival offers multiplayer functionality where you can join or host multiplayer sessions and play with other players in cooperative or competitive gameplay.
To join a multiplayer server in Ark Survival on HTC Vive, access the multiplayer section in the main menu, browse the available servers, select a server that interests you, enter any necessary server details such as a password if required, and confirm your selection to join the server’s world.
To improve performance in Ark Survival on HTC Vive, you can lower the graphics settings in the game options, avoid unnecessary background processes or software, close any resource-intensive applications, update your graphics card drivers, and make sure your PC meets or exceeds the system requirements for the game.
Yes, Ark Survival supports modding, and you can use mods while playing on HTC Vive. However, be aware that certain mods may affect performance or compatibility, so choose mods from reputable sources and ensure they are compatible with your game version.
While playing Ark Survival on HTC Vive, you will use the HTC Vive controllers to navigate, interact with objects, gather resources, attack, and perform other in-game actions. Familiarize yourself with the control scheme provided in the game to fully utilize the VR controls.
These FAQs should address some of the common questions and concerns you may have when playing Ark Survival on your HTC Vive. If you have any additional inquiries, consult the game’s official documentation, community forums, or support channels for further assistance.