
Why password protect an Excel file?
When it comes to sensitive data and confidential information, protecting it is of utmost importance. Microsoft Excel is a powerful tool that is widely used for organizing, analyzing, and storing data. However, without proper security measures in place, anyone who has access to your Excel file can view, edit, or even misuse the data.
Password protecting an Excel file adds an additional layer of security, ensuring that only authorized individuals can access and modify the data contained within. Whether you are dealing with financial records, employee information, client details, or any other confidential data, implementing password protection is crucial for maintaining data integrity and preventing unauthorized access.
Here are a few key reasons why you should consider password protecting your Excel files:
- Data privacy: By password protecting your Excel file, you can keep sensitive information confidential and prevent it from falling into the wrong hands.
- Data integrity: Password protection ensures that the data in your Excel file remains unaltered, reducing the risk of accidental or unauthorized changes to the data.
- Compliance requirements: Many industries have strict data protection regulations, such as GDPR, HIPAA, or PCI-DSS. Password protecting your Excel files helps meet these compliance requirements and avoid costly penalties.
- Protection against unauthorized access: Passwords serve as a barrier to prevent unauthorized users from opening and accessing the contents of your Excel file.
By taking the time to password protect your Excel files, you can safeguard your valuable data and ensure the privacy and integrity of your information.
Setting a password in Excel 2016 and later versions
Excel 2016 and later versions provide a straightforward process for setting a password to protect your files. Follow these steps to secure your Excel file:
- Open the Excel file you want to password protect.
- Click on the “File” tab located in the top left corner of the Excel window.
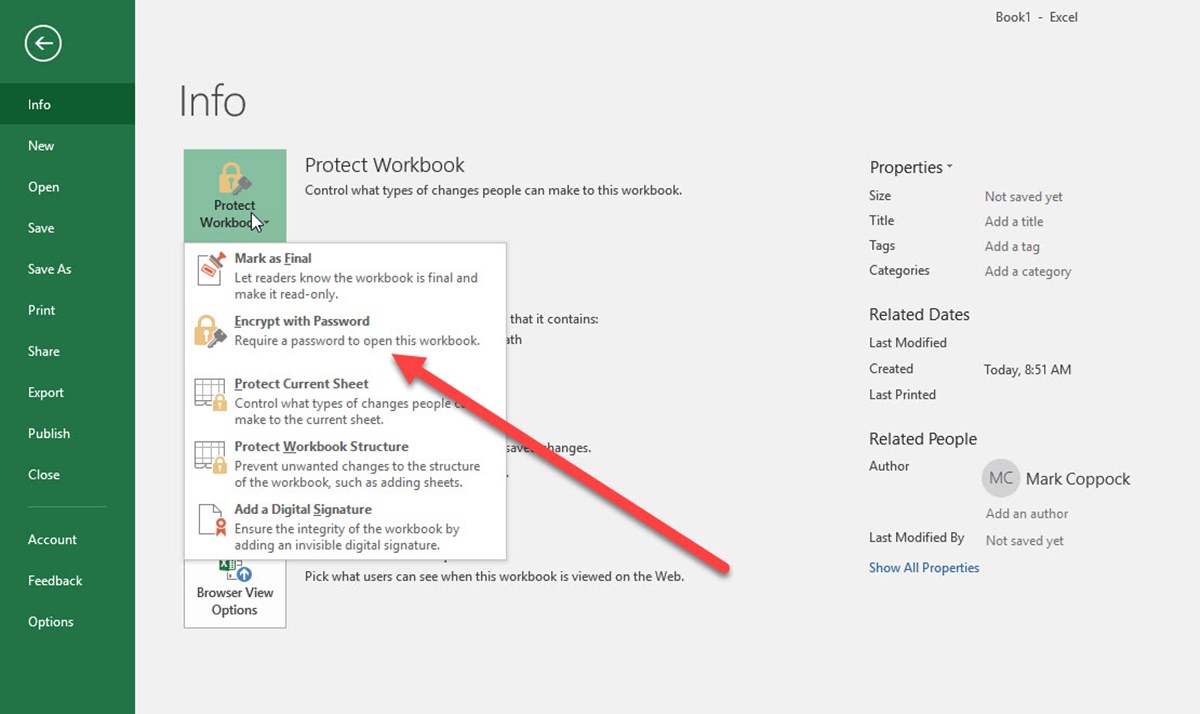
- Select “Protect Workbook” from the drop-down menu.
- Click on “Encrypt with Password.”
- A dialog box will appear, prompting you to enter a password. Choose a strong password that combines uppercase and lowercase letters, numbers, and special characters for maximum security.
- After entering your desired password, click “OK” to apply the password protection to your Excel file.
- You will be prompted to re-enter the password to confirm it.
Once you have completed these steps, your Excel file will be password protected, and anyone attempting to open the file will be required to enter the correct password.
Remember to choose a password that is strong and secure, as a weak password can be easily guessed or cracked. Additionally, it is recommended to keep a record of your password in a secure location to avoid any loss of access to your Excel file.
It is worth mentioning that password protecting your Excel file does not guarantee absolute security, as advanced hacking techniques can potentially break the password protection. Therefore, it is advisable to use additional security measures, such as encryption software or secure storage solutions, for highly sensitive data.
Setting a password in Excel 2013 and earlier versions
Excel 2013 and earlier versions offer a slightly different method for setting a password to protect your files. Follow these steps to password protect your Excel file:
- Open the Excel file you want to password protect.
- Click on the “File” tab located in the top left corner of the Excel window.
- Select “Save As” from the drop-down menu.
- In the “Save As” dialog box, choose a save location and provide a name for your file.
- Click on the “Tools” dropdown button, and then select “General Options.”
- In the “General Options” dialog box, enter a password in the “Password to open” field. Choose a strong password that combines uppercase and lowercase letters, numbers, and special characters.
- You can also enter a password in the “Password to modify” field if you want to restrict editing capabilities.
- Click “OK” to apply the password protection to your Excel file.
Once the password has been set, anyone attempting to open the Excel file will be prompted to enter the correct password.
It is important to note that the password you set in Excel 2013 and earlier versions is not as secure as in later versions. The encryption used in these versions is relatively weaker, and there are password recovery tools available that can potentially bypass the password protection.
Therefore, if you are using Excel 2013 or an earlier version, it is advisable to upgrade to a newer version, if possible, or consider additional security measures such as encryption software for highly sensitive data.
Password protecting specific sheets and workbooks
In addition to password protecting the entire Excel file, you can also apply password protection to specific sheets or workbooks within Excel. This allows you to control access to specific data sets or restrict editing capabilities on certain sheets. Here’s how you can password protect specific sheets and workbooks:
- To password protect a specific sheet, open the Excel file and navigate to the sheet you want to protect.
- Click on the “Review” tab in the Excel menu bar.
- In the “Changes” group, click on “Protect Sheet.”
- A dialog box will appear, prompting you to enter a password for the sheet. Enter a strong password that meets the necessary security requirements.
- You can also specify other options, such as allowing specific actions like selecting locked cells or formatting cells, by checking or unchecking the corresponding checkboxes.
- Click “OK” to apply the password protection to the selected sheet.
To password protect an entire workbook, including all sheets within it, the process is slightly different:
- Open the Excel file you want to password protect.
- Click on the “File” tab in the Excel menu bar.
- Select “Protect Workbook” from the drop-down menu.
- Choose “Encrypt with Password” from the submenu.
- In the dialog box that appears, enter a password for the workbook.
- Click “OK” to apply the password protection to the entire workbook.
By password protecting specific sheets and workbooks, you can have more granular control over the accessibility and editing capabilities of your Excel data. This can be particularly useful for collaborative projects or when sharing Excel files with others while keeping sensitive information secure.
Removing or changing a password in Excel
If you have password protected an Excel file or specific sheets within it, there may come a time when you need to remove or change the password. Whether you want to update the password or remove the password protection entirely, here’s how you can do it:
To remove the password from an Excel file or sheet:
- Open the Excel file or sheet that is password protected.
- Click on the “File” tab in the Excel menu bar.
- Select “Protect Workbook” or “Protect Sheet,” depending on what you want to remove the password from.
- In the dropdown menu, select “Encrypt with Password.”
- Delete the existing password and leave the field empty.
- Click “OK” to remove the password protection from the file or sheet.
To change the password in an Excel file:
- Open the Excel file that is password protected.
- Click on the “File” tab in the Excel menu bar.
- Select “Protect Workbook” (for entire workbook password) or “Protect Sheet” (for specific sheet password).
- In the dropdown menu, select “Encrypt with Password”.
- Delete the existing password and enter the new desired password.
- Click “OK” to apply the new password to the file or sheet.
Remember to choose a strong and secure password when setting or changing it. It is recommended to use a combination of uppercase and lowercase letters, numbers, and special characters to enhance the password’s strength.
It’s important to note that if you forget or lose the password, it may be extremely difficult or impossible to recover it. Therefore, it’s essential to keep a backup of your files and maintain a record of your passwords in a secure location.
By knowing how to remove or change a password in Excel, you can have greater flexibility and control over accessing and modifying your protected files and sheets.
Tips for creating a strong password
Creating a strong password is crucial to ensuring the security of your Excel files and protecting them from unauthorized access. Here are some essential tips to help you create a strong and secure password:
- Length: Aim for a minimum password length of 12 characters. The longer the password, the more difficult it is to guess or crack.
- Complexity: Use a combination of uppercase and lowercase letters, numbers, and special characters (such as !, @, #, $) in your password. Avoid using predictable patterns or commonly used words.
- Avoid personal information: Do not use personal information such as your name, birthdate, or address as part of your password. This information can be easily guessed or obtained by hackers.
- Avoid dictionary words: Avoid using common words or phrases found in the dictionary, as these are easily targeted by hackers using dictionary-based attacks.
- Unique password: Use a unique password for each of your Excel files and accounts. This prevents a breach in one account from affecting all your other files and accounts.
- Regularly update passwords: It’s important to periodically change your passwords to maintain security. Set a reminder to update your passwords every few months.
- Consider a passphrase: Instead of a single word, consider using a passphrase made up of multiple words. This can make the password easier to remember while increasing its complexity.
- Use a password manager: If you struggle to remember complex passwords, consider using a password manager tool. These tools securely store your passwords and generate strong, unique passwords for you.
Remember, a strong password is one of the first lines of defense against unauthorized access to your Excel files. By following these tips, you can significantly enhance the security of your data and protect yourself from potential security breaches.
The importance of password protecting sensitive data
In today’s digital age, the need to protect sensitive data has become more critical than ever before. Password protecting your sensitive data, especially in Excel files, plays a crucial role in ensuring its confidentiality, integrity, and security. Here’s why password protecting sensitive data is of utmost importance:
- Preventing unauthorized access: Password protection serves as a barrier, preventing unauthorized individuals from accessing and viewing your sensitive data. It ensures that only authorized personnel can access the information contained within the Excel files.
- Protecting confidential information: Sensitive data, such as financial records, customer information, trade secrets, or proprietary information, needs to be protected from unauthorized disclosure. Password protecting your Excel files adds an extra layer of security and keeps your confidential information private.
- Complying with regulations: Depending on your industry or location, there may be legal and regulatory requirements for protecting certain types of sensitive data. By password protecting your Excel files, you can demonstrate your commitment to data security and comply with relevant regulations, such as HIPAA, GDPR, or PCI-DSS.
- Preventing data tampering: Password protection helps ensure the integrity of your sensitive data. It ensures that the data remains unaltered and prevents unauthorized modifications or tampering that can lead to inaccurate information or fraudulent activities.
- Mitigating the risk of data breaches: Cybersecurity threats and data breaches are on the rise. By implementing password protection, you can reduce the risk of your sensitive data falling into the wrong hands if your Excel files are compromised or stolen.
- Safe collaboration: Password protecting Excel files allows you to securely share sensitive information with colleagues, clients, or partners. It ensures that only authorized individuals can access and work with the data, maintaining confidentiality and control over the shared information.
Remember that password protecting sensitive data is just one aspect of data security. It is important to implement other security measures, such as regular backups, encrypted connections, and keeping software up to date, to ensure comprehensive protection for your sensitive information.
By recognizing the importance of password protecting your sensitive data, you can safeguard your information, maintain data privacy, and protect yourself and your organization from potential data breaches and security risks.