
Overview of Airpods and Laptop Compatibility
Airpods, the popular wireless earbuds created by Apple, offer a convenient and seamless audio experience. While they are primarily designed for use with Apple devices such as iPhones and iPads, they can also be paired with laptops running various operating systems, including Windows and macOS.
Compatibility between Airpods and laptops depends on the Bluetooth capabilities of both devices. Airpods utilize Bluetooth technology to establish a wireless connection with other devices, allowing you to enjoy your favorite music, podcasts, or video calls without the hassle of tangled wires.
Most modern laptops come equipped with built-in Bluetooth, but it’s crucial to ensure that your laptop has this feature before attempting to pair your Airpods. If your laptop is Bluetooth-enabled, you can take advantage of this feature and enjoy a truly wireless listening experience.
Pairing your Airpods with your laptop is a straightforward process that involves a few simple steps. Here’s a quick guide on how to do it:
- Step 1: Check the Laptop’s Bluetooth Capability
The first step is to determine whether your laptop has built-in Bluetooth functionality. To check this, go to your laptop’s settings or control panel and look for the Bluetooth icon. If you see the icon, it means your laptop is Bluetooth-enabled and can establish a wireless connection with other devices.
- Step 2: Ensure Airpods are in Pairing Mode
Next, make sure your Airpods are in pairing mode. To do this, open the Airpods case and press and hold the button on the back of the case until the LED light on the front starts blinking white. This indicates that your Airpods are ready to be paired with a new device.
- Step 3: Open the Laptop’s Bluetooth Settings
Now, open the Bluetooth settings on your laptop. This can usually be done by clicking on the Bluetooth icon in the system tray or by going to the Bluetooth settings in the control panel or system preferences.
- Step 4: Locate and Select Airpods in the Available Devices List
In the Bluetooth settings window, you should see a list of available devices. Look for your Airpods in the list and select them to initiate the pairing process. Keep in mind that the name of your Airpods might appear as “Airpods” or “Your Name’s Airpods,” depending on how you have set them up.
- Step 5: Complete the Pairing Process
Once you have selected your Airpods, your laptop will attempt to establish a connection with them. You may need to confirm the pairing request on both your laptop and your Airpods by clicking “Pair” or entering a passcode if prompted.
After a successful pairing, your Airpods should be connected to your laptop, and you can begin enjoying a wireless audio experience.
By following these simple steps, you can easily pair your Airpods with your laptop and enjoy the freedom of wireless listening while working, studying, or simply relaxing.
Step 1: Check the Laptop’s Bluetooth Capability
Before attempting to pair your Airpods with your laptop, it’s important to ensure that your laptop has built-in Bluetooth capability. Bluetooth is a wireless technology that allows devices to communicate and establish connections without the need for cables or wires.
To check if your laptop has Bluetooth functionality, you can follow these simple steps:
- Step 1: Look for the Bluetooth Icon or Settings
The first thing you should do is look for the Bluetooth icon in the system tray or toolbar of your laptop’s operating system. The Bluetooth icon typically looks like a stylized “B” with radiating waves. If you see the icon, it indicates that your laptop has Bluetooth capability.
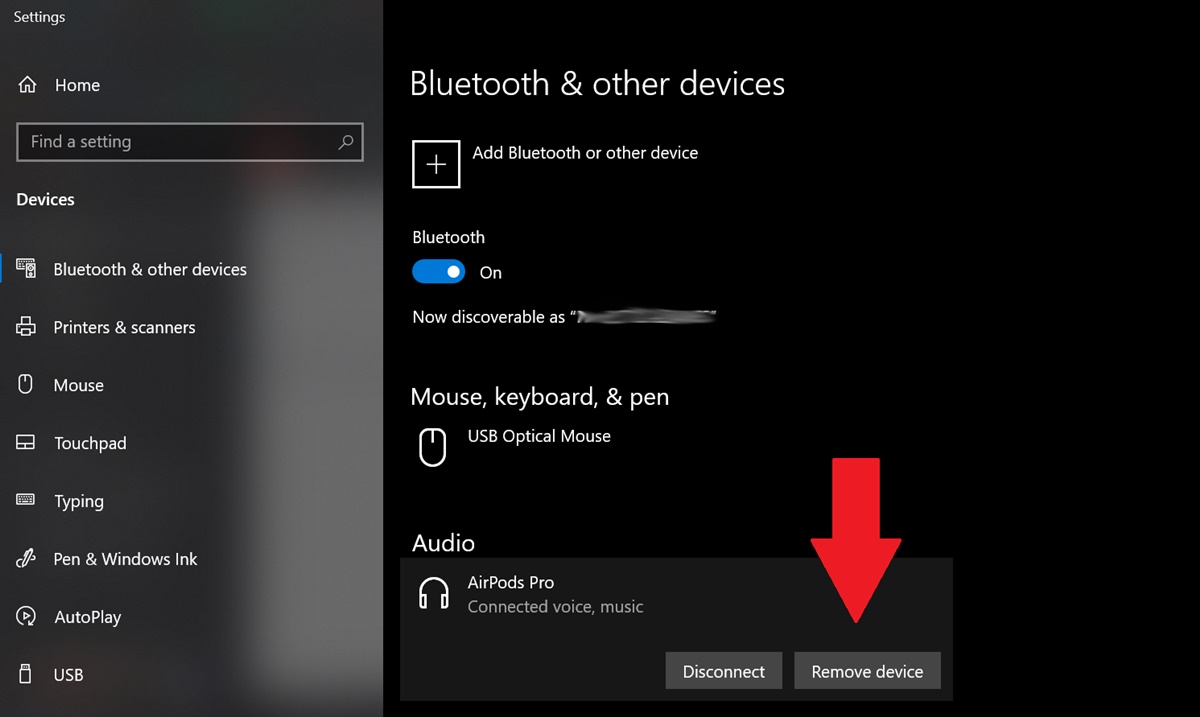
If you can’t find the Bluetooth icon, you can check the system settings or control panel of your laptop. In Windows, you can access the Bluetooth settings by clicking on the Start menu, selecting “Settings,” and then navigating to the “Devices” or “Bluetooth & other devices” section. On macOS, you can find the Bluetooth settings by clicking on the Apple menu, selecting “System Preferences,” and then clicking on the “Bluetooth” icon.
- Step 2: Confirm Bluetooth Status
Once you have accessed the Bluetooth settings, you need to confirm that Bluetooth is turned on and active. In most cases, there will be a toggle switch or a checkbox to enable Bluetooth. Make sure that this option is set to “On” or “Enabled.”
If Bluetooth is already enabled, it means that your laptop has Bluetooth capability. If it’s disabled, you can turn it on by toggling the switch or checking the box.
- Step 3: Check for Bluetooth Device Manager
Sometimes, the Bluetooth settings may also provide access to a Bluetooth device manager. This manager allows you to view and manage all the Bluetooth devices connected to your laptop. You can check if any devices are already paired or connected and remove them if necessary.
- Step 4: Consult the Laptop’s User Manual or Manufacturer’s Website
If you are still unsure about whether your laptop has Bluetooth capability or how to enable it, you can refer to the laptop’s user manual or visit the manufacturer’s website for more information. These resources should provide specific instructions and details about Bluetooth functionality for your laptop model.
By following these steps, you can determine if your laptop is Bluetooth-enabled and ready to be paired with your Airpods. Once you have confirmed the Bluetooth capability of your laptop, you are ready to proceed with the pairing process.
Step 2: Ensure Airpods are in Pairing Mode
Before you can connect your Airpods to your laptop, it’s important to make sure that they are in pairing mode. Pairing mode allows your Airpods to be discovered and connected by other Bluetooth-enabled devices.
To put your Airpods in pairing mode, follow these simple steps:
- Step 1: Open the Airpods Case
Start by opening the lid of your Airpods case. This will expose the Airpods themselves, as well as the LED light on the front of the case.
- Step 2: Press and Hold the Button on the Case
On the back of the Airpods case, there is a small button. Press and hold this button until the LED light on the front starts blinking white. This blinking light indicates that your Airpods are now in pairing mode and ready to be connected to a new device.
Note: If your Airpods have been previously paired with another device, you will need to unpair them before entering pairing mode. To do this, go to the Bluetooth settings of the device they are currently connected to, and select “Forget” or “Disconnect” to remove them. Once they are unpaired, you can proceed with the step above to put them in pairing mode.
- Step 3: Keep the Airpods Case Open
While your Airpods are in pairing mode, it’s important to keep the case open. This allows your laptop to detect and establish a connection with the Airpods.
By following these steps, you can ensure that your Airpods are in pairing mode and ready to be connected to your laptop. Once your Airpods are in pairing mode, you can proceed to the next step of the pairing process, which involves opening the Bluetooth settings on your laptop.
Step 3: Open the Laptop’s Bluetooth Settings
After ensuring that your Airpods are in pairing mode, the next step is to open the Bluetooth settings on your laptop. Bluetooth settings allow you to manage and connect Bluetooth devices, including your Airpods.
Follow these simple steps to open the Bluetooth settings on your laptop:
- Step 1: Locate the Bluetooth Icon or Settings
The first thing you need to do is locate the Bluetooth icon or settings on your laptop. In most cases, you can find the Bluetooth icon in the system tray or toolbar of your operating system. The icon typically looks like a stylized “B” with radiating waves. If you see the Bluetooth icon, click on it to open the Bluetooth settings.
If you don’t see the Bluetooth icon in the system tray or toolbar, you can access the Bluetooth settings through the system settings or control panel of your laptop. In Windows, you can find the Bluetooth settings by clicking on the Start menu, selecting “Settings,” and then navigating to the “Devices” or “Bluetooth & other devices” section. On macOS, you can access the Bluetooth settings by clicking on the Apple menu, selecting “System Preferences,” and then clicking on the “Bluetooth” icon.
- Step 2: Open the Bluetooth Settings
Once you have located the Bluetooth icon or settings, click on it to open the Bluetooth settings window. This window will provide you with options to manage and configure your laptop’s Bluetooth connections.
- Step 3: Ensure Bluetooth is Turned On
Before proceeding, make sure that Bluetooth is turned on. In most cases, there will be a toggle switch or checkbox to enable or disable Bluetooth. If Bluetooth is already enabled, you can proceed to the next step. If it’s disabled, toggle the switch or check the box to turn it on.
- Step 4: Explore the Available Devices
Once Bluetooth is enabled, you will see a list of available devices in the Bluetooth settings window. These are the devices that your laptop can currently detect and connect to. The list may include previously paired devices as well as new devices that are in pairing mode, such as your Airpods.
By opening the Bluetooth settings on your laptop, you are now ready to proceed with the next step of the pairing process, which involves locating and selecting your Airpods in the available devices list.
Step 4: Locate and Select Airpods in the Available Devices List
After opening the Bluetooth settings on your laptop, the next step is to locate your Airpods in the list of available devices. This allows your laptop to establish a connection with your Airpods and complete the pairing process.
Follow these steps to locate and select your Airpods in the available devices list:
- Step 1: Scan for Available Devices
In the Bluetooth settings window on your laptop, there should be a button or option to scan for available devices. Click on this button to initiate a search for nearby Bluetooth devices, including your Airpods.
Note: Make sure that your Airpods are in pairing mode and that their case is open to ensure that they can be discovered by your laptop.
- Step 2: Wait for Airpods to Appear in the List
After initiating the scan, your laptop will start searching for nearby Bluetooth devices. Wait for a few moments for your Airpods to appear in the list of available devices. The name of your Airpods might appear as “Airpods” or “Your Name’s Airpods,” depending on how you have set them up.
- Step 3: Select Your Airpods
Once your Airpods appear in the list, click on them to select them for pairing. This will prompt your laptop to establish a connection with your Airpods.
Note: If your Airpods require a passcode for pairing, you may be prompted to enter the passcode on your laptop. Refer to the Airpods manual or documentation for the specific passcode, if required.
By locating and selecting your Airpods in the available devices list, you are now ready to proceed with the final step of the pairing process, which involves completing the connection between your laptop and your Airpods.
Step 5: Complete the Pairing Process
After selecting your Airpods in the available devices list, you are now ready to complete the pairing process and establish a connection between your laptop and your Airpods. Follow these steps to finalize the pairing:
- Step 1: Confirm Pairing Request
Once you have selected your Airpods, your laptop will send a pairing request to them. On your laptop, you may see a confirmation message or prompt asking you to verify the pairing. It may also display a passcode to be entered on your Airpods for authentication.
- Step 2: Confirm on Airpods
On your Airpods, you will see a similar message or prompt. To complete the pairing process, confirm the request on your Airpods by either tapping “Connect,” entering the passcode displayed on your laptop, or following any other instructions provided.
- Step 3: Successful Pairing
Once the pairing process is complete, your laptop and Airpods will establish a connection. Your laptop will display a “Connected” or similar message, indicating that the pairing was successful.
You can now enjoy the wireless audio experience provided by your Airpods through your laptop. Whether you want to listen to music, watch videos, have hands-free calls, or engage in online meetings, your Airpods will provide seamless, high-quality audio.
It’s worth noting that once your Airpods are successfully paired with your laptop, they will automatically connect whenever they are within the Bluetooth range of your laptop. You won’t need to repeat the pairing process unless you encounter any connection issues or decide to pair them with another device.
With the pairing process complete, you can now take full advantage of the convenience and freedom that wireless Airpods provide while using your laptop.
Troubleshooting Common Pairing Issues
While pairing your Airpods with your laptop is usually a straightforward process, you may encounter some common issues along the way. Here are some troubleshooting steps to help you overcome these difficulties:
- Issue 1: Airpods Not Being Detected
If your Airpods are not showing up in the available devices list on your laptop, try the following:
– Make sure that your Airpods are in pairing mode by opening the lid of the Airpods case and pressing and holding the button on the back until the LED light starts blinking.
– Ensure that the Airpods case is close to your laptop and that Bluetooth is enabled on both devices.
– Restart your laptop and try the pairing process again.
- Issue 2: Failed or Unsuccessful Pairing
If the pairing process fails or is unsuccessful, consider the following troubleshooting steps:
– Check if your Airpods are already connected to another device. If so, unpair them from the other device before attempting to pair them with your laptop.
– Ensure that your laptop’s Bluetooth is functioning properly by connecting other Bluetooth devices to it. If other devices can connect successfully, the issue may be specific to your Airpods.
– Reset your Airpods by placing them in the case, opening the lid, and pressing and holding the button on the back until the LED light flashes amber. Then try the pairing process again.
- Issue 3: Poor Audio Quality or Connectivity Drops
If you experience poor audio quality or if the connection drops frequently, try the following troubleshooting steps:
– Make sure that the Airpods and your laptop are within the recommended Bluetooth range, typically around 30 feet or 10 meters.
– Keep your Airpods and laptop away from potential sources of interference, such as other electronic devices or wireless networks.
– Check for any firmware updates for your Airpods and install them, as updates can often improve performance and stability.
If these troubleshooting steps do not resolve the issue, you may need to consult the user manual for both your Airpods and laptop, or contact the respective manufacturers’ support for further assistance.
By addressing and troubleshooting common pairing issues, you can ensure a smooth and seamless connection between your Airpods and laptop, allowing you to enjoy uninterrupted wireless audio.