
Create Folders for Apps
Organizing the apps on your iPad can greatly improve your productivity and make it easier to find and access the apps you need. One effective way to keep your apps organized is by creating folders. Folders allow you to group related apps together, reducing clutter on your home screen and making it easier to locate specific apps.
To create a folder, simply follow these steps:
- Unlock your iPad and go to the home screen.
- Tap and hold on an app icon until it starts to shake.
- Drag one app icon on top of another app icon that you want to group together.
- A folder will automatically be created with the two app icons inside it.
You can further customize the folder by giving it a name that represents the category of apps it contains. For example, you can create a folder named “Productivity” and move apps like Notes, Calendar, and Reminders into it. This way, you can quickly find these apps when you need them, without having to scroll through multiple screens.
To rename a folder, follow these steps:
- Tap and hold on the folder you want to rename.
- Tap on the “Rename” option that appears.
- Enter the desired name for the folder using the on-screen keyboard.
- Tap “Done” when you’re finished.
Creating folders for your apps is a simple yet effective way to keep your iPad organized. By grouping related apps together, you can easily locate and access the apps you need, reducing the time spent searching for them. Whether you have a large collection of productivity apps or entertainment apps, creating folders ensures that everything is neatly organized and easily accessible.
Rename Folders
After creating folders to organize your apps on your iPad, you may want to rename them to better reflect their contents or personalize them according to your preferences. Renaming folders is a simple process that allows you to customize your iPad’s home screen to suit your needs.
To rename a folder, follow these steps:
- Locate the folder on your home screen that you want to rename.
- Long-press on the folder until it starts to jiggle.
- A popup menu will appear above the folder with various options.
- Select the “Rename” option from the popup menu.
- The folder’s name will become editable, and the on-screen keyboard will appear.
- Use the keyboard to enter the desired name for the folder.
- Once you’re satisfied with the new name, tap “Done” on the keyboard.
You can choose any name you like for your folders. For example, if you have a folder that contains your favorite social media apps, you can rename it “Social Media” to make it easily identifiable. By renaming folders, you can personalize your iPad’s organization system and make it more intuitive for you to locate your apps.
It’s worth noting that you can also change the name of a folder later if your needs or preferences change. Simply follow the same steps mentioned above to rename the folder again.
Renaming your folders allows you to create a more tailored organization system on your iPad. By giving your folders descriptive names that reflect their contents or your preferred categorization, you can quickly identify and access the apps within them. This customization feature adds convenience and efficiency to your iPad usage, helping you stay productive and organized while using your favorite apps.
Move Apps to Different Screens
As you install more apps on your iPad, you may find that your home screen becomes cluttered and difficult to navigate. Fortunately, you can easily move apps to different screens on your iPad to create a more organized layout that suits your needs.
To move apps to a different screen, follow these steps:
- Unlock your iPad and go to the home screen.
- Find the app you want to move and long-press on its icon until it starts to shake.
- While the app is shaking, drag it to the edge of the screen in the direction of the screen you want to move it to.
- Once you reach the edge, the screen will automatically switch, and you can drop the app icon onto the desired screen.
- If you want to move the app to a different page on the same screen, simply drag it to the left or right until you reach the desired page.
- Repeat these steps for each app you want to move.
By moving apps to different screens, you can create a layout that makes sense to you. For example, you could have a screen dedicated to essential productivity apps, another for entertainment apps, and another for utility apps. This way, you can easily find the apps you need without having to scroll through numerous screens.
Keep in mind that you can also arrange the apps within a screen by dragging and dropping them into different positions. This allows you to prioritize your most frequently used apps or group related apps together for easy access.
Moving apps to different screens not only helps declutter your home screen but also allows you to create a personalized and efficient layout. Whether you prefer a minimalist setup or a more organized approach, taking the time to rearrange and customize your screens can greatly enhance your iPad experience.
Delete Apps
Over time, you may find that some apps on your iPad are no longer useful or simply taking up valuable storage space. In such cases, it’s a good idea to delete those unnecessary apps to free up space and keep your iPad organized. Deleting apps from your iPad is a straightforward process that can help optimize its performance.
To delete an app from your iPad, follow these steps:
- Unlock your iPad and go to the home screen.
- Locate the app you want to delete.
- Long-press on the app icon until it starts to shake, and a small “x” icon appears on the top-left corner of the app’s icon.
- Tap on the “x” icon.
- A confirmation message will appear, asking if you want to delete the app.
- Tap “Delete” to remove the app from your iPad.
Deleting an app from your iPad not only frees up storage space but also removes any associated data or configurations. However, keep in mind that deleting certain apps, such as built-in system apps, may not be possible. In such cases, you can try disabling those apps instead to prevent them from running or taking up space.
It’s also important to note that you can always reinstall deleted apps from the App Store if you change your mind or need them in the future. Simply search for the app in the App Store, tap the download icon, and follow the prompts to reinstall it.
Regularly reviewing and deleting unnecessary apps is a sensible practice to keep your iPad organized and efficient. By removing apps you no longer use, you can maximize storage space, improve performance, and streamline your device to suit your needs.
Hide Apps from Screens
Sometimes you may have apps on your iPad that you want to keep but don’t want to display on your home screen. Whether it’s to declutter your screen or to hide certain apps for privacy reasons, you can hide apps from screens on your iPad. This allows you to keep the apps accessible without them being prominently visible.
To hide an app from the screen, follow these steps:
- Unlock your iPad and go to the home screen.
- Locate the app you want to hide.
- Long-press on the app icon until it starts to shake.
- A small “x” icon will appear on the top-left corner of the app’s icon, similar to when you delete an app.
- Instead of tapping on the “x” icon, tap on the app’s icon and hold it.
- Move the app’s icon to the right side of the screen until it reaches the last screen.
- Release your finger to drop the app on the last screen.
By following these steps, the app will be moved to the last screen, essentially hiding it from the main screens. This allows you to keep the app accessible without cluttering your home screen.
It’s important to note that hiding an app from the screen does not delete it or remove it from your iPad. The app is still installed and accessible through a search or by accessing the App Library.
To reveal the hidden app, simply swipe to the right on your home screen until you reach the last screen. Alternatively, you can access the App Library by swiping right on the last screen, where all your installed apps, including the hidden ones, are organized automatically.
Hiding apps from screens provides a handy way to remove clutter from your home screen while keeping important apps accessible. It’s a great option when you want to maintain an organized and personalized home screen layout without sacrificing the apps you use less frequently.
Rearrange Apps on the Dock
The dock on your iPad provides quick and easy access to your most frequently used apps, allowing you to keep them always at hand. However, you might want to rearrange the apps on the dock to prioritize the ones you use the most or to group them according to your preferences. Rearranging apps on the dock is a simple process that can be done in a few easy steps.
To rearrange the apps on the dock, follow these steps:
- Unlock your iPad and go to the home screen.
- Locate the app icon that you want to move in the dock.
- Long-press on the app icon until it starts to shake.
- Drag the app icon to the desired position in the dock.
- Release your finger to drop the app icon in its new position.
By rearranging the apps on the dock, you can customize the order and placement of your most frequently used apps. This allows for quick and convenient access to the apps that matter most to you, without having to navigate through various screens or folders.
Remember that the dock on your iPad can hold up to six app icons. If you want to add more than six apps to the dock, the older icons will be pushed to the right and can be accessed by swiping left on the dock. You can also remove an app from the dock by performing the same steps as moving an app but releasing it outside of the dock area.
Rearranging apps on the dock to suit your needs and preferences ensures a smoother and more efficient workflow on your iPad. Whether you prioritize productivity apps or entertainment apps, having your most frequently used apps readily accessible on the dock allows you to navigate your iPad and switch between apps seamlessly.
Use App Library to Organize Apps
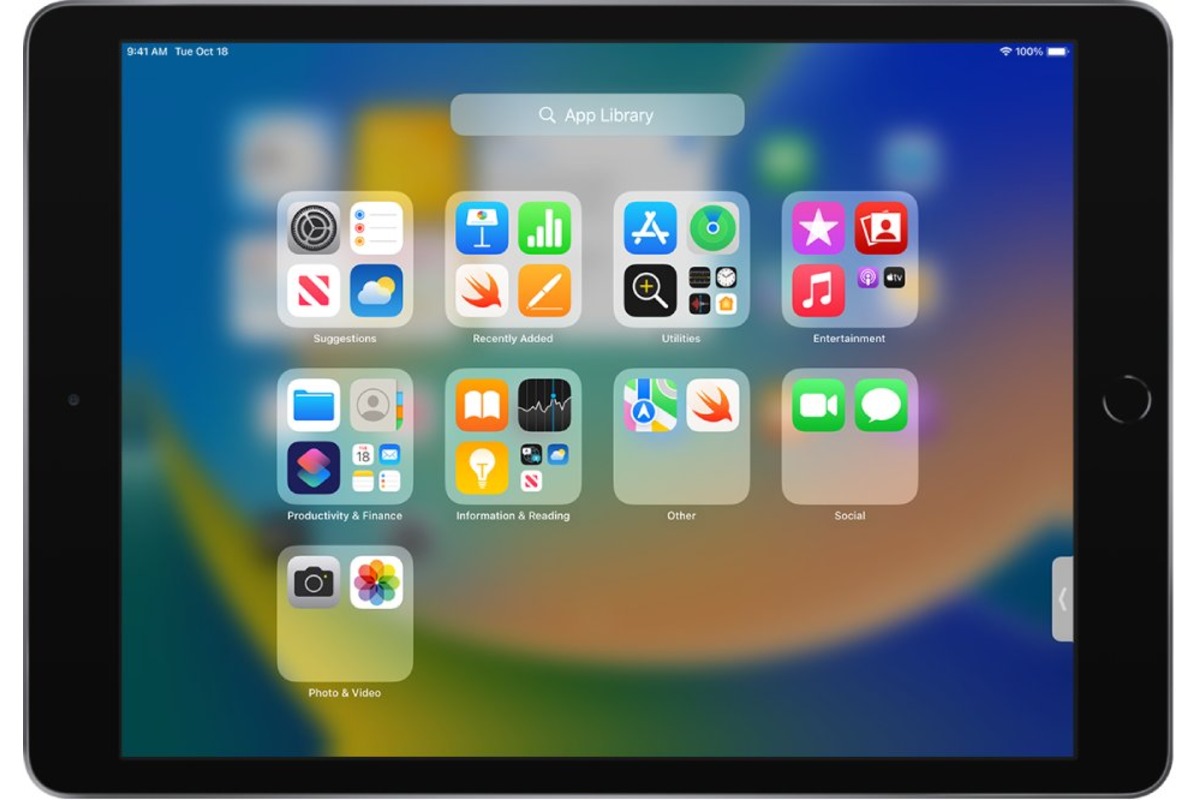
Introduced in iOS 14, the App Library is a handy feature on your iPad that automatically organizes your apps into categorized folders. It serves as a centralized location for all your installed apps, making it easier to locate and access apps without cluttering your home screens. The App Library helps you stay organized and keeps your home screens focused on your most frequently used apps.
To access the App Library, swipe to the right on your iPad’s home screen until you reach the last screen. Here, you’ll find all your installed apps neatly organized into different categories such as Suggestions, Recently Added, and themed folders. The themed folders group similar apps together, such as Productivity, Social, and Entertainment, making it effortless to find the app you’re looking for.
To find a specific app in the App Library, you have a couple of options:
- Scroll through the categorized folders and tap on the folder that corresponds to the type of app you’re looking for. From there, you can find the app within the folder and tap on it to open it.
- Alternatively, you can use the search bar at the top of the App Library screen to directly search for the app by name. Simply start typing the name of the app, and the search results will be displayed instantly.
In addition to organizing your apps, the App Library also offers the App Library Search feature. This feature lets you search for apps using keywords or phrases that are associated with the app, even if you don’t remember the exact app name.
The App Library provides a clutter-free solution for organizing and accessing your apps on your iPad. By leveraging the automatic categorization and search functionality, you can quickly find and launch the app you need without scrolling through multiple home screens. Whether you’re looking for a recently installed app or a specific category of apps, the App Library streamlines the app management experience, saving you time and effort.
Use Search to Find Apps Quickly
Sometimes, you may have a large number of apps installed on your iPad, making it challenging to locate a specific app amidst the sea of icons. In such situations, the built-in search feature on your iPad can be a lifesaver. By using the search function, you can quickly find the app you need, saving time and frustration.
To use the search feature on your iPad, follow these steps:
- Unlock your iPad and go to the home screen.
- Swipe down from the center of the screen or swipe right on the home screen to activate the search bar.
- Tap on the search bar to bring up the keyboard.
- Enter the name of the app you’re looking for using the on-screen keyboard.
- As you type, the search results will begin to appear beneath the search bar.
- If the app you’re looking for appears in the search results, tap on it to open it directly.
The search function on your iPad not only allows you to find apps by their names but also supports searching for apps based on keywords, descriptions, and even content within the apps. This means you can search for apps based on their features, purposes, or even specific tasks they perform.
In addition to finding apps, the search feature on your iPad can also provide information from the web, suggest app shortcuts, display recent contacts, and more. This makes the search bar a powerful tool for not just finding apps but also obtaining quick access to information and performing various actions.
By using the search feature on your iPad, you can quickly find and launch apps without the need to navigate through different home screens or folders. It simplifies the process of locating specific apps, especially if you have numerous apps installed. Whether you remember the app’s name or have a general idea of what you’re looking for, the search function ensures efficiency and convenience in accessing your apps.