
Why You Need to Move or Delete iPhone Emails in Bulk
Managing emails on your iPhone can become overwhelming, especially if your inbox is flooded with messages. It is essential to keep your email organized to improve productivity and ensure you never miss important messages. Moving or deleting emails in bulk can help you achieve this more efficiently. Here are some reasons why you should consider this approach:
1. Time-saving: Manually selecting and moving or deleting individual emails can be a time-consuming task. By utilizing the bulk method, you can streamline the process and save valuable time. This is particularly beneficial when you need to handle a large number of emails.
2. Enhanced organization: Having a cluttered email inbox can make it challenging to find and prioritize important emails. Moving or deleting emails in bulk allows you to quickly clear out spam, sort emails into relevant folders, or delete unnecessary messages. This helps maintain a clean and organized email environment.
3. Efficient email management: If you receive multiple emails from the same sender or related to a specific topic, moving or deleting them in bulk can make your email management more efficient. Instead of tediously dealing with each email individually, you can select and handle them collectively.
4. Storage optimization: Emails can take up a significant amount of storage space on your iPhone. Removing unnecessary messages in bulk frees up storage capacity, ensuring that your device operates smoothly and enabling you to save new emails without any issues.
5. Improved productivity: A clutter-free inbox allows you to focus on the most crucial emails and ensures that no important messages get buried in the chaos. By regularly moving or deleting emails in bulk, you can stay organized, prioritize tasks, and increase your overall productivity.
Moving or deleting emails in bulk provides numerous benefits, including time-saving, enhanced organization, efficient email management, storage optimization, and improved productivity. By incorporating these methods into your email management routine, you can effectively streamline your inbox and make the most out of your iPhone’s email capabilities.
Method 1: Using the Mail App
The Mail app on your iPhone offers a convenient way to manage your emails. Here’s a step-by-step guide on how to move or delete emails in bulk using the Mail app:
Step 1: Open the Mail App
Launch the Mail app on your iPhone by tapping on its icon, usually located on your home screen or in the dock.
Step 2: Select Multiple Emails
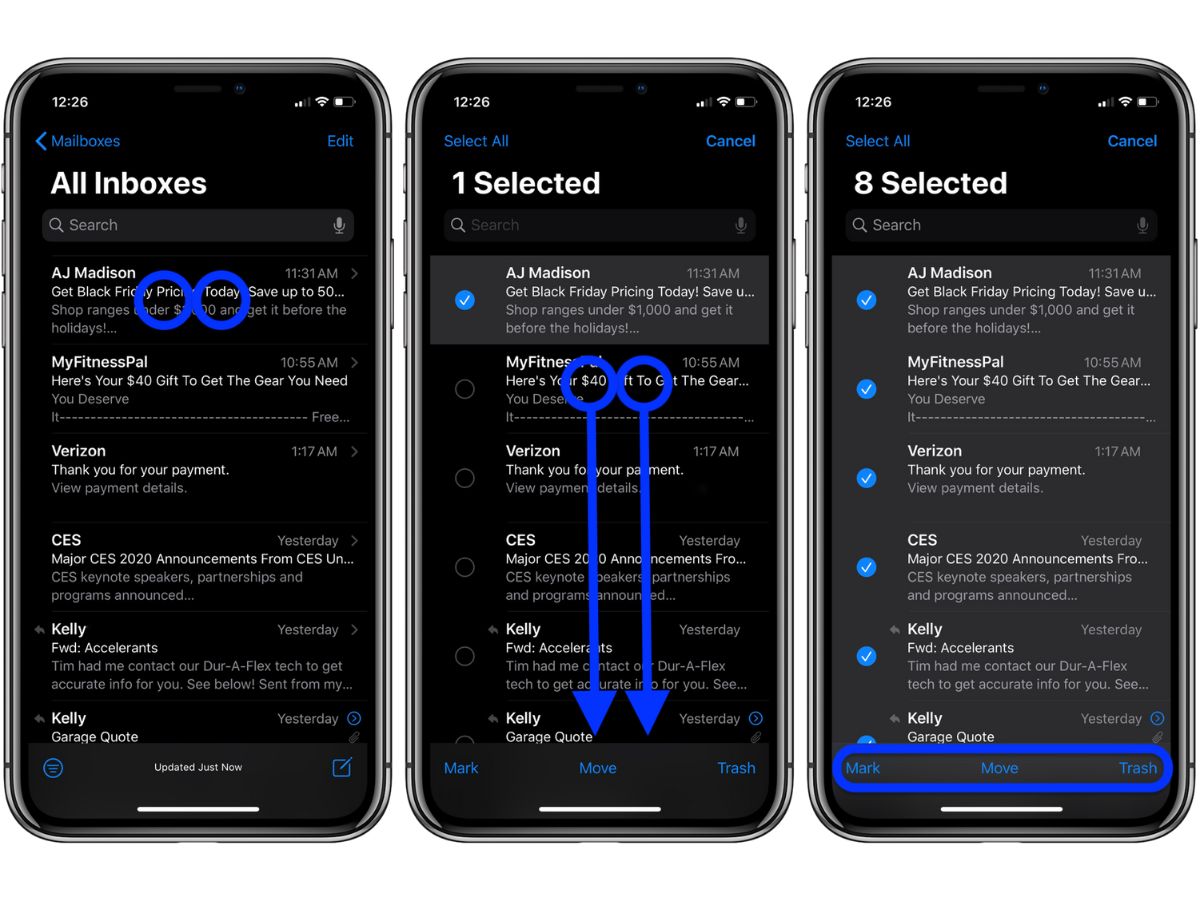
In the mailbox view, locate the emails you want to move or delete in bulk. To select multiple emails, tap on the circular checkbox beside each email. Alternatively, you can tap and hold on an email to enter selection mode and then tap on additional emails to mark them for bulk actions.
Step 3: Move or Delete the Selected Emails
Once you have selected the desired emails, you can now choose to move them to a specific folder or delete them altogether. To move the emails, tap on the folder icon at the bottom of the screen and select the destination folder. To delete the emails, tap on the trash can icon.
This method allows you to efficiently manage your emails within the Mail app. It is particularly useful when you want to move or delete a group of emails that are already selected or share a common thread.
Remember to double-check your selection before performing any actions to avoid accidentally deleting or moving important emails. Additionally, for better organization, you can create custom folders within the Mail app to sort and store specific types of emails.
By using the Mail app’s built-in functionality, you can easily move or delete emails in bulk, saving time and keeping your inbox organized.
— Step 1: Open the Mail App
To begin managing your emails in bulk using the Mail app, you first need to open the Mail app on your iPhone. Here’s how:
1. Locate the Mail app icon on your home screen. It is usually a white envelope icon with a blue background.
2. Tap on the Mail app icon to launch it.
3. You will be taken to the main mailbox screen, where you can view your inbox and other mail folders.
Once the Mail app is open and you are on the mailbox screen, you can proceed to the next steps to select and manage your emails in bulk.
The Mail app is a built-in application on iPhones, providing a convenient and user-friendly platform for managing your email accounts. By opening the Mail app, you gain access to your email inbox and folders, allowing you to easily navigate, search, and take actions on your emails.
It’s important to ensure that you have set up your email account(s) in the Mail app before attempting to open it. To add an email account, you can go to the Settings app on your iPhone, select “Mail,” then “Accounts,” and follow the prompts to add your account(s).
Remember to periodically check for updates to the Mail app, as Apple frequently releases improvements and bug fixes to enhance the user experience and ensure optimal performance.
Once you have opened the Mail app, you are ready to proceed with the next steps to select and manage emails in bulk, whether it’s moving them to different folders or deleting them to declutter your inbox.
The Mail app’s interface and functionality may vary slightly depending on the version of iOS you are using, but the basic steps for opening the app remain the same.
Now that you have successfully opened the Mail app, let’s move on to the next step to learn how to select multiple emails for bulk actions.
— Step 2: Select Multiple Emails
Once you have opened the Mail app on your iPhone, you can proceed to select multiple emails for bulk actions. Here’s how:
1. On the mailbox screen, navigate to the folder or inbox where the emails you want to manage are located.
2. To select multiple emails, locate the circular checkbox beside each email. Tap on the checkbox to mark the email for selection. The checkbox will be filled with a blue checkmark to indicate that it has been selected.
3. If you have a large number of emails and want to select a range of consecutive emails, you can tap and hold on the first email, and then swipe your finger across the screen to select multiple emails at once.
4. Additionally, if you want to select all emails in a folder or inbox, you can tap on the “Edit” button at the top right corner of the screen, and then tap on “Select All” to mark all emails for bulk actions.
By selecting multiple emails, you can easily perform bulk actions like moving or deleting them. This method allows you to save time and effort compared to individually managing each email.
It’s important to note that the options to select multiple emails may vary slightly depending on the version of iOS and the Mail app you are using. The steps provided should work for most iPhones, but if you encounter any differences in the user interface, refer to the documentation or support resources specific to your device or iOS version.
Before performing any actions on the selected emails, double-check your selection to ensure you have chosen the correct emails for bulk management. This will help you avoid accidentally deleting or moving important emails.
Now that you have successfully selected multiple emails, you can proceed to the next step to learn how to move or delete them in bulk using the Mail app.
— Step 3: Move or Delete the Selected Emails
Once you have selected multiple emails in the Mail app on your iPhone, you can now proceed to move them to a different folder or delete them altogether. Here’s how:
1. With the selected emails still highlighted, look for the icons at the bottom of the Mail app’s interface.
2. To move the selected emails to a different folder, tap on the folder icon. A list of available folders will appear.
3. Select the desired folder where you want to move the emails by tapping on it. The selected emails will be transferred to the chosen folder.
4. To delete the selected emails, tap on the trash can icon. A confirmation prompt may appear, asking you to confirm the deletion.
5. If you want to proceed with the deletion, tap “Delete” to remove the selected emails from your mailbox. Otherwise, tap “Cancel” to cancel the action.
It’s important to review your selection before moving or deleting emails in bulk, as these actions cannot be easily undone. Take a moment to ensure you have selected the correct emails and that you have chosen the appropriate destination folder or the decision to delete the emails.
By moving the selected emails to different folders, you can effectively organize your mailbox and keep related emails together for easier reference. This is helpful when you want to categorize your emails based on different projects, clients, or topics. Plus, it can make it easier to find specific emails later.
Deleting the selected emails allows you to remove irrelevant, outdated, or unnecessary messages, decluttering your mailbox and ensuring that you only keep important and relevant content. This can lead to a more streamlined and efficient email management experience.
Remember that some email providers may have their own mechanisms for email deletion and folder management. The steps provided above apply to the native Mail app, and if you are using a different email app or service, the exact process may vary slightly.
Now that you know how to move or delete selected emails in bulk, you can efficiently manage your email inbox and keep it organized on your iPhone using the Mail app.
Method 2: Using the Mail App’s Edit Mode
The Mail app on your iPhone provides an alternative method for moving or deleting emails in bulk using the Edit mode. Here’s a step-by-step guide on how to utilize the Mail app’s Edit mode:
Step 1: Open the Mail App
Begin by opening the Mail app on your iPhone. Locate the Mail app icon on your home screen and tap on it to launch the app.
Step 2: Access Edit Mode
Once you’re within the Mail app, navigate to the mailbox or folder that contains the emails you want to manage. At the top right corner of the screen, you’ll see an “Edit” button. Tap on it to enter Edit mode.
Step 3: Select and Move/Delete Emails in Bulk
With Edit mode activated, you can now select and perform bulk actions on your emails:
– To select individual emails, tap on the circular checkbox located beside each email. The checkbox will be filled with a blue checkmark when selected.
– Alternatively, if you want to select all emails within the mailbox or folder, tap on the “Select All” option at the top left corner of the screen.
Once you have selected the desired emails, scroll to the bottom of the screen to reveal the available actions:
– To move the selected emails, tap on the folder icon and choose the destination folder from the list.
– To delete the selected emails, tap on the trash can icon. You may be prompted to confirm the deletion.
Using the Mail app’s Edit mode offers a quick and efficient way to manage multiple emails simultaneously. It allows you to easily select, move, or delete emails in bulk, without the need to individually mark each email.
Remember to double-check your selection and chosen actions before proceeding. This ensures that you don’t accidentally move or delete important emails.
It’s worth noting that accessing Edit mode may differ slightly depending on the version of iOS you are using. The steps provided above should be applicable to most iPhones, but if you encounter any variations in the user interface, consult the documentation or support resources specific to your device or iOS version.
By utilizing the Mail app’s Edit mode, you can efficiently manage and organize your emails, providing a more streamlined and effective email management experience on your iPhone.
— Step 1: Open the Mail App
In order to utilize the Mail app’s Edit mode for managing emails in bulk on your iPhone, the first step is to open the Mail app itself. Here’s how you can do it:
1. Locate the Mail app icon on your iPhone’s home screen. The icon typically resembles an envelope and is usually labeled “Mail.”
2. Tap the Mail app icon to launch it. This will open the Mail app and take you to your default or last viewed mailbox.
Once you have successfully opened the Mail app, you can proceed to the next step of accessing the Edit mode to manage your emails in bulk.
The Mail app is a pre-installed application on iPhones, designed to help users conveniently manage their email accounts. By opening the Mail app, you gain access to your configured email accounts, folders, and the ability to send, receive, and organize emails.
It’s important to note that you must have at least one email account set up on your iPhone to use the Mail app. If you haven’t done so already, you can set up an email account by going to the Settings app, selecting “Mail,” and then choosing “Accounts” or “Add Account.” Follow the prompts to add your desired email account(s) to the Mail app.
Additionally, make sure you have a stable internet connection to be able to access and manage your emails effectively through the Mail app.
The specific appearance and layout of the Mail app may vary slightly based on the version of iOS you are using. However, the process of opening the Mail app remains consistent across different iPhone models and operating system versions.
Now that you have successfully opened the Mail app, you can proceed to the next step to learn how to access the Edit mode, allowing you to select and manage emails in bulk.
— Step 2: Access Edit Mode
Once the Mail app is open on your iPhone, the next step is to access the Edit mode, which allows you to select and manage emails in bulk. Here’s how you can access Edit mode in the Mail app:
1. Navigate to the mailbox or folder that contains the emails you want to manage. You can do this by tapping on the relevant mailbox or folder on the Mail app’s home screen.
2. Once you are inside the desired mailbox or folder, locate the “Edit” button at the top-right corner of the screen. It is usually represented by the word “Edit” in bold letters.
3. Tap on the “Edit” button to enter Edit mode.
After accessing Edit mode, you will notice that checkboxes appear beside each email in the mailbox or folder view. These checkboxes allow you to select multiple emails for bulk actions.
The Edit mode feature in the Mail app provides an alternative way to manage your emails in a more efficient manner. By entering Edit mode, you enable functionalities that allow you to perform actions on multiple emails simultaneously, saving you time and effort.
It’s worth mentioning that the appearance and location of the Edit button may vary slightly depending on the version of iOS you are using. However, with the majority of iPhone models and operating system versions, you should be able to find the Edit button in a similar location within the Mail app.
Additionally, it’s important to note that accessing Edit mode is specific to the Mail app and may not be applicable to third-party email apps. For other email apps, refer to their respective documentation or support resources on how to perform bulk actions.
Now that you have successfully accessed Edit mode in the Mail app, you can proceed to the next step to learn how to select and manage emails in bulk for efficient email management.
— Step 3: Select and Move/Delete Emails in Bulk
After accessing Edit mode in the Mail app on your iPhone, you can now proceed to select and perform bulk actions on your emails. Here’s how you can select and move/delete emails in bulk:
– To select individual emails, tap on the circular checkbox located beside each email. A blue checkmark will appear in the checkbox to indicate the email has been selected.
Alternatively, if you want to select all emails in the mailbox or folder, tap on the “Select All” option that appears at the top-left corner of the screen. This will select all the emails in the current view.
With the desired emails selected, you can now choose to move or delete them in bulk:
– To move the selected emails, locate the folder icon usually found at the bottom of the screen. Tap on it, and a list of available folders will appear. Choose the destination folder where you want to move the selected emails by tapping on it.
– To delete the selected emails, look for the Trash icon, typically located next to the folder icon. Tap on it to delete the selected emails. A confirmation prompt may appear, asking you to confirm the deletion. Tap “Delete” to proceed with the deletion, or tap “Cancel” to cancel the action.
It’s crucial to review your selection and chosen actions before proceeding to avoid accidentally moving or deleting important emails. Take a moment to double-check and ensure that the selected emails and the chosen destination or deletion action are correct.
This method of selecting and moving/deleting emails in bulk can be a time-saving and efficient way to manage a large number of emails. Whether you want to move related emails to specific folders or delete unnecessary messages, performing bulk actions allows you to streamline your email management process.
Remember that the specific layout and appearance of the Mail app may vary slightly depending on the version of iOS. While the steps provided are generally applicable to most iPhone models, make sure to refer to the documentation or support resources specific to your device or iOS version if you encounter any inconsistencies.
Now that you know how to select and move/delete emails in bulk, you can effectively manage and organize your emails in the Mail app on your iPhone.
Method 3: Using the Search function in the Mail App
Another effective method for managing emails in bulk on your iPhone is by utilizing the Search function within the Mail app. This method allows you to quickly locate specific emails and perform bulk actions with ease. Here’s how you can use the Search function to manage your emails:
Step 1: Open the Mail App
Begin by opening the Mail app on your iPhone. Locate the Mail app icon on your home screen and tap on it to launch the app.
Step 2: Use the Search Function
Once you are inside the Mail app, you will find a search bar at the top of the screen. Tap on the search bar to activate it and enter the keyword or criteria you want to search for.
– If you want to search for a specific sender, type the name or email address of the sender in the search bar.
– If you want to search for emails related to a particular subject, enter the relevant keywords in the search bar.
– If you want to search for emails within a specific time frame, use time-based keywords like “today,” “this week,” or specific dates.
As you type in the search bar, the Mail app will automatically display matching results below the bar. Tap on the specific email or conversation you want to manage in bulk.
Step 3: Select and Move/Delete Emails in Bulk
After selecting the specific email or conversation in the search results, you can proceed to perform bulk actions:
– To select multiple emails, tap on the circle icon located on the left side of each email in the search results. The circle will be filled with a blue checkmark when selected.
– Once you have selected the desired emails, you can choose to move them to a different folder or delete them altogether. Tap on the folder icon to move the selected emails, or tap on the trash can icon to delete them.
Using the Search function in the Mail app allows you to quickly sort through your emails and locate specific ones without the need to manually scroll through your mailbox. This method is especially useful when you want to manage emails that match a specific criteria, such as a particular sender or subject.
It’s important to note that the availability of the Search function may vary depending on the version of iOS and the Mail app you are using. However, most iPhone models come with a built-in Search function within the Mail app.
Now that you know how to use the Search function in the Mail app, you can efficiently manage and organize your emails by quickly locating and performing bulk actions on specific email conversations.
— Step 1: Open the Mail App
In order to utilize the Search function within the Mail app on your iPhone, the first step is to open the Mail app. Here’s how you can do it:
1. Locate the Mail app icon on your iPhone’s home screen. The icon typically resembles an envelope and is usually labeled “Mail.”
2. Tap on the Mail app icon to launch it. This will open the Mail app and take you to your default mailbox or the last accessed mailbox.
Once you have successfully opened the Mail app, you can proceed to the next step to access the Search function and start managing your emails in bulk.
The Mail app is a built-in application on iPhones, designed to help users manage their email accounts efficiently. By opening the Mail app, you gain access to your email accounts, folders, and the ability to send, receive, and manage emails.
It’s important to note that you must have at least one email account set up and configured on your iPhone to use the Mail app. If you haven’t done so already, you can set up an email account by going to the Settings app, selecting “Mail,” and then choosing “Accounts” or “Add Account.” Follow the prompts to add your desired email account(s) to the Mail app.
Additionally, ensure that you have a stable internet connection to access and manage your emails effectively through the Mail app.
The specific layout and appearance of the Mail app may vary slightly depending on the version of iOS you are using. However, the process of opening the Mail app remains consistent across different iPhone models and operating system versions.
Now that you have successfully opened the Mail app, you can proceed to the next step and learn how to use the Search function to manage your emails in bulk.
— Step 2: Use the Search Function
Once you have opened the Mail app on your iPhone, you can proceed to use the Search function to locate specific emails and manage them in bulk. Here’s how:
1. Locate the search bar at the top of the Mail app interface. It is typically denoted by a magnifying glass icon or labeled as “Search.”
2. Tap on the search bar to activate it and bring up the keyboard.
3. Enter the keyword, sender’s name, subject, or any other relevant information related to the emails you want to manage in bulk. As you type, the Mail app will start displaying search suggestions based on your input.
4. Tap on the search suggestion that matches your desired criteria, or continue entering the search term until you find the specific emails you are looking for.
The search results will be displayed below the search bar, listing the emails that match your search criteria. You can scroll through the results to find the specific email or conversation you want to manage.
Using the Search function in the Mail app allows you to quickly find and filter emails based on specific keywords, sender names, or subjects. This is particularly useful when you need to locate and manage a specific set of emails among a large volume of messages.
While entering your search query, you can also use time-based keywords such as “today,” “this week,” or specific dates to further refine your search. This can be helpful when you want to locate emails within a specific time frame.
It’s important to note that the Mail app will search for matching emails across all of your connected email accounts, including the inbox and other folders. The search results will be displayed regardless of the current mailbox or folder you are in.
The availability and functionality of the Search function may vary depending on the version of iOS you are using. However, most iPhone models come with a robust search feature within the Mail app.
Now that you know how to use the Search function, you can easily find the specific emails you want and proceed to manage them in bulk using the Mail app on your iPhone.
— Step 3: Select and Move/Delete Emails in Bulk
After using the Search function in the Mail app on your iPhone to locate specific emails, you can proceed to select and manage them in bulk. Here’s how:
– While viewing the search results, tap on the circular checkbox located on the left side of each email to select it. The checkbox will be filled with a blue checkmark when selected.
– If you want to select all emails in the search results, tap on the “Select All” option that may appear at the top-left corner of the screen.
Once you have selected the desired emails in bulk, you can choose from the following actions:
– To move the selected emails, tap on the folder icon usually found at the bottom of the screen. A list of available folders will appear. Select the destination folder where you want to move the emails.
– To delete the selected emails, look for the trash can icon, typically located next to the folder icon. Tap on it to delete the selected emails. You may be prompted to confirm the deletion.
Before moving or deleting the selected emails, double-check your selection to ensure that you have chosen the right emails for bulk management. This extra step helps prevent accidentally moving or deleting important emails.
By selecting and managing emails in bulk using the Mail app’s Search function, you can quickly handle a specific set of emails without having to individually select and perform actions on each one. This feature is especially helpful when you need to manage a large number of emails that match particular search criteria.
It’s important to note that the availability and functionality of the Search function may vary slightly depending on the version of iOS and the Mail app you are using. However, the general steps provided should be applicable to most iPhone models and operating system versions.
Now that you know how to select and move/delete emails in bulk using the Mail app’s Search function, you can efficiently manage and organize your emails on your iPhone.
Method 4: Using Third-Party Email Apps
In addition to the native Mail app on your iPhone, you can also use third-party email apps to manage your emails in bulk. These apps often offer additional features and customization options to enhance your email management experience. Here’s how you can use third-party email apps to manage emails in bulk:
Step 1: Download and Install a Third-Party Email App
Visit the App Store on your iPhone and search for reputable third-party email apps. Look for apps that have positive reviews and ratings. Once you have chosen an app that suits your needs, download and install it on your device.
Step 2: Sync Your Email Account
Launch the third-party email app and follow the on-screen instructions to set up and sync your email account(s). Depending on the app, you may need to enter your email address, password, and other necessary details to establish the connection between the app and your email account.
Step 3: Select and Move/Delete Emails in Bulk
Once your email account is synced with the third-party app, you can proceed to select and manage emails in bulk:
– Navigate to the mailbox or folder where the emails you want to manage are located.
– Select multiple emails by tapping on the checkboxes or using the selection tools provided by the app.
– Use the app’s options or icons to move the selected emails to a different folder or delete them altogether.
Third-party email apps offer various features and functionalities to streamline the email management process. They often provide advanced search capabilities, customizable swipe gestures, and more efficient ways to categorize and organize your emails. Some popular third-party email apps include Gmail, Outlook, Spark, and Airmail.
It’s worth noting that the exact steps and options may vary depending on the specific third-party email app you choose. Each app has its own interface and set of features, so refer to the app’s documentation or support resources for detailed instructions on how to manage emails in bulk.
By using third-party email apps, you can enhance your email management experience, take advantage of additional features, and streamline the process of moving or deleting emails in bulk. These apps can customize the email management process to better suit your preferences and help you stay organized and productive.
— Step 1: Download and Install a Third-Party Email App
To begin using a third-party email app on your iPhone, you need to download and install it from the App Store. Follow these steps to get started:
1. Open the App Store on your iPhone by tapping on the App Store icon on your home screen.
2. Tap on the “Search” tab located at the bottom of the screen.
3. In the search bar at the top, type the name of the third-party email app you want to download. You can also search by keywords such as “email app” to explore different options.
4. Select the desired app from the search results. Read the app description, reviews, and ratings to ensure it meets your requirements and has a positive reputation.
5. Tap on the “Get” or “Download” button next to the app listing.
6. Authenticate your download using Face ID, Touch ID, or your Apple ID password, depending on your device settings.
7. Wait for the download and installation process to complete. This may take a few moments.
Once the third-party email app is successfully downloaded and installed on your iPhone, you can proceed to set up and configure your email account(s) within the app.
It’s worth noting that there are several popular third-party email apps available on the App Store, such as Gmail, Outlook, Spark, and Airmail. Each app offers its own unique features and functionality, so choose the app that best suits your needs and requirements.
Third-party email apps typically provide additional customization options, advanced search capabilities, and unique user interfaces that can enhance your email management experience. They often offer features designed to boost productivity, such as smart inbox organization, customizable swipe options, and integration with other productivity tools.
Remember to read the app’s documentation or support resources for specific information on setting up your email accounts and exploring the app’s features. These resources will guide you on how to maximize the benefits offered by the third-party email app of your choice.
Now that you have successfully downloaded and installed a third-party email app, you can proceed to the next steps of syncing your email account(s) and utilizing the app’s features to manage your emails efficiently.
— Step 2: Sync Your Email Account
After downloading and installing a third-party email app on your iPhone, the next step is to sync your email account(s) within the app. Follow these steps to sync your email account:
1. Open the third-party email app you installed from the App Store by tapping on its icon on your home screen.
2. Look for the option to add a new email account. This is usually located in the settings or account setup section of the app.
3. Tap on the “Add Account” or “Set Up Account” button to start the process of adding a new email account.
4. Select the type of email account you want to add. Depending on the app, you may be presented with options such as Gmail, Outlook, Yahoo, or Other.
5. Enter your email address and password in the designated fields. If you are unsure of the correct settings, consult your email provider’s documentation or support resources for the necessary information.
6. Follow the on-screen prompts to complete the email account setup. This may involve granting the app permission to access your email account, configuring additional settings, or verifying your account credentials.
7. Repeat the process if you have multiple email accounts to sync. Most third-party email apps allow you to add and manage multiple accounts within the app.
Once the email account setup is complete, the third-party email app will start syncing your email messages, folders, and other related data. This process may take a few moments, depending on the size of your mailbox and the speed of your internet connection.
Syncing your email account(s) within the third-party app allows you to access and manage your emails directly from the app’s interface. You will be able to compose new emails, reply to messages, organize your mailbox, and take advantage of the app’s unique features and customization options.
It’s important to note that each third-party email app may have its specific steps and requirements for adding and syncing email accounts. If you encounter any difficulties during the setup process, refer to the app’s documentation or support resources for detailed instructions and troubleshooting tips.
With your email account(s) successfully synced within the third-party email app, you can now proceed to select and manage your emails in bulk, taking advantage of the app’s advanced features and improved user experience.
— Step 3: Select and Move/Delete Emails in Bulk
Once you have synced your email account(s) within a third-party email app on your iPhone, you can proceed to select and manage your emails in bulk. Follow these steps to select and move/delete emails in bulk:
– Open the third-party email app on your iPhone and navigate to the mailbox or folder where the emails you want to manage are located.
– To select multiple emails, tap and hold on one email until it becomes highlighted, then continue to tap on the other emails you want to select. Alternatively, the app may provide a checkbox or selection tool to mark multiple emails at once.
– Once you have selected the desired emails, look for the available actions within the app’s interface. These actions may include icons or menus for moving, archiving, deleting, or marking emails as read/unread.
– To move the selected emails, tap on the move or folder icon within the app and select the desired destination folder from the available options.
– To delete the selected emails, tap on the delete or trash icon within the app. You may be prompted to confirm the deletion of the selected emails.
It’s important to review your selection of emails before proceeding with any actions to avoid accidentally moving or deleting important messages. Double-check that you have selected the correct emails and that the chosen action is appropriate.
Third-party email apps often offer additional functionalities to enhance your email management experience. These can include features like automatic email categorization, customizable swipe gestures, advanced search capabilities, and integration with other productivity apps.
Every third-party email app may have a unique user interface and set of options for selecting and managing emails in bulk. If you encounter any difficulties using the app’s features, consult the app’s documentation or support resources for detailed instructions specific to that app.
By using a third-party email app on your iPhone, you can take advantage of its enhanced features and streamlined user experience to efficiently select and manage emails in bulk. This allows you to declutter your mailbox, stay organized, and improve your productivity when handling a large number of messages.
Now that you know how to select and move/delete emails in bulk using a third-party email app, you can effectively manage your emails and optimize your workflow on your iPhone.