
Why Move Images in Google Docs?
Images can enhance the visual appeal and overall impact of your Google Docs documents. Whether you are creating a presentation, report, or any other type of document, strategically placing and moving images can help convey your message more effectively. Here are a few reasons why you might want to move images in Google Docs:
- Improved Organization: Moving images allows you to arrange them in a way that makes sense within the context of your document. By placing images where they support or illustrate specific points, you can create a more organized and visually pleasing document.
- Enhanced Readability: By moving images, you can avoid clutter and improve the readability of your document. Placing images in suitable locations can break up the text and make it easier for readers to absorb information.
- Visual Emphasis: Moving images can help draw attention to important details or key concepts within your document. By strategically placing images alongside relevant text, you can highlight and reinforce your message.
- Different Formatting Options: Moving images allows you to explore different formatting options. You can experiment with different image placements, sizes, and alignments to create a unique and professional-looking document.
- Seamless Collaboration: When collaborating with others on Google Docs, moving images can help maintain consistency and align images with the overall layout. Easy image movement ensures that your document’s visual elements remain in sync with your collaborators’ input.
By understanding the benefits of moving images in Google Docs, you can make the most of this powerful feature and effectively communicate your ideas in a visually appealing manner. So, let’s dive into the various ways you can move and manipulate images within your documents!
Moving Images Within a Document
In Google Docs, moving images within a document is a simple and straightforward process. Here’s how you can do it:
- Select the image: Click on the image you want to move. You will see a blue outline around the image, indicating it is selected.
- Drag and drop: With the image selected, you can move it by clicking and dragging the image to a new location within the document. As you move the image, you will see a transparent outline indicating where the image will be placed.
- Release the mouse: Once you have positioned the image in the desired location, release the mouse button. The image will be moved to the new location within the document.
You can repeat this process for any other images you want to move within the document. Take advantage of this functionality to rearrange images based on their context or visual hierarchy.
Additionally, if you want to move multiple images at once, you can hold down the Shift or Ctrl key while selecting multiple images and then follow the same drag-and-drop process to move them collectively.
Remember, moving images within a document allows you to fine-tune the layout and presentation of your content. Whether you are reorganizing images for a better flow or adjusting their position to create visual interest, this capability in Google Docs empowers you to create professional-looking documents.
Moving Images Across Documents
Google Docs offers an easy way to move images between different documents, making it convenient for you to reuse visuals or transfer them to more appropriate locations. Here’s how you can move images across documents:
- Open both documents: Open the document that contains the image you want to move and the document where you want to move the image to. Arrange the documents side by side, using two separate browser tabs or windows.
- Select and copy the image: In the document containing the image you want to move, click on the image to select it. Right-click on the image and choose the “Copy” option from the context menu.
- Paste the image: Switch to the document where you want to move the image. Place your cursor at the desired location within the document and right-click. Choose the “Paste” option from the context menu. The image will be inserted into the new document.
By following these step-by-step instructions, you can seamlessly move images between different documents in Google Docs. This feature comes in handy when you need to transfer visuals from one report to another or when you want to reuse an image in a more relevant context.
Furthermore, if you want to move multiple images at once, you can use the Ctrl or Shift key to select multiple images in the original document, copy them, and then paste them into the target document.
With the ability to move images across documents, Google Docs gives you the flexibility to easily organize your visuals and ensure consistency across multiple projects.
Adjusting the Size and Position of Images
In Google Docs, you have the flexibility to adjust the size and position of images to fit your document’s layout and design requirements. Here’s how you can do it:
- Select the image: Click on the image you want to adjust. The image will be highlighted with a blue outline.
- Resize the image: To resize the image, click and drag any of the corners inward or outward. Hold the Shift key while resizing to maintain the original aspect ratio of the image.
- Reposition the image: To change the position of the image, click and drag it to a new location within the document. Alternatively, you can use the arrow keys on your keyboard to nudge the image in small increments.
By resizing and repositioning images, you can create a visually balanced and aesthetically pleasing document. Experiment with different sizes and placements to find what works best for your content.
Furthermore, Google Docs provides additional options to fine-tune the image’s alignment and text wrapping settings:
- Alignment: You can adjust the alignment of the image to align with the left, center, or right side of the document. To do this, select the image and click on the alignment options in the toolbar.
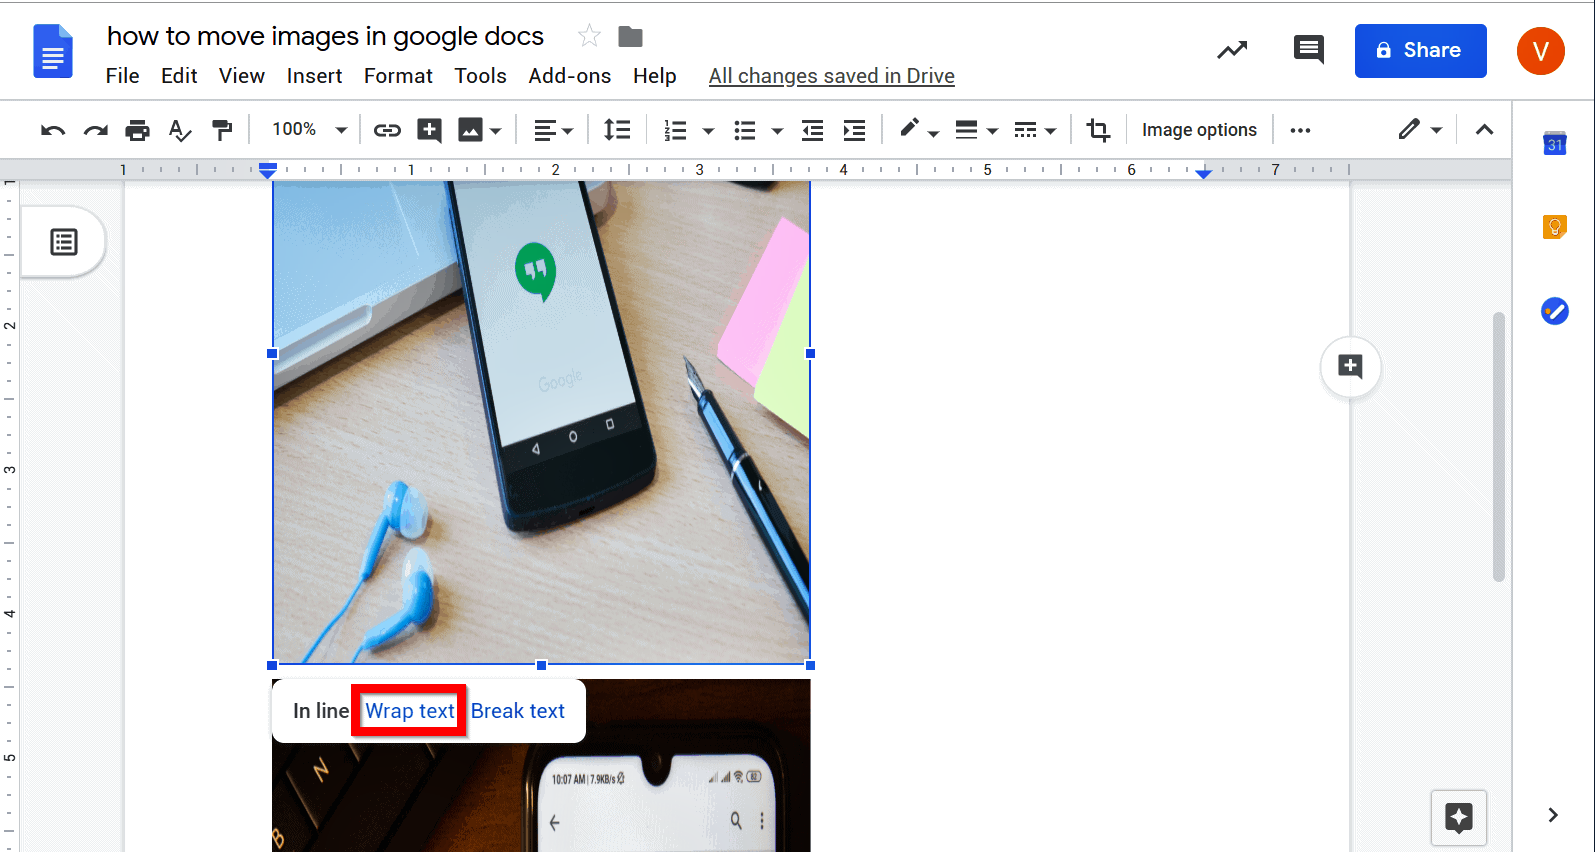
- Text Wrapping: By default, images in Google Docs are set to “Inline” text wrapping, which means the text will wrap around the image. However, you can change this setting to “Wrap Text” or “Break Text” to control how the text interacts with the image. To modify the text wrapping setting, select the image and click on the “Text Wrapping” option in the toolbar.
By leveraging these features, you can ensure that your images are sized, positioned, and aligned appropriately, resulting in a visually appealing and professional-looking document.
Aligning Images with Text
In Google Docs, aligning images with text can greatly enhance the visual presentation and overall flow of your document. Here are the different options for aligning images with text:
- Inline: By default, images in Google Docs are set to “Inline” alignment. This means that the image is treated as part of the text and will appear at the same vertical position as the text on the line it is inserted. The text will flow around the image, creating a seamless integration.
- Wrap Text: If you want the text to wrap around the image but with a clear vertical separation, choose the “Wrap Text” alignment. This will create padding around the image, allowing for a distinct space between the image and the surrounding text.
- Break Text: When you select the “Break Text” alignment, the image will interrupt the flow of the text. The text before and after the image will not be connected, appearing on separate lines.
To align images with text in Google Docs, follow these steps:
- Select the image: Click on the image you want to align with text. It will be highlighted with a blue outline.
- Choose the alignment option: In the toolbar, you will find the alignment options for the image. Click on the desired alignment option, such as “Inline,” “Wrap Text,” or “Break Text.”
By aligning images with text, you can create a visually appealing composition and establish a more engaging reading experience. Consider the content and context of your document when choosing the alignment option that best suits your needs.
Remember, experimenting with different alignment options can greatly impact the visual layout of your document. Take the time to try out various alignments to determine which one best enhances the readability and overall presentation of your document.
Wrapping Text Around Images
Google Docs provides the option to wrap text around images, allowing you to create visually appealing and dynamic layouts. Here’s how you can wrap text around images:
- Select the image: Click on the image you want to wrap text around. The image will be highlighted with a blue outline.
- Choose the text wrapping option: In the toolbar, you will find the text wrapping options for the image. Click on the desired option, such as “Left,” “Right,” or “In line.”
Here is an explanation of the different text wrapping options:
- Left Wrapping: When you select “Left” text wrapping, the image will align to the left side of the page, and the text will flow around it on the right side.
- Right Wrapping: Choosing “Right” text wrapping will align the image to the right side of the page, with the text flowing around it on the left side.
- In line: The “In line” option keeps the image within the text, but the surrounding text will adjust to accommodate the image, giving it a natural flow.
By wrapping text around images, you can create visually interesting compositions and avoid large gaps of empty space in your documents. This technique is especially useful when you have ample text to accompany an image, as it ensures a more harmonious visual arrangement.
Additionally, you can fine-tune the spacing between the image and the surrounding text by adjusting the margins. To do this, right-click on the image, choose “Image options,” and navigate to the “Margins” tab. Here, you can adjust the top, bottom, left, and right margins as needed.
Experiment with different text wrapping options to achieve the desired visual effect and enhance the overall readability and aesthetics of your Google Docs documents.