
What Causes a Window to Go Off-Screen?
Have you ever encountered the frustrating situation where a window on your computer screen is partially or completely off-screen, making it difficult or impossible to access? This can happen due to various reasons, and understanding the causes can help you find the right solution to bring the window back into view.
One common cause is mistakenly dragging the window off the visible area of the screen. This can happen if you accidentally click and hold the title bar of the window while moving it around. In some cases, this can occur when using multiple monitors, as the window may be moved to an invisible portion of the extended display.
Another possible cause is display resolution changes. If you have modified your display settings or connected to an external monitor with a different resolution, it can lead to windows appearing off-screen. This is because the window’s original position is preserved based on the previous resolution, causing it to no longer fit within the visible area.
Furthermore, a window can go off-screen if a program’s window management settings are not optimized. Some applications may have default settings that cause their windows to open in a specific position that is off-screen or too large for the screen. Additionally, issues with window size and position can occur due to software bugs or improper handling of display scaling.
Lastly, a malfunctioning graphics driver could also be the culprit. Outdated or incompatible graphics drivers may cause display-related issues, including windows extending beyond the screen boundaries.
Understanding these possible causes for a window going off-screen can help you troubleshoot and resolve the issue effectively. By identifying the specific cause for your situation, you can then proceed to the appropriate solutions, some of which we will discuss in the following sections.
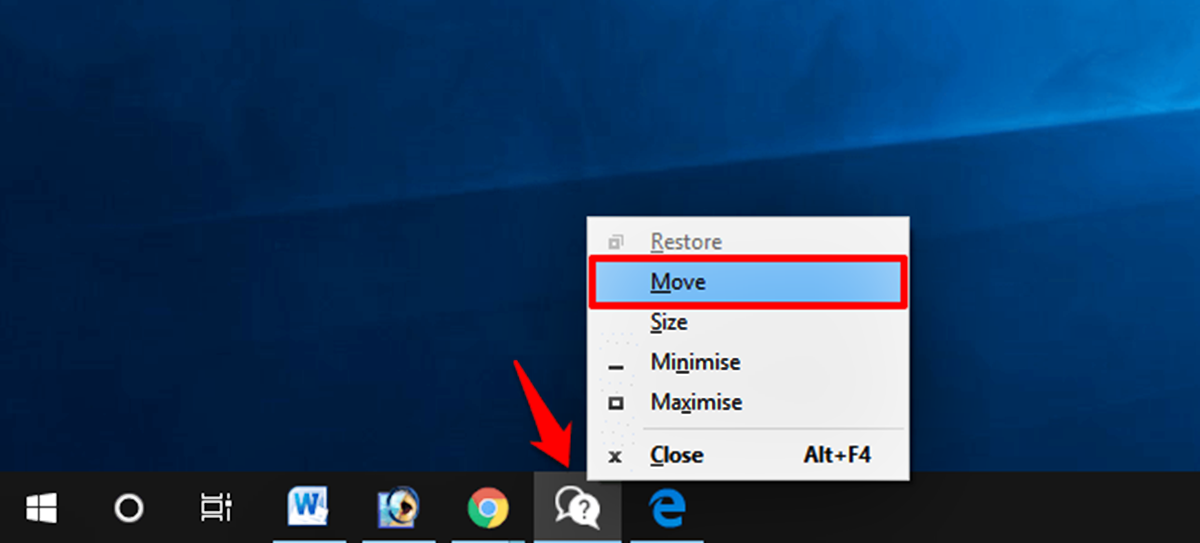
How to Move a Window Using the Taskbar
If a window is off-screen, one of the simplest methods to bring it back into view is by using the taskbar. Follow these steps to move a window using the taskbar:
1. Locate the application on the taskbar: Look for the application’s icon on the taskbar, usually located at the bottom of the screen. If the window is minimized, it will appear as a small icon. If it is open but off-screen, you may see a preview thumbnail when hovering over the icon.
2. Right-click the application’s icon: Once you have found the icon, right-click on it to open the context menu.
3. Select “Move” from the context menu: In the context menu, hover over the “Move” option and click on it. This action will enable the window to be moved using the arrow keys.
4. Use the arrow keys to move the window: After selecting “Move,” the window will be attached to the mouse cursor. At this point, you can use the arrow keys on your keyboard to maneuver the window back onto the visible part of the screen.
5. Press Enter to finish moving the window: Once you have positioned the window in the desired location, press the Enter key to release the window and complete the action.
It is important to note that using the taskbar method may not work if the window is completely off-screen or if the window is too large in size to fit within the screen dimensions. In such cases, you may need to try alternative methods, which we will explore in the subsequent sections.
By following these steps, you can easily move a window back onto the visible part of the screen using the taskbar. This method is straightforward and requires no additional software or complex configurations.
How to Move a Window Using the Keyboard
When a window goes off-screen, and you can’t access it using the mouse or taskbar, you can utilize keyboard shortcuts to move the window back into view. Here’s how you can do it:
1. Activate the off-screen window: Use the Alt + Tab keyboard shortcut to switch to the off-screen window. Continue holding the Alt key and repeatedly press the Tab key until you select the desired window.
2. Use the Windows key + Arrow keys: Once the off-screen window is activated, hold down the Windows key on your keyboard and press the arrow key in the direction you want to move the window. For example, press Windows key + Right Arrow to move the window to the right or Windows key + Left Arrow to move it to the left.
3. Keep adjusting until the window is visible: Continue pressing the arrow keys until the window is fully visible on the screen. If the window is partially off-screen, you may need to use a combination of arrow keys to accurately position it within the visible area.
4. Release the keys to finish moving the window: Once the window is in the desired location, release the Windows key and arrow keys. The window will now be accessible and usable in its new position.
Note that the keyboard method may not work if the off-screen window is completely inaccessible or if the window’s size exceeds the dimensions of your screen. In these cases, you may need to try alternative methods like using the taskbar or shortcuts specific to your operating system.
By using keyboard shortcuts, you can easily move an off-screen window back into view without the need for a mouse or any additional software. These shortcuts are convenient and efficient, allowing you to regain access to the window in just a few simple steps.
How to Move a Window Using a Shortcut
If you prefer using shortcuts instead of mouse clicks or keyboard navigation, there are specific shortcuts available to move windows on your computer. These shortcuts provide a quick and efficient way to reposition off-screen windows. Here’s how you can move a window using a shortcut:
1. Activate the off-screen window: If the window is not currently in focus, click on it to activate it. Alternatively, you can use Alt + Tab or the taskbar to bring the window to the front.
2. Hold the Windows key: Press and hold the Windows key on your keyboard.
3. Press the Shift key: While continuing to hold the Windows key, press and hold the Shift key.
4. Use the arrow keys: While still holding both the Windows and Shift keys, use the arrow keys to move the window in the desired direction. For example, press the left or right arrow key to move the window horizontally or the up or down arrow key to move it vertically.
5. Release all keys: Once you have positioned the window in the desired location, release the Windows and Shift keys.
By following these steps, you can quickly move a window using a shortcut. This method is especially useful when you want to relocate a window without relying on the mouse or spending time navigating through menus or taskbar options.
It’s important to note that the effectiveness of this shortcut may vary depending on your operating system and specific configuration. Some versions of Windows have additional customization options for window management, which can be accessed through the Windows key + Shift + Arrow keys or other combinations.
Overall, using a shortcut to move the window provides a convenient and efficient way to bring off-screen windows back into view. These shortcuts can save you time and effort, ensuring a smooth and uninterrupted workflow while using your computer.
How to Move a Window Using the Mouse
If you prefer a more hands-on approach, you can easily move an off-screen window using your mouse. This method allows for precise control and flexibility in positioning the window. Here’s how to move a window using the mouse:
1. Maximize the window: If the off-screen window is not maximized, click on the “Maximize” button (represented by a square icon) in the top-right corner of the window. This step ensures that the entire window is visible before moving it.
2. Click and drag the title bar: Move your mouse cursor to the top of the window where the title bar is located. Click and hold the left mouse button while dragging the window back into the visible area.
3. Adjust the window’s position: As you drag the window, it will follow the movement of your mouse cursor. Keep dragging the window until it is fully visible on the screen or positioned where you desire.
4. Release the mouse button: Once the window is in the desired location, release the left mouse button to set it in place. The window will now be accessible and functional in its new position.
If the window extends beyond the edges of your screen, you can hover over the edge until the mouse cursor transforms into a double-sided arrow. Then, click and drag the edge to resize the window and fit it within the screen boundaries.
Moving a window using the mouse provides a visually intuitive method for bringing off-screen windows back into view. It allows for finer control in positioning the window and can be particularly useful when dealing with larger or irregularly shaped windows.
Note that this method may not work if the window is completely inaccessible or if it is partially hidden behind other windows. In such cases, you may need to try alternative methods, such as using the taskbar or shortcuts, to regain access to the window.
By following these steps, you can easily move off-screen windows using your mouse. This method gives you the freedom to position windows wherever you prefer, ensuring a more organized and efficient workflow on your computer.
How to Move a Window Using Aero Snap
If you are using Windows 7 or later, you can take advantage of a built-in feature called “Aero Snap” to move and organize windows on your screen. Aero Snap allows for quick resizing and positioning of windows using simple mouse gestures. Here’s how you can move a window using Aero Snap:
1. Activate Aero Snap: Make sure Aero Snap is enabled by going to the Control Panel and selecting “Ease of Access.” Then, click on “Make the mouse easier to use” and check the box next to “Prevent windows from being automatically arranged when moved to the edge of the screen.”
2. Click and drag the window’s title bar: Move your mouse cursor to the top of the window where the title bar is located. Click and hold the left mouse button.
3. Move the window to the edge of the screen: While still holding the mouse button, drag the window towards one edge of the screen. As you approach the edge, you will see the window automatically resize and snap into place, taking up half of the screen.
4. Move the window to a different position: If you want to position the window on a different side of the screen, continue dragging it towards the desired edge. The window will automatically adjust its position accordingly.
5. Release the mouse button to set the window in place: Once the window is in the desired location, release the left mouse button. The window will then take up the designated area of the screen.
By utilizing Aero Snap, you can easily move windows around and organize them on your screen with minimal effort. This feature is particularly useful when working with multiple windows simultaneously, allowing for efficient multitasking.
It is worth noting that Aero Snap may not be available or function differently on older versions of Windows or non-Windows operating systems. In such cases, you may need to explore alternative methods for moving and organizing windows.
By following these steps, you can take advantage of Aero Snap to move and position windows on your screen effortlessly. This feature enhances productivity and helps maintain an organized workspace, enabling a smoother and more efficient workflow.
How to Move a Window Using Third-Party Software
If the built-in methods and features of your operating system are not sufficient or effective in moving an off-screen window, you can turn to third-party software solutions. These software programs offer additional functionalities and customization options for managing windows. Here are the steps to move a window using third-party software:
1. Research and install a window management software: Look for reputable third-party window management software options and choose one that suits your needs. Popular options include DisplayFusion, AquaSnap, and Magnet. Download and install the software on your computer.
2. Open the window management software: Launch the window management software you have installed. The software will provide various tools and features for managing and moving windows.
3. Locate the off-screen window: Look for the window you want to move within the window management software’s interface or window list.
4. Use the software’s features: Depending on the software you have chosen, you will have access to different features and options for moving windows. These may include keyboard shortcuts, hotkeys, or advanced mouse gestures. Refer to the software’s documentation or tutorials for specific instructions on how to move windows using its features.
5. Move the window as desired: Follow the instructions provided by the software to move the off-screen window. This may involve using specific key combinations, dragging the window, or selecting predefined layouts within the software’s interface.
By utilizing third-party window management software, you can gain more control and flexibility in moving off-screen windows. These software solutions often offer advanced features such as window snapping, virtual desktops, and mouse shortcuts, which can greatly enhance your productivity and workflow.
Keep in mind that third-party software solutions may come with a cost or may have limited free versions with restricted features. Before installing any software, ensure it is reputable, reliable, and compatible with your operating system.
By following these steps, you can utilize third-party window management software to effectively move off-screen windows and optimize your workspace. These software solutions provide customizable features that can streamline your workflow and improve your overall user experience.
How to Prevent Windows from Going Off-Screen in the Future
Dealing with off-screen windows can be frustrating, but there are steps you can take to prevent them from occurring in the first place. By implementing a few preventive measures, you can ensure that windows stay within the visible area of your screen. Here’s how to prevent windows from going off-screen in the future:
1. Adjust your display settings: Make sure your display resolution is set correctly and matches your monitor’s native resolution. To do this, right-click on your desktop, select “Display settings” or “Screen resolution,” and adjust the resolution accordingly. Keeping the resolution at the recommended setting will help prevent windows from extending beyond the screen boundaries.
2. Avoid dragging windows too close to the edges: Be mindful when dragging windows near the edges of the screen. If you accidentally drag a window too close, it might snap to the edge and go partially off-screen. To prevent this, leave a small gap between the window and the screen edge.
3. Use window management features: Take advantage of the built-in window management features provided by your operating system. For example, in Windows, you can use Aero Snap or the “Cascade windows” option to neatly organize and position windows within the visible screen area.
4. Configure application-specific settings: Some applications have settings that determine the position or size of their windows. Check the settings or preferences of individual applications and adjust them to open windows in a visible area. Look for options like “Restore window position” or “Remember window size.”
5. Utilize third-party window management software: Consider using third-party window management software that provides additional features and customization options. These software solutions often offer advanced window management tools, such as virtual desktops and automatic window placement, which can help prevent windows from going off-screen.
By following these preventive steps, you can minimize the occurrence of off-screen windows and ensure a more seamless and efficient user experience. Taking a proactive approach to window management can save you time and frustration in the long run.
Remember to regularly check for driver updates and keep your operating system up to date. Sometimes, issues with display drivers or software compatibility can cause windows to go off-screen, so staying current with updates can help prevent such problems.
By implementing these preventive measures, you can maintain better control over the positioning and visibility of your windows, resulting in a more organized and productive digital workspace.