
Why Move a Fullscreen Game to Another Monitor?
Fullscreen gaming on a single monitor has its limitations. While it offers an immersive experience, it can sometimes hinder multitasking and productivity. That’s where the option to move a fullscreen game to another monitor comes in handy. This feature allows gamers to enjoy their favorite games on a larger, secondary display while keeping their primary monitor free for other tasks. Whether you’re a streamer looking to separate your gameplay from chat or a gamer who wants to maximize their viewing experience, moving a fullscreen game to another monitor offers numerous benefits.
One of the main advantages of moving a fullscreen game to another monitor is the increased screen real estate. By utilizing multiple displays, you can immerse yourself in the game world while simultaneously having access to other applications or websites on your primary monitor. This makes it easier to keep track of chat messages, monitor system performance, or even watch tutorials or walkthroughs as you play. It enhances both productivity and convenience.
Furthermore, moving a fullscreen game to another monitor can greatly improve the visual experience. With a larger screen, details become more pronounced, textures become richer, and immersion is intensified. This is especially beneficial for games with detailed graphics, such as open-world RPGs or visually stunning FPS titles. The increased display size allows you to fully appreciate the game’s visuals and immerse yourself in its world.
Another significant advantage of moving a fullscreen game to another monitor is the potential for better multitasking. By having the game on one monitor and other applications on the other, you can easily switch between them without interrupting your gameplay. This is especially useful for streamers or content creators who need to monitor chat, interact with viewers, or manage overlays and streaming software while playing.
Lastly, moving a fullscreen game to another monitor can enhance the overall gaming experience by reducing distractions. By using a dedicated display for gaming, you can minimize the potential interruptions from other applications or notifications that may appear on your primary monitor. This creates a more immersive environment, allowing you to fully focus on the game and enjoy it to its fullest extent.
Check Your Graphics Options
Before attempting to move a fullscreen game to another monitor, it’s important to check your graphics options and ensure that your system supports multiple displays. Most modern computers and graphics cards have the ability to connect and utilize multiple monitors, but it’s always a good idea to verify this before proceeding.
First, check the physical connections on your computer. Ensure that you have the necessary ports and cables to connect an additional monitor. Common connection types include HDMI, DisplayPort, and DVI. If your computer doesn’t have the required ports, you may need an adapter or consider upgrading your graphics card.
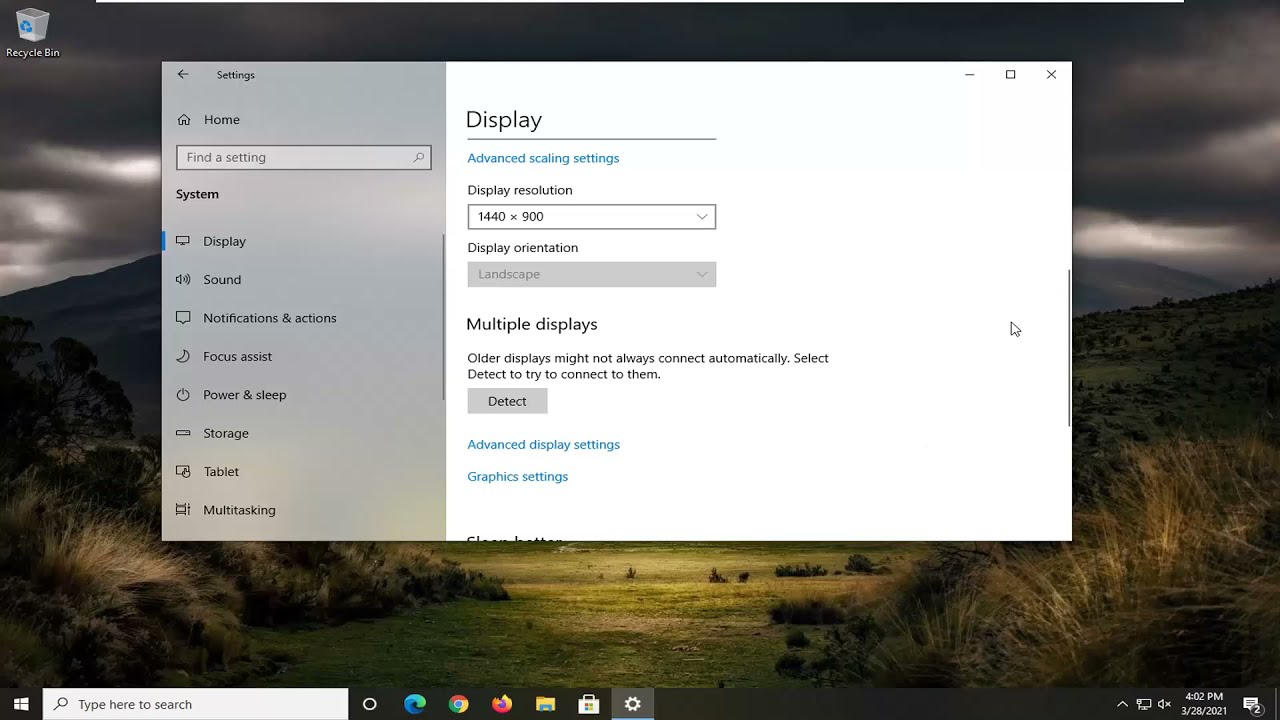
Once you’ve confirmed the physical connections, navigate to your computer’s display settings. Depending on your operating system, this can typically be found in the control panel or system preferences. Look for the “Display” or “Screen Resolution” option, where you can adjust the settings for multiple monitors.
In the display settings, ensure that the secondary monitor is detected and recognized by your computer. If it isn’t, try disconnecting and reconnecting the monitor or restarting your system. If the issue persists, consult your graphics card’s manual or visit the manufacturer’s website for troubleshooting guidance.
After confirming that the secondary monitor is recognized, proceed to configure its placement and orientation. You can choose to extend your desktop across multiple displays or duplicate the same content on both screens. Adjust the position of the secondary monitor to reflect its physical placement in relation to your primary monitor.
Additionally, some games may have specific graphics settings that allow you to choose the display on which the game runs. Check the game’s options or settings menu to see if there is a “Display” or “Monitor” setting that lets you select the specific monitor for the fullscreen game. If such an option exists, choose the desired monitor and save the settings.
Lastly, make sure to adjust the resolution and aspect ratio of the game to match the capabilities of your secondary monitor. This will ensure that the game displays properly and optimally on the chosen monitor without any stretching or distortion.
By checking your graphics options and ensuring that your system is properly configured, you’ll be ready to move a fullscreen game to another monitor and take full advantage of the enhanced gaming experience it offers.
Move the Game Window
Once you have set up your multiple monitors and confirmed that your system supports them, you can proceed to move the game window from one monitor to another. There are a few methods you can use to achieve this, depending on the game and your operating system.
The simplest method is to use the built-in windowed mode or borderless fullscreen mode option in the game itself. This mode allows you to freely move and resize the game window without disrupting the fullscreen experience. Simply open the game’s settings or options menu and look for the display or window mode settings. Choose the appropriate mode, and the game window will become moveable and resizable.
To move the game window, click and drag the title bar of the window and carefully drag it to the desired monitor. Once positioned, release the mouse button to lock the window in place. You might need to adjust the window’s size to fit the new monitor if necessary.
If the game doesn’t have a windowed mode option, you can try using keyboard shortcuts to move the window. In Windows, press “Alt + Enter” to switch between fullscreen and windowed modes. Once in windowed mode, use the “Windows Key + Shift + Arrow Key” to move the window to the desired monitor.
For Mac users, try the “Command + F” shortcut to switch the game to windowed mode, then drag the window to the desired monitor using the title bar or the green maximize button.
If the above methods don’t work, you can also try using the system’s window management features. In Windows, right-click on the taskbar and select “Cascade windows” or “Show windows stacked” to arrange all open windows in a tiled layout. This can help you identify and move the game window to the desired monitor more easily.
On Mac, use the “Mission Control” feature to view all open windows and drag the game window to the desired monitor.
Remember to adjust the game’s display settings, such as resolution and aspect ratio, to match the capabilities of the new monitor for the best visual experience.
By following these methods, you can easily move the game window to another monitor and enjoy your fullscreen game on a larger display, enhancing your gaming experience and productivity.
Change Display Settings
In some cases, simply moving the game window to another monitor may not provide the desired gaming experience. This is especially true if the monitors have different resolutions, refresh rates, or color profiles. To optimize the gaming experience, you may need to adjust the display settings of the secondary monitor.
Start by right-clicking on the desktop and selecting “Display settings” or a similar option. This will open the display settings for your operating system. Within these settings, you can make various adjustments to enhance the gaming experience on the secondary monitor.
The first setting to check is the resolution. Ensure that the resolution of the secondary monitor matches the resolution recommended by the manufacturer. Mismatched resolutions can cause distortion, blurriness, or alignment issues on the screen. Set the resolution to the native resolution of the monitor to ensure the best image quality.
Next, check the refresh rate of the secondary monitor. The refresh rate refers to how many times the screen refreshes per second. Higher refresh rates result in smoother motion and reduced screen tearing. If your secondary monitor supports a higher refresh rate, adjust it to match the primary monitor for a consistent visual experience across both displays.
Adjusting the color profile is also crucial for achieving accurate and vibrant colors on the secondary monitor. Use the color calibration tool provided by your operating system to calibrate the colors and gamma settings. This will ensure that the game’s visuals are displayed correctly and in accordance with the developer’s intentions.
If you’re experiencing input lag or latency issues on the secondary monitor, make sure that the display mode is set to “Game Mode” or “Low Latency Mode” if available. These modes help reduce input lag and provide a more responsive gaming experience.
Lastly, consider adjusting the position and orientation of the secondary monitor within the display settings. Ensure that the monitors are arranged in the correct order to match their physical placement. This will help with consistency when moving windows between monitors and enhance your overall user experience.
By adjusting the display settings of the secondary monitor, you can optimize the gaming experience and ensure that both monitors provide a seamless and immersive gameplay environment.
Use Dual Monitor Tools
If you frequently use dual monitors for gaming, there’s a range of helpful software tools available that can enhance your experience and make managing multiple monitors easier. These tools offer additional features and customization options to optimize your gaming setup.
One popular tool is Dual Monitor Tools, a collection of applications designed specifically for dual monitor setups. These tools offer a variety of functionalities to improve your workflow and gaming experience.
One useful feature is the ability to customize keyboard shortcuts for moving windows between monitors. This allows you to quickly and effortlessly move your game window from one monitor to another without disrupting your gameplay.
Dual Monitor Tools also includes a screen capture tool that allows you to capture screenshots or record videos on a specific monitor. This is particularly handy for content creators who want to showcase their gaming sessions or create tutorials.
Another beneficial tool is the ability to create virtual desktops, which can be useful for separating different tasks or applications on different monitors. This feature allows you to switch between different desktops without cluttering your primary monitor with unnecessary windows or distractions while gaming.
Additionally, Dual Monitor Tools offers tools for managing audio outputs, adjusting monitor brightness, and customizing monitor settings individually. These features enable you to fine-tune your gaming setup to suit your preferences and optimize your gameplay experience.
Another popular tool is DisplayFusion, which provides similar functionalities and even more advanced features. DisplayFusion allows you to create custom monitor profiles, set up taskbars on each monitor, and even extend wallpapers across multiple monitors. It also offers powerful window management features, including the ability to snap windows to specific areas of the screen and manage window positions and sizes.
Other notable dual monitor tools include Actual Multiple Monitors and Ultramon, which provide similar functionalities and customization options. Each tool has its own unique features, so it’s worth exploring and experimenting with different tools to find the one that best suits your needs.
By utilizing dual monitor tools, you can harness the full potential of your dual monitor setup and improve your gaming experience by enhancing productivity and customization options. These tools not only streamline the management of multiple monitors but also offer additional features to optimize your gaming workflow.
Switch Windows Display Settings
If you’re using Windows as your operating system, you can utilize the built-in display settings to switch between monitors and configure how they function. Windows provides a user-friendly interface that allows you to customize various display settings to suit your preferences.
To access the display settings in Windows, right-click on the desktop and select “Display settings” from the context menu. This will open the Display settings menu, which provides an array of options for managing your monitors.
In the Display settings menu, you’ll see a visual representation of your monitors. Here, you can adjust the arrangement of the monitors by clicking and dragging them to the desired position. You can also change the main display by selecting the desired monitor and checking the box labeled “Make this my main display”. This will designate the chosen monitor as the primary one.
If you want to extend your desktop across multiple monitors, scroll down to the “Multiple displays” section. By default, the option is set to “Extend desktop to this display”, which allows you to use both monitors as separate and distinct displays. This enables you to drag windows and applications from one monitor to another, effectively expanding your workspace.
If you prefer to duplicate the same content on both monitors, select the option labeled “Duplicate desktop on X and Y”. This will mirror the content on both monitors, providing an identical display on each screen.
Windows also allows you to adjust the resolution and other display settings for individual monitors. Simply click on the desired monitor in the display settings menu and scroll down to the “Scale and layout” section. Here, you can change the resolution, adjust the scaling, and even customize advanced display settings if necessary.
In addition, Windows provides keyboard shortcuts for quickly managing windows across multiple monitors. Pressing the “Windows key + Shift + Left/Right arrow” moves the active window between monitors, making it convenient to shift your game window to another display without any hassle.
By utilizing the Windows display settings, you can easily switch between monitors, configure their arrangement, and customize the display settings to create a personalized and efficient gaming setup.
Use Third-Party Software
While your operating system may provide basic dual monitor support, using third-party software can offer additional functionality and customization options for managing multiple monitors during gaming sessions.
One popular third-party software for dual monitors is DisplayFusion. This feature-rich application offers advanced window management, monitor settings, and customization options. With DisplayFusion, you can create custom monitor profiles, set up unique taskbars on each monitor, and even extend wallpapers across multiple displays. Its window management features allow you to snap windows to specific areas of the screen, manage window positions and sizes, and create hotkeys for various window operations.
Another notable option is Ultramon, which provides similar functionalities to DisplayFusion. Ultramon allows you to adjust window positioning and taskbar arrangement, customize application shortcuts and hotkeys, and manage screen savers on each monitor separately. It also offers extensive multi-monitor wallpaper management, including the ability to span one large image across multiple screens.
If you require precise control over individual monitor settings, including color calibration and display profiles, software such as ColorMunki Display or SpyderX may be useful. These tools allow you to adjust and calibrate the color accuracy of each monitor to ensure consistent and accurate image representation. This can be particularly beneficial for professional gaming, graphic design work, or content creation.
For those who desire advanced customization and automation, Rainmeter is an excellent choice. Rainmeter is a highly flexible and customizable desktop customization tool. It allows you to create and install various skins that display system information, weather forecasts, RSS feeds, and more. With Rainmeter, you can design unique skins to complement your dual monitor setup and tailor the information displayed to your specific needs.
If you’re a gamer who wants to capture and record gameplay footage, OBS Studio (Open Broadcaster Software) is a widely-used open-source software that supports dual monitor setups. OBS Studio allows you to easily capture gameplay from one monitor while simultaneously displaying chat, alerts, or other overlays on the second monitor. This is particularly useful for streamers who want to interact with their audience while playing games on a dedicated display.
These are just a few examples of the extensive range of third-party software available for managing dual monitors. Each software offers unique features and customization options, so it’s worth exploring and experimenting with different tools to find the ones that best suit your needs and enhance your gaming experience.